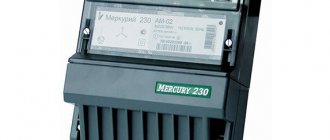
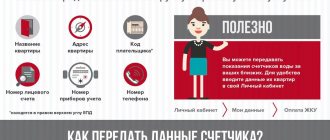
How can you take Mercury 230 electricity meter readings?
Electricity consumption is an everyday part of our lives. Today, not a single device operates without electricity. And every month we receive bills or we ourselves calculate how much we need to pay for light. There are special meters for metering electricity.
And if earlier it was easy to calculate the required amount, then with the development of technology, devices for recording spent energy have also improved. But there are also different tariff plans.
Types of electric meter models
We all pay for electricity based on accurate data taken from installed meters. Of course, the method of accounting for energy consumption using electrical equipment is the most optimal. By carrying out calculations, we can independently monitor the amount of energy spent per month, and it is convenient for energy companies to receive timely payment and, if necessary, check the operation of the device.
There are certain standards that an energy meter must meet.
Therefore, today they are produced in several types:
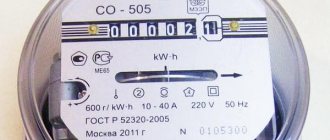
- Induction meters, outdated model. It is based on electromechanics.
- Statistical instruments, a more modern model, with electronic microprocessors in its design.
Each of these electricity meters has its own advantages. Their operating principles are the same. They record any energy power, displaying the information received in digital equivalent on a special display. The numbers on the device are constantly updated, thereby increasing the number on the display.
The uninterrupted operation of the electrical appliance allows you to record consumption both during the day and at night. By comparing the readings of the previous payment on the meter with the new data and carrying out simple calculations, the consumer pays for electricity.
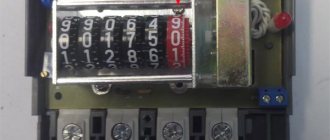
It is easy to obtain accurate information from induction devices. We have become accustomed to them since childhood. Most often they are single-phase and are designed for a couple of decades of uninterrupted operation. All necessary information is indicated on the front of the meter. A counter designed for a four-digit number does not take into account the fifth digit.
To carry out calculations, it is enough to take the current numbers and subtract the previous ones from them. The difference must be multiplied by the cost of kW in your region. For example, 9970.2 is the current counter reading, the previous one is 9870.1. Now let’s calculate: 9970.2 – 9870.1 = 100.1 kW, now multiply by the fixed cost.
Verification
carried out according to document AVLG.411152.025 FROM “GSI. Three-phase static electricity meters “Mercury 230AM”, “Mercury 230AM”. Verification methodology”, approved by LLC “ITsRM” on June 19, 2020.
Main means of verification:
— universal verification unit UPPU-ME 3.1K (registration number in the Federal Information Fund 39138-08).
It is allowed to use similar verification tools that ensure the determination of the metrological characteristics of the meters being verified with the required accuracy.
The verification mark is applied to the verification certificate and the seal on the meter housing.
Meter with built-in computer
Electronic meters are produced without a rotating wheel, with installed digital displays. Due to their versatility, they have a standard menu where additional settings are located.
The latest models of electricity meters are much better equipped. Several phases can be summed up to them. This is very convenient considering that many consumers switch to two or three tariff plans:
All additional settings allow you to find out in more detail information about consumption at a certain time of day, the operating time of the meter and data on the readings T1 and T2.
The consumer's first impression is that it will be difficult to read information from an electronic meter. To do this, you need to study the manual for the electrical appliance or consult an electrician.
In addition, there are models that do not need to regularly take readings. They are connected to a common central network and send readings to a server at the power company. And you just receive a monthly electricity bill.
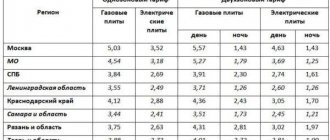
The gradual introduction of two-tariff energy metering allows saving on electricity, especially in apartment buildings, as well as optimally distributing energy. But here it’s also worth considering at what hours your consumption is greater and at which times it is less. If daytime consumption is small, and the main load occurs at night, then the Mercury 230 model is perfect.
Read also: Metal hardening oil
How to legally avoid paying for electricity
Connecting and setting up an electric meter
1. Unpack the Mercury 230 ART electric meter.
ASKUE based on the Mercury 230 ART meter
- Set up and ready for survey
- We will cover communication costs
- If it doesn't work, we'll refund your money.
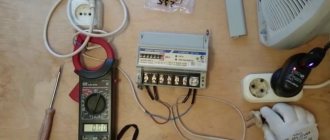
2. Connect the Mercury 230 ART electricity meter to the network and to the modem.
We use the iRZ ATM2-485 modem for this. You can learn more about setting up and connecting this modem by clicking on this link.
Connection diagram of the Mercury 230 ART electricity meter to the iRZ ATM2-485 modem:
How to take Mercury 230 electricity meter readings
If you have a two-tariff plan installed, then readings must be taken from both tariffs, which are indicated:
- T1 – readings of daily energy consumption;
- T2 – night consumption readings.
To take readings of the 1st tariff, you need to go to the menu and call the T1 mode; how to do this is described in detail in the instructions for the meter. Press the “Enter” button and with subsequent pressing the data will be displayed:
- Control mark (in the upper left corner).
- Designation T1 (just below the control mark).
- And in the center there is an indication of how much kW has been consumed.
To fix the 2nd tariff, it is necessary to carry out the same manipulations. You should press the “Enter” button until the display shows the designation T2 with readings of the consumed electricity.
After readings are taken, calculations can be made. The previous figures are taken from the pay stub for the previous month. If you don’t have it, you can contact the energy company, requesting previous readings, to carry out the calculations yourself, or simply transfer the readings you took to the company. Below is a video that explains and shows in detail how to take readings from the Mercury 230 model.
We hope our tips will help you understand the electronic meter.
Electric meter Mercury 230 is a model of an accounting device that allows you to measure consumed electricity and power indicators. The device is designed for use in a three- or four-wire network with several pricing options via direct or transformer connection.
The device provides the ability to operate in individual mode or connected to an external device.
The main tasks of the device include:
- counting and displaying on the liquid crystal display via the interface information on consumed electricity for any of the configured rates and in total;
- number of tariffs – 4, with 16 time zones, with 4 types of days;
- calculation of power, current and frequency indicators;
- influence on loads through the interface;
- storing the most important events (10 for each), displaying the moment the device was started and turned off, the appearance or disappearance of individual phases, when the meter opened and closed, the tariff schedule was adjusted, permissible parameters were exceeded.
The energy meter is equipped with protection that prevents unauthorized use for the purpose of stealing electricity. Accounting is carried out with an accrual total, regardless of the direction of the current.
Counter polling
10. Go to the counter and select the readings tab. Click “Poll”.
We are waiting for the results of the survey. If communication with the meters is established, a message will appear indicating that a new reading has been received, which will be shown in the reading table.
ASKUE yaEnergetik
- Works on any device with internet
- Quick setup of remote polling
- 7 days free use
This article is current as of October 31, 2022
.
If you have any problems setting up, please let us know and we will send you the latest version of the instructions.
To do this, you need to order a call back or call us at number, or write to
We will answer all your questions and help you set up a survey of your counters.
For whom
— For those who use OpenSCADA, but cannot implement more than “out of the box” solutions — For those who are looking for SCADA for themselves, but cannot decide — For those who abandoned this project without understanding how it works
For what
— This solution allows you to read Mercury 230 and Mercury 200 meters without any limits — It’s free
The openscada project (oscada.org) receives undeservedly little attention; only one article has been written about it on Habré. Most engineers are afraid to touch this product with a three-meter stick, God knows what kind of Linux this is. It has been developed for decades by virtually one person, Roman Savochenko.
Having no previous experience with SCADA at all (and being a little familiar with Linux), I chose it to implement monitoring of objects in the enterprise. Since I had nothing to compare with, I took the interface and all data connections with each other for granted. The “quick start” video tutorial was very helpful; personally, I think more such lessons could have been done. I also had to re-read the documentation more than once, but it was worth it. Having connected the first data collection module Nevod+ for a long time I could not understand why it did not work. After all, it was listed as compatible with the DCON protocol in the project list (or rather, its analogue). I looked into the source code of the protocol and... it turned out that it is not compatible with it at all, like many other collection modules from the list. The first contact on the forum corrected my problem and several other errors quite quickly. I won’t talk about all the intricacies of the system; it’s better to read the above-mentioned article on Habré or watch the “quick start”.
Specifications
Device service life
The standard operating life of the energy meter is 30 years; the manufacturer provides a guarantee for trouble-free operation for the first 3 years. Warranty cases are provided if the failure is caused by deviations during assembly at the factory. In case of violation of operating conditions, or if the breakdown is associated with a connection error, the device is not subject to warranty repair.
Calibration interval
The initial verification of the meter is carried out by the manufacturer. After installation, the verification period is 10 years. The specialist performing this work displays the date and result of the verification in the passport.
Meter cost
The device can be purchased at wholesale or retail chains for a price of about two thousand. Ordering online will cost a little less, but in this case you need to carefully control the quality of the product and you will have to pay for delivery.
Protection against interference with the electricity meter
The design of these devices is such that it is impossible to change the readings or stop recording. As for resetting the electric meter, a record of this remains in the meter’s memory, from where the user cannot delete the information. The only thing available to him is time adjustment; there is no way around this limitation.
Unlike disk electricity meters, with digital devices, when the zero and phase are reversed, the electricity consumption will still be recorded correctly. That is, it is impossible to “rewind” the readings.
It is believed that it is possible to stop the device using a neodymium magnet. Indeed, early modifications of the 200 series had such a drawback. Modern models have protection against such interference in operation. We do not recommend testing this through personal experience, since information about an attempt to use a magnet will be entered in the device’s log, which will inevitably lead to unpleasant consequences for the experimenter.
Advantages of the device
The advantages of an electric meter include the following capabilities:
- high class of accuracy;
- the presence of an infrared port and the ability to connect to an external device;
- protection against unauthorized rewinding and independence of data accounting from the direction of current;
- the presence of self-diagnosis with indication of possible problems in operation;
- electronic sealing of the external panel, which eliminates interference with the structure;
- compact size and reliable design.
Read also: How to replace a field-effect transistor with a bipolar one
To ensure reliable operation, it is necessary to comply with the temperature and humidity levels of the environment declared by the manufacturer, and install the meter indoors.
Regulations
GOST 31818.11-2012 Equipment for measuring alternating current electrical energy. General requirements. Tests and test conditions. Part 11. Electric energy meters GOST 31819.21-2012 Equipment for measuring alternating current electrical energy. Private requirements. Part 21. Static active energy meters of accuracy classes 1 and 2 GOST 31819.22-2012 Equipment for measuring alternating current electrical energy. Private requirements. Part 22. Static active energy meters of accuracy classes 0.2 S and
0.5S
AVLG.411152.025 TU Three-phase static electricity meters “Mercury 230AM”, “Mercury 230AM”. Specifications
How to take readings
Taking readings is quite simple. They can be determined automatically - the indicators for sections periodically change on the display. There is a function of push-button switching of the displayed information. Indicators are written out separately for each rate at the beginning and end of the accounting month, the difference is determined by subtraction and multiplied by the corresponding rate, the values are summed up.
Varieties of this counter
The device is available in ten versions. Next - more details about the features of each modification.
ART-00 С(R)N
It is characterized by a calculated phase voltage of 57.7 V, normal and maximum current of 5 and 7.5 A, respectively, the presence of a CAN or RS485 interface, accuracy class for the active type of electricity - 0.5S, reactive - 1.
ART-01 С(R)N
It differs from the previous version in the value of the rated voltage for a separate phase - 230 V, the maximum current - 60 A, the accuracy class for reactive electricity - 2.
ART-02 С(R)N
It differs from the above modification in the current limit value - 100 A, other parameters are identical.
ART-03 C(R)N
This model has a rated and maximum current of 5 and 7.5 A, respectively, the error value for the active type of electricity is different - 1, other parameters are similar.
ART-01 PQRSIN
It differs in current indicators - 10 (100) A, error values - 1/2, IrDA is installed instead of the CAN interface.
ART-02 PQRSIN, ART-03 PQRSIN
The differences are in the magnitude of the electric current - 10 (100) and, accordingly, 5 (7.5) A, the rest is identical.
ART-01 CLN, ART-02 CLN, ART-03 CLN
CAN and PLC-I ports are used; the versions differ from each other in the current value.
Setting up an electricity meter poll
3. Go to YaEnergetik.rf and register.
4. Select the item “ASKUE”
5. Create a counter
6. Enter the name of the object, brand and serial number of the meter. If necessary, we set the number of tariff zones. Next, click “Save and configure ASKUE”.
7. In the counter parameters, select “Mercury 230 ART”. The network address will be calculated automatically.
8. In the connection parameters, select the type of connection you need. In our case, this is a “GPRS modem with iRZ protocol”. We establish that the counter will be polled through a separate device and indicate the IMEI of the modem.
9. In the additional section we indicate the first and second level passwords.
By default, first level password 111111
, and the second
222222
.
Meter installation
The device is mounted on a DIN rail. Direct connection is made according to the following scheme:
The following diagrams are used for transformer connections:
The specified device complies with state standards and can be used on the territory of the Russian Federation and in neighboring countries.
Reading information from the Mercury 230 meter indicator using buttons
When the counter is turned on, within 1.5 s, all indication elements are turned on: cursors, icons and all segments of digital indicators. After which the counter goes into the display mode of current measurements. The LCD of the counter during its operation when using the keys can be in one of three modes:
- in the display mode of consumed electricity;
- in the mode of recording the indication of maximum power;
- in the display mode of the current values of auxiliary parameters (instantaneous values of active, reactive and apparent power, both in each phase and the sum, current in each phase, voltage in each phase, cos ϕ in each phase and in sum, network frequency, and for meters with an internal tariff (additionally - current time and date).
Display mode of accumulated energy according to current tariffs.
When the meter is turned on, the liquid crystal display (hereinafter referred to as LCD) shows the amount of active energy consumed at the current tariff for the entire period of operation of the meter. This value is displayed in kWh, with a resolution of 0.01 kWh (two decimal places). To the right of this number are the units in which the displayed value is expressed (kW⋅h). The number of the current tariff is shown on the left (T1 is the first tariff, T2 is the second, T3 is the third, T4 is the fourth). At the top of the LCD there are elements that indicate the type of energy: A+, A-, R+, R-.
Read also: How to choose a quarter in a tool board
The counter has two indication modes: manual and automatic.
In automatic mode, the LCD screen sequentially displays information about the accumulated active and reactive energy for each tariff and the sum for all tariffs for each type of energy. The number of parameters is no more than 12 and no less than one and is programmed using the “Configurator...” program. The duration of parameter display is also set by the “Configurator...” program. In manual mode, when you press the “ENTER” , the information on the LCD changes cyclically as follows: the sum of the accumulated active energy at all current tariffs, then the next time you press the “ENTER” , the amount of accumulated active energy at tariff 1 is indicated, indicating the tariff number, with further “ENTER” key, the amount of accumulated active energy according to tariffs 2, 3, 4 is sequentially displayed, indicating the tariff number. After the last tariff (if the meter is four-tariff, then after the fourth, if three-tariff - after the third, if two-tariff - after the second), the amount of accumulated reactive energy at all current tariffs is displayed, the subsequent pressing of the “ENTER” displays the amount of accumulated reactive energy at tariff 1 with an indication tariff numbers. When you further press the “ENTER” , the amount of accumulated reactive energy according to tariffs 2, 3, 4 is sequentially displayed, indicating the tariff number. In this case, the number of the displayed tariff is displayed on the left, and if the amount is displayed, then the inscription “Amount” . The amount of information displayed on the LCD is determined by the configurator, but does not exceed more than 12 parameters and at least one. For electricity meters with software version 2.2.83 and higher (production began on 04/07/2008), information on all tariffs and on all types of energy (active, reactive) is displayed manually on the LCD. The ability to change this indication mode using the “Configurator …” program is blocked at the electric meter level.
Indication of auxiliary parameters.
When you briefly press the “” key, auxiliary parameters are displayed on the LCD screen in the following sequence: active power (W) – reactive power (VAr) – apparent power (VA) – network voltage (V) – angle between phases – load current (A) – cos ϕ – network frequency (Hz) , and for meters with an internal tarifficator – current time (s) – current date. The parameter is selected by pressing the “” key for a long time (more than 3 seconds). When you briefly press the “” key, the total parameter value and for each phase separately are displayed on the LCD screen. When indicating network voltage and current, the total value is not indicated. If during the timeout for returning to automatic mode (5÷255 s) the “” button is not pressed, the indicator goes into automatic indication mode.
Power peak indication
“ENTER” button for a long time (more than 2 seconds), the LCD screen displays the current month in the “month _ year” . Next, short presses of the “ENTER” lead to sequential display of morning and evening power maximums for the current month on the LCD. You can also look at the previous three months. When displaying morning maximum power, symbols T1 and T2 are displayed, evening maximums – T3 and T4. The type of power is indicated at the top with the symbol “-” in the appropriate place.
Manual clock correction mode.
Clock correction is carried out in the current time display mode. By long pressing (more than 3 seconds) and releasing the “ENTER” , the current time is corrected. In this case, if the value of the seconds of the current time is less than 30 seconds, the moment the “ENTER” , the seconds of the current time are reset to zero; if the value of the seconds of the current time is more than 29 seconds, at the moment the “ENTER” , the value of the seconds of the current time is set to 59 seconds. Implementation of maximum correction of the current time up to ±29 sec. perhaps once a day.
Additional counter features
Based on the modification, the device has additional functions:
- Forward and reverse metering of electricity;
- Energy metering for each phase;
- Saving an archive of received capacities at step-by-step intervals from 1 to 45 minutes. The archive storage time reaches 85 days;
- The maximum value of morning and evening power is recorded;
- Current quality is monitored;
- Losses and magnetic influence are taken into account - an entry is made in the log.
We recommend: Heat meter Pulse