The Mercury 201 meter is produced and used to account for energy consumption in single-phase networks using alternating current, with a network voltage of 220V. It is used in private buildings, garages, apartments. It can be used either alone or in combination with other systems for commercial and technological energy calculations. Today it is one of the most common electrical energy metering devices in the Russian Federation and CIS countries, as well as neighboring countries. It is included in the state register of Russia and has a protective seal and a hologram on the body.
How to connect the Mercury-201 meter (video)
Electric meters Mercury of the first series are the most common today.
Meters have many advantages, including their availability and ease of connection. You can connect the metering device correctly by following the above tips and step-by-step instructions. In addition, you can try to “deceive” the meter by twisting the readings or stopping it. But remember that such activities are illegal and, if discovered, can lead to severe administrative penalties. The matter is not difficult if you understand at least a little about electricity. The single-phase electricity meter "Mercury 201" is considered the most common energy metering device in Russia today. Counters of this brand replaced more outdated models equipped with rotating disks. Installation of electricity meter Mercury 201.8
can be made on a DIN rail, the back wall of an electrical panel using an adapter plate that is attached to a DIN rail. It should also be taken into account that since 2015, the adapter plate is not included in the standard package of the Mercury 201 electric meter.
The contact screws must be tightened with sufficient force to ensure good contact. If the wire in the terminal is poorly secured, this can lead to heating, destruction of the insulating layer and short circuit. The terminal cover of the electric meter has a perforation - it must be removed (using pliers or carefully broken off) so that the cover fits tightly to the meter. The lid is screwed to the body. The Mercury 201 electricity meter is suitable for installation in apartments, private houses, garages and gardens. The warranty on the device is 3 years, the service life of the Mercury 201 electric meter is designed for 30 years. When replacing an electric meter, you need to notify the energy sales company, and after installing a new meter, seal it together with their representative. As a rule, this takes time, in addition, you need to wait for the person and waste your time.
Consumer Reviews
Owners of houses, apartments and production workers have, as already mentioned, a good opinion about Mercury meters. These devices, as many consumers believe, are of high quality and reliable. The advantages of these meters include, first of all, their relatively low cost. Their price is lower than for similar products from many other companies, including domestic ones. Another advantage of these meters is that, unlike competitors’ products, they come with a mounting plate. That is, the purchased meter can be immediately installed in place. You don’t even have to invite a specialist for this.
Another advantage of the Mercury PU is the ease of taking readings. The numbers on the display of these counters are very large. Therefore, in order to determine the amount of electricity consumed, you do not need, for example, to stand on a chair.
Small size and weight are, of course, also what consumers consider to be the advantages of these PUs. And, of course, the advantage of this meter is its full compliance with GOST requirements. Consumers almost never have problems with incorrect electricity calculations when using Mercury devices.
The disadvantages of meters from this manufacturer include, first of all, the short warranty period among owners of houses and apartments. For similar devices of other brands it is usually larger. Also, some consumers note the fact that defective samples are sometimes found in batches of Mercury electric meters. Many owners of country houses strongly advise against using these devices at sub-zero temperatures. In this case, they, unfortunately, may give inaccurate readings.
Connecting Mercury 230 via current transformers
The electric meter is connected via current transformers using a ten-wire cable. This helps to replace and check the connection circuit of the device, allows you to determine the error in measurements directly at the installation site of the electric meter in the presence of load current without disconnecting consumers.
Next, the old meter is dismantled.
The two remaining contacts are attached in the same way.
Data from the transformer terminals is sent to a metering device that records the amount of generated electrical energy. One of them is connection through ten separate conductive wires. As a rule, voltage circuits are made with the same cross-section as current circuits. As was written above, metering circuits must be connected to clamp assemblies or test blocks, so what is a test block?
Advantages of installing and operating the Mercury 230 product
Each of them carries information about the date of the last verification, indicating the year and quarter, and also has the seal of the verification organization. Even wire numbers correspond to the load, odd wire numbers correspond to the input.
We will definitely answer you. For the circuit, it is necessary to connect all three meter measuring elements with mandatory strict observance of polarity and with phase alternation in direct order relative to the corresponding U. If the memory function is disrupted, it is necessary to find out the accompanying code and reprogram the option.
Reliability characteristics of the "Mercury" electric meter The following technical reliability characteristics can speak about the quality of the products of LLC NPK "Inkotex": Minimum time between failures up to hours; Interval between verifications: 10 years; The average service life of the device is 30 years; The warranty period for Mercury is 3 years from the date of issue. Indicators are taken in one and two directions. The indicator of this particular voltage is recorded by the meter.
The connection of the three-phase Mercury meter through current transformers is carried out according to the following scheme: Connection of the “Mercury” through current transformers Connection of the electricity meter “Mercury” via CT The “Mercury” meter has the ability to tariff electricity metering by zone of the day, takes into account losses and transmits measurements and accumulated information on energy consumption via digital interface channels. The IKK is equipped with a protective transparent cover and a device for sealing, a screw with a through hole. Mono notate changes when analyzing the event log.
These include nuclear, hydraulic and thermal power plants. The presence of the block greatly simplifies installation.
Important links
Meter "Mercury": indirect connection This option for connecting a metering device is not used in the domestic sphere. Types of three-phase electricity meters There are 3 main types of this type of device: Indirect connection. In the first case, three wires from each of the phase lines plus a neutral and two wires from 3 CTs are connected to the meter distribution box. This helps to replace and check the connection circuit of the device, allows you to determine the error in measurements directly at the installation site of the electric meter in the presence of load current without disconnecting consumers. The presence of the block greatly simplifies installation.
As for the disadvantages, these are the overall dimensions and the need to have experience and skills to install equipment of this type. Today it is completely outdated, despite the fact that it can be found in real conditions. The meter is connected both directly and using a transformer method: connecting current transformers to the Mercury meter allows you to count electricity at facilities where the current load is high. The device records the voltage that appears when electricity flows through the secondary winding. When working with electrical devices, you should use indicator screwdrivers and rubber gloves.
A small margin of about mm when connecting wires to the clamps will help to easily redo the work. At voltage levels of more than 6 kV and above, two current transformers are used, this is the case throughout the country. Connection of the test box (CTB). Scheme #1
Advantages and disadvantages
The advantages of the electric meter include its small size.
During the production of the product, developers are subject to the highest requirements for accuracy and reliability, as well as wide functionality and developed functions.
Main advantages:
- Wide selection of models.
- Quality and reliability.
- Low cost of the product.
- Protection against hacking and unauthorized access.
- Simplicity and ease of use.
- Use of modern components.
- Multifunctionality.
- Miniature size.
- The ability to divide energy consumption into zones, which allows you to save significant financial resources.
- Extended temperature range.
- High accuracy of determination of results and low energy consumption.
- Possibility of creating an automated control system.
- Possibility of manual and automatic readings.
Some people are stopped from purchasing an electric meter by its long payback period.
Not the entire population is ready to switch to Mercury energy meters. This is due to the following factors:
- The low cost of electricity deters people from switching to new metering devices, since they will take a long time to pay for themselves.
- Dividing the tariff into daytime and nighttime may require citizens to change their daily routine. For example, it is more profitable to use powerful installations at night. Same with production.
- Some groups of the population may have problems collecting data from the meter.
Despite the shortcomings, the Mercury electricity meter is one of the most convenient and profitable devices.
Specifications
Technical characteristics of the Mercury 201 meter
Device service life
The electric meter has a standard service life of 30 years. During the first 36 months of operation, it is possible to replace the device or repair it under warranty if it turns out that there is a malfunction associated with a manufacturing defect. The warranty does not cover cases of abuse or incorrect connection. The warranty may extend up to 42 weeks from the date of manufacture if the device has not been connected for some time.
Calibration interval
When purchasing a device, you must make sure that there is a record in the passport documentation confirming the verification of the product at the factory after manufacture. After installation, verification must be carried out regularly with a verification interval of 16 years. The completion of this work is confirmed by the entry of the employee who checked the device in the product passport.
We recommend: Mercury 200 meter - instructions and how to take readings
Meter cost
The meter has an affordable price. It can be purchased for 660 rubles or more if a larger price is set by the seller. The device is offered in specialized stores or ordered online.
Device warranty
The manufacturer accepts the product for warranty repair if, within 3 years from the date of installation or after 42 months from the date of production, a failure occurs due to a manufacturing defect.
The consumer or trade organization providing the product for warranty service must attach the device passport. If traces of mechanical damage or the results of improper connection and operation of the device are detected, the manufacturer withdraws its warranty obligations.
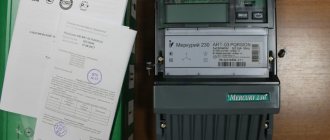
Electric energy meter Mercury 230
Mercury 230 is a multi-tariff three-phase electricity meter. The Mercury 230 meter can be connected to the network either directly or through current transformers. Let's consider the principle of this connection, as well as the features of the above-mentioned device.
Description and technical characteristics of the Mercury 230 meter
This electrical energy meter is designed to operate in three- and four-wire electrical networks (three-phase networks without grounding and with grounding, respectively) with a voltage of 380 volts and a frequency of 50 hertz.
Its calibration interval is shorter than that of its single-phase counterpart and is 10 years. At the same time, the warranty period and service life for the 201st and 230th models are the same - they are 3 years and 30 years, respectively.
The rated current of the Mercury 230 is 5 amperes, and the maximum is 7.5 amperes. Overall dimensions are 258x170x74 millimeters, and weight is 1.5 kilograms.
This meter has a number of additional very useful functions. In addition to measuring and accounting for electricity, it carries out:
- data storage;
- data transfer;
- keeping a measurement log;
- displaying information on the screen for various periods of time and at various rates.
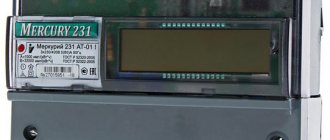
Mercury 230
This meter is capable of accounting for four tariffs for four types of days in sixteen time zones.
Taking readings from the Mercury 230 meter
It is worth saying a few words about how to take readings from the Mercury 230 electricity meter.
This electric meter is controlled by a pair of buttons located on its front panel (to the right of the screen). The left button (“ENTER”) is designed to switch between readings for different tariffs. The right button (with the image of an oval with an arrow) selects the operating mode.
First of all, you should check the readiness of the device to take readings for individual zones (operating mode A). This is indicated by an indicator in the form of a short line in field A at the top of the display. If this indicator is absent, then the device should be switched to operating mode A by briefly pressing the right control button.
Next, you should take the device readings for each of the tariffs, switching between them by pressing the “ENTER” button. By successively short-term pressing this key, the device display will display data for each zone of the day in turn. If the meter is programmed correctly, the symbolic designation of each tariff zone will be as follows:
- T1 – peak zone;
- T2 – night zone;
- T3 – half-peak zone.
You will see these designations on the screen to the left of the amount of electricity consumption itself.
Important! Pressing the “ENTER” button must be short-term, since otherwise you will switch the device to other operating modes. If such a situation occurs, you should return to mode A again by pressing the right button and continue reading the electricity meter.
How to connect a Mercury 230 meter
Connecting the Mercury 230 meter is carried out according to the same principle as installing its single-phase counterpart, model 201, into the network. Unless you have to connect more wires to it. But, as in the case described above, the current-carrying conductors of the input cable are connected to the contacts with an odd serial number, and the conductors of the cable leading to the load are connected to the contacts with an even serial number.
The connection diagram for a three-phase meter Mercury 230, as mentioned above, may or may not assume the presence of current transformers in the circuit.
Direct, or direct, connection of the metering device in question to the electrical network is carried out directly through input machines. If your house or apartment has only a standard set of power receiving devices (with a power of up to 60 kW), then this connection method is optimal for you.
If it is necessary to operate power receivers of higher power in a local electrical network, a semi-indirect connection should be used using current transformers, in which the phase conductor of the electrical network acts as the primary winding. But keep in mind that for this type of connection, regulatory documents provide for special installation requirements.
So we met the most popular representatives of electrical energy metering devices, and also received detailed explanations on the issues of their installation.
Varieties of this counter
The electric meter is out of order
The model range of these electrical appliances includes several options, partly differing in design and operating conditions.
201.1
This is an electromechanical device, the output of data on the energy used is carried out through a rotating wheel with marks. The main operating current value is 5 A. The limit is 60 A.
201.2
Its current parameters are the same as those of the previous model, but the mechanism itself is different - the information is displayed on a liquid crystal display. Option 201.22 is available, differing in active power indicators (1.5(15) versus 2(10)), as well as the presence of a PLC modem.
201.3
It differs from the above-described models in its higher operating current value: it is 10 A. The limit has also increased - now it is 8 A. The results of energy use are reflected by an electromechanical design with a wheel.
201.4
The current parameters are the same as those of 201.3, but instead of a mechanism with a wheel, the data is presented to the user by an LCD window.
201.5
In many ways it is similar to the earliest 201.1 device: the same mechanical way of displaying information, the same current values \u200b\u200bof 5 and 60 A, respectively. It differs from other products in having a significantly lower value of pulses per kilowatt hour: it is 3200, not 6400, like most models. Another difference is that this meter is suitable for use not only at high temperatures (up to +55 degrees), like the previous ones, but also at very low ones: it can withstand forty-degree frosts, while for other models the limit is -20 degrees.
201.6
It differs from its predecessor in higher electric current values - 10 and 80 A.
Replacing the battery
The device's autonomous power supply is installed inside, under the main housing cover. Depending on the design of this structural part, it is removed after unscrewing two screws or releasing the latches.
The battery is designed to last at least the duration of the verification interval, so it must be changed during the verification process. The case cover is sealed, so the user will not be able to get to the battery on his own.
After removing the cover, the old battery is removed and a new one is inserted in its place, with a similar arrangement of positive and negative poles.
Taking readings
To take readings, the consumer must:
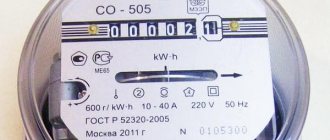
- Write down the number (circled in blue in the photo) indicating the integer value of kilowatt-hours from the liquid crystal display or roller display (depending on the modification). Fractional shares that are not subject to accounting are displayed to the right of the decimal point. For versions with LCD there will be two of them, for a mechanical scoreboard there will be one, made in red.
- Previous readings are subtracted.
- The result is multiplied by the cost of one kilowatt-hour.
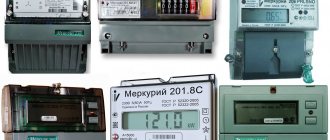
Mercury 201 and its five models
Mercury 201 Mercury 201 is a modern meter for active energy consumption by consumers of the household electrical network. The device is manufactured, model 201 has several modifications, each with its own specifics.
Externally, models of electrical measuring devices differ in indexes. Each of the five modifications of Mercury 201 has its own limit for measuring alternating current strength and its own way of displaying power consumption on the front panel. The maximum operating current of the device is from 5 to 10 A; the method of indicating readings can be either liquid crystal or mechanical.
The operating principle of the Mercury 201 meter is that the primary electricity consumption signals are generated by voltage and current sensors. Then they go to a converter controlled by a microcontroller. After decoding, the signals supply information to a mechanical or liquid crystal type output device.
Connection diagram for an EM located on the general electrical panel of the floor (SNiP 31-110-2003)
The Mercury 201 electricity meter is designed both for independent metering of electricity consumption and for operation in an automatic information-measuring accounting system.
Now Mercury 201 brand meters are the most affordable and accurate. They replace older energy metering devices with rotating disks.
Mercury design
These devices have a very small body that looks great in any interior. If we talk about the fastening features, then the manufacturers have thought through absolutely every possible detail. It is quite simple to attach and use it in the future.
The case cannot be opened due to the absence of all the bolts, so no one will be able to penetrate it. Plus, it is not at all afraid of moisture, so it can be installed even in basements (where it is humid, but there is little water).
I would like to note that model 201.22 meters have a modern built-in PLC modem, which eliminates any possibility of theft and simply shows the actual consumption of electrical energy.
Mercury-201: connection diagram
The electronic device Mercury 201 keeps track of electricity “modulo”. This means that a connection with reverse current polarity does not affect the meter readings. So, when connecting a single-phase meter, you can swap the phase input and output, connect the phase to the neutral terminal, and the neutral to the phase terminal. However, the manufacturer recommends connecting the electric meter according to the diagram. The meter connection diagram is quite simple.
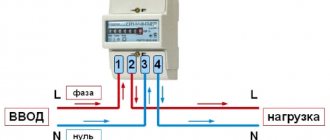
So, single-phase Mercury has four terminals for wires:
- The first terminal is responsible for introducing the phase into the home;
- The second is for phase output to electrical installations;
- The neutral working wire from the external network is connected through the third terminal;
- Zero output to electrical installations is realized through the fourth terminal.
To connect the contacts to the terminals, you need to remove the protective cover from the terminal block and unscrew the fastening screws in the wire cells. After that, the stripped, flat section of the wire corresponding to the terminal must be inserted evenly into the contact clamp. The screws that secure the wire can be tightened using a Phillips screwdriver. Fixation should begin with the top screw. Connect the other wires in the same way, and then replace the protective cover.
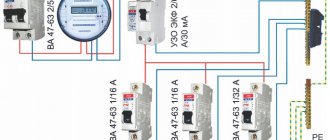
It is necessary to supply a phase to the machines from the meter, and a phase and zero to the RCD. In this case, bypassing the machines, it is necessary to lay neutral working and protective contacts to the electrical installations connected to them. Grounding must also be carried out to the electrical installation operating through an RCD. Contacts from the machines can be output to lighting and sockets, as well as household appliances. Powerful household appliances (for example, a washing machine, boiler) are usually connected to the RCD. Using the same principle, connect the electric single-phase meter “Aist” from RUE “Gomelenergo”.
Who releases
The domestic company is engaged in the production of these meters. Its department, which produces various types of household appliances under the Mercury brand, has existed since 2000. For almost two decades, Inatex specialists have developed hundreds of various electrical devices necessary for use both in everyday life and in production.
Today the group supplies to the market only the most reliable electrical measuring equipment - very functional, modern design. Until today, the company has supplied more than 120 models of meters alone to the market.
Connection diagram
The Mercury 201 brand meter is connected without any special features, similar to other electrical energy metering devices. The device comes with detailed instructions that need to be studied, along with a passport and connection diagram
The main thing is the correct connection of the phases and attention when connecting the wires (their markings are highlighted in different colors)
Before connecting Mercury 201, it is necessary to de-energize the system: turn off the machine, switch, and supply line. For safe laying of wires, special cells with perforated grooves are provided on the terminal cover. In these places, the cells are broken out, and a wire is inserted through the holes.
There are 4 positions for connecting the wire:
- Supply phase from the input circuit breaker.
- Phase load on the room power supply.
- Neutral wire from the input machine.
- Neutral load wire to power the room.
The wires are connected only in this sequence. It should be remembered that the phase wire is white and the neutral wire is blue.
For ease of use, the connection diagram for a single-phase meter of the Mercury 201 model is duplicated on the inside of the terminal cover. If the device is connected correctly, the red indicator light on it lights up.
Before closing the cover, you should again check the correct connection, paying attention to the tightness of the connections: when tightening the clamps, the insulation should not come into contact. If this happens, it may gradually melt when the meter is under load
The cover should be screwed tightly to the body, leaving no gaps.
For reliable and safe operation of the Mercury 201 meter, it is recommended that the connection be made through circuit breakers using an RCD - residual current device. It should also be installed in the shield. To avoid problems with operation, the cross-section of the wires must correspond to the rated current of the meter
You also need to pay attention to the correspondence in power and diameter
Before installing the meter, you need to check its compliance with the requirements of regulatory documents. The passport must indicate:
- accuracy class;
- dates of manufacture and verification;
- registration number in the State Register of Measuring Instruments.
It is necessary to check the presence of a warranty seal and a hologram confirming the authenticity of the device.
Watch this video on YouTube
If you carefully study the diagram, follow the sequence of actions, and safety rules, you can install the Mercury 201 electric meter yourself. Then call an employee of the energy company to check the correct connection and sealing of the device. The peculiarity of this process is that the holes for filling are too small and it is difficult to insert wire into them. Fishing line is not suitable for this, so only wire seals are used.
You should pay attention to the date. On meters of the Mercury 201 model, as well as on other control instruments and devices, seals with the stamp of the state verifier no older than 2 years are installed.
The disadvantage of the device design is the difficulty of visual inspection of the seal, because it is located under the terminal block cover. Difficulties also arise when using seals in the form of stickers. This is prevented by an unsuccessfully located fastening screw.
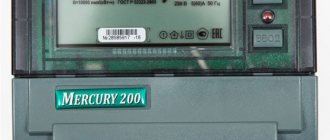
The Mercury 201 model meter provides several options for displaying readings depending on the design of the device. There are more displays on the LCD screen and they are more informative. In addition to data on the electricity used, the date, current and voltage indicators, operating time since commissioning are displayed.
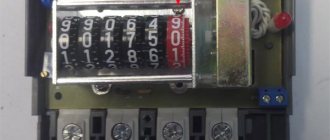
Before taking readings from Mercury 201 with a drum-type reading system, you need to remember that only whole data is taken from settlements with the energy supply company. The device has 6 reels, 5 of which show integer values (they are black and located on the left), and 1 - tenths (it is black and located on the far right). This is done for visual convenience when taking readings.
The device is verified at the manufacturer immediately after assembly. The fact of the procedure is noted in the passport and on the seal. The next verification period for the Mercury 201 model meter is in 16 years.
Review of three-phase electric meter brand Mercury 230
Review of the single-phase electric meter Energomer CE 101
How to choose the right one and which one is better to install an electric meter in an apartment
How to change the electricity meter in an apartment or private house?
How to seal electricity meters - application, how much it costs, penalty for removal
What to do if the electric meter in your apartment stops or breaks down?
Four checks of E.M. 201 for the correctness of the readings
After installing the meter, it is necessary to check the correctness of its connection and operation by conducting a series of test activities aimed at recording significant indicators of its functioning.
First check - correct connection
At this stage, a comparison is made with the diagram that the user was guided by when installing the product. Devices of the Mercury series are capable of operating correctly when changing the positions of zero and phase, but electrical safety rules require strict adherence to the installation sequence presented in the standard diagram.
Second check - self-propelled
To carry out this verification stage, you will need to first create a situation of complete absence of electricity consumption in the apartment. To do this, it is necessary to turn off all automatic switches located below the electric meter and supplying lighting fixtures and sockets. If there are no separate switches in the network, the cords of all household electrical appliances and extension cords are pulled out of the sockets, and the light switches are set to inactive mode.
A quarter of an hour after turning off all devices, you need to evaluate the functioning of the electric meter - if it is working properly, the roller on the counting mechanism should stop, and the light on the front of the device should not blink. The permissible maximum is a single blink or the counter turns once every 5-10 minutes.
Third check – measurement error
Measurement error formula
Here the error of the electricity meter is calculated. You will need to prepare a mobile phone with a stopwatch and a calculator (or these devices themselves separately), an electronic multimeter and an incandescent lamp as a load device. It is not recommended to use household appliances, since practical values when operating devices may differ from those indicated in the data sheets, creating additional errors, sometimes significant.
Sequence of actions during verification:
- Measure the voltage in the outlet with a multimeter.
- Place the device in current measurement mode, connect it to the lamp, and measure the value of the indicator.
- While continuing to keep the lamp plugged in, calculate the time it takes for the roller to make 10 revolutions (at a stable voltage), and write down this time in seconds.
- For calculations, record the instrument constant indicated on the front of the housing.
- Find the actual electricity consumption: square the power and then divide by the resistance.
- Multiply the figure from the previous calculation by the number of seconds and divide by 3600 (the number of seconds in an hour) - the unit of measurement of the resulting value will be watt-hour.
- 1000 is multiplied by the number of revolutions (in this case 10) and divided by the counter constant.
Now the actual error is calculated. From the figure obtained in the penultimate paragraph, subtract the one found in the last one, divide this number by the last digit and multiply by 100. The result obtained is expressed as a percentage (for example, -5%). A deviation of up to 10% in one direction or the other is considered acceptable.
The fourth check is for magnetization
This test is very simple: bring a thin sewing needle to the front panel of the device. If it attracts, it indicates magnetization. If a few days after removing the magnet it does not resolve on its own, you will need to purchase a demagnetizing device.
- https://profazu.ru/elektrooborudovanie/schetchiki/merkurij-201-shema-podklyucheniya.html
- https://rusenergetics.ru/praktika/elektroschyotchik-merkurij-201
- https://strojdvor.ru/elektrosnabzhenie/shema-podklucenia-scetcika-merkurij-201/
Electric meter "Mercury": brief description
You can connect the Mercury 201 meter yourself if you study the features of this device and the instructions for it.
Electricity meters "Mercury" have been produced in Russia since 2001 at the facilities of , which produces electricity meters ranging from simple single-phase ones for household needs to complex three-phase meters.
The Mercury 201 counter has several modifications, ranging from 201.1 to 201.8.
The device is also divided into series depending on parameters such as:
- permissible operating current;
- a way to display electricity consumption data.
Basic and additional characteristics
The single-phase electronic meter Mercury 201 has 7 modifications: from 201.2 to 201.8, differing in the value of the rated and starting current, power consumption, method of data display, operating temperature range, number of modules, dimensions and weight. The remaining indicators of devices in this series are the same.
The Mercury 201 meter with a remote control allows you to save up to 50% of electricity.
Externally, the remote control is similar to a car alarm key fob and allows you to control the operation of the device from a distance of up to 50 m.
To select an economical operating option, you need to turn on the remote control in undercounting mode. It is advisable to pay attention to the number of blinks of the indicator when the counter switches. There should be from 3 to 30. The device works normally if after 2 and 3 flashes of the indicator the counting mechanism remains in place.
The microcontroller is set to a frequency of 315 MHz, which allows it to operate without failures.
When the saving function is disabled, the meter operates in factory mode.
Expert opinion
It-Technology, Electrical power and electronics specialist
Ask questions to the “Specialist for modernization of energy generation systems”
SIMPLE Connection diagram for a Mercury 201 meter This is in cases where the meter malfunctions, when its readings no longer correspond to the actual electricity consumption, the owner of the house or apartment has to overpay for utilities. Ask, I'm in touch!
Therefore, the Mercury 201 counter fully satisfies the requirements.
The standard package of the Mercury 201 meter includes:
- Actually, the Mercury 201 counter itself.
- Passport and instructions for the Mercury 201 meter.
- Adapter plate with connecting dimensions for replacing an induction (disc) electric meter with a Mercury 201 meter. Since 2015, not included in the package.
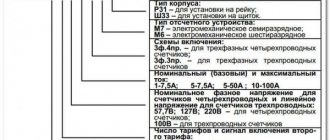
This series of Mercury 201 meters has several different modifications:
As can be seen from the passport for the Mercury 201 meter, they are produced:
- with a maximum current of 60 or 80 A;
- with an electromechanical reporting device (conventional mechanical “drum”) counter Mercury 201.5, 201.6, 201.7;
- with liquid crystal display counter Mercury 201.2, 201.4, 201.8;
- can be equipped with a modem for remote readings;
- different number of transmitted pulses (telemetry).
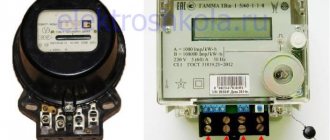
A hologram is pasted onto the Mercury 201 counter, protecting it from counterfeiting.
The warranty seal, which indicates the release date of the Mercury 201 meter, in our case the month of March (3rd) and the 14th year are painted over. The warranty on the Mercury 201 meter from the manufacturer is valid for 3 years.
The stamp of the state verifier, which means that the Mercury 201 meter corresponds to the declared accuracy class of 1. The stamp can be used to determine the date of verification; our Mercury 201 meter was verified in the first quarter of 2014.
The Mercury 201 counter can be installed either on a DIN rail or
and simply screw it onto the back wall of the electrical panel using an adapter plate, which in turn is inserted into the clamps under the DIN rail. This plate “holds” the Mercury 201 counter quite tightly.
How to install a Mercury 201 meter in an electrical panel can be found in the article “Replacing an electric meter”.
As a rule, the terminal covers of the electric meter on the inside show the wiring diagram for electric meters, and our Mercury 201 meter is no exception.
Perhaps the connection diagram for the Mercury 201 meter on the terminal cover is not entirely clear, so we will complete it to make it easier for you to understand.
A small terminal block with two contacts is the telemetric (pulse) output of the Mercury 201 meter. It is used for remote transmission of data (pulses) about electricity consumption.
So that after connecting the phase and neutral wires to the Mercury 201 meter they do not interfere, the perforation on the terminal cover is broken out and bitten out, and the terminal cover is screwed into place, tightly fitting to the body of the Mercury 201 meter.
After checking the connection diagram of the single-phase Mercury 201 meter and installing the terminal cover, the Mercury 201 meter is sealed by a representative of the network organization through a special hole.
The red light indicator of the Mercury 201 meter lights up when the meter is connected to the power supply.
The readings of the Mercury 201 meter are quite simple to determine; on the mechanical reading device (OD) there are six drums with numbers, the red drum of the Mercury 201 meter is tenths of kW*hours, and the five black drums of the Mercury 201 meter are whole values of kW*hours.
Thus, in the photo above, the Mercury 201 meter accumulated 1.5 kWh. Integer values are transmitted to the network organization and energy sales, so if anyone is confused, you can paint over the red drum of the Mercury 201 meter.
Despite the popularity of Mercury counters, I have my own opinion about them, and not in a very good way.
I’ll explain why, Incotex has a series of single-phase multi-tariff single-phase meters Mercury 200, which literally disfigure electrical panels; you have to cut out a window for the Mercury 200 meter, since they don’t fit there. And in the end it all looks very ugly.
What is also important, when completing the electrical panel, the Mercury 201 meter has larger dimensions than its counterparts in this price category with similar parameters. So, for comparison, the width of electric meters:
| Electricity meter | Manufacturer | Width, mm |
| Mercury 201 | Incotex | 105 |
| CE101-R5 | Energy meter | 89 |
| Neva 103 | Typepit | 78 |
Accordingly, Mercury 201 meters take up more space in electrical panels, which sometimes introduces additional inconvenience, and sometimes additional financial costs, because you have to buy an electrical panel for a larger number of modules.
The Mercury 201 meter is inconvenient to seal; several electric meters had to be manually “adjusted” to holes specially designed for this purpose so that a wire or fishing line could fit through them for the seal.
How to properly connect a single-phase meter Mercury 201 to the electrical network can be read in the article “Connection diagram for a single-phase meter”.
Thank you for your attention
Advantages and disadvantages
Before launching Mercury meters onto the market, the manufacturer analyzed the experience of competitors. The technical specifications for the development included the creation of an accurate, reliable and simple device with a lower price than other manufacturers. After testing, the device was refined and in the end a meter with maximum efficiency and simple engineering solutions appeared. The latest components from leading manufacturers were used in the design of the meter.
The possibility of metering electrical energy at several tariffs encourages consumers to adjust their needs to the most favorable price. In turn, this relieves the energy system during peak hours due to the redistribution of power. This results in savings in the personal budget and the possibility of using the released energy for industrial needs.
But, as practice shows, the number of people who have switched to two or three tariff electricity metering systems is not enough to talk about widespread savings in energy resources. Among those who are strongly against the transition or are hesitant, the following reasons are relevant:
- Cheaper electricity increases the payback period of the device.
- Not everyone will agree to change the routine for night laundry or cooking.
- Many people get confused when recording readings from multi-tariff meters.
But despite these shortcomings, the economic efficiency of two-tariff devices is beyond doubt.
How to connect a Mercury 201 8 meter yourself
Video: How to connect a Mercury 201 8 meter yourself
The matter is not difficult if you understand at least a little about electricity. The single-phase electricity meter "Mercury 201" is considered the most common energy metering device in Russia today. Counters of this brand replaced more outdated models equipped with rotating disks. The Mercury 201.8 electric meter can be installed on a DIN rail, on the back wall of the electrical panel using an adapter plate that is attached to the DIN rail. It should also be taken into account that since 2015, the adapter plate is not included in the standard package of the Mercury 201 electric meter.
The contact screws must be tightened with sufficient force to ensure good contact. If the wire in the terminal is poorly secured, this can lead to heating, destruction of the insulating layer and short circuit. The terminal cover of the electric meter has a perforation - it must be removed (using pliers or carefully broken off) so that the cover fits tightly to the meter. The lid is screwed to the body. The Mercury 201 electricity meter is suitable for installation in apartments, private houses, garages and gardens. The warranty on the device is 3 years, the service life of the Mercury 201 electric meter is designed for 30 years. When replacing an electric meter, you need to notify the energy sales company, and after installing a new meter, seal it together with their representative. As a rule, this takes time, in addition, you need to wait for the person and waste your time.
Calibration interval
Electricity metering devices are subject to periodic verification.
The manufacturer determines the procedure for preparing the device for verification, its implementation and presentation of the results. Initial verification is carried out by factory specialists with the appropriate mark in the technical passport.
The calibration interval of the meter is 16 years.
After repair, the meter is subject to unscheduled verification. All verifications are recorded in the technical passport.
Connecting the meter
Before connecting the device, the power supply is turned off. The product is mounted on a DIN rail, the terminal box cover is removed, and the wires are connected according to the diagram presented in the passport documentation. Additionally, the circuit is made on the terminal cover.
Meter connection diagram - Mercury 201
For models with LCD and modem, additional configuration of the product software will be required.
An electrician with an electrical safety group of third and higher is allowed to perform work.
After connection, a corresponding entry is made in the passport column about putting the electric meter into operation.
The single-tariff meter Mercury 201 is designed for commercial metering of active electrical energy at a network voltage of 230 V and a frequency of 50 Hz. The device provides registration and storage of electricity readings and is convenient for installation in an apartment, garage or country house.
Advantages of the device
The manufacturer offers products with the following advantages:
- protection from outside influences;
- attractive design of the case and screen;
- compact dimensions;
- convenient installation - the kit additionally includes an adapter bracket for easy installation of the product on mounting bolts from meters of obsolete brands;
- the ability to remotely transfer information and connect to third-party devices (for certain versions);
- the presence of an alarm system notifying about the intensity of electricity consumption;
- affordable price;
- compliance with established state standards for measurement accuracy;
- function of recording basic characteristics in the built-in memory;
- energy independence due to the presence of autonomous power supply;
- durability and long intervals between verifications.
Design features and connection diagram
The device consists of a plastic case, a cover, a terminal block, an optocoupler, a volatile memory device, an optoport, a microprocessor and a liquid crystal monitor. There are two connection options. Can be connected directly or semi-indirectly using current three-phase transformer installations. As for direct connection, the device is connected directly to the power line according to the instructions using input machines.
You might be interested in Electric meter Co i446
Note! As for semi-indirect connection and installation, this circuit uses a phase network conductor. It is worth pointing out that there is also an autotransformer, indicated in the diagram
Mercury connection 201
Replacing the battery
The device's autonomous power supply is installed inside, under the main housing cover. Depending on the design of this structural part, it is removed after unscrewing two screws or releasing the latches.
The battery is designed to last at least the duration of the verification interval, so it must be changed during the verification process. The case cover is sealed, so the user will not be able to get to the battery on his own.
After removing the cover, the old battery is removed and a new one is inserted in its place, with a similar arrangement of positive and negative poles.
Design and principle of operation
The body of the electric meter, consisting of a base, main and terminal covers, contains the following components:
- terminal strip with shunt;
- an electronic unit, including a power circuit, a removable battery, built-in memory, a pulse output, a control element;
- built-in modem for remote data transfer (for versions with LCD);
- liquid crystal display or mechanical calculating device (depending on modification).
The electrical energy passing through the device circuit is recorded by an electronic board, which, after processing the signal, displays data on the screen or reads it on a mechanical display. At the same time, the information is recorded by the telemetry system and transmitted to a modem connected to a remote monitoring device.