Among electricity metering devices, the most popular in Russia and the CIS countries is the range of electric meters produced under the Mercury brand. These devices have practically replaced morally and technically obsolete devices from service. The information collected in the article will be useful to those who are planning to purchase and install a pulse electric meter, but cannot make a choice. In addition, we will give examples of connection diagrams for single-phase and three-phase devices, and also talk about the features of their operation.
Model range and markings
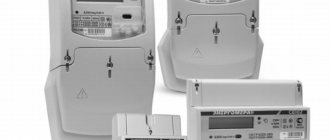
Metering devices manufactured by Incotex are available in the following modifications:
- 100 is a model range of single-phase single-tariff mechanical electric meters of direct connection. The characteristic features of such devices are simplicity of design and low cost.
Model CE 101
This model range is currently discontinued and is being replaced.
- 200 – devices of the second generation, produced in single-phase and three-phase versions. Modifications are being made to allow remote readings to be taken in two-tariff (day-night) and single-tariff modes. For this purpose, a special module (for example, a GSM modem) is built into the device, transmitting information to the appropriate service. Below is a table where, for clarity, several modifications from this model range are given with a description of the main technical characteristics.
Table 1. Example of abbreviated technical parameters of various devices of the 200 model series.
| Model | UNOM (V) | Rated and (maximum) current (A) | Active/reactive energy measurement accuracy class | Number of tariffs |
| 201 2 | 240,0 | 5,0 (60,0) | 1 | 1 |
| 202 5 | 240,0 | 5,0 (60,0) | 1 | 1 |
| 203 1 | 240,0 | 5,0 (80,0) | 1 | 1 |
| 205 FION | 240,0 | 5,0 (60,0) | 1 / 2 | 4 |
| 206 PRNO | 240,0 | 5,0 (60,0) | 1 / 2 | 4 |
| 230 AKE | 3x240.0/380 | 5,0 (60,0) | 1 / 2 | 2 |
| 230 ART 01 PQRSIN | 3x240.0/380 | 5.0 (60.0) | 1 / 2 | 4 |
| 230 ART 02 PQRSIDN | 3x240.0/380 | 10,0 (100,0) | 1 / 2 | 4 |
| 231 AM 01 | 3x240.0/380 | 5.0 (60.0) | 1 | 1 |
| 233 ART 03 KRL | 3x240.0/380 | 10,0 (100,0) | 1 / 2 | 4 |
| 236 ART 02 RS | 3x240.0/380 | 10,0 (100,0) | 1 / 2 | 4 |
As can be seen from the table using the example of the 230 model, the plant can produce several modifications of the device. To define them, special characters are used, they are given below.
Designation of modifications using symbols
Now it will not be difficult to decipher the markings of any Mercury device. For example, the marking 230 AR 01 r 5 60 a 380v means that this is a 3-phase electric meter that allows you to measure the consumption of active and reactive energy. The device is designed to operate with a rated voltage of 380 V and a current of 5-60 A (nominal and maximum value).
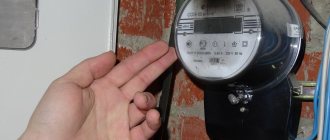
Taking readings
It is better to take readings from the meter manually using a recording. To do this, press a button that changes the information for each individual tariff. Then all the data is summed up and the debt on the utility bill is calculated.
All data is recorded at the beginning and end of the month, after which it is compared. Payment is made based on the calculations. To take readings from the electricity meter, follow the instructions.
- By default, the sum of readings is set to day and night. Click on the "Enter" button to view the readings for each tariff.
- If the meter operates as a two-tariff or three-tariff, then it will be necessary to determine the readings T1, T2, T3.
- Then all the readings are summed up and payment in monetary terms is calculated.
You can view the readings without pressing a button. On the monitor, every 10-15 seconds the counted kilowatts change for each tariff.
Example of a typical design
Devices of this brand are manufactured in a rectangular plastic case. On the front side (closer to the left edge) there is an LCD display or a mechanical wheel-type indicator. On the right side there may be a menu navigation button or the main parameters of the device may be indicated. Below is a drawing that shows the main structural elements.
Example of a typical design
Designations:
- A – information display on which the electric meter readings are displayed.
- B – buttons for switching display modes, for example, displaying information on various tariffs.
- C – sticker indicating the main technical and operational characteristics.
- D - removable panel covering the switching contacts of the device.
Photo of contacts not covered by a removable panel.
The standard dimensions of the electric meter housing (the model shown in the figure) are as follows:
- length – 258.0 mm;
- width – 170.0 mm;
- height – 74.0 mm.
The dimensions of different models of electricity meters may differ from those indicated above.
As for the weight of the device, it depends on the design, in particular, the weight of modifications of the 230 model does not exceed one and a half kilograms.
The metering device is mounted on a standard DIN rail.
Indication modes
The electricity meter has two indication modes:
- display mode for displaying accumulated energy at the current tariff. The monitor displays the number in kW that was spent during the entire operation of the meter. The current tariff number is displayed on the left - T1, T2, T3, T4. Using the cursors on the screen, you can determine the current state of the counter;
- Cyclic display mode. Switching to this mode is done using a convenient menu. The monitor shows: accounted energy for each tariff; date and time; network load power; the amount for all tariffs combined. The listed parameters can all be included in the cycle at the same time or one at a time. Pressing the oval button allows you to return to the previous display mode.
The display mode includes displaying the current date, time, and energy consumption at the beginning of the month.
Briefly about self-diagnosis
Some modifications of the 200 model series have an automatic fault finding function. When detected, the display shows a message in the format E-XX, where “XX” is the error code. For example, if the message “E-18” appears on the screen, this indicates a power limit checksum error and to correct the situation it is necessary to rewrite this data.
A complete list of codes and their descriptions can be found on the manufacturer’s official website or in the instructions for the 200 series models.
Some errors can be resolved on your own, while others require calling a specialist or even returning the device to the manufacturer. For example, error E-01 indicates that the built-in battery charge has dropped to a critical threshold. It would seem nothing complicated, but in most modifications of devices for such a replacement it is necessary to disassemble the electric meter, since the device is sealed, only employees of the electric company providing the services can open it.
Battery in the Mercury 230 ART electric meter
In the described situation, the exception is modifications of the 234 series; instructions for this procedure are available in the passport for the electric meter.
Protection against interference with the electricity meter
The design of these devices is such that it is impossible to change the readings or stop recording. As for resetting the electric meter, a record of this remains in the meter’s memory, from where the user cannot delete the information. The only thing available to him is time adjustment; there is no way around this limitation.
Unlike disk electricity meters, with digital devices, when the zero and phase are reversed, the electricity consumption will still be recorded correctly. That is, it is impossible to “rewind” the readings.
It is believed that it is possible to stop the device using a neodymium magnet. Indeed, early modifications of the 200 series had such a drawback. Modern models have protection against such interference in operation. We do not recommend testing this through personal experience, since information about an attempt to use a magnet will be entered in the device’s log, which will inevitably lead to unpleasant consequences for the experimenter.
Connection diagrams
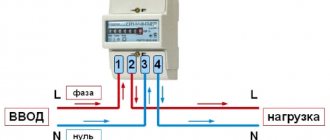
There is nothing complicated in connecting a metering device, if you follow the instructions this procedure does not take much time. The connection diagram is available in the technical documentation that comes with each device. Using model 200 as an example, we will show how to connect a single-phase multi-tariff device.
Connecting an electricity meter Mercury 200
Contact assignment:
- 1-5 – connection of the RS-485 or CAN interface for transmitting pulses;
- 6 – phase input;
- 7 – phase output;
- 8 and 9 – connection of the neutral core.
- 10 and 11 – telemetric output.
That is, the input to the apartment is connected to contacts 6 and 8, and the load (internal network) is connected to terminals 9 and 11.
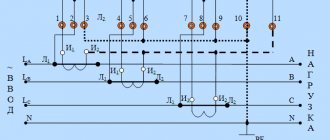
Connecting three-phase devices.
Depending on the modification of the device, it can be connected via direct connection or through a current transformer (hereinafter referred to as CT). Let's use both options for the 230 AR as an example.
Direct connection of the Mercury 230 AR meter
If you plan to connect the device via a CT with the appropriate transformation ratio, you must first remove the jumpers between contacts: 9 and 10, 11 and 12, as well as 13 and 14. After this, you must make the connection according to the diagram shown.
Connection via three CTs
Since the purpose of pins 17-26 remains unchanged (the same as in Fig. 7), it is not given.
Before installing the protective panel covering the contacts, we recommend that you double check that the connection is correct.
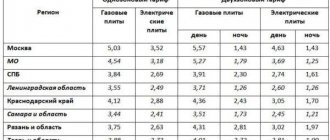
Features of differentiated tariffs
The installation of a two-tariff electricity meter is primarily associated with the possibility of obtaining a certain economic effect. However, the use of these devices may not always give the desired result. Therefore, before connecting the Mercury electric meter, you should fully understand this issue and find out about the peculiarities of using electricity at different times of the day.
The lowest energy consumption occurs at night. When morning comes, people wake up and begin to turn on household and lighting appliances, which work constantly. Due to this, consumption begins to increase and reaches the so-called morning peak load, which lasts until approximately 10.00 am.
Further, as the graph shows, electricity consumption decreases slightly and remains at this level until the evening, which conventionally begins at 18.00. In the evening, the load increases sharply and becomes even higher than in the morning, as high-power equipment is turned on. After approximately 11 p.m., consumption drops again, stopping at a certain level until the morning.
Such changes in loads have an extremely negative impact on the operation of power plants and the general technical condition of power lines. Ultimately, in such a regime, energy resources are used irrationally and inefficiently. Accelerated wear and tear of generators and transformer equipment is observed.
In order to relieve the evening load and thereby increase the reliability of power supply, two-tariff electricity meters began to be used in practice. A regular meter takes into account consumption at a flat rate around the clock from 00.00 to 24.00. A two-tariff meter divides the day into a tariff with daytime from 07.00 to 23.00 hours and night time from 23.00 to 07.00 hours.
Consequently, if you shift the use of powerful household appliances and equipment to the period from 23.00 to 07.00, you can gradually reduce the cost of paying for electricity. This will also benefit power plants by evenly distributing the load and reducing overloads during peak periods.
Instrument verification
In accordance with the norms of Federal legislation, metering devices are subject to mandatory verification. It can be primary and periodic. The first is performed directly at the factory where the products are manufactured. The second is periodically during operation after the expiration of the verification interval; information about it is indicated in the technical passport.
Sometimes an unscheduled procedure may be scheduled before the verification period expires. The following cases are provided for this:
- loss of a document indicating completion of a planned procedure;
- after the device has been set up or adjusted, for example, after repair;
- when installing a new device.
For verification, standard instruments or special installations are used, such as the Mercury 211 multifunctional device. The electronic device circuit includes a source of fictitious power and a reference (model) electric meter. Such a device can simultaneously test up to 8 devices.
After verification, information about this is entered into a special register, which contains the device number, year of manufacture and test date.
Choosing an electric meter
First of all, you need to make sure that the device matches the connection diagram; it can be single- or three-phase. Next, you should take into account the features of the box in which the control device will be installed. The device must be placed in such a way that readings can be taken without opening the electrical cabinet cover. That is, the window in its door should be located opposite the display or mechanical indicator.
In such panels, readings are taken with the doors closed
Please note that when replacing outdated disk devices with devices from the 20X model range, a problem often arises when the device’s information panel is not visible through the dashboard window. The problem can be solved by choosing Mercury 200 as a replacement; the manufacturer specially developed this model for installation in old-type apartment panels, which significantly simplified installation and made it possible to read readings without opening the box.
Currently, Incotex has stopped producing devices operating on the induction principle, so only electronic modules are available for purchase.
It makes sense to purchase multi-tariff devices only if such a payment scheme is used in the region of residence and it is possible to use household appliances at night.
Decide on functionality. Of course, an electric meter with memory is more convenient and allows you to compare electricity consumption with the previous period or any other month. How relevant this is is for the consumer to decide, but given how much such devices cost, it is better to get this information from receipts. The same applies to models equipped with a remote control; its need is greatly exaggerated.
There is no point in purchasing a model capable of transmitting readings to the electric company if the latter does not have this capability.
It is debatable how necessary it is to purchase a device, for example, the 201 series, where after installing special software, it becomes possible to call the office to obtain detailed information. Additional modules that make up such an electric meter lead to a significant increase in the cost of the device. Again, as practice shows, the simpler the device, the longer it will last.
https://www.youtube.com/watch?v=nZW0itCd-mk
Now let's move on from general advice to specifics:
- Each Mercury electricity meter must be equipped with a passport and technical documentation, which indicates the capacity of the electricity meter, a description of how it works, a connection diagram and other useful information. The technical documentation should include an operating manual that describes in detail how to correctly take readings, information about the verification interval, etc.
In the absence of a passport, the device will not be able to be registered and, accordingly, operation will be impossible.
- There must be a hologram on the electric meter, as well as a factory seal.
- Compare the signs and numbers on the electric meter with the serial number indicated in the passport.
- Check that the warranty card is filled out correctly, otherwise the warranty for the electric meter may be invalidated. If such a device fails or does not work correctly (for example, it overestimates the significance of the readings, beeps, consumes a lot of energy from an additional source, etc.), then problems may arise with its replacement or repair.
Please note that inflated readings (the device has more kW than it actually consumes) are not uncommon. This indicates that the device is not adjusted correctly.
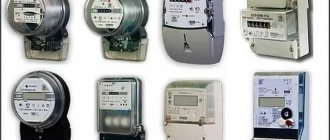
Description of the counter
Types of electricity meters Mercury
The Mercury electricity meter was invented by Incotex. It produces various electronic equipment, but it is meters that are widely used.
Mercury is produced in a miniature case that fits into any room interior. Manufacturers have thought through all the details for attaching the device, so fixing it will not cause any difficulties. It is impossible to open the case, since there are no bolts in it, which has a positive effect on the safety of the device. Mercury is moisture resistant, so it can be installed even in basements.
There are models (for example, 201.22) that have a built-in PLC module. It additionally protects the meter and eliminates the possibility of electricity theft. There is also a Mercury electric meter with a remote control.
The service life is 30 years. These are some of the most durable meters used in homes. The manufacturer provides a 3-year warranty, which is enough to solve most emerging problems. Every 15 years the metering device must be checked; in some modifications the period is different.
The device has instructions for use, as well as a passport, which indicates all the properties. In addition, a diagram for connecting the device is attached, as well as a description of taking readings.
You should buy the product in a specialized store so as not to purchase a fake. Each meter is assigned its own identification code, which is then registered in the register.
Installation recommendations
- First of all, you need to choose the right place in the closet for the device; you can read how to do this on our website.
- Carefully read the description, which provides a connection diagram, and only then start working.
- Before connecting, you must de-energize the input; to do this, you must turn off the input circuit breaker.
- If after connection the electric meter blinks, then everything is in order; this indication indicates energy consumption. If the interval between LED flashes has increased, it means that consumption has decreased.