Installation of gas IR heaters
If the device is powered by a gas cylinder or the gas container is located inside (outdoor gas heaters in the form of a lantern), all precautions must be observed when working with gas.
A good ventilation system is required, as gas combustion products remain in the room
A good ventilation system is required, because... gas combustion products remain in the room.
When installing, be sure to comply with the requirements for safe placement of burners to avoid fire hazards.
If all installation rules are followed, you can create a reliable autonomous heating system and significantly reduce heating costs.
Here you will learn:
Infrared heaters can create a comfortable atmosphere with minimal labor and financial costs. They are compact, safe and efficient, and can be used in premises for various purposes. Installing an IR heater is not difficult; even a novice craftsman who already knows how to hold tools in his hands can handle it. In this review we will look at all the intricacies of installation work.
Installation of film heating on the ceiling
In order for the finished heating system to be effective, the following rules should be followed when operating:
- Before installation, you need to insulate the room (walls, doors, windows).
- Do not install film heating in a room with high humidity or low temperature.
- The heating system, which acts as the main one, must occupy at least 80% of the total ceiling area. For additional, 40% is enough.
- The current power must correspond to the value specified in the heating system passport. If it is less than required, it is necessary to install a distribution block.
- The temperature sensor should be installed at a level of 170 cm from the floor level.
- It is prohibited to bend the roll-up heater at an angle of 90°.
- For ceilings that are too high - above 360 cm - standard models are not suitable, since the energy consumption in this case will be unreasonably high.
- In order to reduce heat loss, it is recommended to install foil film under the IR film. It will reflect heat into the room.
- The roll heater should only be cut along the marked lines.
- The IR heater must be fixed using a stapler or special fasteners, and the fasteners should be located on the transparent areas of the film.
- The distance between film strips should be no more than 50 mm.
- During installation, you must ensure that the heating surfaces will not come into contact with flammable or combustible materials.
- Electrical wiring contacts must be carefully insulated using insulating tape and plastic caps.
Film infrared heating is installed in four stages:
- Calculation of materials for the installation of a film heating system.
- Carrying out work on thermal insulation of the ceiling.
- Installation of heating system elements, installation of a temperature sensor.
- Connection to the network and thermostat.
After determining the required amount of materials and purchasing them, they begin to insulate the ceiling. To do this, use a foil-coated heat insulator (folgoizol penofol and others). The material should be reinforced over the entire surface of the ceiling and extend slightly onto the walls to reduce heat loss.
An IR film is mounted on top. Fix it on the fasteners included in the kit, positioning it so that it falls on the places marked for cutting - this way the heating elements will not be damaged.
When the film is fixed, it is necessary to insulate the contacts on one side and connect the wires on the other. Then you need to install a thermostat on the wall. Testing the operation of the system. If it works as expected, move on to finishing.
IR film can be covered with various finishing materials: MDF, plastic lining, plasterboard and others. The main thing is that they do not have heat-reflecting properties.
Heating a home with infrared heaters is a modern alternative to traditional electrical systems. Its high cost is justified by ease of use, ease of installation, reliability and efficiency.
Efficiency and economy are the main indicators when choosing infrared ceiling heating. The cost of energy sources is high, and many owners of private houses try to use them rationally. These two indicators form the basis for the creation of a unique and modernized IR heating system. How does this system work and is it possible to install it yourself?
Ceiling infrared heating
Required tools and materials
In order to quickly and easily install an infrared heater on the ceiling, you will need the following tools:
- Drill or screwdriver (drill holes for fastenings).
- Pliers (for shortening wires).
- Indicator screwdriver (determine phase and zero).
- Metal detector (optional, used to search for wiring and metal objects in the wall, so as not to accidentally hit these objects when drilling holes. You can make your own metal detector from improvised means.
- A simple pencil and a construction tape (mark the mounting points on the wall).
As for additional materials, to install and connect an infrared heater you may need:
- Demountable electrical plug.
- Three-core copper cable, cross-section 2.5 mm2.
- Wall mounts (purchased as needed, as only ceiling brackets are included in the kit).
Having collected all the necessary list of materials and tools, you can proceed to mounting and connecting the heater..
Where and how to install an IR heater?
The location of the infrared heater depends on its type and heating plan. It can be installed on the ceiling, on the wall, with or without a slope.
Safety precautions
Remember that installing IR heaters is working with electricity
Therefore, it is important to maintain maximum caution and follow safety rules:
- Never install the heater near fire hazards.
- Electrical wiring must be laid on a non-combustible base.
- The fastening elements must not touch the heating element.
- Do not install devices with a power of more than 800 watts for a residential building or apartment.
- Do not connect the heater to the network until installation is complete.
To use the heater more efficiently in your home, place it near materials that have high heat absorption rates, such as wood, carpets, and stone walls. U
You should not install the heater near reflective surfaces, this will reduce the efficiency of the device.
The mounting surface must be strong enough, as some heaters can weigh up to 28 kg, although many, of course, are lighter.
Location and height from the floor
One of the important requirements for installing an IR heater is the distance to a person’s head, especially in work areas, where a person spends a lot of time practically motionless. This distance should be at least 1.5 - 2 meters. In fact, it is determined by the power of a particular heater. If its power is up to 800 W, then it can be placed at a distance of 70 cm from the human body. If the power is 1-1.5 kW, then the permissible distance starts from 1 meter.
The specifics of different rooms determine the features of installing the heater and the optimal layout of the devices.
Where to place the heater: Room Recommended location Bedroom Area above the head of the bed, so that at least ⅔ of the bed is exposed to infrared radiation. Kitchen It is recommended to install the heater so that its rays are directed towards the window, the place where cold air flows from the street into the room. Bathroom On the ceiling, if this is the only source of heat in the room, or opposite a small area where people most often visit, if the IR heater is considered as an additional source of heat. Hallway On the ceiling, pointing down to the floor. It stays warm and dries very quickly. The same goes for shoes - they also dry quickly and remain warm.
However, it is important to clean it so as not to dry it out, thereby spoiling it.
When heating open areas, it makes sense to install several devices at once, so that infrared radiation reaches most of the surface of the body.
IR heaters can provide different temperature conditions in certain areas of the room. To do this, several devices with different power levels are installed in one room.
Next Post
This is interesting: How to properly install a hob in a countertop: lay out point by point
Security measures
Please note that installation of IR panels involves working with electricity. It is very important to exercise extreme caution and follow safety rules:
- It is prohibited to install an infrared heater on the ceiling if fire hazardous objects are located nearby.
- Electrical wiring must be located on a non-combustible base.
- Fasteners must not come into contact with the heating element.
- It is not recommended to install devices with a power of more than 800 W in residential premises.
- The device must not be connected to the network until installation work is completed.
For more efficient operation of the device, it is recommended to place the device near objects that absorb heat well: stone walls, wood, carpets, etc.
Experts do not advise installing the heater near reflective surfaces, because this reduces the efficiency of the product. The mounting surface must be strong, because some structures weigh about 30 kg, although most of them weigh less.
Design and operating principle
The operating principle of infrared equipment is not complicated. Electricity helps heat the heating element, which heats a special heat-emitting plate that emits infrared radiation.
The equipment design includes:
- body (in certain modifications);
- heating element;
- emitter;
- reflector;
- electrical fittings and wires;
- remote control.
If there is a case, it is most often metal. Models without a case are made from heat-resistant film or glass. The heating elements are located inside the film. Glass devices contain a pair of 4-mm plates connected to each other.
The following can act as a heating element in IR devices:
- records;
- heating elements;
- closed or open spirals;
- carbon conductors;
- infrared halogen or quartz lamps.
The reflector is made of heat-resistant metal with good reflective characteristics. Typically this is 120 micron foil. Insulating material is placed between the body and the foil. Typically, an infrared heater is equipped with a power regulator to select the appropriate heating mode.
Important information about the operation of IR heaters
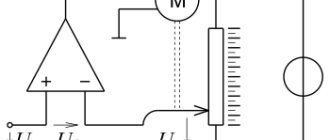
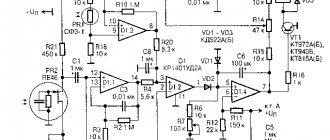
The device of infrared heaters has zonal and spot heating. The connection diagram for this equipment is shown in the following image: Fig. 1.
Before starting work, you will need to prepare installation tools and a house plan. The tools are as follows:
- perforator;
- screwdriver;
- roulette;
- Screwdriver Set;
- pliers.
Figure 1. Connection diagram of an infrared ceiling heater to a thermostat.
Before starting installation, you will need to collect complete information about the house, on the basis of which a wiring diagram for the installation will be drawn up. Determine the area and size of all rooms, find out the characteristics of thermal insulation, window structures, etc.
You will need to measure the voltage in the network at the highest possible load on the thermostat. To do this, you need to turn on as many different electrical appliances as possible at the same time. The voltage should be about 220-230 V with a deviation of no more than 10-20%.
If there is a greater deviation, use stabilizers. You will definitely need an individual connection diagram, for which you need a house plan. If there is none, draw it yourself. Below is an example of a calculation for a standard private house.
Connection
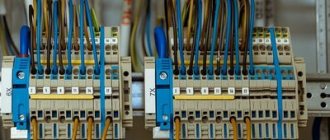
All infrared heaters are connected to conventional single-phase networks. The exception is high-power industrial designs that require a power supply of 380 Volts. The connection diagram for an infrared heater is extremely simple - they are mounted and connected to a thermostat.
The thermostat is an important part. It provides support for a given temperature regime, focusing on the temperature of the surrounding space. Control method: mechanical, with dry contacts. As soon as the temperature reaches a preset limit, the thermocouple is activated and disconnects the equipment from the power supply. When the air cools, the contact closes and the supply of electricity is restored.
If there is a good grounding circuit and three-wire wiring in the house, use a VVG 3x1.5 or VVG 3x2.25 cable - one grounding conductor here. The optimal height for placing the thermostat is 1.2 m, but in no case close to the heaters.
In order to connect IR heaters after they are installed, we need a good wire that can withstand heavy loads. The best option would be VVG 2x2.5, which should be laid in the walls and ceilings, and then hidden under a layer of plaster. Considering the not very high power of the devices, it would be possible to use a VVG 2x1.5 wire for these purposes, but it is most often used to connect lighting devices - for power loads it is recommended to choose a cable with a large cross-section.
Choosing a suitable location
The most important requirement when installing an IR panel is the distance to a person’s head. This is especially true in work areas where people stay in one position for a long time.
The distance should be at least 1.5-2 m, it all depends on the power of the device. If it is less than 800 W, the device can be placed at a distance of 70 cm. If the indicators are 1-1.5 kW, then the minimum gap is 1 m. The specifics of specific premises determine a number of features of the installation of structures and the optimal layout of their placement. The table clearly shows the recommended location for the device in each specific room:
Connection diagram
There are no difficulties in connecting such heaters after their installation - we need to run the cable from one device or group of heaters to the thermostat, and then to the nearest junction box. Our thermostat simply breaks one wire (phase), no additional cables or conductors are needed. If the power of a heater or group of heaters is 3 kW or more, lay a separate solid line to the distribution board and equip it with an RCD.
Installation rules
Many homeowners have found themselves in a situation where batteries interfere with the placement of large household items in a room. Installing an infrared heater on the ceiling will avoid this problem.
This device does not attract too much attention, but at the same time allows you to achieve uniform heating of the space in the room
Installation of heaters is carried out together with laying of thermal insulation and finishing work. As a result, the equipment is virtually invisible.
The installation will be correct only if the following conditions are met:
- a safe distance is maintained from the emitter to interior items, walls, electrical sockets, switches and people;
- During installation, special brackets, hooks and dowels are used;
- Ceiling materials are heat resistant.
Effective mounting is an important requirement for proper installation of infrared equipment. Individual heaters are mounted on suspensions
In this case, the cover is removed from the device, and the suspensions are directed into the grooves. After this, the cover is returned back, and the equipment is put in its place.
To ensure proper installation work, you must connect the grounded electrical cable to the terminal block. Before connecting the equipment, you need to apply alcohol to it, and only after the surface has dried, connect the device to the network. Next, the heater must work non-stop for a couple of hours (to evaporate the lubricant from the manufacturer).
Recommendations for installing a ceiling device and basic mistakes
To mount and hang the heater from the ceiling, it is advisable to use the fittings that come with the device.
To prevent cable routing from being noticeable, a U-shaped profile is used along the wall and ceiling.
Thermostat
When installing, owners often make the same mistake, forgetting that when installing several devices at once in one room, it is necessary to take into account the total power. This applies to units that are connected to one thermostat.
Failure to comply with this rule will result in device failure and electrical failures.
It is recommended to install the thermostat near a door or window.
How to connect to the network securely
To ensure safety, you can ensure that the device is grounded. To do this, the yellow-green cable is connected to the appropriate terminal.
Comparison with other types of heating equipment
Competing heating devices (batteries, convectors, heat fans, oil radiators) are aimed primarily at heating the air. Only then does the warm air partially transfer heat to surrounding objects and people.
This method has a number of disadvantages:
- As a result of heating the environment, “air stratification” occurs. In this case, warm air accumulates at the top of the room, and cold air at the bottom. This disadvantage is especially noticeable if tiles are used as flooring.
- Mixing warm and cold air form convection currents, creating drafts in the room.
- Heating of the room is extremely slow.
On all of the above points, infrared heaters beat their competitors.
Power calculation
The optimal indicator is a power equal to 1 kW for every 10 square meters. m. area. Ideally, you need to build on it, only then will the room be really warm, even in the most severe frosts. If the installation involves their use as auxiliary equipment, nothing prevents you from choosing lower power models - for example, 1000 W for a room of 20 square meters. m.
Remember that the use of overly powerful devices in residential premises is highly undesirable - it is better to install several low-power models.
Advantages and disadvantages
Ceiling heaters have a number of important advantages, including:
- efficiency;
- increased heat transfer;
- low noise level;
- autonomy;
- there is no problem of oxygen absorption;
- do not emit unpleasant odors;
- small sizes;
- no need for design work;
- it is possible to install it yourself (although the seller will probably impose his own installation);
- Can be installed on suspended ceilings;
- ease of operation.
In addition to the advantages, infrared devices also have disadvantages:
- possibility of overheating during prolonged use;
- considerable cost;
- stationarity of equipment.
conclusions
We looked at the options and prices for heating a country house. The cheapest types of fuel are gas and coal. It is possible to connect to a free geothermal heat source, but the cost of installation is not yet affordable for most consumers.
In any case, when planning a home heating system, take into account the availability of energy sources and choose the best option
Take the time to do careful calculations and consult with heating experts. Their professional opinion will help you make the right choice.
Most owners of private houses are accustomed to gas heating from a boiler, which is considered the most economical and affordable. However, what about those where it is not possible to install such a heating system? An excellent alternative option is PLEN heating. Specifications, prices and reviews vary between models. We will analyze all the features and independent installation of such a “warm film”.
Installation option in a wooden house
Main process
Hanging the case
First you need to determine the installation location of the infrared heater in the house (or apartment). As we said above, the housing can be placed both on the ceiling and on the walls, depending on the individual preferences of the owners.
The first thing you need to do is mark out the mounting locations yourself. To do this, use a tape measure to measure the same distance from the ceiling to the selected area. It is also recommended to use a building level, with which you can level the brackets in a horizontal plane.
After marking, proceed to drilling. If the ceiling (or wall) is made of wood, drill holes with a drill. If you have to deal with concrete, you cannot do without a hammer drill. You need to drive dowels into the created holes and screw in the brackets, after which you can install the infrared heater in its place.
Please note that the design of the unit varies. Some products have guides that are fixed into brackets
A simpler option is chains attached to the ceiling (special holders attach to them). Also on the market you can see infrared heaters on a leg, which are simply placed on the floor.
Electric installation work
As we said at the beginning, the process of connecting an infrared heater to the network will be carried out using a temperature controller.
First you need to connect the contacts of the collapsible electrical plug to the thermostat terminal blocks, which are installed in the product body. Each “socket” has its own designation: N – zero, L – phase. It should be noted that there are at least two of both zero and phase terminals (from the network to the regulator and from the regulator to the heater). Everything is quite simple - you strip the wires, insert them into the seats until they click (or tighten the screws). Be sure to follow the color coding of the wires so that the connection is correct.
For your attention here are the correct connection diagrams:
As you can see, connecting an infrared heater through a thermostat is quite simple, the main thing is not to mix up the wires and tightly tighten them in the terminal blocks.
A very important nuance is the correct choice of location of the regulator. You should not install the product next to a heater, because in this case, the incoming warm air will negatively affect the accuracy of the measurements. It is best to place the device in a more distant area, at a height of one and a half meters above the floor.
Also note that you need to install the controller in the coldest room, otherwise the heating problem will not be completely solved. As for the number of infrared devices served by one temperature controller, it all depends on the power of the heaters
Typically, one 3 kW controller is used for several products, with a total power of no more than 2.5 kW (so that there is a reserve of at least 15%).
You can read more about connecting a thermostat to an IR heater in our separate article, which provides several installation diagrams!
So that you can clearly see the entire connection process with your own hands, we provide these lessons for viewing:
Video instructions: connecting an infrared heater with your own hands
How to connect a temperature controller
Step-by-step instruction
The manufacturer must include step-by-step instructions for installation and operation in the set of heating panels. It is necessary to study it carefully, because all units are different, so recommendations for them may differ.
Heater installation
Mounting the device to the wall is quite simple. To work, you will need a screwdriver, drill and hammer drill, as well as basic knowledge of working with the listed tools.
Designs may vary between devices, so please pay attention to manufacturer's advice.
Step by step process:
- Determine the locations for fastening the product and mark them. It is recommended for these purposes to use a measuring tape to measure the height of the mount from the ceiling. You will also need a building level. You need to make sure that all points are at the same height.
- Drill holes into which to then insert dowels.
- Using the parts included in the kit, secure the structure to the wall.
To properly install an infrared heater, you must strictly follow the recommendations described above.
Electrical connection
Any device is installed with a thermostat, which is needed to maintain a constant temperature. Any network consisting of one phase is suitable for connection. The exception is high-power industrial models. In a home or apartment, you don't need to worry about this.
Using a thermostat, the room temperature is monitored. This is necessary to ensure and maintain specified modes. If the values are higher than the specified level, the device automatically turns off, and the supply of electricity to the unit is resumed after the air has cooled.
Installation requires minimal preliminary preparation, no additional communications required
When installing the unit in several rooms at the same time, one thermostat will not be enough. It is necessary to install a separate one for each room. You don’t have to use them at all, but in this case the panels will consume significantly more electricity. In addition, it will be less comfortable to be in the room.
Step-by-step instructions for connecting the product:
- A high load resistant conductor should be used and installed in the ceiling or walls.
- Cover the cable with a layer of plaster. An alternative option is to use special boxes that can be used to hide electrical wires.
- The heater wiring must be connected in parallel to the main line.
- Then you should install a thermostat in each room at a height of 1.5 m.
Installing an infrared heater is not as difficult as it seems at first glance. Today, these designs are the most economical for heating homes. The devices can be used both as the main and additional heat sources.
Advantages and disadvantages
Any equipment has both positive and negative sides. The advantages of infrared heaters include:
- Cost-effective (especially when using devices as an additional heat source).
- The device does not burn oxygen.
- No harmful effects on human health (scientists have proven that devices can even have a positive effect on the body).
- When mounted on the ceiling, they take up minimal space in the room.
- Safety for children.
- Quiet operation. In addition, the products can be used as a light source.
- Many models are equipped with a built-in thermostat, with which you can maintain the optimal temperature level.
- The heat remains for a long time, because heated objects release energy into space.
- Infrared systems are resistant to moisture, so they can be installed in gazebos, bathrooms or on terraces.
Many models have a thermostat, which helps maintain a comfortable temperature level.
The only disadvantage of the products is their high price.
Warm ceiling
- The main advantage of a warm ceiling
- Lack of a warm ceiling
- Installation of a warm ceiling
The main advantage of a warm ceiling
So, the most important argument in favor of using infrared heating is precisely the low power of this type of heating compared to other heating systems.
For example, the power of a water heated floor system averages 50-80 W per square meter. And the power of films for ceiling heating devices, declared by the manufacturer, is 15 W. This is certainly great. But it's not that simple.
To mount a heating film on the ceiling, it is necessary to mount the lathing, mount heat-insulating mats, mount a reflector layer, and only then mount the heating film.
At the same time, you need to understand that heat loss from your home or premises should be minimal. Otherwise, energy consumption when using a warm ceiling will be comparable to traditional heating systems.
This is of course cheaper than a device, for example, a concrete warm water floor system. But the quality is the only plus.
Lack of a warm ceiling
If you have warm water floors, then they can be heated with any boiler. For example, electric, gas, diesel, solid fuel, heat pump, solar collector and so on.
But infrared heating film works only on electrical energy. Thus, if the electricity is turned off, you will be left without heating.
According to the heating principle, warm ceilings and warm floors are the same. Both of these systems operate in the long-wave infrared heating range.
Therefore, I would not consider warm ceilings as the main heating. As an alternative please. For example, you turn on warm ceilings during the day while you are at work. And at night, turn on the stove or turn on another boiler.
It is also convenient to use ceiling heating in the off-season to maintain a comfortable temperature in the house without turning on the main heating.
Installation of a warm ceiling
When installing a heating film on the ceiling, it is necessary to pay attention to the quality of the connection between the supply cable and the film and the reliable insulation of this connection, since water leakage from the roof or upper apartments cannot be ruled out. And if the connection is poorly insulated, you may get an electric shock or a fire may occur due to a short circuit with water. And if the connection is poorly insulated, you may get an electric shock or a fire may occur due to a short circuit with water.
And if the connection is poorly insulated, you may get an electric shock or a fire may occur due to a short circuit with water.
The next rule when installing a warm ceiling is the permissible installation of a finished ceiling at a distance of no more than 100 mm from the heating film.
In this case, the thickness of the finished ceiling materials should not exceed 20 mm.
In addition to all of the above, the heating film for installing a warm ceiling differs from the film for installing a warm floor.
The film for a warm ceiling is equipped with additional reflective elements, which in turn allow the installation of warm ceilings with a height of no more than 4 meters.
To summarize the above, it is advisable to use warm ceilings in well-insulated buildings and premises as alternative heating or in the off-season.
It is also convenient to use warm ceilings with an uninterrupted supply of electrical energy. Although today no one will give guarantees for uninterrupted supply.
And to provide basic heating, you can use radiator heating systems, heated floors or any other system.
If you have questions about the installation of underfloor heating systems, then follow the links and you will receive comprehensive answers on the installation of water or electric underfloor heating. published econet.ru
If you have any questions on this topic, ask them to the experts and readers of our project here.
Principle of operation and varieties
A characteristic feature of such products is the release of heat, which helps to heat various surfaces - walls, floors, ceilings, etc. It should be noted that the air is heated partially, because the main flux of radiation is directed towards objects, which subsequently give off heat from themselves.
Infrared radiation is not afraid of wind, drafts and can warm you up even on a windy day
The device consists of a reflector and an emitter. The latter is responsible for the transmission of radiation during the heating process. The reflective element is a reflector, which is made from heat-resistant materials with high reflectivity. The heating elements can be:
- plates;
- open or closed spirals;
- quartz, infrared or halogen lamps;
- heating elements;
- carbon conductors.
According to energy sources, all heaters are divided into several types:
- Electrical. The most popular type of devices that are installed in any premises. A mandatory element in the system is a mirror reflector for transmitting radiation in the required direction.
- Gas. Best suited for open areas or industrial buildings. Due to their high power, they are rarely found in residential areas. The fuel is a gas-air mixture.
- Diesel. They are in demand in rooms where wiring is weak. Such devices are often found on the street or in garages. The device does not require chimneys; cleaning is carried out through several filters.
- Film - often used in residential areas.
Fastening on rigid floors
This option for placing an infrared heater involves the use of special metal brackets included with some product samples.
Additional information: If the emitter you purchased does not include such brackets, you can make them yourself, following the instructions included with the product.
Before starting installation operations to secure the heater on a rigid base, you should prepare the following working tools:
- An electric drill or hammer drill required for drilling or punching holes for fasteners.
- Pliers (for adjusting the position of the bracket, made in the form of an angle).
- Pencil and ruler used to mark attachment points.
Important! To avoid damage to hidden electrical wiring, it is advisable to stock up on a special one that allows you to determine the routes of its installation in the thickness of the ceiling. If it is absent, you should be guided by the fact that hidden wiring (according to the requirements of the PUE) is always laid from the junction box directly to the mounted lighting fixture.
After preparing all the necessary tools, you can proceed to marking the mounting locations of the mounted device, which is carried out in accordance with the instructions of the attached instructions.
We recommend reading: .
We install the heater ourselves
The simplest and most effective installation method involves placing the heating device on the ceiling of the room. The chassis is suspended in the following order:
- At the short ends of the case, it is necessary to unscrew the screws and remove the covers; the suspension brackets are inserted into the slots and secured with a latch;
- The installation locations of anchor hooks are marked according to the distance between the brackets on the ceiling;
- Using the markings, holes are drilled in the ceiling slab, plugs are hammered in and the suspension hooks are screwed in.
Before fixing the infrared heater, you will need to lay the wiring from the electrical input panel to the thermostat installation location and then to the heater. Ceiling structures are rarely equipped with built-in thermostats, so the box responsible for controlling the heating process is placed at a height of 1.6-1.7 m near the entrance to the room according to the above diagram.
To connect an infrared heater, you will need to strip the ends of the wires and secure them in the chips according to the diagram given in the product passport or pasted on the inside of the cover. All that remains is to connect the wiring to a separate package on the panel, and you can put the infrared heater into action.
Digital thermostats allow you to control the temperature in your room with high precision. But in practice, infrared devices have a slight heating inertia. For example, by setting the room temperature at 22°C on the device, the heater will actually raise it half a degree or a degree higher, since the hot radiating coil or heater panel continues to heat the air by inertia for another 5-7 minutes after the thermostat cuts off the power.
Where to go and how much does the work of the masters cost?
You don't have to do everything yourself. If you do not have enough experience in installation work with electrical equipment, contact one of the companies offering their services. The cost of installers' work averages from 1,500 rubles for 1 heater. Many of them guarantee their work, so there are no other good reasons to refuse these services other than the desire to save money.
Installing infrared heaters should not be intimidating - this is not a reason to abandon one of the most economical methods of heating an apartment or house today. With the help of specialized companies that are ready to help install heaters, difficulties should not arise.
Does it make sense to get involved with infrared heaters?
There are approximately the same number of fans and ardent critics of heating residential premises using infrared radiation installations. It is worth recognizing that, despite the fierce criticism of fans of water heating, the idea of using electric infrared heaters is becoming increasingly popular.
Radiant electric heaters have their own rather interesting advantages:
- Versatility. The infrared heater can be installed on any surface, at any angle, without restrictions on height and method of fastening;
- Locality of heating. An infrared emitter allows you to organize heating of part of the room, even if it is not possible to limit the loss of warm air;
- Easy to install. It is enough to correctly lay the electrical wiring to the places where the heaters are installed, connect the input to the house and a meter designed for increased power consumption of electricity;
- Low inertia of infrared heaters. Heating of the room stops 10 minutes after the electric heater is turned off;
- Possibility of smooth adjustment and precise dosage of room heating.
For your information! Due to the very small thermal inertia of infrared heaters, the air temperature in the room can be adjusted with an accuracy of half a degree; it is enough to install digital or even mechanical thermostats.
Of course, similar options for maintaining the air temperature in a house or apartment at a given level can be implemented using heated floors or electric convectors, but in both cases, good results can only be achieved in closed rooms, when there are no drafts or passage rooms.
Practice once again proves that the use of radiant devices makes it possible to heat a room no less efficiently than when using convectors or water and oil radiators
In this case, it is important to choose the right scheme and method of installing an infrared heater
Conventional electric water-oil heaters and radiators, regardless of the installation scheme, heat the air by convection:
- Most of the heat-transfer surface is covered with a casing or screen to improve, according to the developers, the flow of air to the spirals or tubular sections;
- In some designs, convection electric heaters simply unsuccessfully copy the shape of cast-iron central heating radiators;
- Such heater designs are designed for installation in window sill niches, where warm air mixes with the flow of cold air from the ventilation valve and spreads well throughout the room. In all other cases, the efficiency and economy of air heaters is significantly lower than that of infrared heaters.
Important! There are quite a few comparison tests that measure heating performance, but the most reliable data shows a difference between infrared heaters and convectors by almost 18%. In addition, infrared heaters are practically insensitive to the position of the housing, whereas for a convector, manufacturers require installation only in a vertical position, with an inclination angle of at least 4-7 o
In addition, infrared heaters are practically insensitive to the position of the housing, whereas for a convector, manufacturers require installation only in a vertical position, with an inclination angle of at least 4-7 degrees.
Low temperature infrared heaters
The most frequently criticized disadvantage of an infrared heater is related to the high temperature of the radiating surface. Most often, a spiral or ceramic panel heats up to 300-500 o C, which can cause drying of the air in the room.
Relatively recently, so-called cold or low-temperature heaters began to be used for heating. New infrared heaters look like ordinary square facing slabs measuring 60 cm or 50 cm. The smooth heating surface is made of polymer ceramics; on the reverse side there may be a protective grille or a plastic panel covering the heating element.
Such heaters heat up to a temperature of 90-95 o C, so even with prolonged contact with fabric, curtains or furniture there is no damage. Installation of such an infrared heater can be done almost anywhere, but preferably no closer than 40-50 cm to open parts of the body, you can use the advice in the video:
The most important thing is that the room heating efficiency of such a heater is approximately 20-25% higher than in comparison with vaunted convectors and oil radiators.
Types of infrared heaters
All devices of this kind are divided into two categories:
Gas. These heaters operate from liquefied gas. Their main advantage is considered to be autonomy, because they do not need access to the power grid. At home, they are in little demand, since they are more often used to heat industrial buildings and outdoor areas.
Depending on the installation location, they are further divided into two categories:
- Wall-mounted. They are mounted to the wall, which is especially important for rooms where there are small children, since they can burn their hands on the heater or knock over a regular stationary device. Of course, there is a risk of covering the heat transfer surface, but this is prohibited. The advantages of this type of device include noticeable space savings and ease of use in small spaces.
- Ceiling. Such devices are capable of heating quite large structures in a short time. They can be installed even in damp rooms, due to the fact that they emit much more heat than floor and wall options. This is achieved thanks to the original shape and a special rough coating of the heating surface. The fact is that the heterogeneity of the top layer provides a large area for heat release. Ceiling heaters can have open and closed heating elements. The first option is considered more effective, since it emits a narrowly directed hot flow of heat. They are usually installed in houses with high ceilings, workshops, hangars, and warehouses. A closed heating element is more suitable for residential premises where the ceilings are not too high and the heated area is small.
How to install an infrared heater yourself
Infrared panels are gaining more and more popularity every year. They are easy to use and provide quick heating of the room, and the built-in thermostat allows you to set the desired heating temperature in a few clicks. Moreover, installing infrared heaters yourself is quick and easy if you follow the instructions. Other advantages of this equipment include:
- long service life;
- noiselessness;
- safety;
- spot heating;
- Possibility of use in open space.
It is not surprising that many people are interested in installing infrared heaters themselves. This process does not require special skills and takes from 25 minutes to an hour and a half.
Preparation
In order for the installation of an infrared heater to go as expected, you must have the following tools:
If necessary, more complex equipment can be used. For example, if you are interested in installing several infrared heaters with your own hands, it is best to use a pyrometer for calculations. It will allow you to determine the warmest and coldest places in the room. Based on the information received, you will select the optimal location for each device.
Safety precautions
There is a set of measures that will prevent accidents both during installation and during operation:
- Do not install IR panels near flammable or explosive objects;
Electrical cables must be laid on a non-combustible base;
The fastener should not touch the heating element;
The height at which the panel should hang is 2.5-3.5 meters;
For a house or apartment, devices with a power of no more than 800 watts are purchased.
The device must not be turned on until installation is complete. The device must have an appropriate degree of protection if the panel is installed in a bathhouse or sauna. If all these rules are followed, the installation of an infrared heater will be quick and easy.
Installation recommendations
When installing infrared heaters with your own hands, the distance between the ceiling and the body must be at least 3 millimeters. In country houses, the panels are taken outside to heat the external space, for example, a summer kitchen. In such cases, to increase efficiency, it is necessary to place thermal insulation material or foil under the housing.
To make the installation of an infrared heater as simple as possible, it is better to place the panel with the connector facing the wall. Most models have self-clamping contacts. The delivery package includes elements for attaching the device to the ceiling.
The installation process includes the following steps:
- remove the device from the packaging and place it on any flat surface with the heating plate down;
- mark the installation location and make several holes;
- screw in the screw rings;
- hang the chains, adjusting the height (if necessary).
Secure the device using mounting hooks or brackets.
As you can see, installing infrared heaters with your own hands is not a particularly difficult process. The panels can also be mounted on the wall, but the heating effect will be significantly less.
Installation of different models of IR heaters:
Network connection
The device is connected to a thermostat, which will maintain the desired temperature. This is done through three terminals: “ground”, “phase” and “zero”. Accordingly, the supply cable must be three-core. As an option, you can use PVA 3x1.5.
The ends of the cable are connected to the terminals. The polarity is indicated on the ends of the wires. After the device is installed and connected, it is advisable to wipe the panel with an alcohol solution before turning it on.
Connecting multiple devices
If you are interested in installing infrared heaters with your own hands in large rooms, then you need to take into account that you will need several devices. To ensure coordinated operation, all panels are connected to one thermostat. This will allow you to effectively regulate the temperature throughout the facility.
Infrared device option 3
Its manufacture requires the use of graphite. In addition to this, you need to prepare:
- A flat box, such as shoe polish.
- Pure river sand.
- Fork.
- Two wires.
- Pliers.
- A sheet of tin with dimensions not exceeding the same characteristics of the box.
The production of an infrared heater includes the following steps:
- Removing cream residue from the box and washing it. It should look like a mirror.
- Grinding graphite and mixing it with sand. Proportions: one to one.
- Place the prepared mixture in a container. Only fill half the box with the mixture.
- Cutting a circle or square from a sheet of tin. The blank must match the shape of the box and be placed in the middle of the box.
- Attaching one of the wires to a tin circle. To do this, use pliers. Next, the sheet metal with pliers is installed.
- Cutting a small hole in the side wall. It is necessary for the wire output.
- Further filling of the box with graphite and sand. The mixture is poured so that a dome-shaped top is formed.
- Blockage of the structure with a lid. The latter is pressed tightly, compressing the graphite with sand. Due to this, excess pressure is formed in the middle.
- Connecting the second wire to the box body.
- Installation of plug or terminals for battery. They are installed at the ends of the wires.
The made IR device is very easy to use and can be suitable for any room. especially for the garage. It is small and installation is very easy. It is able to work for a long time, because there is virtually nothing in it to burn out. Thanks to this, there will be no need for frequent repairs.
To control the IR heater, you need to change the position of the lid. The closer it is to the base, the greater the pressure inside becomes and the more the entire structure heats up. To reduce power, unscrew the lid or lift it higher.
Over time, its contents “sinter.” Therefore the power decreases. A small repair to restore power involves loosening the graphite. You can also shake the heater.
What is warmer, a convector or an infrared heater Infrared electric heater Convective infrared heater Infrared gas heater
Peculiarities
Infrared heaters have a rather interesting operating principle. They heat not the air itself, but objects located around them due to infrared radiation. As a result, they become warm, releasing part of the thermal energy into the atmosphere - the room becomes warm and comfortable. Let's look at the main features of IR heaters:
The most striking drawback of these heaters is the high electricity consumption, which is typical for any, even the most economical electrical appliance.
- Correct heat distribution. If you install traditional radiators indoors, it will be cool near the floors and hot near the ceilings. In the case of IR heaters, the floors will be warm, since they will be heated by IR radiation;
- When installed correctly, they do not cause harm to human health - if this equipment is installed correctly in its normal place, then it will not have a negative effect on the body (in particular, there will be no headaches);
- Fast heating of rooms - they warm up noticeably faster than traditional radiators;
- Almost complete silence - only gas appliances make noise (and even then they are practically inaudible);
- Can work in rooms with high humidity levels;
- Available for use in outdoor conditions, creating a comfortable environment in open areas;
- No negative impact on the environment.
Installing an IR heater in a living room will create a warm atmosphere in which it is pleasant not only to relax, but also to work.
Application area
Such heating devices are characterized by high efficiency rates, as a result of which they almost instantly warm up the room and slowly cool it. These factors indicate greater efficiency of the devices. Because of this, their use in rooms with high ceilings and large heat losses can be considered justified.
The most important feature of IR heaters is that they heat not air, but objects towards which the device’s emitter is directed
In addition, infrared panels are often used to heat civil and agricultural premises. In particular, these are schools, offices, greenhouses, kindergartens, shops, etc. There are also modifications that are designed to heat open areas.
Before purchasing a specific heating device, you should compare the upcoming operating conditions with the technical characteristics. For each specific object, it is advisable to choose certain products:
- Shortwave devices. They are often used in production. This is due to the aggressiveness of the design in operation due to the instantaneous heating of the object due to the temperature increase to hundreds of degrees.
- Long- and medium-wave instruments. They are in demand in private homes, as well as on civilian sites.
From this video you will learn how to install an infrared heater yourself:
Installation of a ceiling IR heater
In general terms, the instructions for installing an infrared film heater on the ceiling are as follows:
Laying insulation
Installation diagram of a ceiling infrared heater
The IR film must be separated from the ceiling structures by a heat-insulating layer at least 5 mm thick. If the heater is not equipped with a reflective screen, then you should choose foil insulation. The method of fastening depends on the material of the ceiling: if it is made of wood, use a construction stapler and staples; if it is made of concrete, the insulation is pressed with strips secured to dowels at intervals of 500 mm.
Heater mounting
This operation is practically no different from the previous one. The IR film is fixed using staples or dowels, depending on the ceiling material. We remind you that the heater is equipped with special strips in which holes can be made for fastening elements.
Electric installation work
Heater connection diagram
To connect the ceiling IR heater, a cable line is pulled separately from the distribution board. For this purpose, you can use single-core wire PV-3. The heater should be connected through a thermostat installed on the wall. Its installation is practically no different from installing a regular socket or switch.
To connect IR heaters with a large area and, accordingly, power consumption, a magnetic contactor must be included in the circuit.
For aesthetic reasons, the main line should be laid in a box or channel made in the building structures.
At the final stage, ceiling infrared heating is tested.
For more efficient operation of heating devices on the balcony, it is recommended to first insulate it. Read our article on how to insulate a balcony with polystyrene foam.
The infrared radiation system is also actively used in “warm floors”. We talked about infrared and other types of heated floors for balconies and loggias on our website.
Is insulation and heating ready? Then it's time to decorate the room, for example, make a winter garden. And what is required for this, read here https://balkonsami.ru/interer/ozelenenie/zimniy-sad-na-balkone-svoimi-rukami.html
Optimal location of the heater
Of course, radiation alone, even from the most powerful heater, cannot guarantee to warm up every corner of the room; you still cannot do without convection. Only warm air moving under the influence of the ventilation flow is able to equalize the temperature and evenly warm the entire room.
Different rooms use their own, most optimal heater installation scheme:
- For a bedroom, the most convenient and effective would be to place the infrared heater at the maximum height above the head of the sofa or bed, so that 2/3 of the surface is located in the shadow of the heat flow;
- For the kitchen and living room, the heater is installed so that the heat flow of infrared radiation is directed to the window sill, the place where cold air flows into the room;
- In hallways and corridors, the heater is installed on the ceiling with the vertical direction of infrared radiation down to the floor. The heat emitter has a truly unique ability to quickly dry the floor and remove drops and residual moisture brought into the room from the street on shoes and outerwear. To avoid damaging shoes, they must be removed from the heat flow of the heater in a timely manner.
In addition, it is necessary to correctly calculate the height of the heater ceiling suspension. For the ceiling in the hallway, the best option would be to place the heater in the center; with a standard ceiling height of 250 cm, only people 170-175 cm tall will feel comfortable under an infrared heater with a power of 700 W.
Therefore, when planning the installation of infrared heaters, you will need to make the ceilings in the hallway 260-270 cm high, or instead of one device, use two low-power 500 W heaters so that it doesn’t get too hot. You can see the features of this installation in the video:
Popular models
In PLEN film heaters, the role of the emitter is played by a screen made of reflective foil (aluminum), which is heated by a resistive element (metal thread) connected to the electrical network. The length of the emitted infrared waves is 9.4 microns. The temperature of the heating element is 40 - 50 degrees, which makes PLEN heaters absolutely safe for people and pets.
Film heater PLEN
The heating element and aluminum foil in PLEN IR heaters are separated from each other by lavsan (the domestic name for polyester) film. The entire structure is enclosed in a shell of the same material. The total thickness of all five layers of the PLEN heater ranges from 1 to 1.5 mm.
The maximum installation height of PLEN heaters on the ceiling is 3 – 3.5 m.
Infrared radiation in heaters of this brand is generated by a thin carbon fiber enclosed in a polymer shell. Peony heaters are low-temperature; depending on the settings on the thermostat, they can heat up to temperatures from 30 to 110 degrees. The maximum power of one heater is 500 W.
Power cord and thermostat with thermostat are included.
The service life declared by the manufacturer is 25 years.
Zebra film heaters are produced on the same production base as PLEN, but using more advanced technologies and materials. Thanks to this, we were able to achieve some improvements:
— the protection class has been increased to IP44 (for PLEN it is IP20), which made it possible to use IR heaters in rooms with high humidity;
— a third grounding wire has been added to the Zebra heater connection diagram;
— a series of “Multivoltage” heaters have been developed, capable of operating under voltage drops of up to 150 V.
Film heater installed on the ceiling
Place and method of connecting the thermostat
As you can see, there is nothing complicated in the connection diagram of the temperature controller: connect the power wire and power to the IR heater to it.
Connecting a thermostat to an infrared heater can be done in a variety of ways. For example, a thermostat can be placed directly in the wall - on one side the electrical network is connected to it, and on the other side the heaters themselves are connected (in the example, “Peony” ceiling infrared heaters are used). Temperature sensors can be built-in or remote. Thanks to remote sensors, more accurate control of room temperature is achieved. They are also used to perform multi-zone monitoring.
The connection diagram of the thermostat to the infrared heater is simple: network - regulator itself - heater. The most ordinary ceiling chandeliers are connected in the same way, only instead of a switch we use a temperature controller. Multichannel regulators have several outputs - one for each heater or group of devices.
General rules for installing IR heaters
It is very important to consider:
Heater power and technical characteristics
If an infrared ceiling heater is hung too low above the work area, it will strongly heat the heads of people in the radiation zone, which will lead not only to overheating, but also to various diseases.
It must be taken into account that during operation the surface of such heaters becomes very hot, so the distance to curtains, curtains, and pieces of furniture should be at least 1 meter.
If the heater is intended to be used in constant operating mode, then its height must be at least 2 meters above the working area.
After completing the installation work, you must make sure that there are no interferences in the radiation path: the devices cannot be covered with anything and there should be no foreign objects nearby.
Working with film: basic principles
It is necessary to install the film, guided by a number of rules:
- The minimum permissible ceiling height is 230 centimeters;
- Before installation, all finishing work must be completed;
- If you plan to install electrical equipment and air duct casings, then the distance between them and the film should be more than 5 centimeters;
- The base on which the material will have to be fixed should not accumulate moisture;
- If the ceiling is adjacent to the attic, then it is first necessary to insulate the room.
[my_custom_ad_shortcode4]