The electrical system in a residential or office space is equipped with sockets for connecting equipment, which are held in place by special socket boxes. There are products designed for mounting in lightweight plasterboard partitions or load-bearing concrete walls. The safety of operation of the electrical outlet depends on the quality of installation of the installation box.
Types of socket boxes
To install sockets or switches in concrete walls, plastic mounting boxes without clamping strips are used. The design of the device provides outputs for wiring and couplings that allow you to assemble several elements into a block.
The end surface has holes for fastening socket or switch mechanisms. Previously, metal boxes were used, but due to problems with fixing the mechanisms, this design was abandoned.
There are special single blocks designed to install a triple socket or a combined block consisting of switches and sockets. The design is characterized by increased bending and torsional rigidity; installation in load-bearing walls and partitions made of plasterboard sheets is allowed.
Socket boxes, regardless of design, are available in a standard form (depth 45 mm) or in an in-depth modification (depth 60 mm). The second option allows you to use the cavity of the socket box to disconnect electrical wiring.
Tools and consumables
A set of tools and materials necessary for installing socket boxes in concrete surfaces:
- electric hammer drill equipped with an SDS Plus or SDS Max chuck;
- a drill designed for drilling walls in concrete (diameter from 5 to 8 mm, length from 60 mm);
- safety glasses and mask;
- chisel and hammer (you can use a special steel blade for a hammer drill);
- bit for drilling concrete surfaces, equipped with an SDS Plus or SDS Max shank;
- a special bit with diamond cutting edges (used for hammerless drilling of concrete surfaces);
- spatula for applying gypsum mixture;
- container for mixing the mixture;
- dry solution (the mass of the substance depends on the expected amount of work);
- drill mixer used when mixing the solution.
It is necessary to install socket boxes after laying the wiring; it is allowed to run an additional cable to the installation site. In concrete walls, cables are laid in channels (grooves) of rectangular cross-section, cut into the wall. To make grooves, a special tool (wall chaser) is used, equipped with a window for removing generated dust with a construction vacuum cleaner.
When laying cables yourself, use a grinder with a diamond working tool. The disadvantage of the equipment is the emission of fine dust into the room.
Soundproofing sockets
For neighboring apartments with exactly the same layout, through sockets are often installed, which are good at dispersing not only noise, but also unpleasant odors. Such holes need to be insulated charmingly. We will tell you how to do this in this section. Often one of three methods is used for this purpose:
- moving a point to another location;
- use of a special insulating substrate;
- Replacing a built-in socket with a surface-mounted one.
The first option is considered rational and the simplest. It is realized by itself when organizing repair work, when the owner independently equips the equipment for his convenience.
A special insulating substrate is purchased from electricians, but for its installation they coordinate the work schedule with their neighbors and, if possible, carry out the same insulation work on their part for more reliable protection from noise.
After installing the insulation, you can also take care of installing another design of the socket housing - the overhead. This option will create another soundproofing layer.
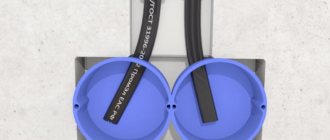
Double surface-mounted socket with improved sound insulation Source drive2.com
Preparing the solution
Since it is necessary to quickly fix the socket in a concrete wall, gypsum or alabaster-based mixtures are used for fastening. A pure gypsum solution hardens in 3-5 minutes, which requires constant mixing of small portions of the mixture and regular cleaning of the container from the hardened material.
To increase the shelf life of the solution, use a mixture consisting of 3 parts gypsum and 2 parts Knauf Rotband gypsum plaster or equivalent. It is not recommended to use pure plaster due to the reduced mechanical strength of the hardened material.
The solution is mixed in a 3-4 liter container made of elastic material. To dissolve the powder in water, use a mixer clamped in the chuck of a drill or hammer drill (in non-stress mode). Before mixing the batch mixtures, the container is cleared of any remaining solidified solution.
Installation of socket boxes
The owner can install a socket in a concrete wall himself or by contacting organizations involved in the construction and finishing of residential premises. Specialists will help you lay electrical cables, install junction boxes, sockets and switches.
The cost of the work depends on the location of the residential or office space, for example, in Moscow, installing one outlet in a wall made of cast concrete will cost 600-700 rubles. (without cable laying and wall finishing).
When installing it yourself, the owner of the premises will need to prepare a tool and complete 3 steps:
- mark the walls in the area of intended installation;
- drill mounting holes in the required quantity;
- secure the socket boxes in the holes;
- complete the final finishing of the wall surface;
- mount mechanisms and connect power cables;
- install the outer cover and then test the operation of the devices.
Marking
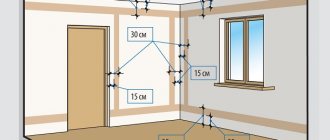
Installing socket boxes in a concrete wall begins with determining the location of the products. Horizontal and vertical lines are drawn on the surface of the wall, allowing you to find the center of installation of the box.
If you plan to install a module or several separate switching nodes, then the distance between the axes is maintained in the range from 70 to 72 mm (depending on the product manufacturer). To determine the dimensions of the module, it is recommended to assemble the plastic boxes into a single block and then check that the markings are correct.
Making holes
To install a socket box in a concrete wall, you need to make a hole with a diamond crown, which is installed in the hammer drill chuck. The diameter of the channel is 70-75 mm, the depth of the hole depends on the type of installation box. In order to reduce tool costs, it is possible to make a hole using a drill.
Holes are drilled around the perimeter of the future landing socket, the central part is knocked out with a chisel. The depth of the hole should ensure that the socket box fits flush with the wall surface (taking into account the plaster layer).
Installation of boxes
Installing a socket box in concrete begins with making a pattern that allows you to maintain the correct position of the block of mounting boxes or adjacent elements. The pattern is made from a piece of metal profile for drywall, the length of the element exceeds the dimensions of the module.
The socket boxes, assembled into a block, are screwed to the guide strip with standard screws. Then the structure is placed in the previously made hole to check the parallelism of the surface of the end of the socket box and the wall.
Before fixing the socket box in a concrete wall, it is necessary to treat the holes with a primer that removes dust particles and improves the adhesion of building materials. To fix the parts, gypsum mortar or similar materials are used. The material is introduced into the channels with a spatula, and then the pattern with the assembled module is inserted. Excess mixture is squeezed into the gap between the side walls of the socket box and the walls of the channel.
The power cable is inserted through the technological hole in the box and laid inside in a coil. After aligning the unit horizontally, the cracks are sealed with fixing material.
The solution is rubbed into the gaps with a spatula until air voids are removed; after final filling, the position of the elements is checked using a hydraulic level. The pattern is fixed with spacer wedges or screws, which are screwed into dowels (pre-installed in the concrete surface).
What should you pay attention to?
Before you carry out the installation, be sure to select the type of electrical outlet that you will use. The modern market is ready to offer you the following types of glasses for sockets and switches:
Plastic structures that do not have presser feet. This type must be used in a concrete or brick wall.
Socket box with presser feet. This type of construction is perfect for drywall or plastic panels.
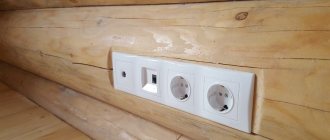
Metal structures with and without bottom. Previously, these structures were used in old houses. Today, these structures can be used to conduct wiring in a wooden house. In the PUE rules you can find information that installation of sockets and switches in wood can only be done using metal socket boxes.
If you have already decided on the type of structure you plan to choose, then begin the preparatory work.
Installation in high-strength concrete with reinforcement
Property owners often have a question about how to install socket boxes in a concrete wall reinforced with steel rods. Then the surface is marked, holes are drilled along the contour of the socket box with a drill, an additional channel marks the center of installation of the box. Then a diamond bit is installed in the perforator, with which the canal hole is drilled.
If steel reinforcement gets in the way of the tool, it is possible to cut the element with a crown. To do this, the hammer drill is switched to shockless operation mode, the diamond working edges will cut off the reinforcement made of mild steel.
It is allowed to destroy the rod using a metal drill or cutting disc mounted on a grinder. The further installation procedure does not differ from the method of installing products in standard concrete surfaces.
Alternative Hole Creation Methods
It can often happen that you simply don’t have a crown at hand, and buying it may not be very rational. In this case, you can make a hole for the socket box in other ways.
So, a grinder with a disc for concrete is perfect for these purposes. With its help, a rectangular niche is cut out according to the markings, which, after installing the glass, is filled with plaster or alabaster, and then carefully plastered.
Another, rather ancient method is to gouge out a hole using a chisel or spatula installed in a hammer drill. The process is extremely complex and energy-intensive, but the result obtained is quite satisfactory.
Common mistakes
Common mistakes made when installing socket boxes:
- Installation of socket boxes before the walls are finished, which makes subsequent leveling of the surfaces difficult. When installing parts that are skewed, you will have to remove the mounted boxes and then seal the parts again. An additional layer of plaster reduces the likelihood of contact between the crown and the reinforcement during drilling.
- Installation of socket mechanisms in walls without transition elements. This installation method is strictly prohibited, since it does not provide insulation of the wall material from the power cables.
- Horizontal skew of the socket block and erroneous determination of the distance between the centers of the mounting boxes. Incorrect positioning leads to the formation of gaps between the wall surface and the decorative frame of the socket module.
- It is prohibited to use foam for fixing socket boxes, since the material does not meet fire safety requirements. There are non-flammable foams of class B1, but the strength of the material is inferior to gypsum or alabaster mixtures.
Additional video instruction
Having sufficiently admired the result of your labor, you can begin connecting the socket mechanism. It can be secured in the socket box either using sliding legs or with simple screws, for screwing which there are threaded holes on the walls of the box. Inexperienced home electricians are better off using screws, because... The fixation with the paws is not very reliable and can disappoint due to the azimuthal misalignment. This means we’ll attach it with screws, close it with a decorative cover on top, and we’ll be happy to use the electrical point we installed ourselves.
Do-it-yourself installation of plastic windows - step-by-step installation technology in photographs
Gas stoves for baths: learning to choose the right ones + rules for self-installation
Installing an electricity meter: rules and subtleties of electrical installation
Should socket boxes be installed before or after plastering?
It is easier to install installation boxes in already plastered surfaces in which electrical cables are laid. If you install products in rooms with a rough finish, then it is necessary to take into account the layer of plaster. Before installing sockets in a concrete wall without plaster, it is necessary to install guide beacons. Then the holes are marked and drilled to the required depth.
The template plate is installed along the beacons, and then the gap between the walls of the hole and the socket box is filled with a solution. Correction of the horizontal position of the block is carried out using a hydraulic level.
It is recommended to deepen the mounting boxes by 1-2 mm relative to the future surface of the plastered wall, which simplifies the application of the finishing material. The leveled block of socket boxes and the pattern are fixed with spacer wedges, which are removed after the solution has hardened.
After the mortar has hardened and additional finishing work has been completed, the walls of the room are plastered. Excess mixture that gets into the cavity of the socket box is removed after the material has dried. Then a mechanism is installed in the box, which is connected to the power cables.