Gone are the days when electricity bills were calculated based on the power of lighting equipment and other electrical equipment located in the room. Currently, the presence of an electrical energy meter is a prerequisite for connecting a consumer to general power supply networks. Modern electricity meters allow you to accurately determine the amount of electricity consumed and calculate fees for its use.
But sometimes these reliable devices completely fail and must be replaced. In this case, you need to connect a new device that records the amount of kW/hours of electricity consumed. Replacing an electric meter is not a very difficult operation, but if you don’t understand anything about electrical engineering, then contact a specialist electrician to avoid irreparable mistakes. If you decide to install an electric meter with your own hands, you should choose a reliable device and carefully study the connection diagram of the device in the electrical panel.
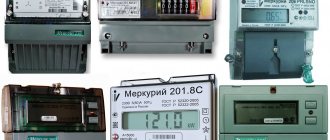
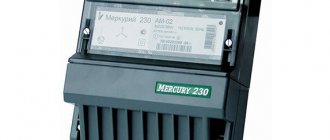
The most popular electricity metering devices on the market are devices from. These include single-phase electricity meters Mercury 201 and three-phase electricity meters Mercury 230. They have high accuracy, reliability, resistance to overloads, low energy consumption and a long service life. In this article we will consider the following issues: connection diagram for a Mercury meter, both single-phase and three-phase, as well as how to connect a Mercury 201 meter.
Attention! Single-phase electricity meters of the Mercury brand are an excellent replacement for completely outdated, both morally and technologically, electricity metering devices with rotating disks.
Basic requirements for Mercury 201 meters
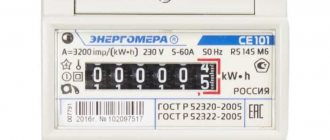
Electric meter Mercury 201
When purchasing a meter, you need to take into account that no more than a year has passed since the date of release (this is taken as the date of initial verification) in the case of devices with two phases and a maximum of 2 years if a single-phase device is selected. The device must have a seal with the release date stamped on it - its presence is necessary for warranty service.
The meter body must also contain a holographic sticker confirming the authenticity of the product and a government verifier’s stamp indicating that the product meets the specified accuracy category.
Specifications
Technical characteristics of the Mercury 201 meter
Device service life
The electric meter has a standard service life of 30 years. During the first 36 months of operation, it is possible to replace the device or repair it under warranty if it turns out that there is a malfunction associated with a manufacturing defect. The warranty does not cover cases of abuse or incorrect connection. The warranty may extend up to 42 weeks from the date of manufacture if the device has not been connected for some time.
Calibration interval
When purchasing a device, you must make sure that there is a record in the passport documentation confirming the verification of the product at the factory after manufacture. After installation, verification must be carried out regularly with a verification interval of 16 years. The completion of this work is confirmed by the entry of the employee who checked the device in the product passport.
Meter cost
The meter has an affordable price. It can be purchased for 660 rubles or more if a larger price is set by the seller. The device is offered in specialized stores or ordered online.
Replacing the electric meter
To replace the previous device with a “Mercury”, the consumer of electricity services must send a request to the HOA branch of his city about the requirements for meters (including regarding the accuracy class). Having received this data, he buys a suitable device.
Before dismantling the old meter, you must contact the authority again, arranging a meeting with an inspector, whose task will be to attest to the integrity of the seal. If a consumer removes the meter without this procedure, he may be charged with theft of electricity and be fined.
The inspector will look at the seal, draw up a report on the dismantling of the old device and set a tariff for the consumer based on data on electricity consumption over the past months.
Before installing and connecting the meter, you will need to de-energize the power line if the switch is located behind the device, or turn off the input circuit breaker.
Advantages and disadvantages
When producing the model line of Mercury brand meters, the practices of other developers were taken into account. The tasks were set to manufacture a device characterized by high accuracy and reliability, with the latest element base, low cost, with developed functionality, meeting all requirements.
At the end of the study, the device was improved. The Mercury electric meter is distinguished by its circuit design and has maximum functionality. This was achieved thanks to the use of imported components from leading manufacturers.
The technical potential of the energy metering system at a separate cost guides the correct consumption of electricity. During the period of maximum use, which occurs in the morning and evening hours, the tariff per kilowatt-hour of electricity is noticeably higher, while at night the cost is several times lower.
However, in practice, the number of people who have switched to energy metering at tariffs is not so large. What is the reluctance of consumers to switch to the latest technical equipment? Experts highlight several points:
- the fairly low cost of electricity, which for some time restrains Russians from spending on modern devices;
- not all citizens want to change their daily routine and use electrical appliances with more power (for example, a washing machine) at night;
- not every production benefits from switching to night shifts;
- Certain groups of the population experience difficulty in taking readings from the meter according to tariffs.
Despite some disadvantages, the advantages of switching to multi-tariff electronic electricity metering devices are beyond doubt.
Connection Mercury 201
Connecting a meter
There are 2 ways to connect a Mercury 201 meter, differing in its position relative to the machine from which electricity is supplied to the network. Electrical installation rules stipulate that the meter must be connected after the machine. However, energy sales companies allow its use only if it is possible to seal the automatic device. If this procedure cannot be carried out, a meter is connected in front of the machine. Then the input wire will be connected to the device. To do this, you need to contact the HOA with a request to turn off the current on the line.
Sequence of actions for direct connection of the device:
- take it out of the box and unscrew the screws holding the terminal block panel;
- strip the insulating material at the ends of the connected wires by 1 cm;
- connect them to the required clamps and tighten the screws;
- remove the plugs from the panel - in their place there will be holes for wiring;
- put the panel in place;
- the inspector performs sealing;
- power is supplied to the line - if the operations are performed correctly, a scarlet diode on the front of the device will light up.
Products with three phases - Mercury 230 - are installed in the same way if the total load power does not exceed 60 kW. If it exceeds this figure, use a modification of the circuit that includes a step-down transformer.
Features in design
By design, the Mercury 201 counter of any series has the same housing. This is a rectangular plastic case. This counter is screwless, making it maximally protected from break-ins, and the mechanism is quite sealed.
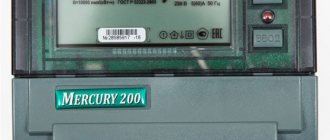
In the foreground (on the front panel) there is a liquid crystal (LCD) display, which displays the necessary information on electricity calculations. Near the LCD display (on the right side) the main technical characteristics are indicated.
The design dimensions are compact and convenient and are: 105 * 105 * 65 mm, where 105 is the width and height of the device, and 65 is its depth. On average, the weight of the device ranges from 250 to 350 grams, depending on the series. Due to this size and weight, the mechanism can be attached to a surface without modification of additional fasteners. The meter is attached to the wall (or to any other surface that the consumer chooses) using a DIN rail.
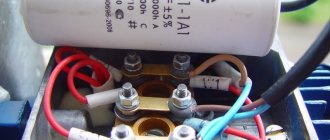
The bottom panel in the mechanism is removable. Its purpose is to protect the contacts of the device. That is, if you remove it, access to the input electrical contacts of the device will be open. The connection itself to such contacts is carried out using a screw connection, as shown in the photo below:
Some basic technical characteristics make the meter more convenient to use. For example, the accuracy class has a technological margin, and thanks to the use of a shunt in the circuit, the direct current component can be accurately measured.
The figure below shows the overall dimensions (drawing) of the Mercury 201 device.
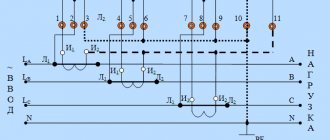
Connection diagram
You can find a connection diagram with other network elements in the device’s operating instructions or use one found on the Internet. There are two types of connecting devices - direct and using a current transformer. The first option is used to connect any of the two types of devices (both single- and three-phase), the second - for a device with three phases with a load of 60 kW and above.
In the case of using a direct connection diagram for the Mercury 201 electric meter, the device is connected directly to the main transmission line. The semi-indirect circuit with transformers assumes that there are a large number of electrical appliances in the house that create very high voltage in the network. The current transforming device used in this circuit uses a phase wire as the primary winding. There are a number of additional requirements for installing meters according to this scheme. The appropriate regulations can be obtained by contacting the HOA.
Connection diagram for four terminals with circuit breakers
Here the points are connected to each other in the following order (from left to right): first, connect the phase wiring from the external network, then the phase to the load going to the apartment or private building. After this, the neutrals are connected in the same way - first from the external network, then to the load cable.
Meter installation
Installation and connection of the device must be carried out by a qualified specialist. It is necessary to first submit an application to the energy supply company, since in the case of self-connection there may be problems with official commissioning.
The connection diagram is quite simple and does not require the use of additional devices:
Connection diagram for MERCURY 200 meters to a 230 V network
This energy meter model is a reliable and durable device that meets the necessary standards required by domestic legislation.
Four checks of E.M. 201 for the correctness of the readings
After installing the meter, it is necessary to check the correctness of its connection and operation by conducting a series of test activities aimed at recording significant indicators of its functioning.
First check - correct connection
At this stage, a comparison is made with the diagram that the user was guided by when installing the product. Devices of the Mercury series are capable of operating correctly when changing the positions of zero and phase, but electrical safety rules require strict adherence to the installation sequence presented in the standard diagram.
Second check - self-propelled
To carry out this verification stage, you will need to first create a situation of complete absence of electricity consumption in the apartment. To do this, it is necessary to turn off all automatic switches located below the electric meter and supplying lighting fixtures and sockets. If there are no separate switches in the network, the cords of all household electrical appliances and extension cords are pulled out of the sockets, and the light switches are set to inactive mode.
A quarter of an hour after turning off all devices, you need to evaluate the functioning of the electric meter - if it is working properly, the roller on the counting mechanism should stop, and the light on the front of the device should not blink. The permissible maximum is a single blink or the counter turns once every 5-10 minutes.
If the roller rotates or blinks, the check is considered failed. Then a laboratory test of the meter's functionality is required.
Third check – measurement error
Measurement error formula
Here the error of the electricity meter is calculated. You will need to prepare a mobile phone with a stopwatch and a calculator (or these devices themselves separately), an electronic multimeter and an incandescent lamp as a load device. It is not recommended to use household appliances, since practical values when operating devices may differ from those indicated in the data sheets, creating additional errors, sometimes significant.
Sequence of actions during verification:
- Measure the voltage in the outlet with a multimeter.
- Place the device in current measurement mode, connect it to the lamp, and measure the value of the indicator.
- The real power and resistance of the lamp are calculated - for the first case, you need to multiply the two indicators obtained above, for the second, divide the voltage by the current.
- While continuing to keep the lamp plugged in, calculate the time it takes for the roller to make 10 revolutions (at a stable voltage), and write down this time in seconds.
- For calculations, record the instrument constant indicated on the front of the housing.
- Find the actual electricity consumption: square the power and then divide by the resistance.
- Multiply the figure from the previous calculation by the number of seconds and divide by 3600 (the number of seconds in an hour) - the unit of measurement of the resulting value will be watt-hour.
- 1000 is multiplied by the number of revolutions (in this case 10) and divided by the counter constant.
Now the actual error is calculated. From the figure obtained in the penultimate paragraph, subtract the one found in the last one, divide this number by the last digit and multiply by 100. The result obtained is expressed as a percentage (for example, -5%). A deviation of up to 10% in one direction or the other is considered acceptable.
The fourth check is for magnetization
This test is very simple: bring a thin sewing needle to the front panel of the device. If it attracts, it indicates magnetization. If a few days after removing the magnet it does not resolve on its own, you will need to purchase a demagnetizing device.
When installing Mercury meters operating on one or three phases, the correct connection in accordance with the established diagram is crucial. After this, you will need to check the functioning, independence of the device and measure the error obtained during the operation of the electric meter.
Features in design
The Mercury electricity consumption meter has the following characteristic features:
- screwless version. Thanks to this, the device cannot be hacked;
- Possibility of operation in any polarity. Old induction meters (with a rotating disk) could be “tricked” by switching the phase and neutral positions. “Mercury” in this case will still work properly;
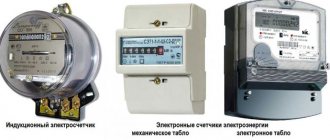
- two ways to display information.
According to the last characteristic, counters are divided into:
- electronic (Mercury 201.2, 201.4, 201.8): data is displayed on a liquid crystal display, there is a function for transmitting readings via a wired network;
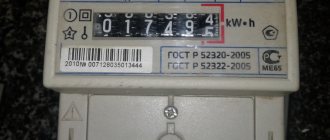
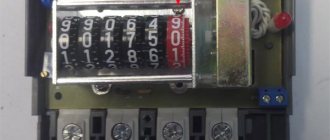
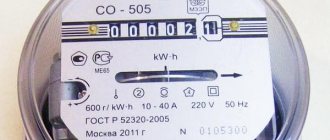
- electromechanical (Mercury 201.5, 201.6, 201.7): the scoreboard is made in the form of several rotating rings with printed numbers (reading device).
In an electromechanical reading device, the last ring is painted red and displays tenths of a kilowatt-hour. Mercury has a wide range of operating temperatures. This allows meters to be installed outside, provided there is a protective canopy.
Electronic electricity meter Mercury 201.2
Electric meters of this brand are produced in single-phase and three-phase versions. The first group includes counters of the Mercury 201 series, the second - Mercury 230. According to the accuracy class, the device has a technological reserve. Its circuit contains a shunt that allows you to accurately measure the direct current component.
The device is equipped with a plastic case with dimensions of 105x105x65 mm (the latter is depth). Weight - from 250 to 350 g (depending on the model). Fasteners - for DIN rail installation. The terminal block contains 4 screw terminals (single phase model) and is protected by a removable cover. The digital display is located on the front panel on the left; technical specifications are also displayed on the right.
In addition to the basic components - a mechanism for metering electricity consumption, a terminal block and an indicator - the Mercury meter contains:
- optocoupler - pulse output (telemetry);
- built-in memory. Meter readings are regularly recorded here automatically;
- optical port An “electronic button” function is provided;
- microprocessor;
- PLC modem. Allows you to connect the meter to an information-measuring system (remote monitoring of readings) with a wired network.
It is important for a potential buyer to know about the disadvantages of Mercury electricity meters:
- relatively large dimensions. For comparison: the width of the CE101-R5 counter with the same parameters and price is 89 mm, the Neva 103 counter from, also similar, is 78 mm. Due to the large width, you have to purchase a larger shield, and therefore more expensive. It is especially difficult to install a multi-tariff meter from this): you have to cut out a window in the panel;
- inaccessibility of the place for filling. According to user reviews, sometimes you have to independently widen the hole for the wire or fishing line of the seal.
"Mercury" has a simple design. If installation is planned in an apartment, many prefer more stylish models.
Life time
Regardless of the modification, the device serves properly for 30 years. The only condition for this is proper operation and absence of aggressive environmental influences. The manufacturer guarantees proper operation for 6 years and states in the technical documentation that the device will serve for 150,000 hours. It is worth noting that the service life will depend on quality maintenance.
Note! In addition to the usual, servicing by an accredited company or manufacturer is required. Verification must be carried out every 16 years
Long service life is the main advantage of the equipment
Mercury 201 is a functional device, thanks to which you can quickly and correctly read electricity consumption readings. Available in different modifications and has a long service life. It is easy to connect it in your home using the supplied circuit diagram. If desired, you can use professional help.
Safety precautions
In order for the installation and operation of the Mercury 201 device to proceed without any problems or injuries, basic safety precautions must be observed. These simple measures will help avoid equipment breakdowns and reduce the likelihood of electric shock.
You may be interested in this Description of the electrical circuit diagram with an example
The most important safety instructions:
- Before you start using the electric meter, you must read the operating documentation.
- Any installation, repair or maintenance activities should be carried out only when the network is disconnected.
- During operation of the device, you need to monitor the maximum permissible values of current and voltage in the network.
- It is not recommended to install the device in places where fuels, lubricants and flammable items are stored.
- Self-installation can only be carried out if you have sufficient experience in such work. Otherwise, it is better to entrust this matter to professional electricians.
- The height of mounting the meter on the wall should be such that the device is out of reach of small children and pets.
The single-phase electricity meter Mercury 201 is a high-quality device that allows you to obtain accurate information about the amount of electricity used. If you install it correctly and follow all the recommendations of professionals, you can significantly speed up the process and avoid any problems.