A kitchen hob is the simplest unit that is in everyday use by the widest masses of the population.
Ease of control and compactness are a definite advantage over household stoves. But the hob, like any technical device, consists of complex electrical components and gas components. During its operation, a sufficient number of errors occur, which will inevitably lead to malfunction. What to do if the hob breaks and stops turning on? Contact service specialists and order repairs at home. Employees will respond to the owner’s request and repair the hob on the day the request is received. Hob repairs are carried out by qualified craftsmen with many years of experience, so we will remotely determine the cause of the breakdown and the cost of the parts over the phone. For residents of Moscow and the Moscow region, we offer the following terms of cooperation:
- Free diagnostics when paying the minimum price for repairs.
- Free call to a technician on the same day - up to 15 km from the Moscow Ring Road .
- Certified spare parts for repairs from official dealers.
- Warranty for hob repairs up to 1 year .
- Calculation of the cost of services over the phone - a specialist answers the calls.
We offer remote service of the glass-ceramic panel without transportation to the workshop, namely: annual maintenance after 10 years of operation; commissioning work after installation and installation of a new one; search and elimination of gas and electricity leaks on the body; We will repair a hob from any manufacturer, regardless of the complexity of the breakdown .
Disabling the necessary communications of the hob for dismantling
In order to dismantle the gas panel equipment, it is necessary to carry out a number of manipulations with the gas supply shut-off valves. If gas is supplied from underground or external gas distribution networks, the ball valve at the entrance to the living space is closed.
If there is no access to the gas tap, an application is submitted to a specialized gas service to suspend the fuel supply.
When using a cylinder gas supply system (propane, butane, isobutane), you need to turn the valve to the “Closed” position. Then unscrew the gas hose from the panel to avoid the appearance of static voltage, install an equalizing jumper between the panel and the gas supply hose.
Dismantling a Bosch brand electric induction surface requires more careful adherence to safety regulations. Disconnect the panel from the power supply by removing the plug from the socket. Then use the “Network” indicator to make sure that the signal lamp is not lit, this means that the equipment is completely de-energized.
Burners do not work after turning on the oven
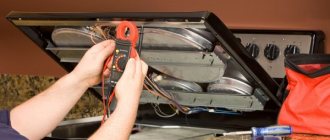
More often this happens due to problems within the circuit: closed or, on the contrary, broken contacts. The latter are concentrated in the distribution box, which is located on the back side of most models.
It is necessary to inspect the wires for physical damage and oxidation of contacts. If the end of the cable is charred, you can try to clean it by cutting off the problem area. The terminals and contact points also need to be treated with sandpaper to get rid of any oxide that has appeared.
Mechanical dismantling: rules and technology
A set of necessary tools for dismantling:
- screwdriver “+”;
- pliers;
- side cutters;
- wrench 8*10;
- gas key.
Special tool for dismantling
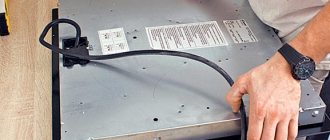
First of all, use a screwdriver to loosen the fastening of the surface with the table top of the kitchen module. If the wire is laid permanently (for electrical panels), the terminal box is disassembled and the supply wires are disconnected. The grounding conductor from the device body is disconnected last.
Then the mounting screws are completely unscrewed and removed from the tabletop. Removal of the hob is considered complete.
Dismantling the gas cooking structure is carried out in the same way. In order to stop the supply of natural gas to the surface, it is necessary to close all fittings and visually ensure that the handles of taps and valves are in the “closed” position. Next, loosen the clamp and install the standard plug on the hose.
Correct removal of the hob
So what is the correct way to remove the hob from the countertop? In order to properly remove the gas surface, it is worth considering the entire process in detail:
- the first step is to find the centering screws that hold the entire structure;
- then the screws on the centering screws are unscrewed;
- after this you need to find the corner mounting hooks. The screws on them are unscrewed, but the main thing is not completely, they must remain in place;
- the hooks will be loosened, so the product can be easily pulled out through the hole in the tabletop;
- After the structure is removed, you can begin installing another new device. If it has not yet been selected, then it is worth choosing it correctly;
- if you have already purchased a new hob, and it does not fit the size of the hole in the table, then cut a new one using a file;
- Next, another panel is installed in place in the countertop.
Glass panels must be removed by specialists
When replacement is required
The hob is dismantled in the following cases:
- the device has expired its service life and is out of order - such equipment cannot be repaired, it is replaced with a new one;
- when cracks appear on the surface of the glass, it is unsafe to use such a device;
- if problems occur in the operation of the stove - in this case, the panel is dismantled to carry out repairs or replace faulty elements;
- when there are no problems with the stove, but there is a need to replace the countertop.
Dismantle the hob yourself or hire specialists.
Important nuances
Before purchasing and installing a new hob, find out the cause of the breakdown of the old appliance.
It happens that the reason is not the device itself, but an incorrect connection or operating errors. For example, when a powerful panel is connected to the network through a regular 16A socket, which cannot withstand it and burns out.
Also, before purchasing a new device, pay attention to the dimensions of the mounting hole cut into the countertop for the old panel. Measurements are taken even when purchasing a similar model to replace a broken one. Manufacturers often make changes to the design of the device and the new panel may not fit in size.
Safety precautions when dismantling heating surfaces
When removing the hob, be sure to do everything correctly. During this process, you must follow the safety precautions listed below:
- operation of a built-in electrical appliance involves only cooking and heating food;
- It is prohibited to use the induction panel for defrosting and cooking food packaged in metallized packaging;
- Full protection from contact with live elements is ensured by compliance with current electrical safety standards;
- if the device does not work correctly or operates with deviations from the specified parameters in the factory instructions, contact the service center;
- if cracks, chips, or crevices appear on your hob, you must turn off the power to the device to avoid electric shock;
- During the cooking process, dishes and burners become very hot, it is necessary to limit access to the device for small children and ensure complete safety in relation to thermal and electrical burns;
- Contact of the electrical cable with the hob is strictly prohibited;
- It is not recommended to place any flammable or combustible materials on the surface of the cooking structure, as this may lead to a fire;
- It is also prohibited to remove blockages and contamination with alcohol-containing liquids;
- It is prohibited to repair equipment independently or by persons who do not have a special license to perform this type of work.
Impeccable design
SMEG products are made in Italy from durable and environmentally friendly materials. Bright, memorable design is a characteristic feature of premium technology. Hobs are produced within several design collections: Coloniale, Cortina, Linea, Classica, Victoria, Dolce Stil Novo. The variety of colors is impressive, the following colors are available: white, black, silver, stainless steel, cream, copper, anthracite, oats, brass. The most demanding client will be able to choose the ideal option for any classic or modern interior.
The collaboration of Italian brand specialists with outstanding contemporary designers and other companies has resulted in the creation of exclusive products. The line of retro equipment “50s style” has become the hallmark of the brand, recognizable and revered all over the world. In collaboration with a famous car manufacturer, the SMEG Fiat 500 designer minibar was created, available in different colors.
The result of the collaboration with Dolce&Gabbana was a special series of Art refrigerators (more than 100 models), as well as the one-of-a-kind collections Divina cucina and Sicily is my love.
In what cases is a built-in hob removed?
The built-in panel is usually removed in the following cases:
- The gas burner does not burn or the flame is weak - the reason is insufficient oxygen supply or excess carbon. Eliminated by disassembling the burner unit, the air ducts are cleaned, which provide the flame with a sufficient flow of oxygen;
Disassembling and cleaning the gas divider
Dismantling a built-in hob is not difficult. In the case of a gas cooking structure, it is extremely difficult to do without the involvement of qualified personnel, because all safety measures of SNiP, PPB and electrical safety rules must be observed.
Modern manufacturers offer more and more advanced gas and electric models of hobs. As a result, there is a need to replace the failed panel with a new, more modernized one. To do this, it is necessary to dismantle the old surface. Having certain skills in the field of electrical engineering and gasification, the installation can be done with your own hands.
Removing a panel from a kitchen countertop
Premium cooktops and ranges
If you are just selecting kitchen appliances, pay attention to SMEG brand products. The corresponding section of our website presents ultra-modern surfaces with gas, electric and induction burners (heating zones can be from 1 to 6). High-quality materials are used to cover the desktop: enameled steel, tempered glass and glass ceramics. There are models with touch and mechanical controls (rotary switches).
You can choose a hob of any size: 30, 45, 60, 75 or 90 cm wide. Many devices are equipped with a WOK burner, which allows you to cook traditional Asian dishes. Induction surfaces with integrated hood (installed in the center of the desktop) are available for order. Multifunctional cooking centers (for example, models TR4110BL1 and CPF9GPR) have high performance and a lot of additional options. Even professional chefs will appreciate their capabilities.
Disabling the necessary communications of the hob for dismantling
In order to dismantle the gas panel equipment, it is necessary to carry out a number of manipulations with the gas supply shut-off valves. If gas is supplied from underground or external gas distribution networks, the ball valve at the entrance to the living space is closed.
If there is no access to the gas tap, an application is submitted to a specialized gas service to suspend the fuel supply.
When using a cylinder gas supply system (propane, butane, isobutane), you need to turn the valve to the “Closed” position. Then unscrew the gas hose from the panel to avoid the appearance of static voltage, install an equalizing jumper between the panel and the gas supply hose.
Dismantling a Bosch brand electric induction surface requires more careful adherence to safety regulations. Disconnect the panel from the power supply by removing the plug from the socket. Then use the “Network” indicator to make sure that the signal lamp is not lit, this means that the equipment is completely de-energized.
Mechanical dismantling: rules and technology
A set of necessary tools for dismantling:
- screwdriver “+”;
- pliers;
- side cutters;
- wrench 8*10;
- gas key.
Special tool for dismantling
First of all, use a screwdriver to loosen the fastening of the surface with the table top of the kitchen module. If the wire is laid permanently (for electrical panels), the terminal box is disassembled and the supply wires are disconnected. The grounding conductor from the device body is disconnected last.
Then the mounting screws are completely unscrewed and removed from the tabletop. Removal of the hob is considered complete.
Dismantling the gas cooking structure is carried out in the same way. In order to stop the supply of natural gas to the surface, it is necessary to close all fittings and visually ensure that the handles of taps and valves are in the “closed” position. Next, loosen the clamp and install the standard plug on the hose.
Correct removal of the hob
So what is the correct way to remove the hob from the countertop? In order to properly remove the gas surface, it is worth considering the entire process in detail:
- the first step is to find the centering screws that hold the entire structure;
- then the screws on the centering screws are unscrewed;
- after this you need to find the corner mounting hooks. The screws on them are unscrewed, but the main thing is not completely, they must remain in place;
- the hooks will be loosened, so the product can be easily pulled out through the hole in the tabletop;
- After the structure is removed, you can begin installing another new device. If it has not yet been selected, then it is worth choosing it correctly;
- if you have already purchased a new hob, and it does not fit the size of the hole in the table, then cut a new one using a file;
- Next, another panel is installed in place in the countertop.
Glass panels must be removed by specialists
Possible difficulties
Owners of private houses are lucky in this regard: they can install any equipment, as long as they do not exceed the permissible power consumption of electricity. But replacing a gas surface with an electric one in a high-rise apartment is much more difficult. The problem is that the presence of gas appliances is recorded in a number of official documents, including the apartment plan and the registration certificate of the house. Therefore, to legally change equipment, you need to obtain permission from the relevant structures. For example, dismantling of an old slab can only begin after agreement with the fire service of the Ministry of Emergency Situations.
Safety precautions when dismantling heating surfaces
When removing the hob, be sure to do everything correctly. During this process, you must follow the safety precautions listed below:
- operation of a built-in electrical appliance involves only cooking and heating food;
- It is prohibited to use the induction panel for defrosting and cooking food packaged in metallized packaging;
- Full protection from contact with live elements is ensured by compliance with current electrical safety standards;
- if the device does not work correctly or operates with deviations from the specified parameters in the factory instructions, contact the service center;
- if cracks, chips, or crevices appear on your hob, you must turn off the power to the device to avoid electric shock;
- During the cooking process, dishes and burners become very hot, it is necessary to limit access to the device for small children and ensure complete safety in relation to thermal and electrical burns;
- Contact of the electrical cable with the hob is strictly prohibited;
- It is not recommended to place any flammable or combustible materials on the surface of the cooking structure, as this may lead to a fire;
- It is also prohibited to remove blockages and contamination with alcohol-containing liquids;
- It is prohibited to repair equipment independently or by persons who do not have a special license to perform this type of work.
Design and main components of an electric stove
The electric stove looks very impressive - it is a complex household appliance, but its design is quite simple, and all the main working elements are located in a special heat-resistant case, which is made of stainless steel.
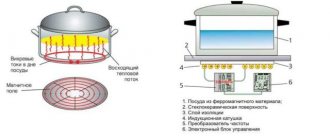
The operating principle is similar to all electrical household appliances: current passing through heating elements (heating elements) heats them to a given temperature. The stove has several burners on the hob, and their number varies: a minimum of two, and the standard is 4 pieces.
The structure of the burners is quite diverse. The classics are burners on an enamel hob with heating elements inside, modern ones are solid ceramic surfaces with various types of heaters built into them. Let's look at the main types of burners.
- Old domestic versions are equipped with cast iron products; they heat up slowly and also cool down, creating a steam effect in the kitchen, but they are resistant to moisture and high temperatures.
- Tubular spirals - they are made of a hollow tube; when heated, such devices not only give off heat, but also promote the circulation of warm air inside their body, which significantly increases their efficiency. These products are very difficult to repair yourself.
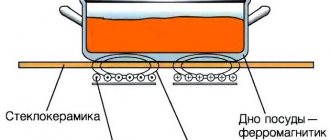
- Ceramic burners are very simple in design, they are easy to repair at home - a nichrome spiral is placed in special cells in a circle and secured. Modern models increasingly use glass-ceramic solid plates - they are more durable and easy to clean.
- Halogen devices are special burners with a similar emitter that are installed in different places on the hob. A stove with such burners provides fast heating, in a second, and low energy consumption, so they are the most economical, but only professional craftsmen can carry out repairs.
All models of modern stoves use a special cross-section power wire to transmit current to the burners; in addition, they are connected to regulators and thermostats, ensuring their protection from overheating.
In different models, the heating level is controlled in different ways: by manually changing the cooking mode or by special timers and alarms that monitor.
In what cases is a built-in hob removed?
The built-in panel is usually removed in the following cases:
- The gas burner does not burn or the flame is weak - the reason is insufficient oxygen supply or excess carbon. Eliminated by disassembling the burner unit, the air ducts are cleaned, which provide the flame with a sufficient flow of oxygen;
Disassembling and cleaning the gas divider
Dismantling a built-in hob is not difficult. In the case of a gas cooking structure, it is extremely difficult to do without the involvement of qualified personnel, because all safety measures of SNiP, PPB and electrical safety rules must be observed.
Hobs from modern manufacturers are functionally complete equipment that can be used independently. But many headsets have special niches for installing a stove. Correct installation of a new hob into an already finished countertop will ensure the quality of its connection and functionality.
Installing the hob: instructions
Manufacturers produce panels powered by electric or gas energy. Installation features depend on the type of device. But there are also general requirements for the process:
- safe installation of a finished kitchen hob should only occur with ventilation or an exhaust hood;
- It is allowed to use cooking surfaces with a heat resistance of at least 100 degrees and a thickness of 25 mm;
- when installing between sections of the headset, it is necessary to maintain a distance from the walls to the slab of at least 1 cm;
- the hob should not be closer than 5 cm to the load-bearing wall of the room;
- thermal insulation is placed between the wall and the equipment;
- The stove is placed only on a thick tabletop - from 38 mm.
Advice! If exhaust hood is not possible, place a very powerful fan on the windowsill.
Necessary materials
To install the hob you will need the following tools:
- jigsaw or hand router;
- screws and clamps;
- silicone-based sealant or nitro varnish;
- roulette;
- self-adhesive seal or thin aluminum tape;
- pencils, ruler and meter board.
Important! In some cases, you will also need a drill.
Taking measurements
How to install a new hob correctly so as not to damage the set? Refer to its dimensions from the instructions. If the brochure is lost, use the following technique:
- Turn the product over onto the table;
- Measure the width and length along the inner edges;
- Measure the parameters of the protrusion for fixation and draw it with a pencil on the surface;
- Mark these parameters on the table with a pencil;
- Find the center of the segments and make markings;
- Check clearances carefully. For a protrusion with a length of 15 mm, a retreat of 10 mm is sufficient. To install the cooker itself, a 5 mm indentation is required.
Experts recommend making calculations step by step and sequentially:
- Marking the cabinet based on the dimensions from the instructions by drawing a rectangle;
- Determining the center using a tape measure. You need to draw a cross on the table so that one line corresponds to the front edge of the tabletop, and the second is perpendicular to it;
- Painting tape is glued to dark table surfaces and markings are made on it;
- Taking measurements of the panel itself with a margin of 1-2 mm;
- Drawing lines - there should be 4 of them.
At the last stage of marking, the evenness of the figure is checked with a ruler or level.
Advice! If you doubt the measurements are correct, make a cardboard mockup and use it.
Cutting holes
For ease of work, you need to drill the central point with a drill with a drill diameter of 8-10 mm, which is held perpendicular to the surface. Through this hole, further insertion and installation of the kitchen hob into your countertop will take place. The optimal tool is an electric jigsaw or a saw with fine teeth. Elements must fit freely into the material.
Important! The sharper the saw teeth, the smoother the edges of the cuts will be.
Further work is carried out according to the following algorithm:
- Several holes are made with a screwdriver or drill in the corners of the figure;
- Painting tape is glued to the tabletop so that no traces of the jigsaw remain;
- A jigsaw or file is inserted into one of the holes on the blade;
- An incision is made according to preliminary markings with the tool pressed;
- When working, the bottom of the tabletop is supported or fixed with tape;
- Sawdust is removed and the quality of the cut is checked in accordance with the dimensions. The plate can slide in freely, so it needs to be moved a little.
Sealing and sealing
To prevent moisture from entering and deformation of the countertop material, the holes are treated with sealant and sealed. The use of silicone sealant has several nuances:
- The surface needs to be prepared - wiped off dirt, dust and treated with a degreaser;
- Place mounting tape on the sides of the seams with an indent equal to the line of the material;
- Cut off the spout from the tube and put a syringe attachment on it;
- Load the tube into the gun and press the lever to release the pressure;
- Gradually squeeze out the sealant, spraying the seam with a solution of soap and water;
- Smooth out the seams with a spatula and remove the tape.
Where to go?
Repair of an electric stove is usually necessary urgently, so you need to know in advance where to go. Our technicians repair such equipment at home, so you don’t have to go anywhere and carry the stove across the city. Just call and get a specialist. A specialist will arrive at the appointed time, conduct diagnostics and carry out repairs. If you need to replace certain parts, this will not be a problem for our specialists.
The advantages of contacting our company include:
- efficiency of repairs of any complexity;
- quick replacement of spare parts;
- professional approach;
- the ability to repair slabs from any manufacturer;
- providing a guarantee for tested work;
- affordable prices for services.
For several years now, we have been providing high-quality and reliable equipment repair services and numerous clients are satisfied with the results obtained, as evidenced by positive reviews.
If your equipment breaks down and any electric stove needs repair, don’t despair and don’t waste time - just contact our specialists. In most cases, any equipment can be repaired and our professionals will do everything possible to bring your stove back to life!
Our technicians also repair Bosch electric stoves
Connecting the hob to the mains
Experts note how to correctly and quickly install a new hob into a kitchen countertop and connect it to communications. The device can be connected to a separate power line if there are RCD circuit breakers for the stove on the panel. In houses with a power supply of 380 volts, you need to make a uniform load per phase.
The panel may require a separate outlet, so first you will have to dismantle the headset. The canal is prepared, strengthened, and covered with a layer of putty or cement. After this work, they move on to cutting holes and installing the slab.
How to obtain permission to change the hob?
Anyone who wants to replace gas equipment in their apartment faces certain difficulties. All owners must agree to disconnect from gas. Only repair specialists from the gas organization have the right to dismantle the old stove. Their services (cutting and welding of the gas pipeline) are paid for according to a pre-drafted agreement.
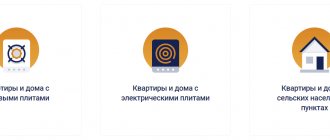
For owners of electric hobs, the law provides for a discount on electricity bills (30% discount). But in order to revise the tariff for an individual apartment, it is necessary to obtain the consent of 2/3 of the neighbors, for which a meeting of residents should be held and their signatures collected. The next step is to contact the management company, which should help you resolve all issues with city services. The general procedure looks something like this:
- filing an application with the Criminal Code;
- obtaining permission from the gas organization to replace equipment;
- meeting of residents and collection of signatures (minimum 2/3);
- obtaining permission from the electricity supplier to increase the power of the house from 5 to 10 kW;
- concluding a new agreement with a branch of the public service center in your region.
Connecting gas communications
The gas supply is completely shut off. To simplify the installation process, the gas hose is immediately connected to the panel. The paronite gasket is secured using a union nut. It is screwed tightly onto the pipe at the bottom of the panel. To ensure a reliable connection, the gasket is treated with grease. You can check for leaks by applying soap to them. If there are no leaks, foam does not appear.
On combined panels, a thermal shut-off valve is advisable, shutting off the gas supply when heated by more than 60 degrees. The supply valve must be located in a place convenient for control.
On gas hobs, the burners must be adjusted. The flame should burn without yellow reflections.
What do experts advise when connecting hobs?
- The film from the seal must be torn off gradually;
- The equipment is tried on in a niche until it lies flat and beautiful;
- The fewer gaps, the safer it is to use the panel;
- Before installation begins, the stove must be connected to the electrical network according to the complete circuit;
- Gaps on the front part can be masked with silicone;
- You can place drawers and metaboxes under the panel, so indentations should be made so that they do not touch the device;
- Two-burner models are installed along the countertop if they correspond to the dimensions of the box;
- The minimum installation depth is indicated in the equipment passport;
- The sole of the jigsaw should be placed at a right angle - this way the surface of the tabletop will not be scratched;
- The hob should be installed only after assembling the kitchen, so as not to deform the table;
- You need to apply sealant over absolutely all end cuts - this will save the material from delamination.
Is it possible to evaluate the strength of the panel before purchasing?
The absence of damage is assessed visually. A new surface simply shouldn’t have them; for this purpose, any production facility has quality control. Damage inside the material cannot be noticed. If they cause cracks in the glass ceramics during the warranty period, the manufacturer will replace it. This material has undoubted advantages, including strength.
Glass ceramics have other advantages:
- high efficiency, since thermal energy is directed strictly vertically;
- reduced power consumption;
- fast cooling;
- adjusting the size of the heated area.
If you follow the instructions for use, damage to glass-ceramic panels rarely occurs.