Modern apartments cannot be imagined without various household appliances. In this regard, situations often arise when the available connection points are simply not enough. This problem is solved by adding new sockets. However, this is not always convenient, especially after a recent renovation, so the solution is a double socket in one socket, installed instead of a standard product. Double sockets are compact in size, fit into existing wiring, and expand the possibilities for connecting electrical appliances.
Main types of double sockets
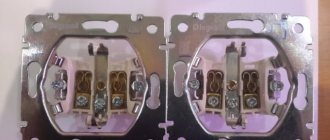
Any type of electrical outlets, including USB, are designed to connect various devices to the network. The design includes the main or working part with a contact group, and a cover that protects the internal mechanism from external influences.
Often a problem arises due to the inability to connect an additional device due to the lack of free sockets. Therefore, double sockets installed in one socket box are becoming increasingly popular among apartment owners. Almost all models are equipped with contacts for connecting a ground wire.
Connected double sockets are presented as separate devices installed at close distances from each other. However, as practice shows, this option is not aesthetically pleasing and requires additional drilling of the wall for another socket box.
A monoblock made in the form of a double socket is considered more convenient. It can be installed in an old place with the obligatory replacement of the existing mounting box and does not cause significant damage to the interior decoration. In such monoblocks, the power of the electric current is divided into two parts, and this is their disadvantage, especially noticeable when simultaneously connecting household appliances.
Depending on the modification, monoblocks with double sockets are divided into the following types:
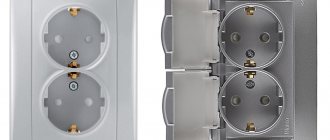
- Closed and open. In the closed version, the holes for the fork are protected by curtains. Such sockets are used in rooms where small children may be present. To activate the curtains, you need to press them simultaneously. Therefore, if a child wants to put some object into the hole, nothing bad will happen. Option 2 is a standard open contact design.
- With or without grounding. In the first case, the sockets are equipped with contacts for connecting the ground wire. Thus, additional protection against current leakage to the device body is provided.
- Sockets with additional protection against moisture and the ability to be installed outdoors. Waterproof devices have a protection class of IP44, and those intended for outdoor use have a protection class of IP55.
Products may be additionally marked. For example, the letter A indicates a double socket made in the USA, the letter B indicates the ground pin.
Work on dismantling old devices
Installation of the socket begins either by removing the old socket box and replacing the wires, or by directly installing it in a new niche in the mounting box.
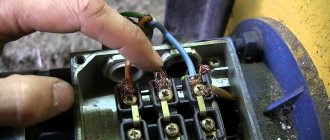
Before you begin directly removing the old outlet, you need to turn off the power to it. Climbing into a current-producing device connected to the network is dangerous to life.
We make sure that there is no voltage. We don’t check it, as some smart experts recommend, with the back of our hand. To do this, there is an indicator, a voltmeter and other devices for checking the presence of current. You can use one of the following, placing their probes correctly on the contacts.
When the device confirms that there is no voltage, we pick up a screwdriver and begin to disassemble the socket. When installation starts from scratch, at a new point, we skip this step and proceed to the actual installation.
First, remove the cover by unscrewing the small bolt located between the two contacts and remove the cover. We unscrew the fastening screws on the sides of the socket box until the “legs” are loosened and the core can be removed. Disconnect the live wires.
Materials and tools
Before starting work, you should stock up on all the necessary materials, components and tools.
For installation you will need:
- A hammer drill or electric impact drill for constructing a seat where the socket box will be installed.
- Jumper cable.
- Indicator screwdriver. Necessary to determine the phase and neutral wires.
- A socket box, preferably Legrand, made of durable fireproof plastic or metal.
- Multimeter. Needed for measuring voltage in sections of the electrical circuit where connections are planned.
- Monoblock, made in the form of a double socket.
- Screwdrivers with a Phillips or flat blade, in accordance with the screws used.
- Self-tapping screws or other suitable fasteners used when installing the socket in the installation box.
- A sharp utility knife used to strip conductor insulation.
- Electrical tape to protect connections and exposed parts.
- Corrugated tube. Its use is not necessary, but is desirable to provide additional electrical safety.
Replacing an old socket and socket box
A double socket in one socket box is most often installed when an old electrical point fails. At the same time, the number of sockets for household appliances increases.
The work steps in this case are similar to the previous ones:
- We turn off the power supply and verify this using a tester.
- We unscrew the screws on the decorative panel of the old electrical outlet and remove the panel.
- Loosen the fastening tabs and disconnect the wires.
- We remove the old core.
- We disassemble the new design into decorative and working parts.
- To connect a double socket, we use the same method as in previous cases.
The double socket very organically solves the issue of increasing the number of sockets for household appliances and helps to eliminate the need for carriers and extension cords. The work is simple and does not require special knowledge or professional tools. Replacing a single-socket model with a new two-socket model and connecting a double outlet does not require professional help. When installing it yourself, it is recommended to opt for a simple monolithic model or a model with the plug of a household appliance being ejected using a spring.
Wiring and connection
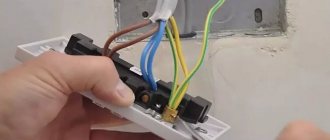
Before starting the connection, it is necessary to remove the insulation from the cable cores. This operation is performed with a sharp knife. The length of the wire should not be too long, usually it is no more than 12 cm. The wires themselves are stripped of insulation by about 1 cm. If the wires are too short, they lengthen.
Until the installation of the double socket has begun, the marking of the cables by accessory is determined. The phase conductor is painted brown or red, less often its color is black or white. The neutral wire is insulated with blue or white-blue insulation. The grounding conductor is always painted in the traditional yellow-green color.
However, sometimes the color gamut is off, so it is recommended to take measurements. To do this, use an indicator screwdriver, which touches the exposed wires one by one. On the phase wire the light signal lights up, but on the zero wire there will be no such signal.
Before installation of a double socket begins, the room must be de-energized using a circuit breaker. If it is not possible to turn off only one room, the entire apartment is completely de-energized. At the point where the wire exits where the double socket will be connected, you need to check again for the presence or absence of voltage.
The wires are twisted together directly inside the socket box. The bare ends are connected by soldering or using a special brass contact. In the second case, subsequent operation of the outlet becomes safer.
The wiring and connection of wires to an outlet equipped with grounding is carried out according to established rules. The right terminals are allocated for the phase wire, and the left terminals for the neutral. The grounding cable is connected to the top and center terminals of the socket. The central terminal has antennae, most often protruding beyond the body. The grounding contact is fastened according to the same scheme that is used for phase and zero.
Existing connection methods
Sockets with more than two pieces are connected in three ways: in series, in parallel and mixed. Electricians use other terms - star (for the first option), loop (for the second). Before choosing one of the methods, you need to find out the pros and cons of each, and choose the one that is suitable for a particular apartment.
If the room has electrical wiring, it is important to consider the way the cables are routed and the total power available. New ones may exceed the limit; the wire will have to be pulled from the shield.
Parallel connection
The essence of the method is to connect sockets in one distribution block, which bears the entire load when the electrical equipment is turned on. A cable is pulled from the common house panel to the distribution box, and wiring is pulled from it to each power point (separate wires).
The advantage of this method is the independent operation of each power point and switch. If one device burns out, the others will continue to work. But if the main wire becomes unusable, the voltage will disappear completely. In such a situation, it is easier to find the gap and fix the problem.
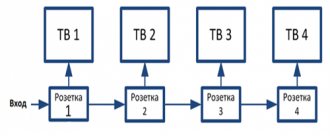
Serial connection
A daisy chain connection means a sequential transition from the first outlet to the next. Instead of twisting wires, device contacts are used. The phase and neutral cables are connected to the first mechanism, then to the next and sequentially to the last.
The “pure form” method is rarely used. For example, if you need to install an additional socket or switch or move one of the devices some distance. In the second situation, they leave the old access point and lead from it to a new location - this way there will be less need to scratch the walls.
It is forbidden to connect devices with high power to sockets connected by a cable. Air conditioners, microwave and conventional ovens, washing machines and other similar devices must be powered from other access points. In a daisy-chain system, many outlets are connected to the same circuit, so the load falls on each one.
Mixed connection and grounding in series connection
If you decide to use a series connection of sockets, you can strengthen the overall design by using a mixed method. The essence of the method is as follows:
- A central cable is connected to the distribution box from the common panel board.
- In the preliminary wiring plan, the most distant point of access to power is selected.
- The selected outlet is connected from the distribution box cable.
- The rest are powered from this device.
Characteristics
The technical characteristics of this product include: voltage, power, current and frequency of alternating current. Most sockets are designed for 220-240 V. In industry, three-phase models designed for 380 V are more often installed.
The current for household appliances should not exceed 16 A, and the maximum permissible power is 3.5 kW.
It is allowed to increase the current to 32 A only in three-phase products. The current frequency, according to international standards, is acceptable within the range of 50-60 Hz.
Common types
Power to current ratio
Manufacturers produce products that have a wide range of applications, designed for use in certain conditions.
Based on the number of consumers, products are divided into single and double. To create blocks of 3-5 points, sources are combined into one system.
Regarding the ability to withstand loads, the devices have the following power ratings:
- weak - 1.7 kW;
- medium - 3.4 kW;
- strong - 6.6-10 kW.
The most popular products in everyday life are those designed for a voltage of 230 V and a current of 16 A.
According to the level of protection against electric shock, products are divided into conventional and grounded. Protected sockets have external contacts that are connected to a separate terminal to which the ground wire is connected.
5-pin socket plug
Since devices and equipment with certain properties are used in various spheres of life, the sockets have a configuration corresponding to them.
The number of connectors is as follows:
- 2 - phase and zero;
- 3 - 2 phases and zero;
- 3 - phase, zero, ground;
- 4 - 2 phases, zero, ground;
- 5 - 3 phases, zero, ground.
Table of degrees of protection
The classification according to the degree of protection is as follows:
- IP 0-24 - no;
- IP 25-40 - against splashes;
- IP 41-54 - from weak water flows, equipped with a lid;
- IP 55 + - absolute, have a sealed plug.
The main difference between the products is the way they are placed.
Brief overview of characteristics and prices
Legrand Valena
The domestic electrical goods market offers a wide selection of socket models with two inputs. Products vary in design, technical specifications and prices.
Most popular products:
- Legrand Valena - grounding, screw terminals, 16 A, IP20, 375 RUR;
- Legrand Valena Allure - grounding, spring terminals, protective curtains, 16 A, IP21, 650 rubles;
- Legrand Etika - grounding, screw terminals, 16 A, IP20, 185 RUR;
- Legrand Quteo - grounding, spring terminals, protective curtains, 16 A, IP21, 220 rubles;
- Legrand Quteo - grounding, screw terminals, water protection, 16 A, IP44, 525 rubles;
- Schneider Electric Duet WDE000120 - without grounding, screw terminals, 16 A, IP20, 110 rubles;
- Schneider Electric Duet WDE000226 - grounding, spring terminals, protective curtains, 16 A, IP20, 130 rubles;
- Schneider Electric W59 - without grounding, screw terminals, 16 A, IP21, 100 rubles;
- Schneider Electric Rondo RA16 - grounding, screw terminals, water protection, 16 A, IP44, 250 rubles;
- Viko Yasemin - grounding, screw terminals, 16 A, IP20, 85 rub.
The product range consists of mechanisms with white and colored covers.
Electrical socket device
Socket structure
The overhead socket has a simple structure, which differs little in different models. Required elements:
- The case is an external protective part, made of plastic: it burns quickly, it is cheap and releases toxins when heated; polycarbonate: the best option – heat-resistant, durable; ceramics: more reliable, does not heat up, minus – fragility. Current-carrying elements are attached to the inside.
- The direct mechanism is brass or bronze elements in a complex. The latter are extremely rare, but more reliable. Mandatory part - grounding: protects equipment and users from electric shocks.
- The panel is an external part that defines the design. In most cases, they are made of polycarbonate; expensive “designer” models can be made of glass, wood, metal and other materials.
The double external socket has no distinctive elements. Thanks to a simple device without the need for gating and finishing, self-installation is possible without the involvement of professional electricians.
When can you install overhead sockets?
Surface-mounted sockets
To make a choice and select the right devices, you need to understand what the main differences between surface-mounted (external) type devices and internal ones are. The most significant points:
- For the first type of sockets, all the key parts are located inside the plastic case.
- Overhead models do not require surface scoring.
- External devices do not require an additional niche or socket box.
When developing the initial plan, such access points are usually not provided if it is possible to make built-in, less noticeable devices. The disadvantage is the significant “bulge” relative to the wall. However, in some cases, an external outlet is the only option:
- The finishing work has been completed, but there is a need for an access point to the power grid in a new location.
- The coating does not require gating: tiles, tiles, panels.
- The thickness of the walls makes it impossible to hide devices and wires.
Users and professionals note some disadvantages during operation. For example, rapid wear and loss of the original appearance of equipment. If damaged, you can get an electric shock - all key elements are outside.
Recommendations for location and use
Overhead socket in the country
An outdoor socket is considered an excellent option for private residential buildings and outbuildings: barn, garage, greenhouses, outdoor kitchen, other open areas). For such structures it makes no sense to lay a separate cable and conduct electrical wiring. Devices and wires are attached to small nails.
When installing an external grounded outlet, it is necessary to take into account the traffic flow of the room. The device should not be secured near door frames; it is advisable to “cover” it with furniture: for example, behind a desk or dining table - access and additional protection.
Selection of quality products
Preference should be given to sockets with copper contacts, a ceramic pad and a body made of heat-resistant plastic.
A double socket with a cover will be the optimal solution for a family with children and animals. The cover will protect the child and at the same time, hermetically seal the contacts from dust and dirt. It is recommended to select models with grounding, provided that there is a grounding wire in the room.
Work order
Since installing a double socket in most cases is part of a cosmetic renovation, we will consider a situation in which you already have an old socket, old aluminum wiring and wallpaper.
Turn off the electricity at the panel
2. Remove the old socket and socket box
We dismantle the socket and socket box
The socket box needs to be dismantled only if it is of an old (Soviet) model
There is usually plaster, which can be knocked down with a screwdriver, chisel or chisel without much difficulty
Trying on a new glass
We thread the wires into the socket box
To do this, we pass the wires through the corresponding functional holes and insert the glass into the resulting niche in the wall. We make sure that the depth allows the glass not to protrude beyond the surface of the wall.
We dilute a solution of gypsum (alabaster)
To make the solution, take a container (for example, a tin can), pour a glass of alabaster and add water until the solution reaches the density of sour cream. The solution should be mixed fairly quickly so that the plaster does not harden prematurely.
This must be done so that the plaster adheres well to the surface.
Alabaster should be applied with a reserve so that the socket is well fixed
After applying alabaster to the socket box, it should be immediately inserted into the wall, having previously threaded the wires.
9. Use the remains of alabaster to cover the resulting gaps between the wall and the socket box.
Without waiting for the plaster to completely harden, you should remove all excess sagging so that the wallpaper fits back without flaws.
Wires should be stripped to a length of no more than 10 mm unless otherwise indicated on the socket body itself
Connecting the double socket mechanism
We fix the mechanism in the glass
We choose how the double socket will be located, horizontally or vertically, and secure it using spacer legs with a screwdriver.
Glue the wallpaper in place
Do not use wallpaper glue for this - it takes a long time to dry and will not set immediately. Use PVA or other office glue.
Make sure that no glue gets on the contact terminals, otherwise a short circuit may occur when the power is turned on.
Installing a block of several sockets
The most popular method of connecting single elements among home craftsmen is still the daisy chain method, even despite its shortcomings. In this case, next to the hole with the working cable, several more are drilled (1,2, 3 or 4), located at the same level, so before work it is necessary to apply the correct markings.
For the operation, use a ruler, level and marker (pencil). It is necessary to maintain the distance from the center of each element (72 mm), otherwise the decorative covers will not be able to be installed in place. When gating, the vertical (horizontal) lines are strictly observed and the same level is used for them.
In the center of all future holes, indentations are made: first, circles are punched with a crown, then the “excess” is knocked out using a chisel and hammer. If the walls are made of plasterboard, the operation is greatly simplified. The next stage is installing the socket box. It is better to choose models that can be connected to each other. They are fixed with mortar, in drywall - with claws located on the sides of the structures. Turn off the electricity. The cable is pulled out of the first socket box, the braid is removed from it, the best tool for this is a repair knife with a heel. Each of the 3 wires is stripped of 10 mm of insulation using a wire stripper. To create a cable, a wire similar to the “originals” is used; there is no other option. Remove the braid from the edge. 200 mm minimum for a block of 2 sockets, the required length depends on the number of holes, so the length is calculated independently. Then the piece is pushed from the second socket box to the last one. The exception is the protective conductor. Since the simple loop method with jumpers for grounding is prohibited by the rules (PUE), branches are made by cutting off pieces of the required length for each socket of the complex. They are connected to the main supply wire, crimped with pliers, and insulated with a heat-shrinkable tube. Then they are placed on the bottom of the box. The ends of the cable are stripped of insulation, then proceed to connecting the first outlet. They do this in the same way: first the phase on the left, then the neutral on the right, grounding in the center
The terminals are carefully but firmly tightened with a screwdriver. The socket is inserted, slightly aligned, but not secured with screws. Connect the next, second device, follow the same algorithm
Then the third, fourth, etc. After connecting all the elements, check the horizontal (vertical, if this installation method is chosen). The last stage is the installation of sockets with self-tapping screws, then stop paws and fixing the decorative panels. If there is a common frame, it is tried on, installed, then the covers are fixed one by one in the centers of the sockets. At this point, the question of how to connect a socket with 4 sockets (2, 3 or 5) can be considered in detail.
If such “fuss” is not too impressive, then you can get by with a purchased model - double, triple or quadruple. However, many owners are against this decision. The reasons for the failure are possible savings, the massiveness of such sockets, both buses equipped with two terminals, which sometimes lead to mistakes by novice craftsmen during installation. The result may be a short circuit, and such an emergency will negate all efforts and also destroy the new product.
Since there are two ways to connect a 4-socket outlet, the decision is up to the owners of the house. To get acquainted with all the pitfalls of working with electricity, it is better to look at the exemplary work of other craftsmen. For example, the one shown in this video: