Home » Household appliances » Appliance repair » Hob repair: main types of breakdowns
Today, many people use hobs. They can be not only electric or induction, but also gas. Each of these options has its own advantages and disadvantages. That is why the nature of their repair may differ. You can repair the hob yourself.
How to repair a hob at home
In this article we tried to consider repair issues in detail. Here you will learn how to repair a hob without calling a technician.
Construction and design of electrical and gas surfaces
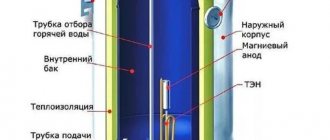
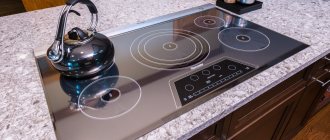
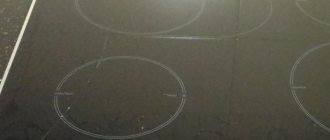
The hob consists of a completely flat surface, which is located at the level of the countertop. Consists of 2–6 burners. Heats up quickly unlike other types of burners. A glass-ceramic hob has a more complex structure than a cast-iron one (you can view repair instructions for glass-ceramic hobs here).
It includes burner spiral terminals, maximum temperature protection contact, pusher, adjusting bolt and residual heat indicator terminals. Gas hobs consist of the following parts and elements:
- electric ignition transformer;
- insulators made of ceramic material;
- the hob itself;
- faucet handle;
- electric spark plug;
- flame sensor;
- thermocouple;
- spring;
- electromagnet;
- gas supply;
- tap.
Tip
Heating elements are the main components of the entire structure. They are placed in a housing. When it is necessary to check their serviceability, the slab is disassembled into its component elements.
By heating elements we mean rapid and halogen. They can be ribbon or pancake type. There are also induction burners. The device body is made of metal or glass-ceramic, control is electronic or mechanical.
They work according to the following scheme:
- electric current is supplied by turning on the control element attached to the burner;
- passing through the heating element, the current heats it to the required value, which is set by the regulator;
- the temperature is kept automatically within the specified range.
Types of heating elements of cooking surfaces:
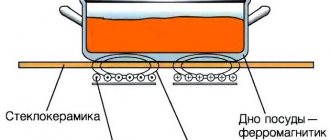
- Induction. The work area remains cool, and only the dishes placed on a specific zone are heated. If there is no coating around the edges, then they do not heat up. All the heat is transferred to the pan, and evenly (read about common causes of breakdowns of induction cookers and their repair here).
- Rapid. Such spirals can heat up quickly and cool down immediately. The approximate time is no more than 10–12 seconds.
- Halogen. The spiral is illuminated with red light and heats up in 2 seconds. Such surfaces emit the maximum amount of heat, unlike other types of heating elements.
- Gas-burners. Fuel is supplied automatically. At the same time, heating and adjustment occur very smoothly, gradually (how to repair a gas stove with your own hands?).
- Electrical. They have a bright red circle in the center. The “pancake” in the middle contains cast iron (we talked about how to repair electric stoves of different models with your own hands here, and how to repair an oven here).
We repair the hob with our own hands
What do you need for daily cooking? High temperature and ability to control the heat source. As it turned out, there are not many types of home “hearth”.
- kerosene burner - 5 decades ago it was the main element in any kitchen;
- a gas stove is by far the most popular “hearth”;
- electric stove - can be a separate element or a built-in component of the kitchen.
Let's consider the last option in more detail. When visiting the kitchen was an exclusively utilitarian matter (that is, the housewife was only interested in the process of cooking), no one thought about the appearance of the electric stove.
Accordingly, from a technical point of view, it was a very primitive device:
- frame;
- heating element (spiral or heating element in its own housing);
- thermostat (not present in every model);
- mechanical heating regulator (spiral resistance switch).
It was possible to repair such a stove with a screwdriver and pliers in hand. Even the heating coil was easy to make with your own hands: nichrome wire was wound around an ordinary pencil. More advanced craftsmen used an electric drill and a wooden mandrel. The steel rod was inserted into the chuck and the winding process was much faster.
Basic faults
Damage to electronic circuits
Electronic systems may not work if the following symptoms occur:
- The hob does not turn on because there is insufficient voltage in the socket or there is no voltage at all . The microcircuit parts may be faulty. A multimeter is used to check the condition of the socket, the absence of current or its shortage. If everything is fine, then you need to check the serviceability of the fuses. Electronic circuits can burn out due to contacts being chafed or the cord being crushed. Sometimes the heating element may break down.
- If one or two burners are faulty, the heater contact may be broken. They are soldered and contact is returned. In this case, a burnt-out heating element must be replaced with a new one. If the contacts are broken, the control unit switch is repaired or replaced with a working one.
- If the burner heats up poorly, the heating element, thermostat or thermostat may overheat. The parts can be repaired, but the thermostat only needs to be replaced with a new one.
- When a fuse blows, the electronic circuits are disrupted. In this case, fluctuations may occur due to voltage drops on electric mains. The part is inexpensive, so it is easier to replace it with a new one.
- The sensor stopped responding. Use a multimeter to check the suitability of the part. If there is no response from the device, then the part is completely removed and replaced with a working one. In rare cases, simply cleaning the sensor with a soda solution helps to improve its operation.
- Hob overheating. It stops turning on or gets very hot. Following this, the thermostat fails. The part cannot be repaired. It needs to be replaced with a new one.
Heating elements are broken
If the equipment does not turn on, you need to check the voltage. The hob may not turn on due to low voltage. To prevent such situations, a stabilizer is installed.
Heating elements break for various reasons.
- First you need to inspect the power cord. In 80% of cases, heating elements break due to a pinched, bent or broken cord. It is inspected after first removing the equipment from the network, and then it is checked for the integrity of the wires.
- The cause may also be a faulty fuse. It is located at the entrance, but can easily burn out if more important parts are protected from power surges. Its resistance is checked with a multimeter. An infinitely high resistance or a break in the indicators indicates a blown fuse.
Problems with the ignition system
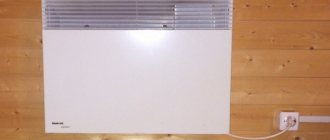
Let's say the hob is connected to the electrical network, but the button to turn on the burners does not work. This happens if the power supplied through the wires is not enough to operate. This happens in houses with poor power supply, or when the hob is connected to a tee. In this case, an electrical voltage stabilizer will come in handy. When electrical appliances are connected to it, it begins to evenly distribute energy between all equipment. In this way, it is possible to provide the 220 volts necessary for the panel to operate. Also, a voltage stabilizer will minimize the risk of electrical appliances burning out in the event of a power surge or short circuit.
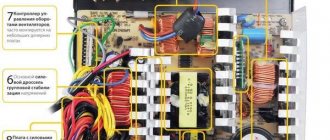
Electrical voltage stabilizer
The following symptoms may indicate problems:
- When the button is pressed, the burner does not turn on.
- The candles sparkle when turned on, but the burners do not light up.
- The panel turns off after releasing the start button.
Repairing an electrically powered hob is possible in several ways.
Diagnostics of breakdowns
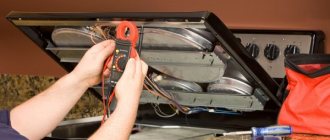
Diagnostics can be carried out by disassembling the device or without it. In case of disassembly, the check is carried out in the following sequence:
- use a multimeter to determine the voltage level;
- turn off the stove from the power grid, inspect the power cord;
- the cable is checked by ringing for integrity and the presence of holes;
- oxidized contacts are identified by unwinding and inspection;
- the fuse also needs to be inspected for flaws, breaks, bends and fusion;
- an important part of the diagnosis is examining the outer pad for damage;
- The multimeter is used in almost all external inspections of parts.
Diagnostics by analysis occurs in the following sequence:
- the power plate is turned off;
- use screwdrivers to dismantle the panel;
- The fasteners are removed from the panel and the surface is removed;
- the wire is inspected for integrity;
- The thermal relay is checked by tracing the wiring;
- A multimeter is used to evaluate the condition of the transformer and thermal fuse.
Important
Increased resistance of the burner indicates its burnout. If the multimeter does not respond to changes in vibrations, then the burner is intact.
Troubleshooting
Below are common problems with electric stoves. Some of them can be fixed on your own, others require professional diagnosis and repair.
Burner not working
If you have a stove with burners, then to change them you need to follow this method.
- Unscrew the nut and remove the grounding.
- Under it there may be a ring or bracket that presses the part to the base.
- The burner is attached with a threaded connection or simply inserted into a special hole. In the first option, we lubricate the thread with oil and carefully try to unscrew it from the body; in the second case, we pry it with a screwdriver and remove it.
- If the model is old, then it is better to immediately replace the burnt-out burners with modern and economical models that are suitable in size.
- If the burners are in good condition, then the cause of the failure is in the control unit - a large current passes through the mechanical regulators, and carbon deposits can form on the delicate contacts, which can be cleaned with fine sandpaper.
Heat switch
Here are step-by-step instructions on how to repair or replace the switch on electric ranges.
- If there are no clicks when turning the regulator, this indicates that it is faulty.
- There is an original way to check its condition: put the regulator in the middle position, apply voltage to the stove, the automatic protection should work - turn on and off after 30 seconds.
- Before removing the handles, you must study the instructions - on some models they cannot be disassembled (Gefest, Kaiser).
- First, remove the control knobs from the outside, then unscrew the front panel.
- There is a bar underneath that needs to be removed to get to the broken regulator.
Electronic control unit
If you cannot hear a click when the relay is turned on, then you need to check the presence of a signal - if it is absent, the reason lies in the microprocessor itself or the output cascade. To repair an electronic unit, you need to have a circuit diagram and understand the complexities of radio engineering . If you don’t have the knowledge and skills, then it’s better to turn to specialists - otherwise you’ll have to buy a new electric stove.
Modern electric stoves with heating elements quite often use a cascade-type burner heating thermostat.
Power regulator
Sometimes a regulator breaks down and an identical replacement can be found. Experienced professionals advise installing a triac type of such a device, but you need to take it with a reserve of power and current. In some models it is installed on the same board along with the radiator. When the stove burner operates at maximum, and the heating adjustment cannot be changed, this indicates that the regulator has failed for an unknown reason - it urgently needs to be replaced.
Every user should understand that modern household appliances are crammed with electronics; each model has its own nuance of manufacturing and control, which is different from others - mechanical or electronic. Outside intervention without special knowledge and skills can negatively affect the delicate filling of electric stoves.
If you have a simple stove with burners on an enamel hob, then you can repair it yourself by first watching the video:
Instructions for eliminating defects
Required Tools
Repair work is carried out using the following tools:
- Screwdrivers. It is necessary to have installation tools with tips of different diameters on hand and purchase a screwdriver with an indicator to check the voltage.
- Stationery knife. It is needed for stripping cable cores or trimming them.
- Pliers. Needed for biting veins.
- Multimeter. Electric current parameters are measured.
- Soldering iron. Important at the stage of detaching parts.
Specifics of repair work
Repairing the hob occurs in several stages:
- The blocking is removed. You can unlock the hob by pressing the key button. It must be held for several seconds until the indicator becomes active. In this case, the lock disappears from the panel. Access for subsequent work is considered open.
- The device is disconnected from the network.
- Dismantle the device with screwdrivers, after laying it on a smooth surface and laying a blanket.
- By removing the fasteners, carefully remove the surface.
- All removed parts are checked for damage.
- Install screw terminals or rivets on the burnt spiral.
- The necessary parts are replaced with new ones. The power relay, thermostat, and halogen burners may need to be replaced.
- Wiring is being replaced. By selecting an identical wire, the wire is assembled and installed. This can be done using a limit switch.
- A working power supply is installed.
- The control circuit of the hob is changing. The procedure is performed through a hand block placed outside the body.
- The hob is assembled in a similar manner and installed in place.
Attention
All work must be performed with the power turned off. You must follow the step-by-step repair instructions to avoid assembly errors.
Repair of direct heating hob (individual components)
Diagnosis of faults is carried out from simple to complex. After the fuse, we check the electrical wiring and the functionality of the heating elements. Control of turning the heating filament on and off is carried out using PWM (pulse width modulation). Don't let this bother you. All the same, power supply is supplied by conventional relays, which are checked with a multimeter.
A burnt-out spiral (tape) is usually replaced entirely; this is not the most expensive element. As a temporary measure, a mechanical connection can be made (rivet or screw for tape, and screw terminal connection for helix). This will allow the stove to work for a while. This “joint” will last for several days, so buy a new spare part as soon as possible.
Power relays cannot be restored; they definitely need to be replaced.
The same applies to halogen heaters. Thermal elements are not repaired (in fact, this is an electric lamp), they are replaced with new ones.
As for burnt wiring, you should select a wire with similar characteristics, make a complete harness, and replace it using end switches.
Before reassembly, contact groups are checked for strength and absence of thermal damage, cleaned and reassembled.
If after checking it turns out that all power conductors and elements (including heaters) are in order, the electronics remain. Self-repair is possible only if you have specialized skills and a detailed electrical diagram.
If you know for sure that it is the electronic module that is not working, and there is no way to professionally diagnose it, you can take this particular unit to a branded workshop. It will be tested (for a small fee) on a stand, or in a similar model of hob. You can install a repaired or new unit in place yourself.
Some craftsmen restore the functionality of the hob by changing the control circuit. For example, you can power the heating elements from a homemade manual control unit located outside the main body. If the cost of restoring standard modules is too high, and the stove heats properly when connected directly, this method has a right to life.
Recommendations and advice from experts
Experts recommend adhering to the following tips:
- Major breakdowns of gas stoves are repaired manually using minimal available tools. It helps to install traverses and tighten the screws when the burner axis shifts. If the switches are loose, just remove the handle and use a screwdriver to press out the slots on the rod. If the oven does not close tightly, it is enough to tighten the spring and put the axle in the eye (read about the signs and causes of malfunction of a gas oven and its repair here, and from this article you will learn how to repair the oven glass of gas stoves).
- If you smell gas, you need to check the tightness of the contacts with a soap solution: tighten and lubricate the taps.
- Screw terminals and spiral rivets are temporary measures.
- The main reason for 90% of breakdowns is non-compliance with the operating conditions of the equipment.
You must carefully follow the instructions for using the hob. - If you don’t have a multimeter to check individual parts of the system, you can use an induction screwdriver; its use is justified if you carry out repairs yourself and have a good knowledge of the components of the hob. Otherwise, it is better not to approach the repair yourself, but to call a specialist.
Before repairing the stove, you should carefully study the instructions. Read articles from our experts and learn how to repair the timer and oven doors.
You can repair the hob yourself if you know about its structure. To do this, you need to study the instructions supplied with the device and follow them. If it is impossible to carry out the work yourself, you need to call a specialist to your home.
Hansa electric stove repair. Oven doesn't work
At the beginning I want to say that for fast food lovers and those who eat at various catering establishments, this note will most likely be useless and unnecessary, since repairing an electric stove, and especially with their own hands, is not at all interesting to them, but who knows, what if ...
One clear day in August, my wife told me that our Hansa electric stove had begun to malfunction - the oven was not working, or rather, it was heating up “with terrible force” and all the baked goods in it were completely burning, I was not only not happy about this emotional news, but even sad , because I know very well what the process of repairing an electric stove and repairing an oven, in particular, is like.
Preparing to repair an electric stove with your own hands
After thinking for the sake of decency for three or four days, I prepared the instrument:
- Phillips screwdriver
- a regular screwdriver
- multimeter or voltage indicator
- pliers with insulated handles
- tweezers (just in case)
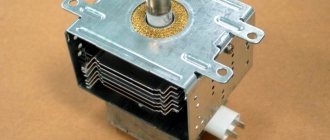
I bought a new thermostat (50÷300 °C), since according to my thoughts and conclusions the fault was hidden in it - the sequence of calculating the faulty element is as follows:
- there is voltage on the heating elements (heating elements) and they are working properly, since they all heat up and the temperature is high
- when switching oven modes, the light indicating that heating is in progress does not turn off (if the oven is very hot, switch to t° = 100 or less, the light should go out, that is, the thermostat will work, but the voltage supply circuit to the heating elements will not break)
- if you disconnect the phase terminal from the thermostat (after disconnecting the electric stove from the network), the heating is turned off and the light goes out
This is approximately the algorithm for troubleshooting, and if you have experience, this can all be calculated in a minute.
The picture shows that the new thermostat differs from the standard one in the type and size of the temperature sensor itself (rod) - 195 mm and 125 mm, as well as in shape, but this does not affect the performance of the temperature controller.
I selected it based on the following parameters:
- temperature adjustment 50 ÷ 300 ° C (on the standard one - seen in the photo 299 ° C) - the distance between the holes on the thermostat should be equal to the distance between the fasteners on the oven mode switch - the length of the capillary also matters - at least 90 cm (should be enough push it into the oven and secure it in the designated place so that the adjustment values are correct)
I found its data on the body of the standard regulator - entered it into a Google search and, based on what was received in the search results, selected it based on price, fasteners and temperature control range.
Having prepared everything for replacement, I began to carry out my plans.
Replacing the thermostat
ATTENTION!!! If you do not have experience in repairing electrical appliances, and in particular electric stoves, and are not familiar with the basics of electrical safety, then it is better for you to contact specialized service centers.
The order of work is as follows:
- disconnect the electric stove from the network (turn off the machine at the distribution panel or unplug it from the socket, i.e. turn off the power)
- move the stove into free space
- since the stove model is gas-electric, it is necessary to unscrew the bolts securing the gas burners to the hob
- lift the hob and securely fix it in the open position (I substituted a piece of polypropylene pipe L = 0.7 m
- After making sure once again that the stove is de-energized, remove the wire terminals from the thermostat
- insert a flat screwdriver between the oven mode switch housing and the thermostat housing, then press the regulator and remove it from the switch latches
- Carefully remove the back cover of the stove by unscrewing 4 bolts
- we find the place where the temperature sensor rod enters the oven and free it from mineral wool
- inside the oven you need to unscrew the thermostat rod lock (upper right corner)
- remove the stem and remove the faulty thermostat
- install a new one on the mode switch latches
- carefully unbend the capillary, place it and fix it in the oven
- connect the wires to the regulator terminals
- close the back cover and lower the hob
- turn on the stove to the network (turn on the machine on the distribution panel or insert the plug into the socket)
- we check the operation of the oven and the electric stove as a whole (the operation of the burners)
In my case, not everything went smoothly - after completing the replacement, I turned on the oven, but it doesn’t work, I checked the voltage at the thermostat terminal - there is no voltage, I measured the mode switch at terminal 1 (it comes directly from the input block) - there is voltage, which means the mode switch cam does not press the contact or it is burnt and because of this there is no contact.
And so it was - I cleaned the contact, voltage appeared at the thermostat terminal, and accordingly on the heating elements - the oven started working.
Main Switch Terminals:
- phase - red wire from the input block
- zero - blue wire from the input block
- phase - goes to the thermostat terminal
- zero - three wires go to the heating elements of the oven
Another point, since the sensor rod of the new thermostat is 7 cm shorter, I did the following: I fixed the rod itself in the oven in a standard holder, and then the capillary went, I insulated it from the temperature with corded asbestos (after wetting the asbestos with water and squeezing it tightly wrap around the capillary).
Maybe this protection was not required, I don’t know, but it’s just in case, and for some reason the hole in the wall of the cabinet was large, 2.5 centimeters in diameter, I covered it at the same time, it turned out, however, not very aesthetically pleasing, In the future, depending on the mood, I’ll redo it...
Watch a short video about Hans's electric stove, in which I explain some points about repairing the oven:
Taking into account all of the above, I want to conclude that repairing electric stoves is not difficult and can be carried out by a more or less trained person who is able to measure the voltage with a multimeter or at least be able to use a voltage indicator, and so that his hands grow where they should.
By carrying out the repair yourself, you will save money and time, you will not need to adapt to the work schedule of a representative of the repair organization, and you will choose the price of the element you need to replace, and besides, you will do everything at a time convenient for you.
Here, as an example, is a screenshot of the price list of one service center in Novosibirsk, besides, just diagnosing a malfunction costs 300 rubles, and they can also “charge up money.”
Dear friends, colleagues and readers of my diary, if you found this note useful, then do yourself a favor and feel free to share it on social networks.
Source: https://blogalexandra.ru/elektroplita-hansa-remont-dukhovogo-shkafa
Connection prices
- Visit of the master - free of charge
- The master will arrive in 30 minutes
Standard installation
Includes: unpacking equipment, sealing and securing the hob in the finished countertop opening, connecting to the electrical network without modifying it, checking its functionality.
Installation of the hob + oven kit
Includes: unpacking equipment, sealing and securing the hob in the finished opening of the countertop, connecting to the electrical network without modifying it, checking its functionality, connecting to the oven, testing the functionality together with the oven.
Order repairs from the website, get a 7% discount
Olga Petukhova
Called a technician from this company, the Samsung refrigerator stopped working. I really liked when contacting them that they immediately advised me over the phone and told me how much.
Evgeniy Ivanov
I contacted him to repair the control board based on other reviews of this company. A competent specialist arrived and fixed everything (although the repair lasted a couple of hours - in my opinion.
Sergey Butenko
The technicians did a good job of repairing the air conditioner and did not create any problems for me. Everything went smoothly, for which I give five stars.
- Free departure in 1 hour
- Free diagnostics
- Warranty up to 3 years
- The best craftsmen work with us
Why did the electric stove stop working?
In a good half of cases, the problem lies in the electrical circuit. The device stops responding to controls, the display turns off, the burners do not heat up, and the oven does not work. There are a number of reasons that can lead to equipment failure:
- faulty socket;
- the heating element is burnt out;
- terminals are disconnected;
- contacts have oxidized;
- fuses or circuit breaker are knocked out;
- damaged network cable.