Electrical wiring in a SIP house differs from the usual wiring system in a brick building, a cottage made of shell rock or foam blocks. Despite the fact that the polystyrene foam inside Canadian panels has a self-extinguishing property, in the event of force majeure, the heated polymer product can start the process of smoldering and combustion of oriented strand boards (OSB).
The causes of a fire can be a short circuit, network overload without voltage stabilization, current leakage, or the formation of an electric arc. To avoid rapid ignition of wood chips in the panel and to prevent the hypothetical possibility of a fire, it is recommended to install and protect the wiring taking into account the specifics of the building materials.
SIP house: difficulties in laying electrical cables
Let us remind you that a SIP house is a prefabricated dwelling, which is assembled from structurally insulated panels. SIP panel is a composite material consisting of three layers:
- OSB sheet - oriented strand board.
- EPS expanded polystyrene is a heat-insulating layer.
- OSB sheet - oriented strand board.
SIP panels are manufactured at the factory and delivered to the construction site as a finished product.
It turns out that a SIP house is a type of frame structure in the form of a house kit. The “bottleneck” of houses made from SIP panels is their supposed increased fire hazard. We have already talked about this “horror story” in the material - 6 myths about SIP houses, which we will refute or confirm . The link to it is at the end of this article. But this does not mean that in a house made of structurally insulated panels , in fact: a structure made of wood (OSB) and polystyrene foam , electrical wiring can be done as desired.
Building materials according to GOST 30244-94 have a classification according to flammability group: G1 (low-flammable), G2 (moderately flammable), G3 (normally flammable), G4 (highly flammable).
The flammability group of OSB boards is G4. To reduce the flammability of OSB, flame retardants are used - substances that reduce the flammability parameters of the material.
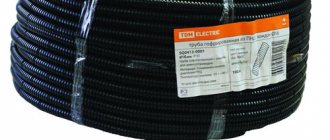
Let's turn to the PUE (Electrical Installation Rules), which says that electrical wiring through combustible wooden structures, and SIP is one of them, can only be done in a metal pipe . We will give below the opinion that these requirements are already outdated, and now we will tell you how to install an electrical cable and mount an internal socket box in a SIP panel according to the PUE.
Mice and other troubles
To save our readers from unnecessary headaches, we decided to talk about the mistakes made during the construction of one residential building. First of all, the material is intended for those who hire contractors for construction. However, it will also be useful for those who build a house on their own.
The facility was built under the “Rural House” program, and local would-be builders acted as the contractor. Unfortunately, the future residents did not pay due attention to the quality of the work. The result is natural - a large number of significant “jambs”.
Brief information about the house:
- Commissioning date: 2008
- Number of floors: 2
- Foundation type: strip
- Technology: frameless
- Panel sizes: 2740x1220x224 (floors), 2740x1220x174 (walls), 2740x1220x145 (dowel for connecting wall panels)
Problems appeared quite quickly and were associated with the most important part of any structure - the foundation. The strip foundation was filled with low-quality concrete, which led to the fact that when moisture entered, it began to crumble
Under the influence of moisture, the foundation began to crumble
In extreme cold (below -30°C), another “jamb” was discovered - part of the plastic floor plinth in the kitchen froze.
It was decided to remove the bottom panels of the vinyl siding, remove the cold bridges where the wall slabs adjoin the first floor ceiling, and sheathe the foundation with corrugated sheets to look like stone.
After dismantling the lower siding panels, signs of field mice appeared.
During construction, the ends of the floor were not covered with boards. Installed pieces of plywood with large distances between them
Also note that the roofing felt does not start from the timber, but from the floor level
A brief explanation of roofing felt. At the time the house was built, vapor-permeable membranes had not been heard of in a particular locality. The contractor was going to lay plastic sheeting on the walls. The customer opposed this, and as a result, roofing felt was used.
It is clearly visible that the mice did not waste any time...
When the baseboard froze, mouse holes were found and the seam between the OSB was not foamed
As a result, the owner of the house had to mitigate the consequences using his modest construction experience.
The possibility of mice accessing the polystyrene foam was previously blocked, then the foundation was sheathed with corrugated sheets
Related errors:
- The lower part of the first floor ceiling has not been treated with bitumen mastic.
- SIP panels with a width of 1220 mm were laid on the floors of the first and second floors (they had to be cut in half lengthwise).
- Raw wood was used.
- The panel for making thermal keys is thinner than the polystyrene foam layer.
- The corners of the house are not tightened with long screws.
- Self-tapping screws are exclusively black.
There were other mistakes, but we do not talk about them, as they do not directly relate to the technology of constructing SIP houses.
Alas, the case discussed above is not the most severe - the fatal option is discussed in the video below.
The conclusion is very simple: you should not blindly trust the customer. All stages of construction must be supervised personally, or seek the help of a knowledgeable person from the outside.
If the construction is carried out by contractors, then the quality of their work can be assessed already at the stage of acceptance of the first floor slab.
How to make electrical wiring in a house from SIP panels
There are 3 main ways to install an electrical cable in a SIP house:
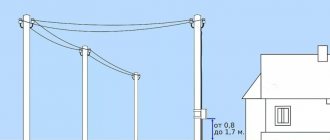
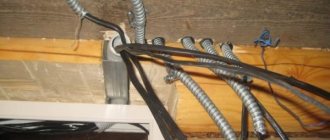
1. External laying of cables in a SIP house in cable ducts and in an open way - by wire along the walls.
This method is a classic option, well known to owners of wooden houses. Advantages of open wiring:
- The cable is always visible.
- The condition of the wiring is easy to visually check.
- The cable is easy to replace.
- High installation speed.
- Cheapness.
Disadvantages - not everyone likes to look at exposed wiring in the interior.
2. Hidden cable laying in a layer of stone wool under plasterboard mounted on galvanized profiles.
The main disadvantage of this method is the reduction in usable area in the rooms.
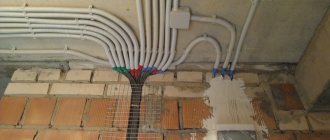
3. Hidden installation of electrical wiring in a SIP house in a layer of plasterboard screwed directly to the OSB.
As practice shows, this method is most popular among owners of houses built from SIP panels. And it raises the most questions. Let's tell you more about it.
Recommendations from experts
If the finishing inside the house is made of wooden wall panels (lining) or plasterboard, which are installed on profiles, then the wires can be placed inside the profile or in the voids between the profiles. If the finishing panel is thick, then it can be grooved to put the wire inside.
To increase fire safety, master electricians recommend using external wiring, which allows you to quickly identify a power outage or the appearance of an arc and turn off the electricity in the house to prevent a fire.
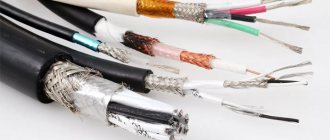
In SIP houses, it is necessary to use electrical panels from well-known manufacturing companies that guarantee the quality of their products. Regardless of the method of laying the wire, it is necessary to purchase wires with triple insulation, which does not burn or melt.
Electrical wiring work should be entrusted to qualified specialists who know the characteristics of the building material and follow all fire safety requirements during installation. Indeed, in 70% of fires in SIP houses, the cause was improperly installed electrical wiring, as well as poor-quality cable insulation.
Article on the topic: Herbal sauna in Phuket how to get there
With any option for installing electrical wiring in a SIP house, you must remember the rules for using electricity and not overload the network.
SIP house: installation of cable in a layer of drywall step by step
PKamchFORUMHOUSE Member
I have a house made of SIP panels. I was wondering how to do electrical wiring on structurally insulated panels. I want to hide it in a layer of drywall, because... The option of installing profiles under gypsum boards is eliminated. There is already little space in the house, and with them it will become even less. Questions:
- What is the best way to lay out drywall over SIP panels.
- How to run an electrical cable in a layer of plasterboard along a SIP panel.
RuralManForumHouse Member
I heard about 2 ways of laying electrical cables in drywall in a SIP house. "Pies" of the walls:
- OSB – gypsum board 9.5 mm thick – gypsum board 12 mm thick. The second layer of drywall is being grooved. The cable is laid in the grooves. Then the gypsum boards are plastered and wallpaper is glued.
- The cable is laid on OSB, then 12 mm thick sheets of plasterboard are screwed close to the cable. Then everything is covered with a second layer of gypsum board. The walls are plastered and painted. The advantage of this method is that there is no need to make grooves, but it turns out that the electrical cable is laid directly on the OSB, i.e. on a combustible base. What should I do?
Let us add that another disadvantage of the second method is its high labor intensity. Imagine for a moment how workers will be able to cut and bring gypsum board sheets to a cable already laid on OSB boards?
Step-by-step diagram for installing an electrical cable in a layer of drywall, based on the experience of FORUMHOUSE users:
1. Seal the joints in the SIP boards with self-adhesive tape for vapor barrier.
2. Using a stapler, nail a 3 mm thick laminate backing onto the SIP panels and secure the first layer of 9.5 mm thick drywall with self-tapping screws, using special bits for a screwdriver.
3. Attach a second layer of plasterboard, 12.5 mm thick, to the SIP walls and make grooves in it, without cutting through the first layer of plasterboard, for laying the electrical cable. After cutting the grooves, lay the eclectic cable in them. Putty and reinforce all joints to prevent them from cracking.
Scheme for laying out gypsum plasterboard sheets along the walls in SIP houses, so that the plasterboard joints do not fall on the OSB joints.
Denis RuchkinSpecialist in engineering communications in wooden houses. Nick on FORUMHOUSE Patriot78
I believe that fire safety has the highest priority when decorating a home. Look, in the installation diagram above, the first layer of gypsum board is a protective spacer between the cable and the SIP wall. The cable itself is laid in a groove and covered with plaster. This is how we comply with the electrical safety requirements of the PUE in wooden houses. Take a flat cable - VVGng-Ls. Drill passages in SIP panels for cables and fill them with gypsum assembly adhesive. After drying, make holes in it for pulling the cable through. Rule: between the cable and the combustible base there must be a layer of gypsum of at least 1 cm. Lay cables with a cross-section larger than 2.5 mm in a metal pipe with a wall thickness corresponding to the cross-section of the cable according to the PUE.
How to prevent a fire?
Well, the last thing I would like to talk about is how to protect the electrical wiring in a house made from SIP panels from fire. And so, there are several methods that are mandatory to use:
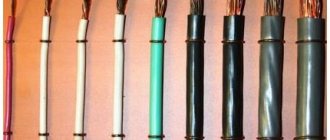
- Use of non-flammable cable grades (NYM or VVGng-ls).
- For open electrical wiring, use cable ducts made of self-extinguishing material.
- Installation of a circuit breaker that will protect against short circuits and network overloads.
- Connecting an RCD in the panel, which provides protection against leakage currents.
- Installation of grounding loop and lightning protection.
- Installation of a fire alarm and fire extinguishing system in a private house
- Replacing incandescent lamps with LED lamps. In this way, you can not only save on electricity bills, but also prevent a fire that can be caused by an electric arc when there is a short circuit between phase and zero in the cartridge.
- Installation of arc protection, which reacts to the occurrence of an electric arc, instantly turning off the voltage in the dangerous area and launching an automatic fire extinguishing system.
How to install socket boxes in SIP panels and how to make grooves in gypsum boards
We figured out how to lay electrical cables in SIP walls using gypsum plasterboard. Now we’ll tell you how to mount an internal socket box in a SIP panel.
The principle is the same - the socket box must be insulated from the foam with a fireproof material - gypsum plaster.
Method step by step:
- Use a crown to drill gypsum sheets and SIP panels. Take the height and diameter of the crown 2 cm more than the height of the socket.
- In the SIP panel, in the foam, there is a cavity that needs to be slightly expanded using a brush for an angle grinder.
This way you will increase the volume of the internal cavity in the SIP panel, which you will then fill with plaster mortar and recess the socket box into it.
- The result is a gypsum “fungus” that will reliably hold the socket box in the polystyrene foam of the SIP panel and at the same time insulate the socket box from the combustible material.
You can select a groove in a sheet of drywall using a cutter installed in a drill.
Or using a “renovator” - a multifunctional device and a special attachment, which is much faster than making grooves with a knife.
SIP house and electrics in it: a modern installation method
Interesting opinion from a member of the portal with the nickname Oldvist. The FORUMHOUSE user believes that the requirements of the PUE are long outdated and the main thing is to install a security group in the house.
OldvistFORUMHOUSE Member
The PUE requirements, in my opinion, are stuck in the Middle Ages. There are many electrical protection devices on the market now, so I don't understand why you would put cables in metal pipes. OSB boards, if they burn, do so only in the presence of oxygen, but where does it come from under a layer of plaster? In the SIP house I installed VVG-ng cables with self-extinguishing insulation. From the electrical panel, each room has its own routes to sockets and lighting, protected by automatic circuit breakers. The switchboard contains several pieces of RCD and UZM-51M, which monitors the voltage in the network and, if it goes beyond the range, turns off the entire house. I covered the SIP walls with one layer of plasterboard 12.5 mm thick. Underneath is a 5 mm thick foamed polyethylene backing. I cut the grooves in the plasterboard with a knife to OSB. I placed corrugation with a diameter of 16 mm in the groove, now I understand that it is not needed there at all. The wiring is in the corrugation. I putty all over the top. I buried the socket boxes 2 cm deep in polystyrene foam. There is no putty there. Abroad, in frame houses they lay wiring directly through wooden posts, without embedding the cables in concrete or pulling them through metal pipes.
Everyone has the right to their opinion. Below we will summarize how to install electrical wiring in SIP houses and how to prevent fire due to faulty electrical equipment in SIP panels.
Add. electrical services
- Electrical installation work in retro style
- Modern electrics in the Art Nouveau style
- Electrical design
- Electrolaboratory
- Insulation resistance measurement
- Electrician consultation
- Installation and replacement of an electric meter
- Installation of poles and power line supports
- Connecting an electric boiler to the network
- Electric heating at home
- Installing a voltage stabilizer
- Electric water heater installation
- Grounding a country house
- Lightning protection
- Modular-pin grounding
- Installation and laying of SIP cable
- Installation of cable wiring
- Connecting and extending electrical wiring
- Chasing walls for electrical wiring
- Checking the condition of the electrical wiring
- Do-it-yourself electrics
- Installation and operation of electrical equipment
- Replacing light bulbs...
- Supply of cable products
- Rules for electrical installations → PUE