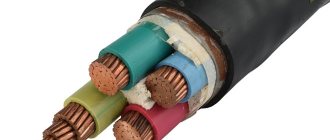
It is difficult to live without electricity in a modern apartment. However, few people think about how it gets into the room. There is an electrical panel for these purposes. This device allows you to distribute, and in residential buildings, to account for electrical energy using a meter.
Technical characteristics of ShchR, ShR, ShRS:
Shock current withstand:
- at a rated cabinet current of 250A, at least 10kA;
- at a rated cabinet current of 400A, at least 25kA.
The scope of application of ShR and ShRS cabinets are power and lighting installations in industrial, residential, administrative, public buildings and other facilities. Distribution boards are designed to protect AC electrical installations with voltages up to 600V and frequency 50Hz during overloads and short circuits. With its help, you will also be able to ensure prompt switching on or off of electrical consumers in the future. Distribution boards can be actively used for industrial enterprises.
Functions and features of the lighting board (SC)
Installation of ShchO (lighting boards) is carried out to protect outgoing lines in lighting networks, receive and distribute energy flows. Their purpose is to switch lighting circuits using high-frequency currents, control various household and industrial lighting fixtures, including emergency and street lighting. Such products may include not only start-up-switching mechanisms, but also motion sensors that ensure the illumination is turned on when a person approaches or photo relays, thanks to which it is possible to turn on the illumination depending on the degree of natural light, various programmable devices that expand the possibilities for controlling lighting devices . If necessary, a transformer can be included in the ShchO or the power switch can be connected to the panel door, if required by the customer.
Compound:
The design features are that the panels can be produced in a floor-mounted or wall-mounted version. The choice of a specific option will depend on the characteristics of the room in which the installation will take place in the future. Today, shields are manufactured in metal or plastic versions. The electrical panel may also include:
- Circuit breakers.
- Contactors.
- Load switches.
- Differential machines.
- RCD
Apartment panel (SchK)
Apartment electrical panels (AC) are designed to perform 3 main functions. Firstly, this is an accounting function, secondly, they are designed to protect household appliances from voltage surges in the incoming network, and thirdly, they must ensure the safety of the person who uses electrical appliances. The ShchK is a complex device, thanks to which the power supply is organized both for the illuminators and for the high-power current circuits.
An apartment electrical distribution board (ASB) is usually either a hinged type or mounted in special niches prepared in advance. The location of such products is the staircases of multi-storey buildings or directly the apartments of electrical energy buyers. ShchKR, as a rule, contains a recorder (meter) of electricity, shutdown protection and circuit breakers, the number of which depends on the wiring diagram of the electrical network.
offers services for the assembly and installation of electrical switchboard equipment in the city of Ryazan, the Ryazan region and surrounding regions.
ShchR 1 UHL4
Elements on the diagram:
| Designation | Name |
| QF1 | Auto. switch (3 ph) up to 63 A |
| QF2-QF7 | Auto. switch (1 ph) up to 25 A |
| A1, A2 | RCD (1 f) up to 40 A |
In order to buy ShR, ShchR, ShRS you must indicate:
- type of instalation
- Cabinet material and IP
- Data on the entire technical load of consumers
- From which company components should I assemble?
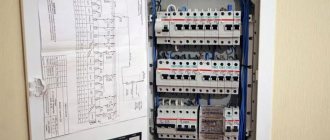
How to properly assemble an electrical panel?
Modern components make this process as easy as possible. For example: a latch lock can be installed on any side, plastic screws are used for fastening, and so on. The electrical panel for the meter and machines is assembled as follows:
- A counter is installed on the top DIN rail.
- An input load switch is mounted next to the meter.
- Both devices are connected by neutral and power wires.
- Protective equipment is attached to the lower DIN rail: voltage relay, differential and circuit breakers.
- Assemble an electrical circuit: load switch, voltage relay, switches.
- The neutral wire is connected to the bus.
- The socket is connected to the circuit.
- The protective grounding wire is connected to the corresponding busbar.
- The electrical distribution panel is completed by attaching the casing and cover to the base.
Price of distribution boards ShR, ShchR, ShchRS.
Below I would like to give you an example of the calculation and price of distribution boards. This assembly was made on the middle price segment of equipment from our domestic KEAZ (Kursk Electrical Apparatus Plant).
| Unit change | Qty | Price with VAT | |
| ShchR-1 | PC. | 1 | 31 259,62 |
| Mounted distribution board ShchRN-60z IP31 with lock (30208DEK) | PC. | 1 | |
| Load switch VN-32-363-UHL3 (141640) | PC. | 1 | |
| Single-pole automatic switch 16A S VM63 6kA (103545) | PC. | 3 | |
| Single-pole automatic switch 10A C VM63 6kA (103543) | PC. | 1 | |
| Automatic differential switch RCBO OptiDin D63-22C16-A-UHL4 with overcurrent protection (103507) | PC. | 18 | |
| Bus for DIN rail in housing (cross-module) 3L+PEN 4x11 | PC. | 2 | |
| Kit of mounting parts | PC. | 1 | |
| ShchR-2 | PC. | 1 | 22 010,23 |
| Mounted distribution board ShchRN-60z IP31 with lock (30208DEK) | PC. | 1 | |
| Load switch VN-32-363-UHL3 (141640) | PC. | 1 | |
| Single-pole automatic switch 16A S VM63 6kA (103545) | PC. | 1 | |
| Single-pole automatic switch 10A C VM63 6kA (103543) | PC. | 2 | |
| Automatic differential switch RCBO OptiDin D63-22C16-A-UHL4 with overcurrent protection (103507) | PC. | 11 | |
| Bus for DIN rail in housing (cross-module) 3L+PEN 4x11 | PC. | 2 | |
| Kit of mounting parts | PC. | 1 | |
| ShchR-3 | PC. | 1 | 21 500,00 |
| Mounted distribution board ShchRN-60z IP31 with lock (30208DEK) | PC. | 1 | |
| Load switch VN-32-363-UHL3 (141640) | PC. | 1 | |
| Single-pole automatic switch 16A S VM63 6kA (103545) | PC. | 3 | |
| Single-pole automatic switch 10A C VM63 6kA (103543) | PC. | 2 | |
| Automatic differential switch RCBO OptiDin D63-22C16-A-UHL4 with overcurrent protection (103507) | PC. | 11 | |
| Bus for DIN rail in housing (cross-module) 3L+PEN 4x11 | PC. | 2 | |
| Kit of mounting parts | PC. | 1 |
How to choose an electrical panel?
When repairing or replacing electrical wiring, the question of selecting this device arises. To select the correct electrical panel, the following criteria must be taken into account:
- Type of wiring used
. If it is open, hinged panels are better suited. If the wiring is hidden, then built-in probes are used. If the house is wooden, it is preferable to install a hinged panel. In this case it is safer. - The material from which the shield is made
(metal or plastic). A plastic body is lighter in weight and looks more modern, but is less durable than a metal one. Plastic will look better in residential areas. - The number of modules that will be installed inside the switchboard
. It depends on the sources of consumption inside the powered object. Based on the number of modules, select a shield of the required dimensions. It is better to take the electrical panel for the machines with a reserve in case of subsequent modernization. - Manufacturer of electrical panel
. The main selection criterion here is the ratio of price and quality of products.
Power shields (PS)
ShchS (Power Shield) is a system created for input/output and control of consumed energy, which also protects against short circuits and current leaks.
Main functions of the ShchS:
- providing electrical appliances with the necessary voltage (320-220 V).
- dividing the power circuit into sections, preventing the occurrence of short circuits and overloads in each section.
- protection of the cable from short circuits and overloads.
Power shields are used both at large industrial facilities and in private homes.
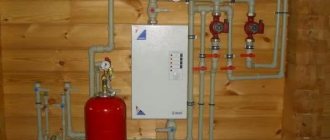
The ShchS package for private houses includes a main switch (switch), which, if necessary, can de-energize the house. There is also a counter and fuses (automatic circuit breakers).
The panel itself is a metal/plastic cabinet with a door containing the above equipment.
It should be placed near the entrance, firmly secured so as not to subject it to forceful shaking. The place should be dry, without heating devices.
Emergency lighting panel (SCHAO)
Emergency lighting panel (SCHAO) UOSCHV is an electrical device for automatically turning on emergency lighting in the event of a failure in the working lighting voltage.
The emergency lighting panel (ELB) is externally a metal welded frame product, inside of which electrical devices are located.
Main purpose:
- Protection of group lines from overloads and short circuit currents
- Electricity distribution
- Protection against electric shock.
ShchAO allows:
- Prevent a threat to human life
- Do not disrupt the technological process.
Electrical panel stickers
They are used to ensure safe operation of the device and make it easier to work with. They combine elements of color, text and graphic marking. This makes them as clear and easy to understand as possible. The electrical distribution board has the following labels:
- Warning about electrical hazards. It's a black triangle with a lightning bolt on a yellow background.
- Indicating input voltage. Executed in the form of numbers and letters (220 V).
- Notice stickers for circuit breakers for each room. Can be made in the form of inscriptions or icons.
- Indicating protective grounding. Depicts a vertical line abutting a triangle made up of lines decreasing in length.
- Indicating the manufacturer.
How to open an electrical panel?
When operating a ShchUR, the problem of penetration into the device often arises. In such cases, the question arises of how to open the electrical panel without a key. The opening procedure is as follows (it should be remembered that independent penetration is fraught with dangerous consequences):
- Carefully inspect the lock and determine its type.
- If the locking device is of the tongue type, then you can press the door with a pry bar and lift or move the tongue with a metal plate.
- If the lock has English type inserts, then it can be opened with a flat screwdriver.
- If the lock is padlocked, then you can have a snack or saw through the shackle. However, the locking device will need to be replaced.
- If the electrical panel has lugs mounted on self-tapping screws, they can be cut off.
Assembly and connection of the shield
Before starting work, we recommend organizing backup lighting for the work area (as a last resort, use a headlamp when reconnecting). Use a table where you can lay out tools and accessories. Make several brackets on the wall to temporarily tie up wires that have not yet been connected. Hang the electrical panel assembly diagram in a convenient place for viewing. Check the completeness of the systems. De-energize the input cable.
Assembly and preliminary installation of the box
The shield body should be prepared:
- remove the plugs on the walls of the box (sometimes you have to cut additional holes for entering wires);
- screw the DIN rails;
- we install neutral and grounding buses on the walls;
- remove the door (if there is one);
- connect the mounting brackets.
Now the built-in drawer can be temporarily fixed in place, checking the quality of the created niche. It is immediately removed to make it convenient to work on the wires; in addition, many professional electricians prefer to do part of the work on a workbench (you can install automatic equipment and make the necessary jumpers).
Preparing the wires
First you need to approximately adjust them in length. This is especially true if there is no cavity in the wall where excess wire can be placed (for example, if the niche is in brickwork). But you need a reserve so that you can easily reach the most distant circuit breaker or bus.
Attention! Sometimes, if there are a lot of consumers, it makes sense to run some of the conductors into the box from above, and some from below. Therefore, group them according to this characteristic and collect them in bunches.
Now the outer insulation is removed from the wiring cables. It is better to do this with a special tool that does not damage the primary insulation of the cores.
It is necessary to clean so far that at the entrance to the box the wire still remains with external insulation. Ideally, a corrugated channel (or pipe) should also fit in.
Attention! When removing the outer insulation, the markings are also lost (often the wires are simply labeled on top with a marker during installation). Therefore, we recommend immediately marking the conductors at the same time as cleaning. It is convenient to use masking tape, on which you can make any notes.
Installing the shield in place
We lay all the conductors and the input cable inside. It makes sense to align the wires in one layer; it is advisable to take into account the order of arrangement of the machines (see the diagram) to which they will be connected.
Arrangement of modular devices on DIN rail
We produce according to the scheme, strictly observing the compliance of denominations. Usually, the RCD is fixed first, and immediately behind it are its circuit breakers; at the end, independent circuit breakers and other modular devices are placed.
It is not necessary to install all the automation at once; some craftsmen like to power the RCD and the automatic devices one by one, as they are mounted on the rail. At the same stage, the meter is installed, if its place is in the shield.
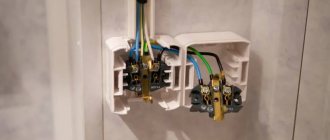
Switching
We alternately connect the cores of each circuit or specific consumer to our machines and buses. There are several important points here:
- we work in order, for example, from right to left;
- we bring the core to the fixation point and cut off the excess;
- we lay wires in the shield horizontally and vertically, turns only at right angles;
- if there is not enough space, or it is not possible to run wires from different sides of the box, you can run the wires behind the DIN rail. We strip the ends of the wires from the main insulation by about 1 centimeter (we use a special tool);
- Be sure to put lugs on soft conductors;
- we place the ends under the clamp of the machine and tighten the terminal tightly;
- We supply voltage to the machine from above, and connect the conductor from below (although most devices are double-sided, this is a generally accepted standard);
- tugging the wire with our hands, we check the reliability of the fixation, while paying attention that the copper does not protrude above the machines, but that the insulation is not pinched;
- We collect bundles of wires together with plastic ties and place them behind the rail.
We distribute phase and neutral between modular devices. Non-professionals usually have difficulties with switching RCDs; how to do this can be seen in the panel diagram.
The main transfer in one row can be done with contact combs; in the absence of such, electricians sometimes use homemade jumpers. These should be rigid wires with a cross-section of 4–6 square.
Input connection
The input cable is clamped to the main circuit breaker (phase and neutral), and the grounding conductor goes directly to the bus. From the machine, phase and zero go either to the counter or are already distributed according to the scheme.