Let's try to understand the approach to choosing an autonomous solar system, which factors are more important and which are less important.
First of all, you need to determine how much energy you need per month, and so that the cost of a solar power plant does not become fantastically high, reduce your needs as much as possible. Then you need to determine how much solar energy can be obtained in the area where the solar installation will operate. Approximate data are given in meteorological reference books; some information on solar insolation can be found on the Internet. Typically, solar insolation levels are expressed in Watts/m2 broken down by month. Moreover, seasonal fluctuations can be very significant.
What do you need for work?
To manufacture a generator consisting of a set of solar panels, the following tools and materials are required:
- modules for converting sunlight into energy;
- aluminum corners;
- wooden slats;
- chipboard sheets;
- a transparent element (glass, plexiglass, plexiglass, polycarbonate) to create protection for silicon wafers;
- self-tapping screws and screws of different sizes;
- dense foam rubber 1.5-2.5 mm thick;
- high-quality sealant;
- diodes, terminals and wires;
- screwdriver or set of screwdrivers;
- soldering iron;
- hacksaw for wood and metal (or grinder).
The volume of materials needed will directly depend on the planned size of the generator. Large-scale work will entail additional costs, but in any case it will be cheaper than a purchased module.
The protective base for silicon wafers can be made of glass, plexiglass, polycarbonate or plexiglass. The first three materials create minimal loss of converted energy, but the fourth transmits rays much worse and significantly reduces the efficiency of the entire complex
For final testing of the assembled unit, an ammeter is used. It allows you to record the real efficiency of the installation and helps determine the actual output.
The procedure for modifying the windings
Before making a generator from an asynchronous motor, you should understand its stator coils, connected to each other and connected to the supply line according to a certain circuit.
Additional Information. For the classic connection of asynchronous mechanisms, two types of connection of stator windings are used: according to the so-called “star” or “delta” circuit.
In the first case, all three linear coils (A, B and C) on one side are combined into a common neutral wire, while their other ends are connected to three phase lines. When turned on with a “triangle”, the end of one coil is connected to the beginning of the second, and its end, in turn, is connected to the beginning of the third winding, and so on until the chain is closed.
As a result of this connection, a regular geometric figure is formed, the vertices of which correspond to the three phase wires, and the neutral wire is completely absent.
For reasons of ease of installation and operational safety, in household circuits a star connection is usually chosen, which provides the possibility of organizing local (repeated) protective grounding.
When modifying the engine, you should remove the cover of the junction box and gain access to the terminals, which under normal conditions receive three-phase supply voltage. In generator mode, the supply line with household three-phase consumers connected to it should be connected to these contacts.
To organize single-phase power supply (socket lines and lighting circuits, in particular), they will need to be connected at one end to the selected phase contact A, B or C, and at the other end to the common neutral wire. The procedure for connecting wires to an asynchronous motor is shown in the following figure.
Thus, a do-it-yourself generator assembled from a three-phase motor will be loaded on all supply circuits, and end consumers will receive the standard power they are entitled to.
Selecting the type of photoconverter
Activities to create a solar generator with your own hands begin with choosing the type of photovoltaic silicon converter.
These components come in three types:
- amorphous;
- monocrystalline;
- polycrystalline.
Each option has its own advantages and disadvantages, and the choice in favor of any of them is made based on the amount of funds allocated for the purchase of all system components.
Features of amorphous varieties
Amorphous modules do not consist of crystalline silicon, but of its derivatives (silane or hydrogen silicon). By spraying in a vacuum, they are applied in a thin layer to high-quality metal foil, glass or plastic.
The finished products have a faded, blurry gray tint. No visible silicon crystals are observed on the surface. The main advantage of flexible solar panels is their affordable price; however, their efficiency is very low and ranges from 6-10%.
Amorphous solar cells made from silicon have increased flexibility, exhibit high levels of optical absorption (20 times greater than mono- or polycrystalline counterparts) and operate significantly more efficiently in cloudy weather
Specifics of polycrystalline types
Polycrystalline solar cells are produced by gradually cooling a silicon melt very slowly. The resulting products are distinguished by a rich blue color, have a surface with a clearly defined pattern reminiscent of a frosty pattern, and exhibit an efficiency of around 14-18%.
Higher efficiency performance is hampered by the areas present inside the material, separated from the overall structure by granular boundaries.
Polycrystalline solar cells operate for only 10 years, but during this time their efficiency does not decrease. However, to install products into a single complex, a strong, solid base must be used, since the sheets are quite rigid and require strong, reliable support
Characteristics of monocratylic variants
Monocrystalline modules are characterized by a dense dark color and consist of solid silicon crystals. Their efficiency exceeds that of other elements and amounts to 18-22% (under favorable conditions - up to 25%).
Another advantage is the impressive service life - according to the manufacturers, over 25 years. However, with prolonged use, the efficiency of single crystals decreases and after 10-12 years the photoreturn is no more than 13-17%.
Monocrystalline modules are significantly more expensive than other types of equipment. They are produced by sawing artificially grown silicon crystals
To create a solar generator at home with your own hands, you mainly take poly- and monocrystalline plates of various sizes. They are purchased from popular online stores, including eBay or Aliexpress.
Due to the fact that photocells are valued quite highly, many suppliers offer customers products of group B, that is, fragments suitable for full use with a slight defect. Their cost differs from the standard price by 40-60%, so assembling a generator costs a reasonable price that is not too expensive.
About batteries for autonomous systems
Batteries are probably the most expensive and important part of the system, they are very capricious and quickly deteriorate, there are many types of them and they need to be treated with care, otherwise they quickly lose capacity and deteriorate.
That’s why you need to buy a smart controller so that it can be configured for different types, or it should already have pre-installed settings for working with different types of batteries. For example, car starter batteries lose capacity very quickly in autonomous systems, just 1-2 years and they already lose 90% of capacity. This is due to deep discharges, since cheap controllers turn off consumers at 10 volts, and car batteries are not designed for this, so if you use them, do not discharge them more than 110.8-12.0 volts.
Traction batteries are more durable and can be discharged by 80%, but they are more expensive and it is also not advisable to discharge them to 10 volts. There are also, for example, gel batteries that are critical to overcharging. There are many subtleties and it is better to study everything so as not to lose your money. You can read more about lead batteries here - Automotive and traction batteries
Alkaline batteries are very durable, but also very expensive. And if lead batteries have an efficiency of 85-90%, then alkaline batteries are a little inferior here, and if they are operated by charging and discharging with high currents, then their efficiency noticeably deteriorates. Such batteries are not profitable, especially in winter, since there is already little energy coming in, and even the batteries give out 30% less energy than they receive from solar panels. Although now it seems that alkaline batteries with improved efficiency have appeared, the overall picture is the same.
Lithium iron phosphate batteries are the most promising for autonomous systems; they have a high efficiency of 95-98%, and at the same time are not at all afraid of undercharging, deep discharges, and high discharge-charge currents. But they are also expensive and require an additional BMS cell condition monitoring system. If such a battery is charged or discharged below the required level, it irreversibly loses capacity or the cell stops working altogether. But the condition of the battery is monitored by the BMS and it also balances the battery charge, so if something goes wrong, it will protect the battery and turn everything off, and it will not deteriorate.
You can’t describe everything in one article, but I tried to mention and describe the main things so that it would be clear to those who are not at all familiar with this. You can read more in other articles from the section. But in general, at the moment, judging by my experience, it is more profitable to build a small power plant without an inverter and power all electronics from 12 volts, and if everything is transferred to 220 volts, then build a system at 48 volts. Especially in winter, even a little extra energy is very necessary. Also, this winter I have lithium iron phosphate (lifepo4) batteries, and obviously the energy in general is noticeably greater than when using car batteries, plus lifepo4 have not deteriorated at all and there is no loss of capacity, although they have not been charged for a whole month before end and were constantly discharged until shutdown.
How to make a frame for plates?
To make the frame of the future generator, strong wooden slats or aluminum corners are used. The wooden version is considered less practical, since the material requires additional processing to avoid subsequent rotting and delamination.
In order for the wooden frame to withstand the operational load and not rot after the first rain, it must be impregnated with a special composition that protects the wood from moisture.
Aluminum has much more attractive physical characteristics and, due to its lightness, does not place unnecessary stress on the roof or other supporting structure where the unit is planned to be installed.
In addition, due to the anti-corrosion coating, the metal does not rust, does not rot, does not absorb moisture and easily withstands the effects of any aggressive atmospheric manifestations.
To create a frame structure from aluminum corners, first determine the size of the future panel. In the standard version, 36 photocells measuring 81 mm x 150 mm are used per block.
For correct subsequent operation, a small gap (about 3-5 mm) is left between the fragments. This space allows us to take into account changes in the basic parameters of the base exposed to atmospheric manifestations. As a result, the total size of the workpiece is 83 mm x 690 mm with a frame corner width of 35 mm.
Silicon wafers placed in an aluminum profile frame look almost like factory-made products. A durable and strong frame provides the system with impeccable tightness and gives the entire structure a high level of rigidity
After determining the dimensions, the necessary fragments are cut out from the corners and assembled into frame frames using fasteners. A layer of silicone sealant is applied to the inner surface of the structure, making sure that there are no gaps or voids.
The integrity, strength and durability of the mounted structure depends on this. A protective transparent material is placed on top (glass with anti-reflective coating, plexiglass or polycarbonate with special parameters) and securely fastened with hardware (1 per short and 2 per long part of the frame and 4 at the corners of the body).
For work, use a screwdriver and screws of a suitable diameter. At the end, the transparent surface is carefully cleaned of dust and small debris.
Heat pumps for heating
Heat pumps are one of the most advanced technological solutions in obtaining alternative energy for your home. They are not only the most convenient, but also environmentally friendly.
Their operation will significantly reduce the costs associated with paying for cooling and heating the premises.
Classification of heat pumps
I classify heat pumps by the number of circuits, the source of energy and the method of obtaining it.
Depending on the final needs, heat pumps can be:
Based on the type of energy source and method of obtaining it, the following heat pumps are distinguished:
- Soil - water. They are used in temperate climate zones with uniform heating of the earth, regardless of the time of year. For installation, a collector or probe is used, depending on the type of soil. Drilling shallow wells does not require obtaining permits.
- Air - water. Heat is accumulated from the air and directed to heat water. The installation will be appropriate in climate zones with winter temperatures not lower than -15 degrees.
- Water is water. Installation is determined by the presence of bodies of water (lakes, rivers, groundwater, wells, settling tanks). The efficiency of such a heat pump is very impressive, which is due to the high temperature of the source during the cold season.
- Water is air. In this combination, the same reservoirs act as a heat source, but the heat is transferred directly to the air used to heat the premises through a compressor. In this case, water does not act as a coolant.
- Soil is air. In this system, the heat conductor is the soil. Heat from the ground is transferred to the air through the compressor. Non-freezing liquids are used as energy carriers. This system is considered the most universal.
- Air - air. The operation of this system is similar to the operation of an air conditioner, capable of heating and cooling a room. This system is the cheapest, as it does not require excavation work or laying pipelines.
When choosing the type of heat source, you need to focus on the geology of the site and the possibility of unhindered excavation work, as well as the availability of free space.
If there is a shortage of free space, you will have to abandon heat sources such as earth and water and take heat from the air.
The efficiency of the system and the costs of its installation largely depend on the correct choice of the type of heat pump.
Working principle of a heat pump
The operating principle of heat pumps is based on the use of the Carnot cycle, which, as a result of sharp compression of the coolant, provides an increase in temperature.
Most climate control devices with compressor units (refrigerator, freezer, air conditioner) operate on the same principle, but with the opposite effect.
The main operating cycle, which is implemented in the chambers of these units, has the opposite effect - as a result of a sharp expansion, a narrowing of the refrigerant occurs.
That is why one of the most accessible methods for manufacturing a heat pump is based on the use of individual functional units used in climate control equipment.
So, a household refrigerator can be used to make a heat pump. Its evaporator and condenser will play the role of heat exchangers, removing thermal energy from the environment and directing it directly to heating the coolant that circulates in the heating system.
Low-grade heat from soil, air or water, together with the coolant, enters the evaporator, where it turns into gas, and is then further compressed by the compressor, resulting in the temperature becoming even higher
Assembling a heat pump from scrap materials
Using old household appliances, or rather, their individual components, you can assemble a heat pump yourself. Let's look at how this can be done below.
Step #1 - prepare the compressor and condenser
Work begins with the preparation of the compressor part of the pump, the functions of which will be assigned to the corresponding unit of the air conditioner or refrigerator. This unit must be secured with a soft suspension on one of the walls of the workroom where it will be convenient.
After this, you need to make a capacitor. A 100 liter stainless steel tank is ideal for this. You need to install a coil into it (you can take a ready-made copper tube from an old air conditioner or refrigerator.
The prepared tank must be cut lengthwise into two equal parts using a grinder - this is necessary for installing and securing the coil in the body of the future capacitor.
After installing the coil in one of the halves, both parts of the tank must be connected and welded together so as to form a closed tank.
To make the condenser, a 100-liter stainless steel tank was used; using a grinder, it was cut in half, a coil was installed, and reverse welding was performed.
Please note that when welding you need to use special electrodes, and even better, use argon welding, only it can ensure maximum quality of the seam.
Step #2 - making an evaporator
To make an evaporator, you will need a sealed plastic tank with a volume of 75-80 liters, into which you will need to place a coil made of pipe with a diameter of ¾ inches.
To make a coil, it is enough to wrap a copper tube around a steel pipe with a diameter of 300-400 mm, followed by fixing the turns with a perforated angle
Threads must be cut at the ends of the tube to subsequently ensure connection with the pipeline. Once assembly is complete and the seal has been checked, the evaporator should be secured to the wall of the workroom using brackets of the appropriate size.
It is better to entrust the completion of assembly to a specialist. While some of the assembly can be done yourself, soldering the copper pipes and pumping in the refrigerant should be done by a professional. Assembly of the main part of the pump ends with the connection of heating batteries and a heat exchanger.
It should be noted that this system is low-power. Therefore, it will be better if the heat pump becomes an additional part of the existing heating system.
Step #3 - arrangement and connection of an external device
The best source of heat is water from a well or borehole. It never freezes and even in winter its temperature rarely drops below +12 degrees. It will be necessary to install two such wells.
Water will be drawn from one well and subsequently supplied to the evaporator.
Groundwater energy can be used year-round. Its temperature is not affected by weather conditions and seasons
Next, the waste water will be discharged into the second well. All that remains is to connect it all to the inlet of the evaporator, to the outlet and seal it.
In principle, the system is ready for operation, but for its complete autonomy it will require an automation system that controls the temperature of the moving coolant in the heating circuits and freon pressure.
At first, you can get by with an ordinary starter, but it should be noted that starting the system after turning off the compressor can be done in 8-10 minutes - this time is necessary to equalize the freon pressure in the system.
Selecting a transparent element
The main criteria for choosing a transparent element to create a generator:
- ability to absorb infrared radiation;
- level of refraction of sunlight.
The lower the refractive index, the higher the efficiency the silicon wafers will demonstrate. Plexiglas and plexiglass have the lowest coefficient of light reflection. Polycarbonate also has far from the best performance.
To create frame structures for home solar systems, it is recommended, if possible, to use anti-reflective transparent glass or a special type of polycarbonate with an anti-condensation coating that provides the necessary level of thermal protection.
The best characteristics in terms of absorption of IR radiation have durable thermal-absorbing plexiglass and glass with an IR absorption option. For ordinary glass these figures are significantly lower. The efficiency of IR absorption determines whether the silicon wafers will heat up during operation or not.
If the heating is minimal, the photocells will last a long time and provide stable output. Overheating of the plates will lead to interruptions in operation and rapid failure of individual parts of the system or the entire complex.
Device classification
The classification of the device is extensive. Today it can be asynchronous and synchronous, with a fixed rotor or stator, single-phase, two-phase and three-phase, with independent or self-excitation, with field windings or excitation from a permanent magnet.
Note! It is worth noting that at the moment three-phase models are more popular due to the rotating circular magnetic field, the balance of the system, operation in several modes and high levels of efficiency.
Equipment classification
How to test the installed unit?
Before finally sealing the assembled generator, it must be tested in order to identify potential malfunctions during the soldering process. The most reasonable option is to check each soldered row separately. This way it will immediately become clear where the contacts are poorly connected and require re-processing.
To carry out the test, use a household ammeter. The measurement is carried out on a cloudless sunny day at lunchtime (from 1 to 3 p.m.). The structure is placed in the yard and installed at the appropriate angle of inclination.
A household ammeter helps measure the actual current. Based on its readings, it is possible to determine the level of performance of the mounted solar system and identify violations in the sequence of connection of silicon photocells
An ammeter is connected to the output contacts of the solar battery and the short circuit current is measured. If the device shows results above 4.5 A, the system is completely correct and all connections are soldered clearly and correctly.
Lower data that appears on the tester display indicates violations that need to be tracked and re-soldered. Traditionally, do-it-yourself solar generators from photocells with a slight defect (group B) show figures from 5 to 10 Amperes on the test.
Factory-produced units show data 10-20% higher. This is explained by the fact that the production uses silicon wafers of group A, which do not have any defects in the structure.
Basic requirements for an inverter
To create this device, you need to clearly understand why it is needed in the system. Inverters are involved in converting electrical current. After all, thanks to solar cells, a constant charge accumulates in the batteries.
Meanwhile, to power all household appliances, only alternating voltage of a certain frequency is required. This means that you will have to use powerful field-effect transistors to assemble the inverter.
To select them, you will first have to calculate the total power that the solar-powered system will power. At the same time, it is hardly worth talking about how hot the field-effect transistors will be during operation.
Consequently, for their high-quality cooling, you will have to use a fairly large radiator, which will be forced to blow. To effectively remove heat, you will have to additionally use thermal paste.
Don’t you think that creating an inverter yourself requires a lot of effort? It is much easier to purchase a ready-made device in accordance with power recommendations.
The final stage of work
If the test shows that the battery is fully functional, it is sealed with a special silicone sealant or a more expensive and durable epoxy compound.
The work involves two ways of doing it:
- Full filling - when the entire surface is covered with a sealing compound.
- Partial treatment - when the sealant is applied only to the outer elements and the empty space between the elements.
The first option is considered more reliable and provides the system with complete protection from external factors. Photocells are clearly fixed in place and work correctly with maximum efficiency.
To seal photocells inside the housing, it is advisable to use a frost-resistant sealant that can withstand sudden temperature changes and low subzero temperatures.
When the filling is completed, the sealant is allowed to “set.” Then they cover it with a transparent element and press it tightly against the plates.
In order to provide additional protection and shock absorption, some craftsmen recommend placing dense foam rubber between the surface of the silicon slab and the back of the frame. This will make the structure more integral and protect fragile photocells from unnecessary load.
Then a weight is placed on the surface, which acts on the layers and squeezes air bubbles out of them. The finished generator is tested again and finally installed in a pre-prepared place.
Neutral wire method
Voltage is supplied to a residential building using two conductors: one of them is phase, the second is zero. If the house is equipped with a high-quality grounding circuit, during periods of intense electricity consumption, part of the current flows through the grounding into the ground. By connecting a 12 V light bulb to the neutral wire and ground, you will make it glow, since the voltage between the zero and ground contacts can reach 15 V. And this current is not recorded by the electric meter.
Producing electricity using a neutral wireThe circuit, assembled according to the principle of zero - energy consumer - earth, is quite working. If desired, a transformer can be used to equalize voltage fluctuations. The disadvantage is the instability of the appearance of electricity between zero and ground - this requires the house to consume a lot of electricity.
Despite the fact that such a system uses the earth to operate, it cannot be classified as a source of earthly electricity. How to extract energy using the electromagnetic potential of the planet remains open.
Where and how to place the generator?
The location for installing the solar generator is chosen very carefully and without haste. The plates that receive light must be placed at an angle so that the rays do not “fall” perpendicularly to the surface, but seem to “flow” neatly along it.
Ideally, the structure is positioned so that it remains possible, if necessary, to adjust the angle of inclination, in this way, “catching” the maximum amount of sun.
It is quite acceptable to install a solar system from solar panels on the ground, but most often the roof of a house or utility room is chosen for placement, namely that part of it that faces the most consecrated, mainly southern side of the site.
It is very important that there are no tall buildings or powerful, spreading trees nearby. Being in close proximity, they create a shadow and interfere with the full operation of the unit.
For solar installations to perform well, they must be kept clean and tidy. A layer of dirt formed on the surface of the catching panel reduces efficiency by 10%, and adhered snow completely shuts down the unit. Therefore, regular maintenance is a must and helps keep the modules in perfect operating condition.
The average roof slope level for installing a solar generator is considered to be 45⁰. With this arrangement, photocells absorb solar flux very efficiently and produce the amount of energy necessary for the correct functioning of the house.
To get real returns from the panels and provide the average family with the required amount of energy, you will have to occupy 15-20 sq.m of roof surface for a solar generator
For the European part of the CIS countries, slightly different indicators apply. Professionals recommend using a stationary tilt angle of 50-60⁰ as a basis, and in movable structures during the winter season placing the batteries at an angle of 70⁰ to the horizon.
In summer, change the position and tilt the photocells at an angle of 30⁰.
By installing generator panels on a track system equipped with an automatic sun tracking option, you can increase the output efficiency by 50%. The module will independently detect the intensity of the rays and will adjust to the maximum illumination from dawn to sunset
Immediately before installation, the roof is additionally strengthened and equipped with special strong supports, since not every structure is able to withstand the full weight of equipment for converting solar energy.
To reliably and firmly install a solar generator on the roof, it is worth purchasing special fastenings. They are produced separately for each type of roofing and are always available for sale. When installing between the panels and the roof, it is necessary to leave a gap for full access of air and correct ventilation of the sun-absorbing elements
In some cases, reinforced rafters are placed under the roof to protect the roof from collapse, potentially due to increased load, which increases significantly in the winter season when snow accumulates on the roofing surface.
To put the solar system into operation, you will need batteries, an inverter and a charge controller. You will learn about the rules for selecting devices and their inclusion in the circuit from the articles we recommend.
Popular sources of renewable energy
“Green technologies” will significantly reduce household costs through the use of practically free sources.
Since ancient times, people have used mechanisms and devices in everyday life, the action of which was aimed at converting the forces of nature into mechanical energy. A striking example of this are water mills and windmills.
With the advent of electricity, the presence of a generator made it possible to convert mechanical energy into electrical energy.
The water mill is the predecessor of the automatic pump, which does not require the presence of a person to perform the work. The wheel rotates spontaneously under the pressure of water and independently draws water
Today, a significant amount of energy is generated precisely by wind complexes and hydroelectric power plants. In addition to wind and water, people have access to such sources as biofuels, the energy of the earth's interior, sunlight, the energy of geysers and volcanoes, and the power of tides.
The following devices are widely used in everyday life to generate renewable energy:
- Solar panels .
- Heat pumps.
- Wind generators for home.
The high cost of both the devices themselves and installation work stops many people from receiving seemingly free energy.
Payback can reach 15-20 years, but this is not a reason to deprive yourself of economic prospects. All these devices can be made and installed independently.
When choosing a source of alternative energy, you need to focus on its availability, then maximum power will be achieved with a minimum of investments
Sets of solar panels 3 kW for a dacha from 60,000 rubles
At the dacha, as a rule, there are low-power electrical appliances that require a limited number of batteries and a small frequency of their use. If there is no centralized power supply at the dacha, then it is advisable to install a set of solar panels that will generate electricity for free. However, in order to receive such free pleasure, you will initially have to spend money on purchasing the necessary materials, the cost of which will only pay off in a few years.
To produce 1 kW of electricity, a kit with a capacity of more than 200 W is required. According to numerous reviews, solar power plants for a country house with a capacity of 800 W are capable of providing a complete autonomous power supply to the facility. The cost of such a system will cost from 80,000 rubles.
A standard kit for a solar power plant for a summer residence consists of 200 W panels, a 40 A charge controller, a 3 kW inverter, two 200 A batteries and other auxiliary parts. The price of such a kit starts from 60,000 rubles, and the approximate payback period is 3-5 years. However, this is the most profitable way to obtain electricity for facilities without a centralized power supply. It is less expensive than using a diesel generator.
Components of a solar station
According to reviews from owners, it is better to equip solar panels for a house in a summer cottage with two or four modules with a power of 200 V each. This depends on the number of energy consumers, the duration and frequency of their use. If the power is not enough, it can be increased by adding solar panels.
Many people purchase such a kit for the private sector, where there is a centralized power supply, as an additional source of energy. Numerous reviews of solar panels for the home indicate that in this case you can significantly save on electricity bills.
Real output of a solar power plant for a home
The output depends on the power and angle of inclination of the panels, the intensity of the sun and the length of daylight hours.
Batteries differ in area, which affects their power. It can be 10W, 100W, 150W, 260W and so on. However, the actual output of the panel is usually higher than its rated power, since the solar intensity factor must be taken into account. In the southern regions the sun shines stronger and longer, and in the northern regions it shines weaker and less, so the same panel produces different amounts of electricity.
Case Study
This is a graph of electricity production from one 260W panel for June 2022. The total output of the station for the month is 34.89 kW. Based on the calculation that the nominal monthly power of the battery is 7.8 kW (260 W X 30 days), its actual power turned out to be 4.5 times higher (correction factor). In summer it is larger, in winter it is smaller or absent altogether.
The graph shows that production is not constant and there are sharp drops - these are cloudy days, when daylight hours are shorter and solar activity is very weak. The worst performance was recorded on June 17 - about 0.4 kW, and the maximum on June 25 - about 1.4 kW.
And this is what the output of a solar battery looks like hourly during the day:
Production starts around 9am, peaks around 1pm, then gradually declines and stops around 7pm. During the day there are small dips - when the sun was hidden by clouds.
Power generation was unstable from approximately 1:00 pm to 3:00 pm due to cloud cover. But this did not greatly affect the final performance of the station - 1.32 kW.
There were many failures during the day, which affected the final output of the station - 0.98 kW.
And this is a cloudy rainy day, when solar activity is very weak and the generation during the day was 0.45 kW.
From this we can conclude that relying entirely on solar electricity is difficult. The performance of the station is highly dependent on the intensity of the sun and even in summer it can be inconsistent due to cloudy weather.
Preparing the coils
Ideally, you need to make a detailed calculation of the coil parameters. But, for a low-power generator operating at low speeds, an approximate calculation can be made. For this device, there are enough coils in which the total number of turns will be in the range of 1000-1200.
To increase power, the number of poles should be increased. Make the coils using thick wires to minimize resistance and therefore increase the current.
After assembling the generator, it should be checked. To do this, it is not necessary to attach the unit to the windmill. Just connect your measuring instruments to it and try turning it by hand.
How to connect if there is electricity on the site
If the site is connected to the network, then installing a solar power plant will make the house more energy independent, reduce energy costs and even make money on it thanks to the feed-in tariff.
- DIY solar cell assembly
There is no battery in this connection scheme, since there is no need to store electricity (but if you want to have a backup power source in case the lights go out, then a battery is required).
To connect such a station, you only need a solar battery (or several), which is connected to an outlet through a network inverter. In this form, the station is already ready for operation. The battery generates electricity and you immediately consume it for internal needs: running the refrigerator, lighting, kettle, etc.
Photo of real power plant connection
For example, the station’s daily output is 1 kW of electricity, and the building consumes a total of 5 kW. In fact, you only take 4 kW from the network. But if the station produces 5 kW per day, and you actually consume only 2 kW, then the remainder (3 kW) is burned. In this case, you can connect a green tariff and sell the difference to the state at a higher price, or install a battery and accumulate the excess for it.
Now there are companies that connect green tariffs on a turnkey basis. Starting from the selection and installation of the station to the conclusion of an agreement with OBLENERGO.
Testing
Before testing the “balcony” system, one problem emerged - inverters for such a small scale are simply not produced. Typical parameters of a grid tie inverter are power from 250W and panel voltage 22-65 or 45-90V. I have 2 parallel connected solar panels of 50W each giving 12-21V. Finally, after searching on ebay, almost the only model with a long name was found: 500W MPPT Micro Grid Tie Inverter 10.5-28V. The word “micro” here is clearly marketing, because... There is no possibility of mounting on the panel. The inverter looks something like this (photo from the seller’s page).
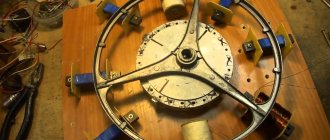
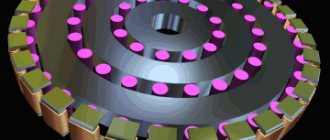
Attaching magnets
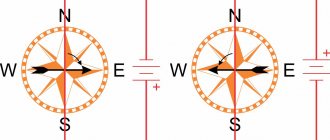
The magnets should be fixed on the rotor disks. For a standard hub, 20 magnets of standard size 25x8 mm will be sufficient. Magnets must be positioned with alternating poles.
It is better to make a paper template, which you attach to the disk, and place magnets on it.
Ideally, rectangular magnets should be used. Before applying, mark each magnet by pole to avoid confusion when alternating.
The attracting sides are “+”, the repulsive sides are “-”. Magnets must be secured with reliable glue. For additional fixation, they should be filled with epoxy resin on top.