Design features
Any electric drill consists of a housing where electrical and mechanical parts are located. There is also a chuck in which the drill is mounted (on the main shaft of the tool).
What is included in the electrical part of the drill? Typically these are the following components:
- Contact brushes (they are fixed in the brush holder).
- Start button.
- Engine speed regulator.
- Reverse.
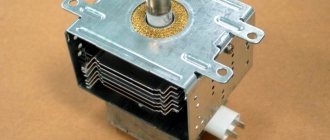
- Electric motor.
- Start capacitor.
- Power cable (cord).
The mechanical part includes a gearbox and a bearing system. Without electrics and mechanics, the operation of a tool is impossible. The responsibilities of the gearbox are to transmit rotation from the electric motor to the shaft.
In an impact drill (hammer), the mechanics are more complex. Here the mechanism provides not only rotation, but also the shock-translational movement of the drill. Therefore, a hammer drill has gears, as well as two pistons, an impact and a flying pistons, a ram and a striker.
Symptoms of electric drill problems
Every electric drill system can fail. You can determine the causes of a malfunction by knowing their main symptoms.
Mechanical defects
The following signs indicate that the problem lies in one of the mechanical devices:
- jamming of the cartridge, inability to turn it by hand;
- metallic knocking and grinding noises during operation;
- crunch of plastic inside the case;
- hum of worn-out bearings, increased vibration;
- the impact mechanism does not turn on;
- the cartridge flies off the working shaft.
Mechanical failure can lead to malfunctions that occur periodically. Don't expect it to correct itself. As soon as the first signs of a problem are detected, it is necessary to stop work and eliminate the defect. Otherwise, the cost of repairs will increase significantly.
Signs of electrical failure
The electrical part also has its own characteristic signs of malfunction:
- the drill does not start, the motor does not rotate;
- the motor hums, but does not work;
- brushes spark strongly;
- The speed controller does not work, the speed does not change;
- The reverse does not work, the cartridge rotates only in one direction;
- the engine runs unstably, sometimes breaking at high speeds;
- there is a characteristic smell of smoldering wiring;
- The drill body gets hot.
Selection of spare parts
During maintenance or DIY repairs of a Bosch drill, you may notice wear on some parts. Of course, they need timely replacement. Many craftsmen warn that it is necessary to use only original components.
Also, don't look for any complicated workarounds. A typical example of a gross and unforgivable mistake - instead of a broken button of the standard version, a regular toggle switch is installed. This type of “repair” should be avoided because using such a drill can be dangerous.
The range of spare parts market for power tools is quite diverse, so you can always find the necessary spare part. If the drill was purchased in one of the stores of a large retail chain, then finding the part will not be a problem. All you need is to determine the manufacturer’s brand and the exact name of the instrument model. For example, Bosch. Do-it-yourself drill repair will be greatly facilitated if you know this information. Usually it is printed on the nameplate of any device.
This is due to the fact that various modifications of the same model may have both compatible components and completely unsuitable parts. You should not only focus on their appearance, but also clarify information regarding the main dimensions and dimensions of the parts.
With the components of the drive mechanism, everything is not so difficult, since the data can be found without difficulty:
- There are bearing markings on the protective rings of the cages.
- Gear nomenclature codes are stamped on them.
As practice shows, it is very easy to select spare parts for many models of the most popular tools. As an exception, there are drills that have been in use for more than thirty years.
If the electric motor is faulty, when should it be replaced?
The commutator-type electric motor on a drill and any other tool is the heart of the equipment, which costs 60% of the total cost of the device. If the malfunction is related to the electric motor, then there are two ways to repair the drill malfunction - replace the entire motor or carry out diagnostics, identify the malfunction and eliminate it. It should be noted right away that you can do the diagnostics yourself, but you won’t be able to fix the faults yourself. Here you will need to take the faulty unit to a specialized workshop, but practice shows that it is easier to buy a new rotor or stator than to repair them.
This is interesting!
It is also rational to take the engine in for repair when it is impossible to find spare parts for it.
Let's consider the principle of checking the serviceability of the stator and rotor of an electric drill motor with your own hands:
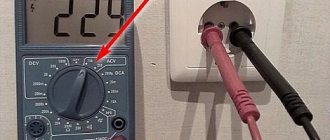
- Using a multimeter in resistance measurement mode, the value between the armature windings and the metal core is measured. The presence of resistance indicates a violation of the integrity of the insulation
- We use a marker to indicate the plate from which the check begins. Use the probes of the tool to touch the plates one by one and record the resistance value. In this case, the value between the plates should be approximately the same. A resistance difference of more than 10% is unacceptable and indicates the presence of a break
- Checking interturn short circuit. A special device can be used to measure the presence of an interturn short circuit. It makes no sense to buy such a device specifically, since if there is no breakdown of the insulation on the body or a short circuit between the plates, then with a high degree of probability it can be assumed that the armature is working
- After this, you should check the serviceability of the rotor. Similarly, the absence of resistance between the winding and the core is checked
- Check the resistance between the windings. The absence of resistance indicates complete damage to the winding, and if its value is large, a breakdown can be assumed. The video description below describes in detail how a step-by-step check of the serviceability of the commutator motor is carried out.
Malfunctions of the stator are less common than the rotor, but in any case, if the drill has recently been operating under high load, then the motor will fail. If it is determined that the motor on a drill is faulty, then it is easier to replace it than to repair it, and sometimes it is better to buy a new drill. The video below describes in detail how to find and fix electrical problems with a drill.
What equipment you may need
To be able to perform basic repairs on your own electric drill, you cannot do without the appropriate equipment. Usually, it all depends on the nature of the malfunction, but in most cases, to repair a Makita drill (or any other manufacturer) yourself, you will definitely need the following tools:
- Screwdriver – for disassembling the device body.
- Multimeter - you can use it to find a fault in an electrical circuit.
- Sandpaper – for cleaning oxidized contacts.
Based on what exactly caused the breakdown, you will need to purchase some components:
- Gears.
- Brushes.
- Bearings.
- Trigger (button).
If the previous disassembly of the drill was carried out a long time ago, then the lubricant in the gearbox should be replaced as a preventive measure. This will not only significantly reduce the load on the electric motor, but also increase the service life of manual equipment. Bearings also need lubrication. For this reason, after eliminating the main causes of the malfunction, these parts should be diagnosed.
Electrical problems
Before disassembling the drill , you should make sure that it is unplugged. Any disassembly begins with removing the fasteners. Then we unscrew the screws and screws, remove the upper part of the product - all the components remain in the lower part. The electrical circuit of the drill is quite simple - there is no need to separately describe all the elements, everything is already intuitive.
Naturally, for models with electronic adjustments it is much more complicated, but it is unlikely that you will be able to repair a drill with such components yourself; it is better to entrust this to specialists from the service center.
Do-it-yourself repair of a drill gearbox
If there is a need to disassemble a tool (breakage, simply replacing a part, or another reason), then it makes sense to pay attention to the gearbox and evaluate its technical condition. Perhaps some parts of the transmission mechanism have worn out.
In most drills, the gearbox is designed quite simply - two flat gears, which are made of metal or hard plastic. To diagnose, it is worth blocking the motor spindle and trying to turn the gears. In this case, it is important to evaluate the degree of backlash, and also check whether there is slippage at different transmission points.
When it comes to a professional tool, the gearbox can be equipped with a gear selector or contain an adjustable safety clutch. Only these parts cannot be repaired. Therefore, we have to install new ones.
To replace the gear, you cannot do without the help of a circlip remover. When removing a part, it is important not to lose the key, since it is very difficult to find a replacement. When carrying out DIY repairs on an impact drill, when the gearbox has already been disassembled, you should remove the armature completely, which will allow you to evaluate the smoothness of operation and check for play in the bearings.
Armed with an awl, you can remove the protective covers of the separator to ensure its safety. For the mandrel, it is best to choose a copper tube or a wooden block with a longitudinal hole.
After performing manipulations with the gearbox, you need to remove any remaining grease and fill the chamber with new molybdenum paste (up to 2/3 of the volume). Before reassembling in reverse order, you should make sure that there are no foreign objects.
2. How to check a screwdriver when buying a used one.
1. Is it worth buying a used power tool? Yes, of course you can if you follow a few rules. Before purchasing, visually inspect its external condition. The case is worn, there are cracks and scratches. If the instrument has been preserved in more or less normal form. Then we move on to the next stage of verification.
2.Check the cartridge to ensure there is no play. The clamping mechanism worked properly. To check, hold the bit or hex key and shake it.
3.Check the operation of gearboxes that switch speed, direction and mode.
4.When turning on the tool, there should be no extraneous noise or grinding noises.
5. To externally check the screwdriver brushes, turn it on at idle. And let it work for about a minute. There should be no foreign odors, such as burning or the smell of new varnish.
6. We check the batteries; here, of course, you need to use any tool that can measure the voltage. It should not be less than 3 volts. If the battery gives out something below. I do not recommend taking such a tool. If you choose a newer model, then they are all already equipped with indicator lights. And in principle, just press the indicator to see the current charge and turn the screwdriver for about five minutes at idle speed with a pause every minute. If the battery is not dead. That's all right. Of course, nothing more precise than a tester has yet been invented. But you don’t always carry it with you. Just a note, try to screw 10-15 100 mm self-tapping screws right under the cap. If he did it, then the tool is good. Therefore, the battery is the first thing to fail. And the main danger lies within it. Since the cost of a new battery can be equal to the cost of your purchase of a used tool.
7.Check the operation of the charger. There are no tricks here. We measure the output voltage; it should be at least 12,14,24 volts. Depending on the model. We check the power with the battery, in extreme cases, we lower the battery a little and try to charge it.
The minimum kit for purchasing and operating a used screwdriver should contain: the tool itself, two batteries, and a charger. Otherwise, everything is at the discretion of the buyer.
Complex equipment
Models of tools with power from 600 to 800 W are distinguished by a wedge-cone chuck fit. The spindle is a sleeve into which the shank of the collet chuck fits. To remove it, you need to find a hole on the side of the bushing and insert a powerful screwdriver there. Use it to pry the end of the shank and push it out.
However, there may not be a hole. Then the bushing must be clamped in a vice and the cartridge must be struck with a hammer of medium force through a piece of wood. They should not be chaotic - they should be alternated at diametrically opposite points on four sides.
Low power electric drills
For low-power tools, the spindle at the end is equipped with a right-hand external thread, onto which the chuck is screwed. In its central part there is a hole, but with a left-hand thread for a shunt bolt. This fastener has a head designed for a square or Phillips screwdriver. It needs to be unscrewed.
Further, doing the repair of the drill chuck yourself comes down to the following. First you need to block the engine impeller, which can be done with a nail. Then try to tear off the cartridge in a counterclockwise direction with a sharp but moderate force movement.
How to check a commutator motor: 3 ways to analyze rotor windings
Tomorrow I'm going to see my first real client and I'm very excited. Why is he first? Because I just finished my studies and became a certified specialist.
At home I can do any work, I have tools. For example, a screwdriver that my father gave me as a child. I take it with me.
But something tells me that this is where there may be a misfire. An experienced tool. We need to check the engine. At the same time, I’ll test my new Mestek MT102 multimeter.
First, let's figure out what a commutator motor is, which is what powers my screwdriver.
Electrical faults
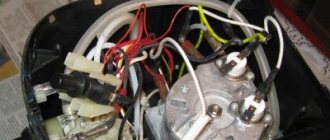
Now it’s worth touching on the malfunctions of the electrical part of the drill. In almost every model, the corresponding compartment is located not just anywhere, but in the handle (the button is also located there). In most cases, troubleshooting requires completely disassembling the device.
As a rule, this does not cause difficulties, but some nuances may arise. The fact is that sometimes the case is held in place not only by screws, but also by clamps. Having disassembled the case into two halves, you should remember, but it is better to photograph the location of the elements and wiring. For some models, the layout can be quite intricate, which makes it a little difficult to repair the drill yourself.
The main symptom of an electrical breakdown is that the device simply does not turn on. To begin with, it is recommended to move the cord (in the place where it comes out of the housing) with the drill power button held down, as a partial break of the wire is possible. This malfunction is observed in 90% of cases. If so, the tool will start working again.
How to Check the Drill Stator with a Multimeter
Checking commutator motors
power tools
Good day! Now it’s my day off, I have a little time of yours. So I immediately started writing articles. Let's talk now about ways to check commutator electric motors
used to drive hand tools. As an example, let's look at an electric drill.
The client brought a drill
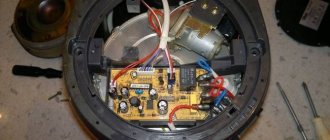
and said that she had finished spinning and a burning smell appeared. There is no smoke without fire; it means something has burned or started to burn. This is what we have to find out from you. And let's get started. For this purpose, we remove the screws from the electric drill and remove one half of the plastic case from the other. Below it we see the “heart” of our entire drill - this is the electric motor.
The part that rotates is called the armature, and the part that surrounds the armature and is motionless is called the stator.
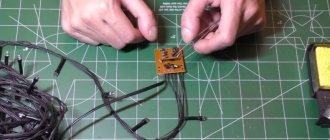
I’ll digress a little and say what we need from measuring devices to check the components of the electric motor. First, we'll need a digital multimeter. Secondly, you need a PPY device. What kind of PPY device is this anyway? It stands for anchor checking device. Here he is in the photo.
Start button malfunction
Identifying the malfunction of this part of an electric tool is not difficult. You will need to disassemble the drill body, connect the power cord and use an indicator screwdriver to check the presence of voltage at the input contacts of the button.
If current is present, you should press the trigger. If the drill motor shows no signs of life at this moment, then the malfunction is more serious. Then there are two options for further events:
- Try to repair the starter yourself.
- Replace the button.
It is better to prefer the second option, although there are certain nuances here (we will discuss them below). However, if you want to gain personal experience or just pass the time profitably, you can try to fix the trigger mechanism when doing your own drill repairs.
Diagnosis of failure
This simple-looking device, during use, gives signals to the user that he will soon need repairs, but not everyone understands them. If the drill begins to work with temporary interruptions or the button requires pressing harder than before, then these are the first symptoms of incorrect operation of this part.
When you use a cordless drill, the first thing you need to do is measure the battery voltage with a tester - if it is less than the nominal value, then it needs to be charged.
In this case, we are especially interested in the condition and functionality of the product’s on/off button. It is quite simple to check that it is working properly: you need to unscrew the fastenings of the main body, remove the top cover and check the voltage of the wires going to the device by plugging the power cord into a power outlet. When the device shows voltage, but when you press the button the product does not work, this indicates that it is broken or the contacts inside the device have burned out.
Button repair
For some models of electric drills, this part is equipped with an electric motor speed regulator, and also has a regulator for the direction of rotor rotation (reverse). This is a fairly complex design, so repairing the button should be carried out with a high degree of care. Often, after disassembly, further use is not possible.
Inside the button of such a complex device there are many small parts that can fall out when the case is opened. They are easily lost and difficult to put back in their original place. Therefore, this part of the work should be performed with increased attention.
After careful disassembly, you should clean the terminals from carbon deposits (perhaps that is why the current did not pass) and reassemble everything in the reverse order. Next you need to check the button for functionality.
Checking the electric motor: causes of breakdowns and repairs
There are several reasons for damage to the armature or stator of a drill. First of all, this is illiterate operation of the device. For example, many users simply overload the tool, working without interruption. This leads to the fact that the drill motor does not have time to “rest”. The second reason lies in poor coil wire, which is often found in cheap models. That is why breakdowns of cheap tools are much more common. In this case, repairs must be carried out using specialized tools. And it will be better if you entrust this work to professional specialists.
However, if you decided to carry out the repairs on your own, you will definitely have a question - how to do everything right? As you already understand, an electric drill “suffers” from damage to the armature and stator, and checked with several signs, for example, when the tool suddenly sparks during operation. If there are no “bright” signs, you can use an ohmmeter.
- First, carefully disassemble the device body;
- Remove the wires and all internal parts;
- After finding out the causes of the breakdown, we replace the spare part with a new one and close the housing again.
Replacing a button
As for the starting mechanisms, which do not have a speed controller and the direction of rotation of the engine, not everything is so simple here. Although their design is somewhat lightweight, it is still quite complex. However, there is often no point in repairing the drill button yourself, since it is much more practical to install a new one.
To do this, you should visit the nearest store that sells spare parts for electric tools.
Here you need to take into account an important nuance. There is a great variety of drill models, so not all buttons are absolutely identical. When going shopping, you need to copy the data of the old part onto a sheet of paper. But even with such actions, misunderstandings may arise, since there is a possibility that the purchased button with the same parameters will not be installed in the body of the power tool, since there are differences in the design of this mechanism, which makes it impossible to secure it.
For this reason, the best option is to take the old button with you and use it to select a new part with exactly the same parameters, including dimensions.
Drill button connection diagram - how to fix the problem?
Unfortunately, to check the functionality of the tool, a tester will not be enough for you, which is due to the fact that most of the device’s buttons are equipped with smooth speed control, and therefore a regular tester may give you incorrect data. In this case, you will need a special connection diagram for the drill button. Often in instruments one wire is connected to a terminal, and therefore pressing the button simultaneously leads to ringing of the terminals. If the light comes on, everything is fine with the button, but if you notice a malfunction, it’s time to replace the button.
When making a replacement, keep in mind that the circuit can be either simple or with reverse. Due to this, all work on replacing the button must be carried out exclusively according to the diagram, without adding anything “on your own”. So, the part must be suitable in size and match the power of the tool. At the same time, calculating power is a fairly simple task. We use the formula P = UI (taking into account that the drill power is 650 W), I = 2.94 A (650/220), which means the button should be at 2.95 A.
Brushes
Another common problem with electric drills is wear on the motor brushes. When they are ground down by 40%, interruptions in the operation of the drill and even sparks can be detected. With an even greater degree of wear, the power unit simply will not start. Replacing outdated parts at home is not that difficult.
Some models have the ability to do electrical repairs yourself. drills (in particular, replacing brushes) without opening the case. There are special plugs for this. It is enough to unscrew them and replace the old worn brushes with new ones. When choosing new parts, you should pay attention not only to their dimensions, but also to the cross-sectional profile.
You should not allow the brushes to wear too much, as this can lead to a number of troubles. Firstly, the gap between them and the collector plates increases, which leads to increased sparking. Secondly, because of this, the plates become very hot, as a result of which they can move away from the base of the collector. This may result in the need to replace the armature.
Parts layout
If you know the structure of the drill and the principle of operation of the tool, then repairing the product yourself will not be difficult for you.
Regardless of the model or manufacturer, all of these power tools consist of a typical set of basic components.
- Network cable. Many users do not pay due attention to the cord connecting the tool to the network, but according to statistics, 50% of malfunctions of electrical products occur because of it. The cord breaks easily during operation; its frequent break points are the entrance to the device handle and the place where the contacts are soldered on the start button. The defect often occurs due to the mobility of the entire button block.
- Capacitor. This small rectangular-shaped part is located in the drill handle and is designed to suppress the resulting interference from sparks.
- Start button . One of the weakest points is that if problems arise in the electrical part of the product, it is tested immediately after the cable.
- Electric motor stator. In the event of a short circuit, a breakdown of the winding may occur - a very unpleasant case, the entire winding must be rewinded. Inside is a rotor or armature.
- Support bearing.
- Electric motor brush locations. The brushes are made of durable graphite and wear out from long-term use; they can be responsible for the malfunction of the electrical part of the product - each of them sparks when operating in normal mode. Frequent problems are a wad of dust between the brush body and the rotor.
- Collector. If its contacts are clean, then the rotor rotates smoothly.
- Product body.
- Fan. It is designed to constantly cool the electric drill motor.
- Mode switch.
- Gearbox. Always present in any model, since the cartridge does not fit directly onto the rotor axis.
- The largest gear in the gearbox. Frequent malfunctions: dust and foreign particles get into the lubricant, because of this it loses its properties, and the gearbox quickly wears out and needs to be replaced.
- Two cartridge bearings. They bear the heaviest load, so they require periodic inspection and maintenance - removal, washing, replacing lubricant.
- The axis on which the cartridge is mounted. In hammer drill models, it has a return spring.
- Product cartridge. Its collet mechanism for clamping a drill or various attachments can be of a quick-release type or clamped with a special key.
Any repair of a drill with your own hands must begin with a visual inspection of all parts. The principle here is simple - from simple to complex, i.e. first we check the cord, wiring, contacts, various fasteners, then we begin to test the blocks and the engine. It does not always come to complete disassembly of the product, but in practice one must be prepared for such a development of events. The instruction manual will help you disassemble a specific model.
Connection cord
When the power goes out, all you have to do is change the position of the product - the reason lies in the cable; most likely, one of the wires has broken. You need to unplug the drill and check it with a multimeter cable. You can use the simplest option - a light bulb and a battery in one circuit.
Attention! Pulling the cord when the drill is plugged in is strictly prohibited; to avoid a short circuit, you will have to rewind the motor winding.
After checking, you can bend it as you like to find the break point, then part of the cable is cut off, the wires are stripped and new contacts are created for connection. When a break occurs in the middle of the cable, it must be completely replaced with a new one. True, thrifty users prefer to connect broken wires by soldering, followed by reliable insulation of the repair site, but there is no longer complete trust in such a wire.
Power button
This part has a very simple design, but if a problem occurs it will prevent the drill from turning on. Its operation is simple: the key slides in a special block and closes the contacts with a pusher finger. From long-term use, dust accumulates inside the unit, which prevents the button from moving and blocks it, preventing it from closing the circuit of contacts. The defect can be eliminated simply by opening it and removing dust with a brush.
Important! Never try to lubricate the sliding surfaces of the button - dust mixes with the lubricant and wear occurs, as a result of which the entire unit must be replaced.
To repair the drill button, you need to remove the side wall and check the integrity of the contacts. When carbon deposits have formed, clean the contact with fine sandpaper. If the contact burns, we replace the entire unit.
Checking the rotor
For a thorough check, carefully remove the rotor from the stator. The contacts may be charred or have scale - you need to clean them with sandpaper strictly in the direction of rotation. The cause of the appearance of scale may be prolonged operation at maximum speed. How to check the rotor for serviceability? Test with a multimeter - their resistance should be identical.
Don't forget to check the winding to see if there is a short circuit with the magnetic circuit housing. If a breakdown is detected, the faulty winding is rewound independently or taken to a service center.
Sources:
https://ingener-pto.ru/2019/12/12/kak-proverit-knopku-na-dreli/ https://kmd-mk.ru/kak-proverit-knopku-testerom/ https://tehnika. expert/dlya-remonta/drel/otremontirovat-svoimi-rukami.html
Engine malfunctions
Such breakdowns can completely disable the necessary device. A clear example of this is a break or short circuit in the windings. In this case, the tool makes extraneous sounds (like mooing), or the engine refuses to start at all.
In this case, when repairing the drill yourself, you need to disassemble the housing.
You can determine where exactly the damage occurred (in the stator or rotor) by the presence of traces of melted and blackened varnish. Testing the circuit with a multimeter also helps. An armature with an impeller, including a stator, can be purchased at any store. Next, you need to replace the old one with a new one.
Failure of the mechanical part of the instrument
If electrical faults are difficult to identify, then dealing with mechanical breakdowns is much easier and cheaper. Mechanical defects can be identified even without the need to disassemble the instrument. If the drill cracks or the chuck does not rotate, but the characteristic sound of the engine is heard, it means there is a breakdown in the gearbox. When the attachment does not hold in the drill, there is a malfunction in the clamping jaws. Bearings can also fail and cannot be repaired and require comprehensive replacement.
Let's consider each type of malfunction, and the features of their identification and subsequent elimination.
- The bearings have failed.
Typically, bearings last quite a long time, and the main reason for their rapid failure is the lack of lubrication or its depletion. There are two types of bearing failures: complete destruction of the balls or wear. If completely destroyed, the part must be replaced. There are no difficulties when replacing bearings, so be sure to check their serviceability - Jamming of the gear unit - here breakdowns are associated with licking of the driven or driving gear.
Even during operation, a tooth may break off, which will ultimately lead not only to a decrease in productivity, but also to a complete jamming of the transmission mechanism. If the gearbox malfunctions, the gears must be replaced. It should be taken into account that on household tools the gearbox can be made of plastic gears. They must be replaced with similar ones, otherwise installing metal gears will lead to accelerated engine wear. - Repairing the impact mechanism of a drill - unlike a hammer drill, this mechanism on a drill has a primitive design.
The design consists of two parts, reminiscent of a friction clutch. Impacts are created by the movement of a toothed gear. The notches on the rotating gear mesh with teeth of a similar design on the housing, and as if jumping, clicks are created - they are also impacts. Malfunctions of the impact mechanism of a drill include the following: licking of jagged edges, which ultimately leads to a decrease in productivity. More often, the notches are licked off on the moving gear, which needs to be replaced. Another breakdown can occur when the shock mode of the limiter is not turned off. The reason is the wear of the metal ball, which, when the switch is moved, goes into the end of the shaft, thereby limiting the possibility of the gear teeth coming into contact with the protrusions on the body. To eliminate the malfunction, you should replace the ball in the design of the impact mechanism - Malfunction of the actuator - cartridge.
Drills use key type chucks, which are characterized by increased reliability and efficiency. The clamping jaw on this part may fail and should be replaced. Detailed instructions on how to remove, repair and replace the chuck on a drill
Bearings and cartridges are considered minor mechanical failures, and failure requires an appropriate approach. Even if diagnostics have shown that the gearbox does not need repair or replacement of parts, it must be dismantled, washed in gasoline and new lubricant applied. Such manipulations must be performed regularly, depending on the frequency of use of the power tool. A detailed description of how to repair the impact mechanism of a drill is described in the video report.