To increase attractiveness, safety of movement and reduce the crime situation on city streets, a functioning and reliable lighting system must be installed. On the other hand, street lamps are also used to illuminate local areas.
Bright light sources lead to significant consumption of electrical energy, so various additional devices can be used to save money. One of these is a light sensor for street lighting.
This equipment is in great demand among the population and municipal authorities. Sensors are placed in lighting systems for local areas and secondary city streets. There are devices designed for indoor use, near staircases and walk-through doors. Below we will discuss the principles of operation, devices, technical parameters, and acceptable installation schemes for light sensors.
Purpose and scope of application
The device is popularly called a light sensor or motion sensor. Specialists may call it a light-control switch or a light-sensitive machine. There are other names, including photo sensor, twilight sensor, day and night sensor, etc. In all cases, they mean the same device, with the help of which the light is automatically turned on and off at dusk and dawn, respectively.
To create a photo relay, which is the main component of the sensor, special phototransistors or photoresistors are used, the parameters of which vary depending on the level of illumination. As long as enough light falls on the photocell, the power circuit remains open. With the onset of darkness, changes in parameters occur, and when a given level is reached, the circuit closes, which leads to the lamps turning on. The sensitivity of the device is set individually.
In the morning, the reverse process occurs: the food chain is broken after registering a sufficient amount of natural light.
Main technical characteristics
There are several basic technical and operational parameters that you should pay attention to when choosing a light sensor. The first is tension. The sensors can be connected to a 220 V AC or 12 V DC mains. In the second case, the devices are less powerful but safe; they are powered by a plug-in battery or a step-down transistor that converts AC electricity into DC.
The next important characteristic is the class of protection against dust and moisture. Since we are talking about street lighting, the device must have reliable protection - at least IP44, which indicates increased tightness (dust particles larger than 1 mm and water splashes are excluded). You can choose sensors with a higher protection class, but not a lower one. In the house you need to install devices with protection class IP23.
We recommend that you familiarize yourself with the permissible temperature standards when operating the equipment (operating mode). You need to rely on models that can easily cover the average plus and minus temperatures in your region.
You need to remember about the power of the photo relay - the permissible number of connected lamps depending on the total power. The motion sensor can operate at a higher load than specified in the technical documentation, but still the best option would be to purchase a device with a certain power reserve (approximately 20%).
In addition to the basic parameters, it is recommended to pay attention to a number of additional ones. Many devices have their own sensitivity (operation) threshold. For example, if there is a chance of precipitation (especially snow), it is best to reduce the sensitivity of the equipment, since the light reflected from snowflakes may be perceived by the product as a dawn. This will cause the device to turn on and off unintentionally for short periods of time. Such a light show will be superfluous both on the city street and in the local area.
Speaking of sensitivity, you need to look for parameters that determine the upper and lower limits. For example, for one sensor the range may be 5-100, for another - 10-100 lux.
To eliminate possible false switching on or switching off of the light, you need to adjust the response delay. For example, at night the photo relay may receive light from the headlights of cars passing by. If the delay is set to minimum, this will most likely result in the lights turning off. It is enough to set a delay of 7-10 seconds to avoid an unwanted situation.
Recommendations for choosing street light sensors
Built-in or remote sensors operating in automatic mode make life much easier. If you want the external lighting of the local area, the lighting of paths or shop windows to turn on independently, simply install the device in a place of active traffic.
It is not recommended to install the devices in shaded areas or at a height below 2 m - accidental dimming or bright headlights will cause false alarms
Installing a sensor is also a simple way to save energy, especially when using incandescent lamps. The lights will turn on at dusk, when visibility decreases, and turn off at dawn.
Thanks to an established lighting system in the summer, you won’t have to get up at 4-5 o’clock in the morning specifically to turn off the street lights in the local area.
Now let’s look at what characteristics of devices are important to consider when purchasing.
Criterion #1 - design and installation method
Conventionally, all devices can be divided into 2 categories: with a built-in light-sensitive sensor and with an external one. In the first case, the photo relay is integrated into the housing and is installed together with the lamp on the street; in the second, it is mounted on a DIN rail along with the circuit breakers, and the wire with the sensor is brought out directly.
We described in detail the principle of operation of a photo relay in our next article.
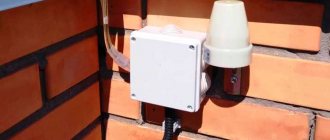
If you prefer do-it-yourself or quick installation, a built-in model is suitable. It resembles a flashlight, and installation is very easy - on a metal corner
To connect to the network, you need to use the diagram supplied with the product by the manufacturer. For budget models, you should connect 3 conductors coming out from under the base of the case.
Criterion #2 - adjustability
It is very important what kind of lighting you consider insufficient to set the sensor settings. You can adjust the lower and upper shutdown threshold. Simply put, with some settings the device will turn on when it gets slightly dark, with others - only in the dead of night.
To make adjustments, a regulator (toggle switch or wheel) is installed on the body, which can be moved smoothly. It is advisable to make adjustments depending on the time of year and, accordingly, the length of daylight hours
There are inexpensive models with a maximum twilight threshold (for example, 20 lux), but without the ability to adjust. There is a possibility that such a device may not suit you, since it will light up too early or, conversely, only at night.
Criterion #3 - degree of protection
Increased demands are placed on outdoor devices, as they are located in unfavorable conditions. Maximum protection is especially important for rainy regions or dusty locations.
Thanks to this table, you can determine what degree of protection you will need a sensor with. You need to consider whether there is a canopy over it and how high it is fixed above the ground (the higher, the less dust)
If the IP rating is small, you can build something like an additional cover - for example, put a piece of plastic bottle on top. But do not forget to wipe off dirt from both the body and the protective screen so that the device does not give false alarms.
Criterion #4 - operating temperature and dimensions
Operating temperature is the range at which the sensor is recommended to be used. In practice, the choice of device does not always correspond to reality. Usually the lower threshold is limited to a temperature of -20-25°C, and in winter it can be much lower. What to do? If possible, insulate the housing, place the sensor in a wall niche, or buy a more expensive model designed for extreme cold.
Dimensions of the device - for built-in devices, the dimensions are not so important, since most often they are mounted on any free section of the wall and have a height of no more than 10 cm. But the body of the remote photo relay is located inside the electrical panel, among many protective devices. You need to allocate a place for it in advance, and also think about how best to bring the sensor out.
If you still doubt the advisability of purchasing a photo relay, then we suggest taking a closer look at lamps with a motion sensor or solar-powered street lamps.
Types of photo relay
Photo relays are available in several types: some have a built-in light sensor, others are equipped with a remote element.
We list the main types of light sensors for street lighting:
- Photo relay with built-in motion sensor. These devices are suitable only if the lamps should be turned on only while a person is in the illuminated area. For example, in the toilet, in the backyard, at the entrance gate, etc.
- Photo relay with timer. If you need to ensure that the light is on only for a certain period of time, use this model. Set a timer on it, after which the built-in sensor will automatically turn off the lighting at the specified time. An excellent option for decorative lighting of a garden, flower bed, or yard.
- An astro timer is an improved photo relay, the memory of which stores advanced parameters, for example, the time of sunset and sunrise depending on the climate zone. When pre-configuring the equipment, you need to set the time zone, after which the device will automatically turn on and off the lighting at the right time. The cost of the device is significantly higher than conventional photo relays, but it eliminates possible flare and problems with choosing an installation location.
If you are only interested in one of the listed functions, then you can go another way. For example, buy a regular photo relay and connect either a motion sensor or a timer to it in series. The device will perform similar functions, but it will be possible to reduce the costs of installing the system, repairing or replacing elements. The fact is that if any element built into the photo relay fails, you will have to change the entire device, but if, for example, the motion sensor is connected separately, then it will be enough to replace only it.
How to connect a photo relay to the network?
The first crucial moment is the choice of location. Do not forget that outdoor appliances require regular care and maintenance, so the installation point must be accessible.
Installation tips:
- The photocell should be exposed to the sun's rays as much as possible, ideally illuminated throughout the day.
- To prevent accidents or breakage of wires, the installation base must be strong and the fasteners must be securely fastened.
- There is no need to place the photo relay next to an artificial light source. If the light is on, it will not work.
- The installation height should be such that the headlights of passing cars do not fall on the sensor.
The case will have to be wiped regularly, depending on the degree of contamination. If the moisture protection of the device is weak, you need to place it in a transparent capsule.
The connection diagram is included in the kit.
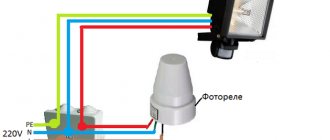
The simplest diagram for connecting an outdoor photo relay to a lamp through a distribution box, which can be located both inside the house and outside. When connecting wires, it is important to take into account the color coding
Let's consider the most popular option - installing a wall-mounted built-in device. We connect the wires in advance or install a waterproof junction box nearby.
Work order:
- We find the installation location on the wall and make marks for fastening.
- Using a drill, we make holes for a corner or bracket and install it.
- We fasten the device body and remove the wires.
- We insert the conductors into the box and connect according to the attached diagram. You can use terminals, if not, do not forget to insulate the twists.
- We close the junction box and test.
If you are installing a remote sensor, the diagram will be different. The housing is mounted on a DIN rail, and the sensor is placed outside. Please note that the length of the wires included in the kit is limited.
If the regulator is located in an inaccessible place after installation, make adjustments before installation.
Installation site requirements
When choosing a place to install a photo relay connected to a street lighting system, you need to focus on the following requirements:
- The photo relay or remote light registration sensor must be exposed to daylight under all conditions.
- All other artificial lighting devices, including lanterns, billboards and home lamps (the light shines through the window) should be installed as far as possible from the light relay, which will eliminate false alarms of the device.
- The likelihood of light from car headlights should be minimal.
- The installation height is 1.5-2 m, which will allow you to configure the necessary parameters while on the ground. Otherwise, you will have to use a stepladder or regular ladder to reach the sensor.
Finding a place that satisfies all of the above requirements is quite difficult. However, you can use little tricks to make the task easier:
- Use a piece of plastic pipe (preferably black) 15-20 cm long with an increased diameter to protect the photo relay or sensor from light coming from windows or streetlights. The lower part needs to be set at an angle at which the pipe will point upward. What this angle will be depends on the installation location and the location of the sensor, but usually it is 30-45 degrees from the vertical structure (wall, pole).
- If a photo relay is installed on a powerful lamp, then ideally it should be placed behind the lampshade, where less light enters.
It is recommended to install light sensors on the western or eastern side of the house, which will greatly simplify setting up the operating parameters of the equipment. The main condition is the absence of nearby bright light sources. If there are any, then the photo relay should be mounted on the side where the likelihood of exposure is lower.
Photo relay, or street light sensor to turn on the light
A photo relay is a device for regulating street lighting. It is used in different places to save energy. The principle of operation of the relay, which is based on the photoelectric effect, is that when there is a small number of light rays, the contacts close. As a result, the street sensor is turned on. When the lighting increases to the required level, the contacts automatically open and, accordingly, the lamps turn off.
Photo relays are used in different places to save energy
The device has many names and definitions. In some technical textbooks it is called a light-control switch, in other publications it is called a light-sensitive switch. In informal vocabulary you can most often hear the phrase “light sensor” or “light sensor”, “photo sensor”. There are also simpler names, such as “twilight sensor” or “day/night switch”. All these are names of the same item, which in industrial production is called a photo relay.
Photo relays are installed at the entrances to houses, in the territories of administrative buildings, in the entrances of apartment buildings, and on power poles. Thus, entrances to premises, streets and roads will be constantly illuminated at dusk. With such a device, forced switching on and off of lamps and street lighting lamps on poles will not be required. This will happen automatically, and energy costs will be significantly reduced.
Operating principle and design of a light sensor for street lighting
The photo relay is based on a photoresistor or phototransistor, which changes its parameters with a certain change in illumination. If there is enough light falling on them, then the power supply circuit is open. With the gradual onset of darkness, the photocell begins to react, and at a certain reading specified in the settings, the circuit is closed. The process can occur not only in the evening, but also, for example, in very cloudy weather. When the lighting improves, that is, morning comes (or the clouds and fog clear), the circuit opens.
Main unit and remote photo relay sensor for street lighting
Interesting to know! The photo relay device is considered universal, and it can be used for other purposes, for example, for irrigating lawns. To do this, the device is connected to the irrigation system and, thus, the lawn or flower bed will be moistened every night.
When installing street lighting, you need to decide what technical characteristics the photo relay should have. Based on this principle, two types of devices are distinguished:
- photo relay with remote sensor;
- device with a built-in light sensor.
The remote sensor device is small in size, it is easier to provide protection from external negative influences and illumination. This device can be placed autonomously, for example, in an electrical room. An example of such photo relays are models for DIN rail. The built-in sensor should be located in close proximity to the lighting device, for example, next to lamps - on street lighting poles. In this case, it is very important to choose a place so that the lamp light does not fall on the photosensor. This option is most often used when installing solar-powered street lighting.
Photo relay with built-in light sensor
Performance characteristics of the street light sensor
Having chosen the desired type of sensor, you need to determine the technical parameters of the device. The main ones, which directly affect the quality of work and service life of the photo relay, are the following:
- Mains voltage. It can be 220 or 12 V - the choice depends on the voltage providing street lighting. Twelve-volt light sensors are most often used for battery-powered lighting.
- Operating mode. It is necessary for the photo relay to operate under significant temperature changes, which depends on the climatic conditions in a particular region. Ideally, the device should withstand extreme heat and severe frost.
- Housing protection class. For installing street lighting, IP44 or higher level is suitable, ensuring protection of the device from splashing water, dirt and solid particles with a diameter greater than 1 mm. If we are talking about installing a photo relay indoors, then a protection level starting from IP23 is suitable.
- Power. The operation of any relay is designed for a certain voltage level of the power load, and the total power of all connected devices must be 20% less than the permissible norm. In this way, it will be possible to reduce the wear of devices and extend their service life.
The photo relay operates under significant temperature changes, regardless of climatic conditions
This is a basic, but not final list of photo relay characteristics that must be taken into account when choosing a sensor. A competent approach in this matter will have a positive impact on the performance of the device and extend its service life.
Helpful advice! One of the main conditions for the uninterrupted operation of a photo relay is the presence of a stable voltage in the network, which should be 30% higher than the given indicator of the device itself.
Light sensor connection settings options
Almost all devices have an automatic adjustment system that allows you to select a specific operating mode. The peculiarity of this element of the device is that it has to be configured manually. To do this, turn the special knob in the desired direction and select the required option.
Photo relay is used to automate the street lighting system and at the same time save energy
The photo relay can include the following setting controls:
- Response threshold. This setting allows you to increase or decrease the sensitivity of the device. It is recommended to lower its level in winter, especially in snowy weather, to avoid unnecessary reflection of light from the snow, as well as in places with bright street lighting, for example, in megacities.
- A second delay to turn the device on or off. If you increase the turn-off delay, you will be able to avoid false alarms that occur when a random beam hits the photo relay, for example, light from car headlights. Delaying the switch on will prevent the device from reacting to a momentary darkening of the device, for example, from a cloud or the shadows of flying birds.
- Light range control. When connecting a photo relay, using this setting, you can provide the required level of illumination. At its lower limit, the sensor is activated, turning on the power supply, and, conversely, at its upper limit it turns it off. The range can vary from 2 to 100 lux (2 lux – pitch darkness) or from 20 to 80 lux (in this case, 20 lux – deep twilight, when the outlines of objects are barely visible).
Mastering and effectively using the listed settings will help ensure the most optimal operation of the photo relay, eliminating false alarms, thereby making the lighting more comfortable and energy consumption as economical as possible.
The photo relay can include many regulatory settings
Possible connection diagrams for photo relays for street lighting
So, the purpose and principle of operation of the photo relay, which essentially performs the functions of an automatic light switch, has been determined. This leads to a simple connection diagram: the sensor is supplied with a phase that leaves two outputs and goes to a lamp or other lighting device. Since the device needs power, one of the contacts is zero. To increase safety during operation of the product, it is ideal to connect the grounding.
To understand which sensor to choose, the load power (total power of light sources, lamps) is taken into account. As the power of equipment increases, its cost increases. To save money, power in the circuit can be supplied through a magnetic starter. This will still require a photo relay, but in this case it will be possible to use a low-power device, since when connecting in series, the power of the magnetic starter is taken into account, and not the sensor itself. The desired load is applied to the terminals of the product.
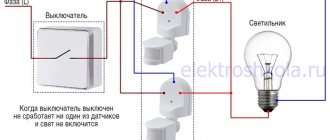
If additional sensors (motion, time) are used in the electrical circuit, they are connected in series after the photo relay. The order in which the motion and time sensors are located does not matter. If at some point you need to get rid of these sensors, just remove them from the circuit, it will still function.
Connection and setup
First you need to use a simple diagram for connecting a photo relay with a power unit and a street lamp. It is advisable to place the sensor in close proximity to the lighting device. Each product comes with instructions describing step-by-step installation and connection. In most cases, the relay is attached directly to a pole with a lantern to a height of no more than 3 m.
The presence of a remote sensor does not change the installation sequence. The relay is mounted in the right place so that the sun's rays fall on it, and no other objects come between the sun and the product. The unit is connected indoors next to the power supply. Ideally, you need to use devices that can independently adjust their performance characteristics. However, most models are equipped with conventional mechanical toggle switches that adjust the light sensitivity threshold.
The body of a quality product must have indicators that simplify the process of connecting and adjusting the device. When you rotate the toggle switch upward, the photo relay will operate faster and turn on the flashlight at dusk. If the toggle switch is turned in the other direction, the sensitivity threshold will decrease, which can lead to the light turning on only with the onset of complete darkness.
You can assemble the photo relay yourself, and it’s quite simple to do. In order for the product to be compact, it is necessary to exclude the use of large elements. You should not take an emitter follower assembly; it is best to construct it from two transistors to increase the input current.
Connect a low-power relay to the circuit, used as a transistor cascade. To eliminate the effects of reverse current, you need to use diodes that conduct electricity exclusively in one direction. The simple truth is that as the voltage increases, the product becomes more sensitive.
Setting up the light sensor
In addition, the photo relay has its own sensitivity adjustment. You can manually set one or another trigger threshold.
That is, the flashlight will work in complete darkness at night, or in the evening, when it is just beginning to get dark.
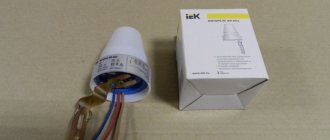
On popular photo relay models from IEK FR-601 and FR-602, the regulator is located at the base and rotates in the range from “+” to “-”.
If you turn it to the maximum “+”, the photo relay will operate at dusk or in bad weather (cloudy sky). According to the technical characteristics, this adjustment corresponds to approximately 50 Lux.
If you move it to the extreme “-” position, the sensor will only work in complete darkness (illuminance 5 Lux).
It is usually set to the middle position.
These twisters are quite delicate and break easily if too much force is used. So be careful, especially when adjusting sensitivity in cold weather.
At the same time, pay attention to an important nuance.
Mistake #1
The photo relay should be configured outdoors, not indoors.
The sensor is always supplied with a black bag to check its functionality. They covered the device cap with it - the relay worked.
So, in many models, sensitive photocells located inside the case can react, in addition to illumination, to ultraviolet radiation from the sun's rays.
At home, due to glazing, 80% of UV rays are extinguished, but not on the street. Therefore, setting up at home with the creation of artificial darkening may differ from the real outdoor setting.
When there isn't enough range, some get creative and use foil for additional adjustment. The sensor is wrapped with it (fully or halfway), and thereby achieves an initially larger dimming value.
Tips and tricks
The selection process is complicated by a wide variety of motion sensors, characterized by different functionality. To choose a suitable photo relay, you should consider a number of factors. The first and most important is the conditions of future operation. In the local areas of country houses, it is advisable to use products with the ability to change the photosensitivity threshold. An excellent option would be the additional installation of a time sensor.
It is necessary to remember the correspondence of power, which was noted at the beginning of the article. Finally, do not forget about pricing policy: you should not buy a device with unnecessary functionality that will not even be used. But this will affect the cost of the product and lead to unnecessary overpayment.
Thus, photo relays for street lighting are designed to automatically control lighting systems and significantly extend the working life of individual devices. The light will only work when needed. Automatic control will allow you to create the most cost-effective system, and you will not need a network operator to manage it.
It should be remembered that the connection diagram for the light sensor is on the product body. This simplifies the process of commissioning the device.
Selecting a suitable installation location
For the normal functioning of the light sensor, it is important to choose the right place for its installation . There are a number of factors to consider:
- The device must be exposed to sunlight, that is, the sensor must be in the open air.
- Nearby windows, lanterns and lamps should be located as far away as possible.
- It is undesirable for the photo relay to be illuminated by car headlights.
- Do not install light sensors too high. This is necessary for the most convenient service.
When installing automated street lighting, it is very important to choose a suitable installation location. Often, a photo relay is installed directly on a pole. However, this is not very convenient in terms of maintenance, since at such a height it will be difficult to clean. It is better to place the photo sensor on the wall of the home, and extend the power cable to the illuminator itself.