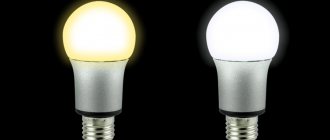
What is a dimmer?
A dimmer is an electronic device designed to control the power of lamps. The adjustment is carried out by changing the voltage supplied to the load.
The dimmer for conventional incandescent lamps was invented a long time ago. The very first devices were rheostats that regulated the brightness of emitters by changing their resistance. Later, compact electronic dimmers with expanded functionality were created.
The unique feature of a dimmer, which distinguishes it from a rheostat, is that it is directly related to the power of the LED lamp - as soon as the brightness of the light decreases, the power consumption drops, and along with it, energy costs also decrease.
Why is it needed?
A dimmer for LED lamps is used wherever you need to adjust the brightness of the lighting. This device allows you to create a comfortable and cozy environment that adapts to the needs and mood of the user.
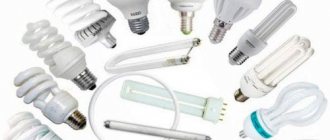
All LED lighting sources are divided into two large groups:
- independent devices – lamps;
- LED strips.
Today, almost any 220 V LED lamp is dimmable. These are lamps with sockets E, MR, G. They are screwed into a regular socket and the brightness is controlled through a regulator. For LED strips, devices with PWM (pulse width modulation) are used.
Examples of using a dimmer:
- reducing light flux in the bedroom before bedtime;
- in designer interiors where a variety of light patterns is required;
- switching lighting to standby mode to reduce energy consumption;
- obtaining lighting effects during concerts and other events, including for home celebrations - the lights are dimmed during dancing or a romantic dinner.
Currently, highlighting individual zones is in trend. The room is equipped with lighting, which is adjusted using a dimmer and illuminates a specific object or area - for example, a painting or a large vase.
Tips for choosing dimmers
When selecting a regulator for incandescent lamps, it is important to take into account all the features listed above. In addition, experts recommend paying attention to a number of additional nuances.
If you plan to place the device in a room whose temperature exceeds +25 °C, it is better to use a model equipped with built-in ventilation or a fuse.
Light control using a dimmer is done using the “phase cutoff” method. In this case, part of the sinusoid is cut off, which leads to a decrease in the voltage supplied to the lighting
Dimmers are designed for a certain power of lighting fixtures, which cannot be exceeded. If the control device is planned to be connected to a chandelier or group of lamps, the total indicator must be taken into account.
The cost of products varies widely. The most budget options are keyboard and rotary models, but electronic ones provide more options. If you wish, you can assemble a simple dimmer model with your own hands.
Since the operation of electrical equipment is directly related to home safety, it is better to give preference to products from reputable brands whose products are highly rated in user reviews.
Design and principle of operation
The main element of the brightness control is the key - it is more often called a switch or switch. It is controlled by semiconductor transistors, triacs, and thyristors. Thanks to dimmers, 220 and 12 V LED lamps operate at 10-100% of their potential.
Operating principle:
- An alternating current of a sinusoidal shape flows through the electrical network. To change the brightness of the LED lamp, a truncated sine wave is fed to it.
- Trimming a sinusoid occurs by cutting off part of it - the leading or trailing edge. Because of this, the voltage supplying the light source decreases. As a result, the power and brightness of the lamp changes.
There are two ways to regulate voltage:
- Along the front line. This method is used to control 220V LED and compact fluorescent lamps through electromagnetic transformers. Also, regulation along the falling edge of a sine wave is used in low voltage lamps.
- On the back edge. This regulator is used for halogen and LED lamps. Dimming is carried out through electronic transformers.
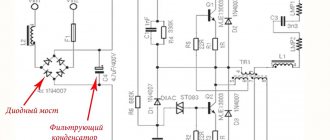
Dimmers are generators of electromagnetic interference. To reduce them, an inductor with a high resistance (choke) or an inductive-capacitive filter is included in the circuit.
The following video will help you learn more about a typical voltage/brightness regulator circuit:
The dimmer is installed with a switch or instead of it. The main condition is that the device must be located before the driver of the LED lamp.
An LED lamp driver is a device for maintaining electric current at a given level. It provides constant current to the LEDs, preventing them from flickering and breaking.
Even a slight deviation of the voltage from the specified parameters leads to flickering and attenuation of the LEDs - these semiconductor elements are extremely sensitive to power.
To ensure the supply of voltage within specified limits, modern circuits use not the traditional method of load regulation - changing the resistance - but pulse-width modulation. It supplies current to the diodes in short pulses at relatively large intervals.
How a PWM dimmer works:
- The circuit is a generator that generates a high-frequency current (200 Hertz).
- A pulse appears at the output, which makes the diodes light up.
- A driver is installed inside the LED lamp that responds to external control. It comes from the regulator. If the current is increased, the driver sends maximum PWM pulses.
The brightness of LEDs depends on the parameters of the applied pulse, and that of a conventional lamp depends on the current strength. Therefore, the LED dimmer must not be used to control other light emitters.
Working Principle of AC Dimmer: Detailed Explanation for Beginners
The English word Dimmer refers to an ordinary regulator of electrical power that can make the lighting dimmer.
It can be found in ordinary electric tools, for example, a drill or hammer drill, when it is necessary to change the speed of rotation of the rotor or lighting fixtures to dim the brightness of their radiation.
I will further describe the operating principle of an AC dimmer sequentially for lamps of different lighting systems.
The simplest and most ideal (from the point of view of the quality of the supply voltage) devices for regulating the light flux are an ordinary rheostat or a laboratory autotransformer - LATR.
A rheostat is a powerful nichrome wire resistor on which a carbon wheel is rolled. Its position changes the resistance section that limits the current through the connected lamp.
When the knob is turned, the autotransformer changes the value of the output voltage, which is fed further into the circuit.
In both cases, the voltage sinusoid at the input and output retains its harmonious shape and frequency. Only its amplitude changes.
The rheostat and autotransformer allow you to control the amplitude of the voltage sinusoid smoothly and almost to zero from the maximum value of the signal received at their input.
From an electrician's point of view, these are ideal devices for regulating voltage, but they are large in size and consume a significant amount of energy. For these reasons, their use is not acceptable for domestic use.
Another diagram will help you understand the principle of operation of the dimmer, showing how an ordinary Ilyich light bulb is turned on and a surge of current is created through its filament.
This is explained by the fact that the resistance of the thread in a heated state increases significantly in relation to the usual cold state.
The graph shows that at the initial moment of instantaneous voltage supply, uncontrolled heating of the metal of the thread occurs (transient zone) and a current surge exceeds the value of the nominal mode, and then the process stabilizes.
Because of this initial peak in current, lamps most often burn out when turned on, and also when turned off when the filament begins to cool sharply . Sudden voltage changes during operation also disable it.
To prevent these phenomena, for ten years I had a smooth switching circuit for 60-watt incandescent lamps installed in a three-arm chandelier.
HL1 lamps are connected in series with a filament ignition circuit consisting of a rectifier bridge, a thyristor, a capacitor and a resistor.
When voltage is applied by switch S1, current begins to flow through thyristor VS1, which is initially in the closed state. It smoothly opens from the increasing control current that occurs as capacitance C1 is charged.
The rate of increase of the charging current depends on the characteristics of the capacitor and the value of resistor R1. The heating time of the thread from hundredths to a second can be adjusted by selecting their parameters.
If you add a circuit for limiting and stabilizing this current to the circuit, you will get a full-fledged light controller - Dimmer.
The brightness of the luminous flux can be limited by connecting a ballast resistor in series. But, it will consume some of the power and heat up. Alternatively, for walk-through rooms where bright lighting is not required, it is permissible to connect two incandescent lamps in series.
They can be placed at a distance from each other at different ends of the corridor. The light will become dim, but sufficient for orientation in space, and the lamps will work for a very long time: the lighting is created economically - at full intensity.
You just need to select them so that the resistance of each filament is the same. Otherwise, one will shine brighter and the other dimmer. You won't be able to control their light output with this connection.
A modern dimmer is made from electronic parts in the form of a separate small-sized module on a printed circuit board. Manufacturers are trying to provide it with additional functions of limiting inrush current and conveniently adjusting the amount of luminous flux.
In the photo below I show one of the options for this execution.
What types of dimmers are there: what attracts people to their designs
Manufacturers produce modern Dimmer with different brightness adjustment technologies. It can be equipped with:
- A simple rotary handle placed on a variable resistor. Its rotation regulates the electrical resistance of the control circuit, which changes the current according to Ohm's law, and, therefore, affects the luminous flux of the source. Such a module often has a switch contact in the end position, giving the device the function of a conventional switch.
- Wired design. It works on the same principle, but is mounted not on the wall using the standard method, but on the lamp’s power cable.
- Rotary handle with pressure function. When you press the wheel, the mechanism operates as a light switch, and when it rotates, the luminous flux is adjusted.
- Keys that respond to pressure. The light is controlled by its intensity. Such modules are difficult to distinguish from conventional switches in appearance. They have recently appeared on the market and are beginning to take their place in the sun; they have the function of control from mobile gadgets.
- Touch control, which is similar to conventional mobile devices. Many users like the beautiful body, the absence of buttons, keys and wheels. The interface is immediately clear to use.
Advantages of modern dimmers:
- ease of control of workplace lighting;
- increasing the service life of lamps due to the gentle mode of switching it on under load;
- opportunity to save energy;
- creating the effect of presence in the owner’s home with minimal electricity consumption, as a preventive measure against unauthorized break-in by vandals;
- remote control function from a remote control or smartphone;
- replacing a conventional switch;
- there is no need to use low-power light sources;
- efficiency of changing the light flux;
- organization of lighting according to a pre-entered program;
- compatibility with light sensors, allowing you to control the light automatically.
Among the disadvantages that Dimmer has, two can be distinguished:
- the possibility of light flickering, which is especially noticeable in low light;
- increased sensitivity to overheating, which can cause damage to semiconductor elements, which will require repair of the module by qualified specialists.
Types of dimmers
Before purchasing and installing a dimmer, understand their classification. These devices are widely available on the market. They differ in design, installation method and regulation.
By installation type
All regulators according to installation method are divided into two large groups:
- External. They are surface-mounted switches that are mounted directly on the wall. Such devices are usually installed when the interior issue is not a priority.
- Internal. These devices are placed in a pre-prepared niche. The most popular option for residential premises.
By design
Not only the capabilities, parameters, cost, but also the scope of application of the dimmer depend on the design. Design options:
- Modular. The second name is panel boards. They are installed in the electrical panel. This is a rather expensive option with complex electronic filling. It is rarely used in everyday life. Install it on mounting rails. There are modular models for LED lamps that change not only the brightness of the glow, but also perform a number of other functions, controlled through digital transmission channels. Devices of this type are used in the Smart Home system.
- Block. Compact device that connects directly to the lighting circuit. They are used when installing spotlights on suspended ceilings - the device is mounted behind the canvas.
- Monoblock . The most primitive option. Such devices are mounted in standard socket boxes. They are usually installed in apartments.
By control method
A dimmer is a small device that looks like a regular switch. Switching brightness is carried out in fundamentally different ways. Regulator options:
- Push-button. Simple and easy to use. The brightness changes by pressing one or another button.
- Rotary. They provide for turning the mechanism clockwise or counterclockwise. When you turn it for the first time, a click is heard - the lighting turns on and the lamps light up at 10% of the nominal value.
- Turn-push. The mechanism rotates in the same way as the previous case, but in this way only the brightness is adjusted. To turn the lamps on and off, press the switch.
- Sensory. A more modern approach to management. Adjustment is carried out by clicking on the corresponding zones. Expensive models have a color display.
- Remote. Control is carried out wirelessly. The signal is transmitted via radio waves or infrared. In the first case, you can adjust the brightness from any room in the house, in the second - by pointing the remote control at the regulator.
Triac dimmer circuit
The circuit of triac brightness controllers is basically the same everywhere, differing only in the presence of additional parts for more stable operation at low “output” voltages and for smooth regulation. Also, details are introduced into the circuit to reduce the level of interference generated by the dimer into the network.
The simplest dimer scheme
The operating principle of the circuit is as follows. In order for the lamp to light up, the triac must pass current through itself. This will happen when a certain voltage appears between the electrodes of triac A1 and G (which one - see in the datasheet, can be downloaded at the bottom of the article). This is how it appears.
At the beginning of the positive half-wave, the capacitor begins to charge through the potentiometer R. It is clear that the charging speed depends on the value of R. In smart words, the potentiometer changes the phase angle. When the voltage on the capacitor reaches a value sufficient to open the triac and dinistor (see datasheet for dinistor), the triac opens. In other words, its resistance becomes very small, and the light bulb burns until the end of the half-wave.
The same thing happens with the negative half-wave, since diac and triac are symmetrical devices, and they do not care in which direction the current flows through them.
As a result, it turns out that the voltage on the active load represents “stubs” of negative and positive half-waves, which follow each other with a frequency of 100 Hz. At low brightness, when the lamp is powered by very short “pieces” of voltage, flickering is noticeable. The same cannot be said about rheostat regulators and regulators with frequency conversion.
This is what a real light controller circuit looks like. The parameters of the elements are indicated taking into account the variation among different manufacturers, but this does not change the essence.
Practical diagram of a rotary dimmer
More details about the operation of the dimmer can be found in the video:
You can install any triacs in this circuit, depending on the load power. Voltage - not lower than 400 V, since the instantaneous voltage in the network can reach 350 V. Dinistor - DB3, in extreme cases DB4. The starting and ending points of ignition and the stability of the lamp’s combustion depend on the size of the capacitors and resistors.
At the maximum resistance of resistor R1, there will be minimal lamp burning, since the triac will open at the end of the half-wave, or will not open at all.
Advantages and disadvantages
The main advantage of a dimmer is its function - to regulate the brightness of the light. This opportunity allows a person to choose the optimal lighting mode for himself, taking into account his immediate needs.
Other advantages of a dimmer for LED lamps:
- Saving. Dimming can significantly reduce energy consumption by reducing power consumption.
- Zoning. By dividing the room into separate zones using lighting, the brightness of the glow in a specific zone is adjusted.
- Operating at minimum power. When leaving home, you can leave the lights on, setting the lamps to the lowest brightness. This step imitates the presence of the owners and scares away thieves.
- Quality. Modern dimmers are distinguished by their reliability, durability and undemanding operating conditions. They withstand overloads, operate quietly, are compact and weigh little.
- Versatility. The device is used both to control lamps with standard E14 and E27 sockets, as well as for more rare modifications. Regulators are installed both on single LED lamps and on entire groups of lamps.
Flaws:
- Expensive. It takes months, or even years, for the device to pay for itself.
- Risks. There is a possibility of device failure, which could lead to a fire in the circuit. There is also a danger that the regulator will not open the power supply circuit when necessary, which threatens the user with an electric shock.
Answers to popular questions
Almost everyone who is thinking about purchasing a dimmer has many questions. I'll try to answer the most popular ones.
Does it make sense to install a dimmer?
After reading this article, you are probably wondering – is it worth installing a dimmer? Would such a project have any significant disadvantages? Like any device, a dimmer has advantages and disadvantages. Let's put them in a table:
| Advantages | Flaws |
| The ability to quickly create a comfortable level of illumination using the same lighting fixture. This is especially convenient when using a wireless remote control | Additional costs (a quality multi-function controller may be more expensive than a lighting system) |
| Ability to program and create various lighting effects automatically. Relevant not only at home, but also for entertainment centers, shopping centers, and for use in decorative lighting | When using budget devices with a low PWM adjustment frequency, flickering and “ringing” of the SL are harmful to the eyes. The effect is especially noticeable when setting low brightness levels. |
| Extremely simple installation and connection that you can do yourself |
So, the main disadvantage of installing a controller for an LED strip is its high cost. But here we are talking only about full-fledged multifunctional controllers. From the functions you just need to select the ones you need, and a regular dimmer without additional functionality, even from the most famous brand, is quite inexpensive. In addition, simply connecting a dimmer allows you to avoid the services of a qualified installer, which is also not free.
As for flickering, it is typical only for extremely budget products and devices. If you purchase a device from a normal (not necessarily the most famous) manufacturer, there will be no problems with flickering.
Does it fit any tape or not?
If the dimmer has sufficient power and supports the required number of channels (I spoke about channels above), then it will fit any SL with the same number of channels, designed for the same voltage as the dimmer. All LED strips are dimmable unless they have a built-in power supply. The only thing is that they need a special dimmer, designed to work together with LED strips, and not the one that is installed in switches to control light bulbs in a chandelier.
Now you know almost everything you need to know about dimmers for LED strips to make the right choice and install it yourself. And for those who like to hold a soldering iron in their hands, after reading this article, I hope you can easily assemble a simple but fully functional dimmer on your own.
Dimmer and minimum lamp power
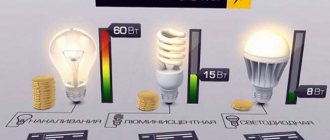
LED lighting is much more economical than conventional incandescent lamps.
Therefore, select less powerful models for them, this will increase the sensitivity of the adjustment. For example, you have an old chandelier and a dimmer for it instead of a switch.
If all the incandescent lamps in a chandelier are replaced with dimmable LED ones, but the dimmer itself is not changed, then with a high probability we can say that the chandelier will not work normally.
Instead of decreasing brightness, the light bulbs may even begin to blink.
The point here is that the old regulator was designed for a minimum power of 60 or 100 W, and after replacing all the lamps, this power dropped sharply several times.
Therefore, you will need an appropriate regulator, with adjustment limits at minimum loads of 20 or even 5 W.
How to choose a dimmer?
For the dimmer to work correctly, it must be compatible with LED lamps. Therefore, first decide which LED lights will be used.
Dimmer selection:
- For a 220 V lamp. Pulse-phase devices with sinusoid cutoff at the trailing edge are recommended.
- For 12 V. Any PWM controllers or dimmers for LED strips are suitable for low-voltage DC LED lamps.
All modern dimmers for LED lamps operate on the PWM principle - linear regulation has long been outdated. It is also recommended to use special lamps designed to work with a dimmer.
How to choose power:
- Sum up the load of all LED lights that will be connected via a dimmer.
- Add another 20% to the amount received.
If 2 dimmers are included in one circuit, the maximum permissible load is reduced by 25%. Models for 220 V lamps are usually designed for a load of 0.3-1 kW, for low-voltage 12 V lamps - up to 0.1 kW.
When purchasing a voltage regulator, it is important to consider its parameters. It often happens that the dimmer and LED lamp are incompatible. Any brightness control has a certain voltage threshold, which may not be enough to control a particular lamp.
For example, there are LED lamps that can turn on and operate at 5% of their power. If you choose the wrong dimmer, it will adjust in the range of 40-100%, which significantly reduces the dimming capabilities.
Operating principle
The power regulation of different types of lighting fixtures, including halogen, fluorescent and incandescent lamps, is different, therefore the variators used in each specific case have a different operating principle.
- The filament heating circuit, depending on the voltage level supplied from the light regulator and changing the brightness of the glow, is used on halogen lamps and incandescent lamps with an operating voltage of 220 V.
- A circuit with a transformer that converts the voltage level, which is output by the light controller to 12–24 V, is intended for the operation of low-voltage halogen lamps. In this case, an electronic and adjustable type of transformer is used, providing a “soft” switching option, which is important for heating the lamp filament and helps prevent overload.
In circuits for use in any lamps with an electronic choke, the network voltage is converted to 0–10 V using a variator. This voltage, supplied to the electrodes of the lighting device, regulates the power indicators in the electrical discharge created between them, which allows you to control the strength of the gas glow.
Advantages and disadvantages of application
The most powerful and most modern devices have a whole range of functions:
- automatic light switch-off;
- software setting to turn the lighting on and off;
- backlit button or key;
- resistance to high-power loads;
- maximum and minimum levels in adjustable brightness levels;
- human presence simulation mode;
- connection under combustion conditions of a phase wire;
- presence of a built-in float-type fuse;
- memory function for set brightness parameters;
- fixing several levels of lighting in memory at once;
- a very wide range of usable voltages ranging from 0–220 V;
- protection against overheating and short circuits;
- high resistance to sudden temperature changes.
In any case, the advantages of using modern regulators are much greater than the disadvantages, which are in most cases insignificant.
Installation and connection
There is nothing complicated about connecting a dimmer for LED lamps. All you need is an indicator and a screwdriver. The voltage regulator is connected in series with the switch. But you have to tinker with the installation.
If the regulator has an on/off option, it is installed instead of a traditional switch. Installation procedure:
- Drill the wall with a hammer drill or a drill with a cylindrical drill bit. Use diamond or tungsten carbide core bits and drill into the wall using the non-impact mode. Toothed crowns - in impact.
- The depth of the drilled niche is equal to the depth of the socket box, the diameter is slightly larger. Using a chisel, knock out the material inside the drilled outline and form a blind hole.
- Punch a groove in the wall using a hammer drill or chisel. This will connect the junction box and the hole you drilled.
- Make a groove from the groove to the lamp. Near the hole, deepen it diagonally to bring it to the back wall of the socket box.
- Place the wiring in the grooves and fill them with solution.
- In the socket box, push out the plug from the side of the supplied wire. Place the wire sticking out of the wall into the hole.
- Place a little alabaster or cement mortar into the hole and install a socket box.
- Remove the insulation from the wires protruding from the socket box, strip the ends of the wires and connect them to the terminals located on the inside of the dimmer.
- Fold the wire like an accordion and place the inside of the dimmer into the socket. Unscrew the screws and move the spacer legs apart. Screw in the self-tapping screws.
- Snap the front panel of the dimmer to the socket.
- Connect the wires to the lamp and check how the regulator functions.
Many experts advise laying wires not in grooves, but in corrugation. If they burn out, you won’t have to hammer into the walls.
A video about installing the dimmer is below:
The procedure for connecting a 220 V dimmer:
- Don't turn off the electricity. Use the indicator to determine the phase. Label the wire to avoid confusion.
- Turn off the electricity and proceed with installation.
- The regulator has terminals “L” and “N” on the body. Screw the phase to “L”, zero to “N”.
- Clamp the wires tightly to create reliable contact. Using the adjustment bolts, level the dimmer body, secure the panel and test the operation of the device.
Standard connection option
Connecting the dimmer to the lighting system is quite easy; you just have to take into account that, depending on the modification, the device may have two or four terminals.
When connecting a device to a circuit, safety regulations must be followed. All manipulations should be carried out with the electricity turned off, using tools with proper insulation.
The design of monoblock models provides two terminals through which the broken phase of the lighting circuit must be connected. As a rule, such devices are installed instead of switches in an existing socket.
Instructions for connecting the dimmer
The process consists of the following steps:
- First of all, you need to unscrew the bolts and remove the switch, disconnecting it from the electrical wiring.
- Then carefully examine the markings of the terminals, where the arrows indicate the incoming and outgoing phases. To clarify, you can check it with a tester.
- Observing the polarity, the wires remaining in the socket are connected to the dimmer terminals.
- After this, the dimmer is inserted into the box and secured with screws or another method.
- At the end of the process, electric current is again supplied to the circuit to check the correct operation of the connected equipment.
When connecting a dimmer with four terminals, two of them are attached to the open phase of the lighting circuit, and the control button is attached to the other two.
Exploitation
Dimmers are used to regulate special LED lamps - dimmable ones. Conventional LED lamps cannot be used in conjunction with a voltage regulator.
If a non-dimmable LED lamp is connected to a dimmer, it will only flicker, turn on and off. It is impossible to adjust its brightness; it may burn out. Dimmable lamps are easily recognized by the corresponding markings on the packaging.
There are LED lamps that have a quenching capacitor. They can be adjusted, but within a very small range, so they are also not suitable for use with a dimmer. To make sense in purchasing a regulator, use it with dimmable lamps.
Possibilities when using dimmers:
- Control from different points. There are regular and pass-through dimmers. Thanks to the latter, you can control the lamps from different rooms.
- Automatic on/off. Dimmers for chandeliers and other lamps can not only be built into a timer, but also provide programming. They are also allowed to connect to smartphones. By programming the glow modes for different times of the day, you don’t have to waste time on adjustments.
- Remote control. It allows you to adjust the brightness of the glow in various ways - by voice or remote control.
- Wi-Fi control. You can change the brightness in your home from anywhere in the world. They do this using a smartphone, tablet, etc.
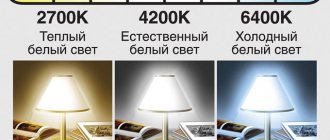
- Adjusting color temperature. When the brightness changes, the color of the radiation also changes. When dimming, the light from the lamps becomes different. Color temperature varies from 2,700 K to 1,500 K - this is an approximate range.
The best manufacturers
A dimmer is a high-tech electronic device that you cannot skimp on. Cheap Chinese devices are unreliable and can fail at any time. The most popular dimmer manufacturers are located in Western Europe.
Legrand
This oldest French company is considered one of the best among manufacturers of electrical products. The brand is the most recognizable in Russia. Legrand products are sold all over the world.
The wide range includes dimmers from budget models to premium ones. The cost of rotary-push versions is 2-6 thousand rubles. The devices are distinguished by their laconic design and high quality.
Schneider Electric
This manufacturer is also French owned. The company is famous for its high-quality electrical equipment. For many years it has been setting fashion and standards for electrical goods in Europe. The brand has several factories in the Russian Federation, and its products are in demand all over the world.
Rotary and rotary-push dimmers from Schneider Electric, built-in and surface-mounted, can be purchased for about 3-5 thousand rubles.
ABB
The company represents a joint Swedish-Swiss production and is one of the giants of electrical engineering. The company has been operating in the market for the second century. It introduces advanced technologies and sells its products throughout the world. The average cost of ABB dimmers is about 9 thousand rubles.