Pulse welding - what is it? In essence, this is ordinary electric arc welding, during which additional short-term pulses are applied. Please do not confuse this type of welding with spot welding. Pulsed spot welding and pulsed arc welding are two radically different methods of joining metals.
But what if you want to try this method of joining metals in your practice, but do not want to spend a lot of money on buying a high-quality welding machine? There is a solution! You can make homemade pulse welding. Pulse welding can be assembled on your own in one and a half to two hours, and all components are inexpensive. In this article we will tell you in detail how to make pulse welding with your own hands and what is our experience in using a homemade welding machine.
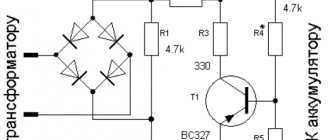
Pulse Welding Assembly
Converter
Let's start by assembling the converter. Which is also called the power part of the welding machine. Below you can see a detailed assembly diagram.
We have also provided several tables with specifications of the components used.
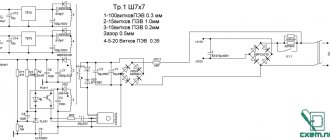
Control circuit
Below is a clear and working control diagram, and a small part of the device’s startup diagram is also visible.
As when assembling the converter, we have provided several tables with the specifications of the components used.
Pay
Below you can see a schematic image of the printed circuit board.
And here is the layout of all the elements on the board.
Please note that the “soft start” is located on the control board.
Complete device
Below you can see the assembled device. This is its simplest form. What is missing is a housing with fans, a control board (it needs to be attached to the housing itself), a connector for welding current, as well as a surge protector and a circuit breaker (also attached to the housing).
Application experience
Our experience has shown that a device assembled according to these circuits works almost flawlessly. We were pleased with the functionality and quality of the resulting seams. Of course, with the help of such a unit you will not be able to perform professional welding work, but it is not necessary. This homemade welder is suitable for pulse welding of a fence or greenhouse. In a word, it will not let any home craftsman down, and its assembly will be very cheap.
The welder assembled according to these diagrams is designed to work on a 220V network. But in our memory there have been situations when the voltage was unstable, especially in the country. Nevertheless, the arc burned stably and was ignited quite simply. Yes, this is not professional micropulse welding, but still. By the way, we recommend using only consumable electrodes when working with such a homemade device. Welding with a consumable electrode is much more effective and stabilizes the arc quite well.
Naturally, we needed to spend our own time and effort to assemble it. But the final cost of a homemade pulse welding machine turned out to be several times lower than that of budget models from the store. At the same time, the homemade device copes with its functions perfectly.
Functional diagram of spot welding
Spot welding requires a current pulse of several hundred amperes. Often a transformer from a microwave is used as a current source. I didn’t want to mess with transformers because of their gigantic size and weight, and I’ll take a pair of 3000 Farad ionistors as a source.
The welding power is selected depending on the thickness of the nickel-plated tape. To connect batteries, tapes with a thickness of 0.1 mm - 0.3 mm are used.
Scheme of spot welding on ionistors and mosfets.
The one-shot on timer 555 generates a single pulse when the green button is pressed. A 10k variable resistor allows you to adjust the pulse duration from 5 to 30 ms. A pulse with a longer duration causes local overheating of the welding site and deteriorates the quality of the connection.
The generated pulse is sent to the TC4420 power transistor driver, which can abruptly open or close an assembly of IRF1324 power switches.
Current-voltage characteristic of the IRF1324 transistor
According to the current-voltage characteristic, it is clear that at a voltage of 5 V one transistor can produce a current of more than 100 A. An assembly of 4 mosfets will produce currents of approximately 500 A. And at 7.5 V more than 1000 A
For sharper operation of power switches on the gates, it is advisable to generate a voltage of 7 - 12V. This reduces transients and reduces transistor heating.
To increase the voltage from 5 V to 12 V, I’ll take a ready-made DC-DC booster. At the output of the booster, a capacitor of 470 - 1000 μF is required. It is this that powers the circuit during welding, and the diode located in the booster prevents the capacitor from quickly discharging when the welding electrodes are short-circuited.
The 5 V 3 A power supply recharges the ionistors during breaks between welding pulses.
A prototype board assembled on a breadboard.
Advantages of a homemade device
In addition to the price, a homemade pulse welding machine has many other advantages over models sold in stores. The first advantage is low current consumption. If you plug an ordinary device from a store into a household outlet at your dacha and weld a gate, for example, you will soon receive electricity bills and be unpleasantly surprised. In addition, connecting such a device to a household outlet is simply dangerous; the machines may not withstand such power.
Don’t forget about the dimensions of purchased devices. It is simply impossible to calmly carry them in your hands from place to place. In factories, welders simply use very long wires so as not to move such a device around the workshop. However, the price for such wires is very high, and we don't think you'll want to spend an extra $100 on cables. But the homemade device weighs little and can be easily moved.
Also, purchased devices have their own production capabilities, and they rarely exceed 80%. And often they are at around 50%. This means that such a device simply cannot reveal its full potential. This happens because a large and technically complex welder gets very hot and takes a long time to cool down. For this reason, you will also not be able to cook for more than 2-3 minutes at a time.
A homemade welder assembled according to our diagrams does not have such disadvantages. There are no reactive currents in it, so almost all electrical energy is used. You can easily connect such a welder to a home outlet and not worry about electricity bills and possible operating time. After all, the power of our homemade device is only slightly greater than the power of a regular iron.
Using a homemade pulse welding machine, you can cook for more than 20 minutes, which is definitely longer than the allotted 2-3 minutes for the machine in their store. And the weight of such a homemade device does not exceed 10 kilograms. This is what the home handyman needs.
What other advantages are there? Well, you can reduce the cost of the design even more at the assembly stage. For example, to use wires with a smaller cross-section as welding cables, 12 square millimeters is enough. And to power the device, you can use wires from household extension cords.
Types of contact welding
There are several types of resistance welding. These include spot welding (it can be single-point, two-point and multi-point), projection welding, seam welding (can be continuous, stepwise or intermittent), butt welding (performed either by resistance or by fusion). Combinations of different methods are also possible, for example, seam butt welding or relief spot welding. In this case, the combined method will have all the characteristic features of both types of resistance welding.
Let's take a closer look at the methods of contact electric welding of metal products.
Spot welding
Spot welding is the most common type of resistance welding. Its essence is the formation of so-called points by heating the metal and its further deformation. The points are formed in small increments, forming a welded joint.
Spot welding is quite versatile, it is used to join thin sheet metal, small parts used in electrical appliances, and thick parts up to 2 centimeters. Using this method, fast and high-quality welding of stainless steel is possible.
As for the quality and reliability of the connection, everything is simple: the more points, the more reliable the seam. Beginners mistakenly believe that such a connection is unreliable and can break at any moment. But this is a big misconception. A lot of pressure is used to form the point. It easily deforms the heated metal, which then cools and reliably fixes the parts together.
Relief welding
Resistance relief welding is carried out on the same principle as contact welding, only before work the edges of one part are processed using special tools or machines that form protrusions. The part is placed on top, with the protrusions down. The protrusions can be semicircular or oblong. In the place of the protrusion there will be a point formed by the resistance welding machine. The second part remains unchanged, it is placed below.
The relief welding method is often used in automobile assembly. It is very complicated due to the need to form protrusions and is therefore rarely performed at home.
Seam welding
Seam welding is somewhat different from other types of contact welding. Here the electrodes are roller, with their help the metal is not only rolled, but also welded. In this case, the welded joint looks like spot welding. But the dots overlap each other by a few millimeters, forming a seam more like a connection made by hand using a coated electrode.
Seam welding is used when welding thin metals up to 3 millimeters. Seam welding is also excellent for welding sealed products, such as tanks and cisterns.
Butt welding
Resistance butt welding also uses heat and pressure, but in a different plane. The seam is formed not between the upper and lower electrodes, but in the middle. To better understand the concept, look at the diagram below.
Butt welding is divided into resistance welding and fusion welding. In resistance welding, the parts are first joined, then compressed under slight pressure, and only after that a current is supplied to the weld area, which heats the metal, softening it. The metal then cools and a compound is formed.
In fusion welding, parts are preheated to a plastic state and only then connected using pressure. Heating can be either constant, where heat is supplied throughout the entire welding process, or intermittent, where the part is heated at intervals. Intermittent heating is used to save electricity. It is also useful if the parts are small and thin, in such cases there is no need to use heating constantly.
Attentive craftsmen will ask, where does the molten metal disappear? Indeed, with other welding methods, when melting, the metal begins to oxidize and slag is formed. And this creates additional problems. The fact is that in resistance welding, the current has an electrodynamic effect, so it easily throws the molten metal outside the welding zone.
Peculiarities
Do-it-yourself welding using a homemade welder has a number of features. We will talk about them below.
During work, the arc may burn unstably. To fix this you need to use a transformer with a high degree of inductance. But keep in mind that in this case the current value may decrease. This is, of course, a minus. After all, such welding machines often operate with alternating current and, by default, have a small current adjustment range, and at the same time a low efficiency.
But for devices operating on direct current, the current itself is stabilized thanks to a separate choke. Some models may have two throttles at once. Therefore, the arc recovery time is significantly reduced, and the value of the welding current increases.
The conclusion is obvious: the welder needs to operate on direct current. But keep in mind that you need to monitor the inductance of the inductor. If it is too large, then you will not be able to light the arc normally and the electrode will simply begin to stick to the metal. Is it possible to achieve fast arc ignition and stable welding current? Certainly. But to do this, you need to make sure that the inductance of the inductor is low, while the current frequency is high.