How to fix an electric kettle button
Most people's mornings begin with a cup of invigorating drink - coffee or tea.
To prepare it, as a rule, an electric kettle is used, since it heats the water to the desired temperature in just a couple of minutes.
However, what if one fine morning everything went wrong?
You habitually press the kettle button, but it does not lock, or it seems to turn on, but there is no contact, and the kettle does not work. Problem? Even some! Someone will say: buy a new kettle, and that’s the end of it. How much does it cost there - mere pennies...
In fact, if the power button for an electric kettle is broken , then this is not a death sentence for the entire device. Practice shows that even a person very distant from the world of electronic boards and various chips can repair this unit.
You just need to follow simple rules and have a general understanding of the subject of repair.
Electric kettle protective element
Note that every modern model of electric kettles has a special protective element. It turns off the household device at the moment when water boils or when there is no water. The presence of a protective element reduces the risk of accidents, such as the risk of accidental fire.
Previously, many people, having forgotten to pour water into a classic kettle, turned it on. It was this type of forgetfulness that caused a fairly large number of accidents. This, in turn, led manufacturers of electrical appliances to develop a modern security system - creating a function to automatically turn off the kettle when the water in it heats up. There is no water - the kettle will not turn on.
Design and principle of operation of the kettle button
At its core, the kettle button is a thermostat. This unit has a fairly simple design. It ensures that the electrical circuit is closed or opened depending on the set temperature.
When the required value is reached, the circuit opens and the button turns off.
The button consists of metal and plastic elements. These are several plates to which contacts are connected, as well as a plastic pin on which the outer part of the button is located.
When repairing a button, there is no need to use complex and expensive devices, so an ordinary person and even a fragile girl can successfully cope with this process.
Instructions - what to do if the kettle button does not work
An electric kettle is a fairly simple device in its design.
- housings;
- stands;
- ten;
- cord;
- on and off buttons.
Before repairing, you need to equip yourself with a tool that will effectively fix the breakdown. In this case, there is no need to reinvent the wheel - take a set of screwdrivers and sandpaper to clean the contacts. Sometimes a tester may be needed to check the voltage.
First, we determine the location of the button. It can be located at the top or bottom of the kettle body.
Causes of the malfunction and ways to resolve it (the button is located below):
- The button is fixed, but the electric kettle does not turn on
There are two possible options here - either the thermostat is completely out of order and needs to be replaced, or the contacts that fit the plates have burned out.
- In order to check the condition of the contacts, you need to remove the kettle handle. This is done using a flat or Phillips screwdriver (depending on the type of screws used for fastening). Remember, to get to the button block, you must act carefully, since almost all structural elements of the electric kettle are made of plastic and can be destroyed due to strong mechanical stress.
- If you see that the contact has burned out or is covered with a layer of burning, then this means that this is most likely the reason for the breakdown of the heating device. It is necessary to carry out work to clean or restore the contact group.
- You can remove carbon deposits on the contacts of the on/off button using a needle file or fine sandpaper.
- After cleaning, you need to immediately ring the chain with a tester; if a chain appears, reassemble the kettle in the reverse order.
VIDEO REVIEW » alt=»»>
- The button does not lock
In this case, the cause of the breakdown may be the loss of any fixing element. To eliminate it, you need to disassemble the unit and carefully inspect it. If a part has fallen out, it should be replaced.
- The kettle starts to heat water, but does not turn off
Here, too, the problem may be that the thermostat is not working correctly. Sometimes, to eliminate this breakdown, it is enough to clean the contacts. If this does not help, you need to change the thermostat.
- The kettle turns on and off during operation
This means that the power supply is interrupted. The reason for this may be the same carbon deposits on the contact group of the thermostat. The recommended solution is to strip the wires and plates.
Quite often, under the influence of high voltage, plastic elements melt, which causes the contact plates to come out of their sockets, which leads to a violation of the correct operation.
The button is at the top
Repairing the electric kettle button , which is located at the top of the handle, has its own characteristics. The fact is that its main block, which includes a thermostat and a contact group, is located in the lower part of the case. For repairs, watch the video with instructions.
VIDEO INSTRUCTIONS » alt=»»>
To connect the key to the “brain” of the button, a special plastic connector is used, which may lose its integrity during operation. To repair it, it is recommended to use thin copper wire. Two holes are made in the damaged parts of the connector with a soldering iron, and then they are connected using wire.
Reassembling the electric kettle is done in the reverse order. As you can see, repairing a button is a very real task that you can handle on your own.
What to do when the kettle leaks
This problem is not uncommon; it occurs with every third electric kettle. This is understandable, electric kettles simply cannot withstand constant operation for a long time, some part will weaken.
- If the kettle is leaking, then you need to immediately find the root of the problem. Study the diagram of the electric kettle. If you see that some part is broken, then you need to immediately contact a specialized service center.
- It happens that the water indicator breaks. You can check its condition for the presence of cracks and other connections responsible for leaks by examining the plastic indicator, after first removing the lid that covers the electric kettle switch;
- Perhaps the problem associated with leakage is related to the weakening of its heating elements. To solve this issue, it will be enough to slightly tighten the screws and nuts that secure the classic heating element. If the leakage cannot be resolved, you must immediately contact a specialized service center, whose experts are engaged in solving problems associated with leakage of electric kettles. As a last resort, you can simply change the electric kettle by purchasing a more modern model in a household store;
- It happens that the cause of a leak in an electric kettle is damage to the gasket. If this happens, then know that tightening a number of fastening elements will not help eliminate the cause of the leak. The gasket is the cause of a leak quite rarely, but if this happens, then it is necessary to replace the burst gasket with a new one. This is the only way to resolve this problem and eliminate the leakage of the electric kettle;
- Probably the most terrible and unpredictable problem in every sense of the word that resulted in a leak is damage to the bottom. Not very good news for those who are not used to the fact that electrical things tend to break down. If this happens, then there is no point in taking the electric kettle to a service center for repairs; you will have no choice but to purchase a new electric kettle at a household store. There is also no point in repairing the kettle yourself - the bottom cannot be repaired or replaced, and only in rare cases, when the equipment has a high price, is it replaced in accordance with special schemes that are available in every second service center.
DIY electric kettle repair.
Lyrical introduction. If you were the owner of the production of electric kettles, then perhaps you would be faced with two urgent tasks: 1. The company's products (electric kettles) must be very reliable, as fire and electrically safe as possible. So that customers choose your products. Reliability is very good. But if equipment never breaks down, people will not buy new products, and this is bad, the company may go bankrupt. This leads to the second task. 2. There should be a “surprise” in the product (in teapots). “Surprise” is some part that would break after several years of using the kettle, but it would not just break, but with the condition that the breakdown should not be in any way related to the loss of fire and electrical safety. In this case, the client will think: “Too bad. It was a good kettle, reliable. I worked for so many years and would probably still work if this unfortunate breakdown had not happened. OK. If I come across it anywhere, I will definitely buy a new kettle from Boiling Incorporated. Some kind of nonsense, you say? May be. Or maybe not. This is not the first time we have encountered the same type of breakdowns of electric kettles. Broken teapots from various famous manufacturers, not just some nameless ones. The kettles are reliable and have worked for many years. And apparently, if they are repaired, they will work for a long time. And we fixed them, and they really work as before. Well, why not the same “surprise” described at the beginning of the article? Practical storytelling. Electric kettles come in two types. Some have the switch located at the bottom, while others have the top. Our broken kettles belong to the second type. The breakdown happens like this. Once again wanting to boil the kettle, you fill it with water, place it on the stand, press the power button, and, bang!, it doesn’t work. It feels like it's dangling. Previously, the button was fixed when turned on, but now it just dangles. What to do? Throwing away? In no case? Your kettle will still serve you well. Now we will start repairing it. Before starting the renovation, I would like to say this. Modern kettles are usually made of plastic. How they figure it out, in what sequence, is a mystery. Most likely, you will have to act at random, through trial and error. During disassembly, some plastic retainer may break off. Dont be upset. It's not scary. After the repair, everything will work great without this lock. Now let's get down to business.
Here he is, our ward. Kettle with top switch. Something happened to the switch. The kettle does not turn on.
Let's start disassembling the kettle. There are no fastenings on the outside. We carefully look at where we can start to disassemble. We lift the cover and find two screws under it.
Remove the cover. Everything is made of plastic. Let's take our time. With minimal effort, remove the cover to provide direct access to the screws.
Ready. The cover was removed. Oh, the slot on the screws has an asterisk. You can't take it with a simple screwdriver. No problem, we are ready for this. A screwdriver with the type of bit we need is at hand.
We turn out the screws.
Now, we are also trying to remove the kettle handle with minimal effort. Not served. Most likely it is held on by plastic clips. Lightly lift the handle. Click! The handle was removed. This time the clamps remained “alive”.
And here is the “surprise” that was written about at the beginning of the article. The top plastic key switch (the one that dangles) is connected to the real switch located below, a plastic piece. This part usually has the narrowest point at the bottom. If the plastic part itself is several millimeters thick, then at the bottom it has a tiny isthmus half a millimeter thick. It is precisely this isthmus that, after several years of operation of the kettle, breaks. In fact, the kettle is working, but you won’t be able to turn it on.
The same broken isthmus.
Our entire repair will consist of putting the plastic piece back together. For the connection we will use thin copper wire, less than a millimeter in diameter. Copper wire has sufficient flexibility and is not subject to corrosion. These properties are very important to us. Where can I get such thin copper wire? From a piece of telephone wire. We take a piece of telephone wire and strip it.
Now, you need to drill a thin hole in the plastic connector so that the wire can pass through it freely. For drilling, take a drill 1mm thick. Why do you need to drill? Why not make a hole with a hot needle or awl? You can, of course, use a hot needle, but our plastic is too thin and if you don’t move carefully, you can simply cut off a piece with a hot needle. And, with a thin drill, at minimum speed, we will get a clear hole of the required diameter. Let's drill.
The wire passes. The hole is normal.
Now we drill holes in the other part of the plastic connector. In the part that sticks out of the teapot.
Ready. We tie the parts of the connector with wire.
We twist the wire. We cut the edges and bend them.
The connector has been restored. Let's try the switch key. The connector works as before. The key doesn't wobble. Place the kettle on the stand and press the button. The key is fixed (stuck). Everything is fine.
By the way! Do you know why, when the kettle is on the stand, the key sticks, and when the kettle is not on the stand, the key does not lock. It's all about a small fuse button in the kettle's contact connector. Place the kettle on the stand, the button is pressed, the key sticks. Removed from the stand, the button is released, the key does not lock. Here it is, this micro fuse button located at the bottom of the kettle, in the contact connector.
Reassemble the kettle in reverse order. You can boil tea.
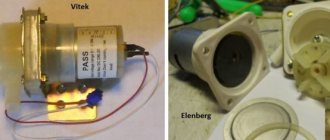
Here's another electric kettle as an example. The kettle is from a different manufacturer, but the breakdown is the same, which led the author of the article to think of a “surprise”, although perhaps these similar breakdowns are a pure coincidence. This kettle is handled a little differently. Look. It might come in handy.
First, for this kettle, you need to remove the upper part of the handle by prying it off with a knife or screwdriver.
Here, under the handle, instead of screws like the first kettle, there are two brass pins on which the handle is held.
We pry up the pins. We take them out. Remove the kettle handle.
We removed the handle and see the same type of breakdown. Broken plastic connector. This connector was repaired before this article was written. Here we demonstrate it as an example. Also a very thin isthmus that was torn.
All. We hope this article was interesting.
Household electrical appliances are widely used all over the world and one of the most common electrical appliances is the electric kettle. Despite the reliability of many models and manufacturers, the service life of electric kettles, like other electrical appliances, is limited, so kettles, sooner or later, break. And in this case, it is not necessary to send the kettle in for repair or purchase a new one - you can repair the electric kettle yourself. In this article, we will discuss with our readers how to repair the most common breakdowns in electric kettles.
Kettle button repair
One such case is repairing a kettle button. Although the problem described below occurred with a Daewoo kettle,
It is possible that a similar breakdown could occur with another kettle of similar design.
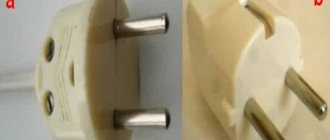
So, everything in order. The bottom of the kettle is secured with “tricky” screws. In order to unscrew them, you need a special triangular screwdriver. Although, if you really want, you can replace it with a regular flat one of suitable width.
After the screws are unscrewed, pry up the bottom with a flat-head screwdriver. You need to pry it off at the lock location. This kettle has four locks. The location of which can be easily determined by the holes.
After removing the bottom cover of the kettle, move the metal rim aside
and, spreading the seat with a flat screwdriver, remove the pressure lever (the button to turn on the electric kettle).
The problem turned out to be that the plastic “antennae” on the button broke.
To fix the damage, a metal clip and a drill were needed.
I used a mini power drill (jewelry drill) with a 0.75mm drill bit. (depends on the diameter of the paper clip). This is used for jewelry work.
Clamping the lever in a small vice, I drilled two recesses about 6mm deep.
Then, slightly heating it on gas, inserted the tip of a steel wire (formerly a paper clip) into the recess and bit off the excess with side cutters, leaving a tendril 4 mm long. A similar operation was repeated with another depression.
kettle button repair
Reinstalled the lever in reverse order. Check the functionality of the restored button while the el. The kettle is disassembled, you can do it as follows. Most models have a safety button in the recess of the power connector. Press it with a screwdriver and turn on the kettle.
If the power button stays pressed, then everything is working. Once you remove the screwdriver from the safety button, the power button will return to its original state.
Recommended articles:
- Lid for the kettle (do-it-yourself repair)
- DIY washing machine repair
- Do-it-yourself double-glazed window repair
- How to remake a radiator screen with your own hands
- DIY wood crafts
- DIY mosaic
- Do-it-yourself micro-ventilation of plastic windows
- Repair of the Sherkhan 5 key fob body
- DIY socket installation
- DIY vacuum cleaner filter
Conclusion on electric kettle repair
As readers understand, this is one of the cheap models of Chinese teapots, made to order from a certain company. The maintainability of the product is zero. Difficult to disassemble, even more difficult to assemble. By picking, it is easy to spoil the presentation and functionality. The bottom got dressed quite simply, with considerable effort and threatening clicks. The lid caused a lot of trouble. Skillful use of a hairdryer will help. With only a screwdriver, disassembly will be difficult.
We recommend evaluating the assembly in the store. How difficult will it be to disassemble the device in order to repair the electric kettle with your own hands? If the product is disposable, this is not very encouraging, and if, in addition, it is dangerous... no comment.
We hope that after such a detailed review, readers will be able to repair Tefal electric kettles and repair Scarlet electric kettles. After all, most products are made in China. We want to say goodbye, look at the pictures, evaluate, study. If the bimetallic strip is inserted the wrong way, the electric kettle will stop turning off when it boils! Although the click is heard.
DIY kettle repair: 4 comments
Oh boy! I have the same problem, only the Tefal kettle has the name and looks exactly the same (globalization). I screwed self-tapping screws from the models into the drilled holes.
Thanks for your feedback! If you can take a photo of the “modernization”, that would be great! I would post it here on the page, it will probably be useful to someone. If it works, here's the mail
Please tell me, I came across a problem where the button in this kettle does not lock, I took it apart, I also thought there was something wrong with the plastic claw of the switch, but everything is perfect, but then, following your example, when I press the safety button, there is no reaction. Is there any way to fix this kind of problem?
Alas, I won’t give you any advice. The kettle is no longer “alive” (it was broken).
The kettle turns off before the water boils: reasons, disassembly and DIY repairs
The electric boiler was invented a long time ago and is extremely simple in its functionality.
But in the modern world, program-controlled devices are already in use, which will not only boil water at a set time, but also maintain its temperature at a given level for quite a long time.
Regardless of the simplicity or complexity of the design, any thing is subject to malfunctions. One of them is that the kettle turns off before the water boils. It is this problem and ways to eliminate it that will be discussed in this material.
With a huge number of manufacturing companies, all kettles have the same electrical circuit. The differences can only be in the added little things. For example, now the device is often improved by installing a control module containing various timers. But, despite the additional indicators and backlights, the design of the device remains reasonably simple for any home craftsman to understand.
A modern electric kettle consists of two parts:
- stable stand with power cord;
- housing containing a flask with a heating element.
A durable cord supplies voltage to contacts hidden deep inside the stand to prevent accidental contact with the human body. The same contacts are located at the bottom of the device body. When the kettle is placed on the stand, the terminals are short-circuited, and the current travels further through the wires to the thermal switch, which operates in two modes:
- manual activation via a button on the frame;
- Automatic shutdown when liquid boils.
Important! There is also backup protection. It is constantly in the on mode and switches off only when you try to turn on an empty kettle.
After activating the switch, current flows to the heating element (tubular electric heater). The consumer will see the indicator light up, which informs that the device has started the boiling process.
After boiling, the steam hits the bimetallic plate in the thermal switch, where two different metals come into contact with each other. When heated by steam, one of the plates will bend and the contact will open. The device will disconnect from the network.
overheat protection
In backup protection, plates with different expansion coefficients act as temperature sensors. Having a special sample inside, the plates are glued together and fit tightly to the bottom of the kettle. They are helped in this by a paste with increased heat-conducting properties, which is applied to the surface. Under no circumstances should it be removed from the thermal protection switch.
Using a ceramic rod, the plate is connected to the contacts. When heated, one of the plates bends, the rod moves and opens the circuit. But then a gradual cooling occurs, and the rod closes the connection again. This action will continue in a circle until the heating element burns out or the kettle is removed from the stand. To prevent automatic switching on, backup protection is installed, which cuts off the voltage supply to the device.
Disassembling the electric kettle
To understand why the device turns off prematurely, it is necessary to partially or completely disassemble it, which will allow you to quickly find the faulty unit and repair it or completely replace it. The dismantling algorithm will be considered using the example of a kettle from a brand manufacturer - Bosch. At the bottom of its case there are four screws that need to be removed. To do this, select a screwdriver that matches the screw heads. A cross is usually suitable.
But recently, the manufacturer has begun to use protection against attempts at self-repair. For example, he can hide the bolts under plastic plugs, which can be easily pulled out by prying them with something sharp. Or use one screw (or all) with a non-standard head. Then you will need a two-pronged fork type screwdriver, which can be replaced with tweezers. You can also do it yourself by sawing a groove in the flat blade of a regular screwdriver with a needle file.
Advice! If the self-tapping screw does not want to unscrew, then the easiest and fastest way to deal with this problem is to heat it up a little by applying the switched-on soldering iron to the head. The plastic will soften slightly and the screw will come out easily.
The last level of protection is the clever latches on the case and the lid itself. There is an opinion that sometimes removing the cover is more difficult than making the repair itself. In this case, two thin screwdrivers will help. The first one is pushed under the lid to create a gap. And the second one in this gap is to find the place of the latch and carefully release it.
Important! After disassembling the electric kettle, be sure to check all wire connections for integrity. Loose contact can cause many problems, including early shutdowns.
Main reasons for premature shutdowns
The main reason for this problem is the long service life of the boiling unit. Over many months of operation, a layer of scale and soot forms on the heater, which reduces heat transfer . Because of this, the heating element overheats, and, as a result, the protection mechanism is triggered. Even if there are only a few seconds left before the water boils, the thermostat turns off the device earlier, since it interprets this situation as a fire hazard.
Most often this happens with open-type heating elements. In such cases, you can carry out the repair yourself.
And if in models with disk heaters it is enough to boil the flask with a solution of citric acid or vinegar several times, then the spiral must be removed and cleaned with a knife. You need to remove the plaque carefully, but at the same time being careful not to damage the coating of the element.
Then the part should be wiped until shiny with a dry cloth. After this procedure, the heater becomes like new, the problems stop and the kettle continues to serve for a long time.
Due to age, the thermostat may not work correctly. After many years of regular expansion and contraction, the bimetallic strip becomes deformed and begins to turn off at the wrong time. Taking advantage of the fact that the protection is duplicated and both thermostats are identical, some masters swap them. Often this solves the problem.
Important! It is strongly not recommended to replace a faulty thermostat with a backup one yourself, as this may lead to a fire.
It's better to try to bend the plate into place. The measure, although temporary, is more reliable. Don't forget about low-quality Chinese stampings. The service life of such products is short, and, as a rule, they cannot be repaired.
Other reasons why an electric kettle turns itself off
If the above is not related to the problem, and the kettle still turns off without boiling, then the problem may be due to the following breakdowns.
- A faulty switch where the contacts can burn due to poor connections. And he himself may turn out to be defective. To check this, the button must be disconnected and the wires connected directly. If everything works, then, without a doubt, the switch should be replaced with a new one. Often you don’t even need to disassemble the kettle to do this. A few cases when the button does not snap back are enough to replace it.
- Liquid leakage from the flask, which most often affects plastic and glass water containers. Accordingly, metal flasks are much more reliable (they are often used as a thermos). Even a few drops of leaking water can affect the operation of the device. At home, you can only change the rubber gasket on the bottom between the body of the kettle and the compartment with the heating element.
- Broken electrical wiring contacts. When disassembling, having reached the heating element, you should carefully inspect the contacts at the junction of the wires. Their violation contributes to loose attachment of the heater to the body. If the heating element is an open type at home, it is not difficult to solve the problem yourself by cleaning the contacts and high-quality insulation.
- Thermal fuse is broken. Many models have additional protection in the form of a thermal fuse. It is needed in case the device does not turn off for some reason after the thermostat is activated. Typically, contact opening occurs at temperatures above 100 degrees Celsius. But if the thermal fuse is faulty, then it can operate at lower settings, thereby preventing the water from boiling.
When to take it to the master
It is not recommended to undertake DIY repairs if:
- insufficient knowledge, experience and self-confidence;
- The thermostat needs to be repaired or replaced;
- you need to repair the crack in the flask body;
- We have to work with a closed-type heating element.
Advice! In such cases, contact a service workshop.
Water in a faulty kettle does not boil completely for many reasons. And only the user can decide whether to repair it himself, take it to a workshop, or buy a new one.
The best electric kettles of 2022
Kettle Kitfort KT-633 on Yandex Market
Kettle Braun WK 3110 on Yandex Market
Kettle Kitfort KT-623 on Yandex Market
Kettle Kitfort KT-621 on Yandex Market
Kettle Zimber ZM-11181/11182 on Yandex Market
The kettle heats but does not boil water
If the kettle turns off before the water boils, there may be one of the reasons for this:
- Presence of scale on the heating element. It overheats excessively due to plaque and the fuse trips earlier;
- Faulty thermostat. The unit must be disassembled, ringed, and replaced if necessary.
Self-repair of electric kettles, causes of problems
Of all types of household appliances, electric kettles are most often subject to breakdowns, which is due to their intensive use and the low quality of water used for boiling. The malfunction can manifest itself in different ways: the device does not turn off on its own or, conversely, turns off prematurely, the power button sticks, the liquid does not heat up to the desired temperature. In case of minor breakdowns, it is possible to repair electric kettles on your own, but sometimes it is impossible to solve the problem without the help of a service center. In any case, you will need preliminary diagnostics of the equipment, which will allow you to determine the cause of the problem and select suitable options for eliminating it.
- Principle of operation
- Troubleshooting
- How to disassemble
- Variants of problems and ways to solve them
- The kettle won't turn off
- Shuts down prematurely
- Water doesn't heat up well
- Heating element burnout
- The button does not lock
- Warranty rules
- Video
Summing up
An electric kettle can be repaired in half of all cases. Each device has its own operating principles, and if they are violated, breakdown cannot be avoided. But if something happens (water leaks, the button sticks, does not turn off on its own), you should not continue to use the device. This can lead to short circuits, fire and other problems.
When starting a repair, you need to be prepared for any situation, which means preparing the necessary tools (screwdriver, soldering iron, knife, electrical tape). During the repair process, you should not make sudden movements, because the teapots are plastic and therefore fragile. When disassembling them, it is worth remembering the sequence of work, otherwise it will be difficult to assemble them again.
The lid of the Polaris PWK 1766CWr kettle has stopped opening. The button is pressed, but the latch does not open. A short article - a review of the kettle and how to disassemble its lid.
Looking ahead, I will say that the copy that came to me turned out to have a hidden manufacturing defect. Therefore, when returning under warranty, it makes sense to give it back with a note, “I ask you to carry out the examination in my presence,” so that a careless examination does not write that the breakdown is your fault (fell, crushed the button, etc.).
Polaris PWK 1766CWr
We open the jammed lid by inserting a thin awl, knitting needle or steel wire into the gap next to the spout. Then, from bottom to top, draw over the spout, at the location of the latch, and press the latch. You can try using a bent paperclip.
We begin disassembling the POLARIS PWK by removing the plug.
Polaris disassembly
It is soft and if you pick at it, for example with an awl, a mark will remain, traces of disassembly will be visible. Unscrew the screw under the plug. Unscrew the two screws under the cover.
Principle of operation
The electric kettle is standard. Inside the removable housing there are heating elements with a power of up to 2 kW, a flask with a volume of 2–3 liters and a thermostat. Connection to the electrical network is provided by a stand with a flexible cord. The difference between individual models is manifested in the type of heating element - a stainless steel spiral or a closed disk, as well as the location of the switch (at the bottom or at the top of the handle).
The electrical circuit of teapots works on the same principle:
- mains voltage is supplied to the contacts of the stand when the cord is plugged into the outlet;
- After installing the kettle on it, the spring-loaded contacts of the stand close with the electrodes of the body;
- after turning on the power button, voltage is supplied to the disk or spiral heating element in the kettle with passage through the thermal protection elements;
- the bimetallic plate completes the circuit until the signal is received from the steam sensor.
The additional thermal protection element is optional and is not available on some models. It is introduced into the circuit to turn off the device when there is a risk of overheating and is activated only if there is no water in the device. In operating mode, the kettle's backlight should be on; when turned off, all contacts, except those spring-loaded on the stand, open.
The electric kettle does not turn on if there is no connection in any of the following areas: loose connection of the cord or stand, opening of contacts when trying to heat an empty device. In such cases, the backlight does not light up, but the device itself may be a contact device. If the kettle does not work after eliminating these reasons, the device needs diagnostics - disassembly and sequential testing of individual elements of the electrical wires.
Automation and security
All modern kettles are equipped with an automatic shut-off function when boiling and a safety lock against being turned on without water. Automatically turning off a kettle with heated water has several advantages: saving energy and, most importantly, not boiling water. According to experts, it is advisable to boil water once, especially tap water. When boiling, desalted steam comes out, and the concentration of salts in the remaining water increases.
As a rule, a modern electric kettle has a top lid with a locking lock that protects against accidental splashing of hot water. The kettle handle does not heat up from hot water.
Troubleshooting
The need for ringing arises when any component of the electrical circuit breaks down (the device does not turn on, the reasons are unknown, and trivial errors such as a non-working socket or loose installation have been eliminated). The work is carried out using a special device - a multimeter, as well as screwdrivers selected according to the type of screws, and a sharp knife with pliers or pliers. In this case, the following points are sequentially checked:
- The performance of the flexible cord and stand contacts. It is difficult to repair a burnt stand without the appropriate experience, and its breakdowns are visible to the naked eye, but to save time, the contact group is always checked. At this stage, one end of the tester is applied to the plug, the other to the springy contacts (most often they are located in the center). Detected faults, such as a burnt or insufficiently thick cord, carbon deposits on the surface of the brass contact, are eliminated if possible, after which the group is called again. If there are no problems on all three lines (2 current-carrying lines and ground), repairing electric kettles becomes more complicated; the body has to be disassembled.
- The performance of the heating element power supply terminals at the base of the housing. At this stage, you need to disassemble the kettle, as indicated in the instructions, and check the contacts of the outer and inner copper rings in turn. If there is no ringing, the power supply block is completely disassembled to remove carbon deposits, reassembled and checked again.
- Power button functionality. One probe of the tester touches the contact of the wire that supplies current to the button, the second touches the power wire of the heating element. The button is checked in the off and working state; if there is no sound signal about serviceability, in the second case it needs to be repaired or replaced (if necessary, power the kettle directly).
- The performance of the heating element. One probe is directed to the power contact, the second to the connection point with the wire from the power button. If the circuit breaks, you need to replace the heating element with a new one, which is not always possible.
In addition to checking the circuit with a multimeter, the actual resistance of the heating element is assessed. To perform this operation, it is enough to remove the bottom of the kettle, turn on the tester in measurement mode and point its probes at the output terminals. If there is a significant deviation from the value calculated or declared by the manufacturer, the heating element needs to be cleaned or replaced.
Check the functionality of the flexible cord and stand contacts
Check the contacts of the outer and inner copper ring
See if the power button works
Carry out diagnostics of the heating element operation
What needs to be checked before repair?
Before repairing an electric kettle, it is worth checking the obvious things:
- The plug must be inserted into the socket and the corresponding start button must be pressed. Often the problem concerns the plug and socket. Sometimes the connector moves from side to side. It turns out that there is no power supply from electricity.
- Incorrect fixation. This happens sometimes, but rarely. It is better to exclude this from the rules.
When these reasons have been verified, but the unit has not started working, it is worth continuing work. If an electric kettle breaks, how to fix it? To avoid creating a more complex breakdown, you need to follow simple steps.
How to disassemble
This stage is considered difficult; devices from different manufacturers may have different locations of the latches holding the handle, have their own way of removing the kettle lid, and open or hidden locations of the fastening screws. To avoid mistakes, before disassembling electric kettles of a particular modification, you should carefully study the process. Some manufacturers include this information in the instructions. The general disassembly procedure includes 2 main stages:
- Removing the bottom by unscrewing the exposed screws. This design is typical for old-style teapots or fasteners covered with decorative plugs. The bottom can be removed with a simple movement or after squeezing the teeth-clamps using a flat-head screwdriver. If necessary, remove the stand cover in the same way.
- Removing the switch. Repairing kettles at this stage requires attention and patience. The function button can be located either at the top or at the bottom of the handle. To access this element, carefully remove the fragile plastic covers and turn out the internal screws, which, unlike the bottom, are almost invisible. When repairing Brown kettles and similar models with two-piece handles, the latches are snapped off along the seam; for a number of modern appliances, the upper part of the body will be removed along with the handle.
Repairing old-type kettles does not require complete disassembly of the device; heating elements and thermal protection elements open after removing several screws. Models with a switch at the top of the handle will have to be completely dismantled.
We disassemble an old model electric kettle
The disassembly steps are slightly different:
- unscrew the screws that are located at the bottom of the device;
- the lower side part of the device is removed;
- then access to the heating element, switch and thermostat opens.
In older models, to get to the main components of the device, you do not need to unscrew the entire structure, just unscrew a few screws. However, if the power and shift button is located at the top of the handle, then complete disassembly is inevitable.
We disassemble an old-style electric kettle
To check the functionality of the heating element in kettles where the heating element is open, it is enough to remove one cover, and then it is released.
However, the cause of a breakdown may not always be related directly to the device itself. Its stand may fail. Therefore, it is important to know how to disassemble the kettle stand to check its functionality.
Thermopot device
Thermopot is an innovative modern device that combines the functions of a kettle, filter and thermos. The prices for such electrical devices are relatively high, but are justified by the quality and durability of the product. However, even the most expensive equipment can break down.
Thermopot in working condition
Thermopot in working condition
Before talking about possible malfunctions and their causes, it is worth understanding the design of the thermopot and the principle of its operation. The main components of the thermos kettle are:
- frame;
- heating elements;
- electronic board;
- DC motor;
- control board;
- thermal switch;
- thermal fuse.
Bottom thermopot panel
To inspect the internal parts of the device or repair it, the first step is to remove the housing. It can be ceramic, glass, plastic or metal. Sometimes there are thermopots made from combined materials. The shape of the water tank can be semi-cylindrical or rectangular. Regardless of this, the disassembly scheme for the device is the same for all models.
Heating elements are located at the bottom of the electrical device. They can be either disk or spiral, similar to an electric kettle. However, a thermopot is always equipped with two heating parts: one brings the water to a boil, the other maintains a constant temperature in the device. Practice shows that spiral thermal kettles fail more often than disk ones. Therefore, the second type is considered the most optimal choice.
Thermopots also differ in power, which determines the speed of heating water and maintaining a stable temperature regime (from 60 to 90 degrees). The range includes devices with a power of 600-2000 W.
Disassembled thermopot
The thermopot is considered a completely safe electrical appliance for children and very convenient for use by pensioners, since it does not need to be lifted and tilted to pour water into a cup. It is equipped with a special element for supplying water - a pump. This part comes in two types: electrical and mechanical. Water begins to flow into the cup after pressing the “Water Supply” button, which can very often be associated with thermopot malfunctions.
What should you pay attention to?
Sometimes the kettle starts to work slowly and the water heats up ineffectively. The difference may occur over time, but why is this observed? The fact is that scale accumulates on the heating element, and its performance is reduced several times. If an electric kettle breaks, how to fix it? The problem can be solved using special cleaning products. They are sold in stores. After purchase, you should refer to the instructions, because they are different for each device model.
The fact is that everyone creates anti-scale products according to their own principle. The application process will depend on the composition inside. Therefore, when answering the question of how to fix a broken electric kettle, you should not exclude such a situation as the formation of plaque. Some people try to clean it with a sharp object, but this solution will not bring the desired result and can damage the heating coil.
Another unexpected thing that is not a breakdown is the open lid. If it is not tightly fixed, the kettle will not turn on. The work does not start because the steam that comes through the hole may be blocked. This happens rarely, but it does happen. And the hole becomes clogged with a coating of lime. The steam has no way to the biometric plate and nothing happens.
Frequent thermopot breakdowns
The following inconsistencies in the operation of the device may indicate a breakdown of the thermopot:
- The device does not turn on, the indicators are not illuminated.
- The main boiling does not function, only heating is turned on.
- The heating does not work, but the main boiling functions as it should.
- There is no water supply.
- The water takes a long time to heat up, while the thermal kettle itself quickly turns on and off.
- When heating, the device makes a loud noise.
The cause of malfunctions in electrical equipment for this purpose can be such parts as: heating elements, electrical cords, capacitors, diodes, microchip, microcracks on the board, and many others. etc.
After some time of operation, the thermopot begins to slowly bring the water to a boil. In this case, the malfunction may be due to excessive scale formation. This problem is usually eliminated with the help of special products that can be bought in stores, or by using a homemade citric acid solution.
It happens that water gets on the device itself, after which problems begin, which may indicate failures in microcircuits and boards. It is recommended to check the boards for microcracks and burns. It is not recommended to solder any elements, especially with an inappropriate soldering iron.
If the device stops boiling water, the first thing you need to do is check the heating elements; the heating element may have failed. First, using special tools, you need to ring all the parts that are responsible for boiling water. But experts do not recommend replacing burnt heating elements, as the pricing policy shows - this is not at all cost-effective in this case; it is better to buy a new electrical appliance.
The backlighting of the indicators may be the result of a malfunction of fuses, thermal switches or the power cord. The cord of the device must be checked together with the connector, which is located inside the case. It needs to be tested with a multimeter and, if unusable, replaced with a new one.
Replacing the heating element: the electric kettle does not turn on
A burnt heating element is the most common cause of device failure. It can happen for many reasons:
- constant overheating of the heating element;
- network drop;
- the presence of a large amount of scale.
Regardless of the model, repairing an electric kettle yourself begins with diagnosing and checking for other reasons why it may not turn on. First of all, you need to check the socket itself, if everything is in order, then check the cord for integrity, and only then proceed to disassemble the case.
What to do if the water supply button on the thermopot does not work
The control panel of a thermal kettle usually has two buttons: one is responsible for supplying water, the other for heating. Non-functioning of the first may indicate serious damage to the electrical device. When the water supply button on the thermopot does not work, you can think about a malfunction in the pump’s power supply, a burnt-out coil, as a result of which the voltage supply to the motor is stopped.
If the device does not work when you press the “Water Supply” button, try moving it; suddenly appearing water may indicate that the cause is the contacts.
Thermopot control panel
If there are problems with the water supply to the thermal kettle, the pump of the electrical appliance is dismantled and all its components are checked:
- connecting tubes;
- supercharger;
- electric motor;
- the buttons themselves, which are located outside.
Connecting tubes require checking for dirt, scale, etc. The motor itself needs to be ringed using any external voltage source. Even the most ordinary batteries are suitable for this. Some technicians use a car battery. A breakdown of the device when the thermopot button does not work indicates that the electric motor, whose normal operating voltage is 8 - 24 volts, does not respond. In the case of a thermal kettle, independent repairs are not always worthwhile; it is better to contact a service center.
Repair of power indicator and backlight
For ease of use, the kettles are equipped with a power indicator. It can be made on the basis of a neon light bulb or LED. It can also be equipped with backlighting. In this case, the indicator can be combined with the backlight.
Electric kettle with light Polaris PWK 1767CGL
The indicator allows you to determine whether the kettle is properly installed on the stand or whether it is plugged into the outlet. It also performs some diagnostics. After all, if the light is on, but the water is not heated, this indicates a poor contact or a malfunction of the heater.
Electric kettle power indicator
The power indicator may be a neon light bulb or an LED connected to the terminals of the heating element. The light bulb is usually connected through a current-limiting resistor of about 200 kOhm. Malfunctions are extremely rare and usually breakage of conductors. The light bulb is checked by replacement, and the resistor is checked by a tester.
When using an LED, a rectifier (diode) and a current-limiting resistor are used. All together they form the so-called driver. The parts are checked by a tester.
LED lights
LEDs are chosen for illumination, as they have a high brightness. Neon is not suitable in this case. As in the case of indication, power is provided by the driver. The diagram is simple and is given below:
Simple LED Driver
Failures are rare and the weak link here is the LED.