03/21/2016 master
Today we have a wide variety of household appliances in our home. There are especially many of them in the kitchen, where they help simplify the process of preparing or heating food. The most popular kitchen appliance that can be found in almost any home is the microwave oven.
Microwave in the kitchen
This device is a long-liver, unlike the same newfangled multicookers, and it has been in household use for quite a long time. But, like everything in our lives, there are situations in which microwave ovens begin to malfunction or do not perform their direct duties at all. In such a situation, it is necessary to find out the cause of the breakdown. A frequent breakdown is the failure of a high-voltage diode. Our article will tell you what this part is and how you can check it.
Device structure
Sooner or later, the day when it will not be possible to heat food in a microwave will come in every home. Of course, this is regrettable, but you cannot insure yourself against certain breakdowns. In this case, the device will not always give an obvious “distress signal” in the form of a stream of smoke and other visual effects. Otherwise, it is unlikely that you will be able to repair the breakdown yourself. You will have to contact a specialist, and this will cost a pretty penny. If the device stops working without “special effects,” then there is a chance to fix it yourself. There are some malfunctions, the diagnosis of which and elimination of the causes of the breakdown will be quite cheap. And you won’t have to spend money on expensive repairs or purchasing a new model. But for this you need to know the structure of a microwave oven. Despite the abundance of different models and manufacturers, the operating principle of a microwave oven and its design remains unchanged. The device is assembled from the following components:
- high voltage power transformer;
- high voltage diode;
- high voltage capacitor;
- magnetron;
- fan for cooling the magnetron;
- thermal fuse that protects the magnetron from overheating;
- network filter;
- an electric motor for rotating a cup with food placed on it;
- limit switches.
Inside view
The serviceability of all of the above components of the device ensures uninterrupted operation of the device throughout the entire period of operation.
Causes of failure
Even despite strict compliance with operating conditions, microwave ovens break down and the most common causes of failure can be:
- high voltage fuse blown;
- breakdown of a high-voltage capacitor;
- failure of such an important part as a high-voltage rectifier diode.
All three of these reasons, if desired, can be eliminated with your own hands by returning the microwave to working condition again. It is worth noting that a malfunction of a high-voltage diode is the most common cause of failure of a microwave oven.
Important detail
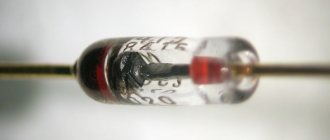
High voltage diode
To understand how you can correct the situation if the cause of the breakdown is a high-voltage diode, you need to understand what it is.
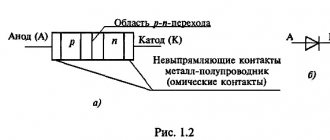
A high-voltage diode has the form of a large number of connections that connect the diodes in series into one element. This includes conventional rectifier diodes. They are made using the same technology and are part of a single body. During the assembly process, capacitors and resistors are not used to equalize the voltage. As a result, this diode has a nonlinear current-voltage characteristic. Therefore, its resistance depends on the applied voltage. Due to this design feature, it is quite difficult to check the functionality of this component of the microwave oven.
Note! This element cannot be checked by a tester. Using a tester in this situation will not give an accurate result. The device will not show either reverse or forward resistance. Here you can use, for example, a multimeter. Its resistance should be measured in forward and reverse directions.
To do this, the multimeter should be switched to R x 1000 mode. Here, when the “+” output of the multimeter is connected to the anode on the diode, resistance is measured in the forward direction. As a result, the device should show the final value for resistance. If the connection goes to “-”, then the measurement is carried out in the opposite direction. In this case it should register infinity.
Detector diodes
One of the most significant types of diodes are microwave detector diodes .
The main purpose of the detector diode is to carry out the process of identifying a low-frequency signal in a modulated voltage, based on which amplitude modulation of high-frequency signals is performed.
The role of the detector diode is predominantly performed by a point-contact diode or Schottky diode. The most significant characteristic of this element is considered to be the steepness of the current-voltage characteristic in the vicinity of the operating point. The value of the detector output voltage should be in direct proportion to how powerful the microwave signal is (the square of the input voltage).
The operation of a microwave detector diode does not primarily imply that the operating point will shift. But when recording a weak signal, it would be appropriate to implement an operating point in the low voltage zone. This is possible for forward-biased microwave diodes.
A certain number of detector diodes have a characteristic close to quadratic. As a result: with their help, you can determine the power of microwave oscillations.
The main special characteristics of detector-type diodes are:
- Current sensitivity;
- Voltage sensitivity;
- Quality coefficient.
When a modulated high-frequency signal is applied to a microwave diode, current flows through the diode with its positive side. If we determine how the indicator of the increment of the current rectified by the diode relates to the microwave power that was the condition for the resulting increment, then the result obtained will be an indicator of current sensitivity. This value is determined if the load is specified and the operating mode has already been established.
The voltage sensitivity value of a microwave detector diode is calculated in a similar way. Only instead of the current increment value, voltage increment data is used. Often this characteristic is determined only for those diodes that are used to detect pulse-type signals. It must be remembered that as the temperature increases, the level of sensitivity tends to decrease.
There is another significant parameter for detector diodes - tangential sensitivity. The main meaning of this criterion is to determine the lowest limit of the signal perceived by the detector.
The qualitative coefficient of the detector diode allows you to immediately evaluate all its basic parameters for efficiency. However, this indicator is calculated using a rather complex formula.
Methods for assessing the condition
As you can see, due to the specifics of the assembly, such a diode cannot be measured with a conventional tester. To check it, the element should be turned over in order to measure from two directions. To check the diode for serviceability, you need to do the following manipulations:
- disconnect the microwave from the power supply;
- disconnect the diode from the electrical circuit;
- We connect the circuit element to the lighting network. To do this, you need to use a low-power incandescent light bulb of approximately 15 V on a 220 V network.
Note! The incandescent light bulb should burn at half its brightness and at the same time flicker clearly.
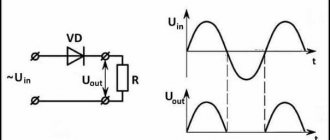
Diode test circuit
This circuit must be powered from a 220 V network. There is also another way to check the diode for serviceability. An incandescent lamp is also used here and the verification principle is very similar:
- connect the element being tested to a 20 V lamp;
- if the diodes are connected in one direction, the light bulb will burn at full intensity (serviceable element);
- after that we turn the diode over.
A change in glow is an indication that the element is “broken” and should be replaced. In addition to the verification options described above, there is another method to verify the serviceability of this
Checking in the second way
microwave oven component. To do this, you will need to charge your mobile device or tablet. Here you will also need an additional tseshka. Note! Chargers for tablets and mobile phones have a voltage of 5 V. In this situation, testing involves the following manipulations:
- remove the diode from the microwave's power supply;
- connect the element to the circuit;
- When measuring, you need to switch the circuit to 10 V.
Connected diode
If there is a working diode, the arrow of the device will show 0.25 V. However, in the opposite direction it will not show anything. If the element is faulty and “broken,” then in any direction of measurement the device will demonstrate a lack of indicators. If the diode is faulty, the light bulb should burn evenly or not light at all. Here there is a drop or complete absence of voltage. If such a situation is detected, this component of the electrical circuit must be replaced. After this, the microwave will work as before. When replacing, remember that the two terminals for the diode differ in the way they are connected, as well as in their purpose. The positive lead diode (anode) ends in a bolt ring and is marked on its body. At the same time, the cathode (negative terminal) is connected to the capacitor and ends with a bracket. No other connection option is allowed in this diagram.
Conclusion
You can check the serviceability of a high-voltage diode for a microwave oven yourself, which will help you repair the device yourself. To do this, you just need to use one of the above methods for assessing the performance of electrical network components. Separately, it is worth noting that if you have the necessary equipment (ammeter or gauge), the check will go quickly and show the real state of affairs. Depending on the light coming from the incandescent light bulb, you can effectively determine whether the diode is working or broken. In this case, during replacement, you must adhere to the correct connection of the anode and cathode. This is the only way you will be able to fix the problem yourself and bring back the “life” of your microwave oven. This way, you can repair the microwave on your own and avoid unnecessary expenses on a new device or the services of a repair specialist.
How to test a magnetron in a microwave with a multimeter
Microwave ovens are actively used in every home for cooking and heating food. However, the owners do not understand at all how exactly this equipment works. Therefore, when the device fails, repair difficulties arise. A magnetron for a microwave oven is a source of microwave waves, which, in fact, provide heating of food. Failure of this component is one of the most common types of microwave oven malfunctions. Now we will take a closer look at what a microwave magnetron consists of, how it works and methods for restoring this part.
Principle of operation and design of the magnetron
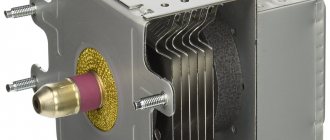
The word "magnetis" is literally translated from Greek as "magnet". The structure of a microwave oven magnetron looks like this:
- a copper part in the shape of a cylinder is an anode-resonator;
- the element inside which the filament is located - the cathode;
- The ring-shaped components located at the ends of the magnetron for a microwave oven are magnets.
The key principle of operation of a magnetron in a microwave oven is the inhibition of electron flows that intersect at an angle of 90 degrees. This process occurs in magnetic and electric fields. Ring magnets form a field. A special casing equipped with a flange acts as a conductor. It is with the help of this element that the part is attached to the waveguide.
Microwave waves appear as a result of the interaction of the electron flow formed by the emitted cathode and the magnetic field. A wire loop identifies these waves and then transmits them outward using a special antenna. This emitter is located inside a cylinder made of ceramic. Now you know what a magnetron is and how this component works.
As mentioned earlier, the antenna acts as a wave emitter - this is a small pipe, which is usually called a rod. The antenna also pumps air out of the lamp. A cap made of metal is securely fixed to this element. During operation, the magnetron in the microwave becomes unusually hot. The possibility of overheating is eliminated due to the special design.
The component in question is supplemented with a plate radiator. This element is constantly blown by a fan, which significantly reduces the temperature. Temperature fuses provide an additional level of protection against overheating. An integral component is also a high-frequency filter that prevents radiation penetration. This part is created using special capacitors and outputs.
Now you know how a magnetron works in a microwave. It is obvious that this is an electronic device with an unusually complex and multi-level design. Only an experienced craftsman can disassemble the part without damaging it. Therefore, after diagnosing the failure of a component, it is advisable to contact a service center to eliminate the possibility of aggravation of the malfunction.
However, the presence of special equipment and superficial knowledge of radio electronics allows you to repair a microwave oven yourself at home. There is only one condition - adhere to expert recommendations and act strictly in accordance with step-by-step instructions.
Causes of magnetron malfunctions
Experts usually identify several main reasons for the failure of the magnetron of a microwave oven:
- Failure of the cap attached to the vacuum tube. Microwave oven owners can replace this component on their own. Find a similar cap on any other magnetron. The installation locations for this part have a standard configuration.
- The heater broke. The component may overheat and fail. This happens due to violation of the rules for operating equipment. For example, it is strictly forbidden to turn on an empty microwave oven. To check the functionality of the microwave, namely its filament, measure the resistance level between the capacitor elements. The serviceability of the component will be indicated by an indicator - from 5 to 7 Ohms.
- The feed-through capacitor is damaged. To diagnose this breakdown, use a tester. If it shows infinite contact resistance, then replace the capacitor immediately.
It is due to these reasons that the magnetron in the microwave stops working. Now let's take a closer look at how exactly this malfunction manifests itself.
Possible faults
We list the main breakdowns:
- During operation, sparks appear, indicating that the cap has burned out. Replacing this component will not be difficult, since all caps have the same configuration.
- The high-voltage diode has broken down.
- No voltage is supplied to the magnetron.
- There is no contact in the fuse that controls the temperature and heating level.
- The filaments have burned out.
- The magnetron for the microwave oven has depressurized due to complex overheating.
- The high voltage capacitor is not working or the fuse is blown.
Check the microwave magnetron to determine the type of problem. Absolutely all of the listed breakdowns can be repaired independently at home, except for depressurization. Now you know how to test a high voltage diode in a microwave. We remind you that repairs should only be carried out by those people who have at least a superficial understanding of radio electronics.
How to determine a breakdown
To determine the malfunction, turn off the power to the equipment by unplugging the power cable from the outlet. Start with a visual inspection of the inside of the microwave oven. How to check the magnetron and understand what is the source of the problem? Failure of this component is accompanied by the appearance of traces of combustion. This type of diagnostic will let you know if a fuse may have blown.
Before checking the magnetron in the microwave with a multimeter, be sure to do a visual inspection. After all, this is also an effective type of diagnosis.
However, it is impossible to identify hidden hardware faults without special equipment. Remember that you must first disconnect the component, and only then test its functionality. Be sure to follow the simple step-by-step instructions:
- Connect the multimeter probes to the terminals of the part. An infinite value on the tester screen indicates a component failure.
- Check the integrity of the printed circuit board, because many important elements are integrated into it: diodes, varistors and resistors. You don't have to solder all the parts, just test the board.
- Ring the fuse at room temperature. In such conditions, he must give an appropriate signal.
- Check the high voltage capacitor for possible breakdown. In working condition, it gives the multimeter an infinite value. If the part is broken, then almost zero resistance will appear on the screen.
- High voltage diode test. The main obstacle to diagnostics is the serial connection. Inspection is not possible and internal resistance is too high to measure. Therefore, make sure that there is no breakdown in this part using a megger.
Use these instructions and also monitor the appearance of characteristic symptoms in order to promptly detect equipment failure.
Magnetron repair
Some hardware components cannot be restored. If the magnetron burns out in the microwave, it will have to be replaced. This component cannot be repaired. The cost of original spare parts for a microwave oven is unusually high. Sometimes it is more profitable to buy new equipment. Therefore, it is extremely important to thoroughly check the magnetron with a tester by measuring the voltage.
Next, we’ll look at how to test a magnetron in a microwave using special measuring instruments. We will provide detailed step-by-step instructions. It is possible that only individual elements of the component are damaged, which makes it possible to carry out repairs without major capital investments.
Anyone who has at least a little knowledge of radio electronics and also has access to a regular tester and megger can handle hardware repairs. If you doubt your abilities, then it is better to seek help from a service center staffed by experienced professionals.
Control unit diagnostics
Microwave oven testing will vary depending on the design of the device. It is customary to distinguish several main types of control units:
- mechanical;
- electronic;
- sensory.
The magnetron for a microwave oven is checked with a multimeter. Diagnostics of the control unit is carried out in a similar way. Using this tool, make sure that voltage is supplied to the transformer. If you turn on the timer, having previously selected the operating mode, but there is no voltage, this indicates a failure of the control unit.
The easiest way to repair models is those equipped with a mechanical timer and manual operating mode controls. Start with a visual inspection, and then use a tester to measure the current level at the switch contacts. Such diagnostics allows you to determine: burnt contacts, failed parts, oxidized cables. Replace defective parts.
A microwave with an electronic control unit is more difficult to repair. Perform an initial inspection using the display. If a malfunction occurs, the display will show incorrect information. If the screen does not light up at all, then be sure to make sure that the built-in fuse is intact.
The good thing about the electronic control unit is that each user can start the automatic diagnostic process. Check the detected error code with the values indicated in the special table. This is enough to obtain the necessary information. No multimeter connection required.
The control unit is a radio-electronic module with a rather complex structure. To restore the functionality of this unit, special measuring instruments will be required. If you do not have access to them, contact an authorized service center in Moscow or any other city.
Checking the radio wave emission system
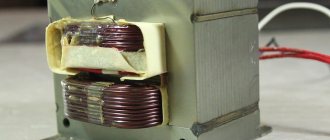
Incorrect operation of hardware components, including the control unit, as well as the magnetron for the microwave oven, indicates the need to check the condition of the elements of the microwave radiation system. It includes a high-voltage transformer as well as voltage shift circuit components. Modern furnaces are equipped with high-voltage MOT transformers. Their design includes three levels of winding:
- primary – 220 V;
- step down – 3 V;
- boost - 2 kV.
To determine a burnt element, you need to sequentially check each winding with a tester. The lowest level of resistance is precisely the step-down winding, which provides heat to the magnetron for the microwave oven. The highest resistance is the high-voltage winding. If a breakdown of the microwave oven is detected, and the user has determined that one or more layers of the winding are broken, replace the transformer.
In no case can we exclude an interturn short circuit, which is observed in the high-voltage winding. A sign of this malfunction will be a low temperature level. The noise may increase significantly during operation of the microwave oven. A conventional multimeter cannot measure the voltage at the output terminals of a given winding. Therefore, you will have to use professional measuring tools. If the fears are confirmed and a short circuit is detected, change the transformer.
Be sure to check all the parts that make up the voltage multiplier system. The magnetron for a microwave oven is a key element of this circuit, but it is far from the only one. It also includes capacitors and diodes. The internal resistance level of a high-voltage diode is very high, and its breakdown cannot be measured with a multimeter. Therefore, you will have to use the megger again. If the part is faulty, then install a new diode.
Be sure to check the capacitor for breakdown. A working component will show resistance close to zero. It will increase significantly in just a few seconds. The resistance of faulty capacitors does not change sharply, since there is no contact with the cover.
It is likely that the oven began to heat food noticeably weaker due to the appearance of a leak between the plates. You can also determine the source of the leak using a megger. Faulty radio elements should be replaced.
Magnetron replacement
If the user is sure that the microwave magnetron is broken, replace this element. This procedure is mainly carried out by qualified specialists. However, everything can be done with your own hands. The main thing is to understand a little about radio electronics, and also know how current voltage is measured.
The replacement procedure in a microwave oven requires that the user first purchases a new component. To make your choice successful, you need to follow a few simple recommendations:
- The power level of the magnetron for a microwave oven fully corresponds to that of a broken device. All necessary information is specified in the technical passport.
- The new part has identical mounting holes, and all contacts match.
- The dimensions of the broken component fully correspond to the dimensions of the new spare part.
Installing a new magnetron for a microwave oven is not difficult. However, the user must achieve the tightest possible fit of the component to the waveguide. Don't forget to check the capacitor.
How to check the magnetron of a microwave oven for serviceability
To correctly determine a microwave malfunction, you need to disassemble the device and conduct a thorough diagnosis. Some hardware components are extremely expensive, so to avoid unnecessary financial waste, pay close attention to the initial inspection. Everyone can figure out how to connect a magnetron to a microwave; repairing this part is much more difficult, since it is impossible. The only way out is to replace the component.
Diagnosis is carried out as follows:
- Turn off the power to the microwave oven by unplugging the power cable from the socket.
- Remove the protective casing of the device.
- Find the broken part, and then remove the terminals from the component's terminals.
- Use a multimeter to measure the voltage of the magnetron, namely its contacts. It should be insignificant. If the indicator is too high, then this indicates a burnt-out filament.
- Measure the voltage between the terminal and the device body.
This completes the check. Now you know how to act.