Which machine should be installed on the hob and other electrical appliances, what does the choice depend on, and for which consumers should the electric machine be installed? The high power of modern household appliances dictates its own rules; nowadays not a single home can live without circuit breakers. These devices are installed to protect wiring from fire and are selected taking into account the total load, network parameters and other equally important nuances.
The nuances of installation using the open and closed method
Experts strongly recommend a hidden method of conducting electrical wiring in the kitchen as it is safer for this room.
Installation of hidden wiring in a residential area involves gating walls to create channels for the electrical network, followed by putty and plaster. In a new building, the wires are attached to the wall with special fasteners. Boxes and socket boxes are installed in the recesses. For light sources, the cable is routed through voids in the ceiling slab. After complete installation of the network, plastering and cosmetic repairs are carried out. So the wiring is completely hidden.
Exposed wiring is attached to the walls using porcelain rollers located at a distance of 50 cm from each other. The wires are subject to the same requirements as with the hidden method. They are located parallel or at right angles to the walls of the room at a distance of 10-20 cm from the cornice. Near a door or window, the net is placed 10 cm from the opening. Sockets and switches are overhead. They are installed on a special external socket box.
How to properly place sockets and switches
Before you start drawing up a diagram, you need to find out how appliances and furniture will be arranged in the kitchen. Convenience and safety of operation depends on this. For the kitchen, sockets with ceramic inserts rated at 16 A are suitable.
When choosing their location, the following points are taken into account:
- To connect low-power devices, power points are placed at a distance of 10 cm from the tabletop.
- For large equipment they are installed 30-60 cm from the floor. No more than a meter from an electrical appliance.
- For the hood and TV, maintain a height of 190-200 cm from the floor.
- It is better to plan one outlet outside the kitchen area for unexpected connections (phone, laptop, etc.).
Switches are designed for lower loads, but are used more often
You should pay attention to the surface of the case. Rough coating quickly collects dust
It is better to opt for a smooth body, which is easier to clean. There are no strict requirements for installing the switch. Most often, a place is chosen on the right side at a distance of 10 cm from the doorway and 150 cm from the floor.
Basic rules for the selection and location of sockets and switches
The main rules for placing sockets and switches when creating electrical wiring with your own hands are as follows:
- The installation of sockets in the kitchen must be done evenly and so that the wiring directly approaches the equipment locations;
- It is not advisable to leave long wires hanging;
- The location of the sockets is chosen so that they are not located near the sink or stove - this will protect them from deformation due to overheating or high humidity;
- Built-in (hidden sockets) are perfect for a home where small children live. In addition, such elements will never spoil the design of the room. By the way, sockets are often located in the countertop, which is very convenient for connecting desktop equipment;
- The height of the sockets must be observed - low-lying elements are not always safe (especially in homes with small children);
- Several powerful devices cannot be connected to the same power point;
- Wiring is created throughout the room - you should not group sockets in one place, and especially - bring them closer together vertically.
How to choose the right sockets? Both when installing sockets in a countertop and when mounting them on a wall, preference should be given to products designed for a current of more than 16 amperes. The most durable products are those equipped with ceramic plates and nickel-plated slats. As for the switches, they should be smooth, this will make cleaning much easier.
Sockets in the kitchen are located at a height of 30-40 cm from the floor, and switches are installed at a meter height and 15 cm from the door frame. Sometimes the common kitchen switch is also placed in the hallway. Separate switches are installed for additional lighting in the work area. A special corner socket can be used.
Electrical panel and distribution box
These devices are essential in the modern electrical-heavy kitchen to ensure electrical safety and ease of use. The electrical panel allows you to control the connection/disconnection of power supply to sockets and switches in the kitchen. The box allows you to divide the network into wire branches for connecting household appliances, general and local lighting.
Weak link protection
Each individual line must have its own circuit breaker
In addition to the cross-section, when choosing suitable cable products, pay attention to the actual operating conditions. Standardized values are given for heating to a temperature not exceeding +60°C
When installing the line on a site near a country house, it is necessary to provide protection from humidity and other adverse external influences.
Carefully check all parts of the electrical network. The basic rule is reliable protection, taking into account the performance of the area with the worst parameters. It should be taken into account that copper is designed with the same cross-section for greater loads compared to aluminum. The purity of the metal is of certain importance. As impurities increase, conductivity deteriorates and losses due to useless and dangerous heating increase.
Self-installation
To connect an automatic protective switch in the electrical panel, first install the upper part of the switch on the DIN rail . Use a screwdriver to pull out the eyelet and press the lower part. The lower grip is released and snapped into place.
Then the contacts are connected. If stranded conductors, crimped with lugs, were previously connected, they are inserted back into the upper and lower clamps and the screws are tightened. If the core was without a tip, it is better to remove and clean the old end, then use a screwdriver to make a fresh, undeformed conductor.
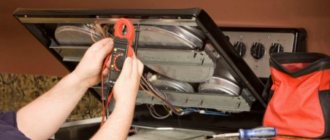
After connecting the wires, voltage is applied to the machine and its operation is checked. If everything is in order, connect electrical appliances and make sure that no sparks, crackling, heating or other undesirable effects appear at the switch contacts. Heating is checked with a pyrometer.
It is important to choose the correct ratings of the circuit breakers, the diameter of the copper conductors, and install the breaking phases and not the neutral wire. The machines are installed in the operating position by sliding the switch buttons up.
This is interesting:
Connecting the hob and oven to the same outlet and is it possible to do this?
Connecting the plug to the hob
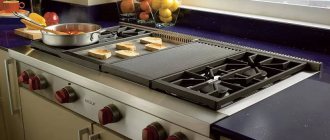
Where to install sockets under the hob and oven
There are no special requirements here. Usually this is the basement area of the kitchen and the installation height is 10 cm (top edge of the outlet). If the oven is mounted above table level, then it is advisable to also make an outlet nearby.
General rule!
Do not place outlets and auxiliary equipment directly behind equipment. Otherwise, you may end up with a problem—the oven or dishwasher will get stuck and won’t go into place. The same applies to other communications. They need to be installed either next to the equipment or below its level if the equipment is planned to be installed above the floor.
Concealed or outdoor installation
In the case of concrete or brick walls, you can use both options for installing an outlet for an electric stove. From a safety point of view, hidden installation is preferable. But if the repair period has long been completed, external installation using cable channels will also work. When installing, avoid contact of the wire with flammable materials, such as wood, non-fire-resistant plastics.
Remember.
You cannot lay a separate wire for grounding, grounding the outlet to risers or pipes. Do not connect other kitchen appliances to the power circuit of the stove or oven. This is life-threatening.
Wires for kitchen wiring
For electrical wiring you need electrical cables of the VVG or NUM brands. They have copper cores and are double and triple insulated, respectively, which is undoubtedly good for safety.
- The cable cross-section for sockets should be 3×2.5 mm2.
- The cross-section for the cable for the stove should be 3x4, or better yet 3x6 mm2.
- A 2×1.5 mm2 cable is sufficient for lighting.
The power cables must be led from the floor or apartment panel and the third wire (yellow) in the cable should be used to ground the kitchen outlets.
The height of the sockets is selected depending on the layout of the kitchen furniture. The height of the working sockets above the working surface is 10-15 cm.
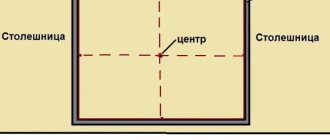
Rules for creating an electrical wiring diagram
This is the last stage of preparatory work. An electrical wiring diagram indicates where sockets and switches will be installed and how wires will be connected to them. Therefore, even at the stage of creating a kitchen design project, you need to decide exactly where the household appliances will be placed. Based on this, you need to arrange the sockets on the diagram.
As practice shows, almost all equipment is located in the kitchen area. Consequently, the sockets will be located mainly on the apron or at the bottom of the furniture, or, more precisely, either on the wall behind the floor cabinets, or under the tabletop, like pull-out units.
Device selection
In order for the circuit breaker to work, it is selected taking into account the type of network (single-phase or three-phase), type of room and type of equipment.
For a single-phase network (220 V), there are single- and double-pole circuit breakers. Only 1 conductor is connected to single-pole ones - phase, to bipolar ones - phase and zero. Single-pole circuit breakers are installed on 220 V indoor lighting circuits, on socket groups in rooms with normal operating conditions.
For three-phase networks (380 V), three- and four-pole devices are distinguished. These circuit breakers are placed on the lines to which all 3 phases are supplied: for example, an electric stove, a three-phase hob, an oven.
For other household appliances, two-pole circuit breakers are sufficient. They must disconnect both phase and neutral.
Attention! The basic rule for choosing a circuit breaker: the device must operate before the current exceeds the capabilities of the wiring. It follows from this that the current rating of the machine must be less than the maximum current that the wiring can withstand.
The choice of automation for the oven and hob is as follows. Let's say an electric stove has a maximum connection power of 7 kW (this figure is indicated in the technical documentation for the device). The power is divided by the network voltage: 7000 W/220 V = 31.8 A. A 20% reserve is added: 31.8 A + 20% = 38.1 A.
The circuit breaker is selected with the rating that is closest to the received figure. In this case, the rating is 32 amperes.
This is interesting:
What kind of power outlet is needed for the hob?
Self-installation of oven and hob
How to replace a hob
Difavtomat
There is another potential hazard in household electrical systems that a circuit breaker cannot handle. These are differential currents that can lead to electric shock or fire. The difavtomat warns against such risks.
Reference. The difavtomat combines the protective functions of a machine and a residual current device (RCD). The device body is more compact, which is important if there is little space in the electrical panel.
A difavtomat for the hob and oven is selected as follows. The rated current value is taken one step higher than for the machine. For example, if for an automatic machine it is 32 A, then for a differential it is 40 A. Another important indicator is the sensitivity of operation. For a hob, 30 mA is optimal.
Which machine should I put on other consumers?
for an electric oven
The main indicators are the same as those indicated above for hobs, but due to the comparatively lower power of ovens, they can be powered through a three-core cable with a cross-section of 4 mm and a machine with a rating of 16 A or the use of NYM cables. Preference is given to two-pole class “B” circuit breakers, due to the high probability of breakdown - connected through an RCD or differentiated. In this case, the rated current of the RCD should always be one step higher than the rating of the circuit breaker.
for a washing machine
With the average power range of modern washing machines ranging from 2-3.5 W, to protect their power lines, a two-pole circuit breaker with a rated shutdown current of 16 A (25 A for RCDs introduced into the circuit) is sufficient. The optimal leakage current depends on the condition of the wiring; for old but reliable networks it is 30 mA, since installing an RCD or DA with a lower value (namely, 10 mA recommended for wet rooms) results in many false alarms. When protecting new circuits, 10 mA diphatmoates are installed. Additional sockets are not connected to the group.
for air conditioning
When calculating the circuit breaker rating and selecting the wire cross-section for these devices, it is important to use the correct power value (consumption, not cooling) and take into account the maximum inrush current. As a rule, to power standard household air conditioners with a power consumption of up to 2 kW, a wire with a cross-section of 1.5 m2 and a rating of 16 A is sufficient; for “eighteenth” and higher models this value is 2.5 mm2 and 25 A, respectively. There is no need for differential protection of air conditioners; due to high starting loads, the line is protected by an automatic device with a class of at least “C”.
on the refrigerator
Due to the relatively low power consumption and low risk of leakage currents, modern refrigerators are powered through power lines with a conventional 10 or 16 A circuit breaker. Some owners add additional sockets to the line, which is generally not recommended, but is acceptable when monitoring the total power of connected devices. The outlet for the refrigerator must be grounded.
for an electric boiler
When connecting powerful water heating devices (heating boilers, instantaneous heaters, boilers of various types), the rating of the machine and the wire cross-section are selected according to the passport or from tables, with obligatory consideration of the phase and network condition. In modern single-phase networks, line and consumer protection is provided by a two-pole difautomatic circuit breaker (30 mA) or an RCD with a rating one step higher than a conventional circuit breaker.
for the heating system pump
Ideally, these devices are powered from an uninterruptible power supply and a voltage stabilizer; if this is not possible, any automatic device suitable for the current and type of wires, usually with a small rating, is introduced into the circuit.
for lighting
To power standard household lighting or alarm systems, wires with a cross-section of 1.5 mm2 and a machine rating of 10 A with a current limit of 16 A are sufficient. The recommended maximum load power is 4.1 kW; there is no need to connect via an RCD or DA.
Carrying out installation work
The main thing when performing electrical installation work is compliance with safety rules. Always operate with the power switched off.
Connecting the plug and socket
To connect the plug, strip the wire from the oven or stove; if the wire is stranded, then crimp it with NShV lugs and pass it through the plug body. Mount the phase and neutral on the outermost contacts of the plug. Yellow-green grounding conductor - on the middle contact. To prevent the wire from dangling inside the plug, clamp it with a clamp and tighten the plug body.
The socket is connected in the following way: the socket is mounted in the required place, the socket body is removed and the power line is connected to it. Mount the phase and neutral on the outermost contacts of the socket. Yellow-green grounding conductor - on the middle contact. Next, screw the socket housing.
Cable connection diagrams for the oven and hob
There are two main circuits for connecting an electric stove or hob: single-phase and three-phase. The connection is made to the terminals of the hob, which can be accessed through its back cover - it is unscrewed and removed. Pay close attention to the color markings on the terminals - this will allow you to avoid mistakes, read the connection instructions and safety requirements.
Single-phase 220V circuit (most common in apartments)
Phase L is simultaneously connected to terminals L1-3 of the hob. To do this, two removable copper jumpers are installed between them at the manufacturer. If for some reason you don’t have jumpers, you can make them yourself from an electrical cable whose cross-section is no less than that of the supply cable. Zero N is connected to terminals N1-2. Protective conductor PE – to the PE terminal.
Three-phase 380V circuit (common in private homes and businesses)
Phases A, B, C – are connected to terminals L1-3 of the hob. In this case, it is necessary to remove the jumpers installed at the factory between terminals L1-3. Zero N is connected to terminals N1-2. Protective conductor PE – to the PE terminal.
Connecting the oven is much easier. Most often, such devices are already supplied with an electrical cord with a plug for connection, so the Euro plug is simply inserted into a Euro socket. To connect to machines or terminals, it is best to use a separate cable, since if you cut off the plug on the cable from the kit, this can significantly affect the warranty for this device.
The oven connection diagram is always single-phase: