Until recently, the load on the electrical network in residential premises was insignificant. Calculations and installation of networks were not given due attention. Electrical supply projects were carried out according to standard schemes. The emergence of modern high-power equipment causes the redevelopment of the entire residential electrical wiring network, recalculation of its power and replacement of electricians. To carry out design and installation work in a new formation, you need to know the modern principles of arranging a residential electrical network.
Calculations and diagram
Single-line diagram according to GOST
First, you need to draw a wiring diagram for your apartment . To do this, you don’t need to be an engineer, because you don’t need a complicated linear diagram according to GOST. It is enough to draw a schematic drawing by hand. An electrical wiring diagram is needed in order to correctly distribute the cable throughout the apartment, and calculate its approximate amount, as well as determine the load on each future line.
Electrical wiring diagram
Draw where you will have sockets and switches. At the same time, take into account what household electrical appliances you will include in them, how many and what kind of lamps you will use.
It is not recommended to hang more than 8-10 sockets on one line. Since all sockets in the line are pass-through, with each subsequent socket there is a possibility of weakening the contact. Especially do not make many sockets on one busy line, for example in the kitchen; it is better not to save money and extend two lines to the kitchen.
Determine the required number of lines and the expected load on them. It is better to divide the lines into zones, for example: kitchen sockets, corridor sockets, bathroom sockets, room 1 sockets, lighting, etc.
Line for lighting
The light can be turned off separately or with one common switch.
Multi-level power distribution
Important! If there is one chandelier in the living room, and low-power lamps are used in the rest of the rooms, it makes sense to power them together - this will not create a high load on the network.
If the lighting includes a scattering of devices of different types and purposes, then it is worth breaking it down into groups - a separate main light source, a separate additional spotlight, etc.
Using the same principle, it will be possible to separate the rooms in which the most powerful equipment is installed. This also applies if step-down transformers and various power supplies are installed in the room.
Powerful home appliances
This term refers to those devices that heat something. For example, an electric heating and water heating boiler, an electric stove and an oven. When turned on, they create a high load on the network - 10 Amps is far from the limit.
The heating element from the oven can consume up to 4 kW
The socket and wiring must cope with such a load, as they are designed for loads of 16 Amps.
But, firstly, not all sockets and wires, and, secondly, other devices can work in parallel with them.
Turn on the electric kettle at the same time as the oven, and the protection in the panel will probably trip and the line will be de-energized. For this reason, manufacturers of large household appliances recommend a separate connection.
If such a device breaks down, if it is connected independently, it will be convenient for the master to work. You don't have to look for and reach for the plug, which is usually located in hard-to-reach places.
Kitchen appliances
The reasons here are the same as in the case described above. The kitchen chain is the busiest. There is a high concentration of powerful electrical appliances here.
This includes: washing machines and dishwashers, toasters, microwave ovens, multicookers, bread makers, hoods, grills, meat grinders, water heater, lighting, and so on.
This equipment creates serious loads on the electrical network
Therefore, the kitchen is separated into a separate line, and particularly powerful appliances have their own RCDs, powered from the input circuit breaker.
Such a number of devices requires a thoughtful arrangement of sockets. The group is placed in the work area so that it is possible to connect mobile devices. Sockets for large household appliances are provided separately.
Rooms with high humidity
Previously, there were no sockets in bathrooms and toilets, but today many devices have been invented for this room too.
Using them in a damp environment is dangerous.
For this reason, the room needs other protection devices. The wiring diagram in the bathroom has its own requirements:
- The room junction box should not extend into the room. It can be installed in any convenient adjacent room or corridor.
Junction box on the wall in the hallway
- Each device that will be used in the bathroom must be connected to a separate outlet only. The use of extensions and tees is not permitted.
Separate socket for washing machine
- The switch for controlling the room lighting is installed, like the box, outside the room. The most convenient place is next to the door.
- The electrical cable is laid as close to the ceiling as possible. An insulating corrugation must be used.
Installing electrical wiring in the bathroom
Important! Increased safety requirements are also imposed on fittings. The degree of protection must be at least IP 44. It is recommended to take sockets with a cover that acts as splash protection.
It is recommended to use lamps that operate on 12V voltage. All devices with a metal casing must be grounded.
Interesting to know! This problem remains unsolvable for old houses, in which grounding is not provided in principle.
Many people ground equipment to water pipes, but this should not be done because of the risk of electric shock, not only to you, but also to your neighbors.
In old houses, sometimes a complete reconstruction of electrical networks is carried out, which makes it possible to install an external ground loop. If so, then the residents are lucky - all that remains is to replace the internal wires.
Replacing electrical wiring requires major repairs
Cable selection
In order for electrical appliances to operate without overloading the network, the cable of each line must be of the appropriate cross-section. And if there are several consumers on the same line (for example, to the kitchen) (and there will be), then it is necessary to calculate their total power and leave a margin of “strength” for the cable , that is, select the required cross-section (wire thickness). The power of all household appliances is always indicated by the manufacturer. For example: an incandescent lamp is 40W, and a hob is 6000W, etc.
In order not to bother with calculations, follow one simple rule. — For outlet lines, use a copper cable with a cross-section of 2.5 sq. mm, for all lighting 1.5 sq. mm, and for a hob or instantaneous water heater 4 sq. mm - and everything will be fine!
| Wire cross-section (sq.mm) | Current (A) | Power, W) | Machine denomination |
| 1,5 | 15 | 3300 | 16 |
| 2,5 | 21 | 4600 | 20 |
| 4 | 27 | 5900 | 25 |
| 6 | 34 | 7400 | 32 |
Each device (consumer) has its own declared maximum power, measured in Watts.
Simplified power formula
The cable must be three-core (phase, neutral, ground). Zero is always blue, ground is yellow or yellow-green, phase is any other color . If you change the wiring, do not skimp on the material - always take a cable with a third core (with grounding), because all modern devices have an additional protective terminal, and automatic protection works only using grounding .
To replace electrical wiring, it is best to use a VVG-ng cable. You can, of course, use NYM or PVS, but the advantages of the VVG cable over others are obvious. Firstly, VVG does not need to be crimped with sleeves (soft ones need to be crimped). And secondly, it is smaller and flat, which allows you to make smaller grooves, and it is possible to insert the cable into a thin slot (3mm for a three-core cable with a cross-section of 1.5mm)
Uncrimped wire with sleeve
Always take only cable in accordance with GOST! For example, an excellent cable is the Gostov VVG ng cable. This is a very important point in preparing to replace the wiring! You can save on automation or sockets (they can always be replaced), but don’t skimp on the cable - get a good one.
Route planning
The points where power is supplied have already been designated; all that remains is to lay out the paths along which the energy will reach them. But before this, it is immediately determined whether the network will be open or closed.
You need to start with the installation box, which should be different in each room. Usually the box is located inside the room, however, in the case of a bathroom, it is recommended to leave it outside to avoid the contact connections being affected by high levels of humidity.
Installation boxes should also appear on the apartment plan; it is advisable to mark them with a special symbol so as not to lose them.
*(The junction box looks like this and is marked on the diagram with a circle with a cross)
Wires from sockets must extend to distribution points strictly parallel to the walls or floor. And the best solution is to connect your own cables to all outlets, rather than connecting them in series. Otherwise, the farthest one will be constantly at low voltage.
It is also worth mentioning situations when sockets in different rooms are on the same level or, technically speaking, on the same axis. Such sockets can be connected with wires that come from one box and one groove at a time. You can even use the same cable for them to save even more on material. But the cross-section of the wire must necessarily correspond to the amount of potential load.
It is better to highlight the wires that connect the sockets to the wiring box in one color, and those connecting the switches and light sources to the same box - in another.
And it would be possible to limit ourselves to one cable, which will power both lamps and sockets, but it is better to make two streams.
The next step is to lay the cables from the power distribution board to the junction boxes. It is also better to mark this with a new color.
Now you will need a fourth color in order to mark the cables that are supposed to be stretched to the location of devices that consume higher power current. These lines must have their own:
Grooves, that is, paths on the surface of the walls.
- RCD.
- Automatic machines.
But they shouldn’t have separate branches. And reinforced sockets are installed for such lines.
Among the appliances that may need such a system resistant to high voltage are ovens and boilers, which create a heavy load.
On the diagram it remains to indicate only one more line, stretching from the shield in the entrance. After this, the plan according to which the wiring will be created is considered complete. From it you can calculate the amount of material, and also use it as a direct plan when transferring the drawing to real walls.
*(The last drawn line is green, going outside the apartment into the entrance)
But before this you need to purchase wires, and for this you will need to determine their length and cross-section.
Marking
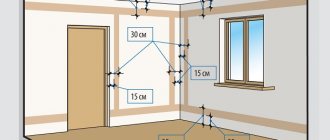
Determine at what height the sockets and switches will be located; the easiest way is to measure the lines of sockets and switches from the ceiling, because the floors in apartments are most often crooked. For example, if the height from floor to ceiling after renovation will be 250 cm, and you want to raise the sockets by 30 cm, measure 220 cm from the ceiling. If there are several sockets and switches in one group, draw a horizontal line along the level and place a mark every 7 cm (socket box size 71mm), the same applies to vertical groups.
For lovers of standards, so that it is “like everyone else” or “how they do it” - remember, they do not exist! There are requirements for children's institutions, kindergartens and schools, where sockets and switches are installed at a height of at least 160 cm . Everything else, especially in your home, you can do as you please. For example, some make sockets in window slopes or even in the floor.
Where to start installing electrical wiring in an apartment
Work on installing electrical wiring in an apartment or other residential premises should always begin the same way - with drawing up an electrical wiring plan. And that's why. Let's say you made a renovation without really thinking about the end result. They did it as they wanted.
We rearranged the furniture and arranged the household electronics. So what did we get? Catastrophe! All sockets were in “cold reserve”: one was blocked by a closet, another by a sofa, a third by a chest of drawers, and a fourth by a bedside table. Even to connect a TV and favorite stereo system, as per the law of meanness, there were no sockets within a radius of 3-4 meters.
And here begins a very fun and exciting game called “Scatter extension cords and pilots throughout the apartment.” The question arises: why did you make new electrical wiring so that you could then walk around and trip over extension cords? Imagine how much money and nerves can be wasted.
Preparing for gating
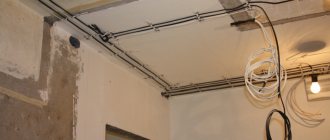
Typically, wiring in apartments is carried out either on the floor or on the ceiling. There are other options, such as laying cables under baseboards or ducts.
Lighting lines, in any case, are laid behind a suspended or suspended ceiling; if these are not planned, then the ceiling needs to be chipped. And since it is strictly forbidden to ditch , you need to apply a layer of plaster to the ceiling, which will allow you to hide the cable without damaging the monolith. We strongly do not recommend ditching the ceiling yourself, since you need to know the technology for correct gating so that the whole house doesn’t collapse someday.
In cases where plastering of the ceiling is not planned, experienced craftsmen find voids in the monolith slab with the old cable, and tighten a new one in its place.
Using a 70mm or 68mm concrete crown (attachment for a hammer drill), holes for the socket boxes are drilled. Using a wall chaser or grinder, grooves are cut out for laying the cable. The grooves in the walls must be strictly vertical and not horizontal or diagonal. The lines from the sockets to the panel are laid in the floor screed or along the ceiling.
If the ceilings are not wooden, then according to the PUE (electrician's bible), cable laying without corrugation is allowed! There is also no need for a corrugated floor screed; the most important thing is a high-quality cable with good insulation in accordance with GOST! Save on corrugation; if you don’t have drywall or wood (or other flammable materials), then you don’t need corrugation!
A detailed description of the correct cutting of holes for socket boxes. Why can you lay cable without corrugation?
Tips for properly connecting electrical points
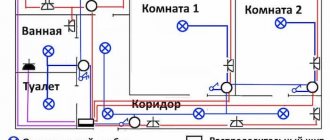
To create effective wiring in an apartment, it is necessary to distribute different directions and combine groups of electrical points in these directions.
So, for laying electrical wiring from the electrical panel, it is worth highlighting the following lines:
- lighting for living rooms, kitchen and corridor;
- electricity supply to living rooms;
- separate power supply to the kitchen;
- lighting and power supply for the bathroom and toilet;
- a separate power line for electric stoves and appliances that consume high power.
For each group it will be necessary to install a special protective shutdown device, which will promptly turn off a specific line, which will protect the wiring and the equipment powered by it from damage.
When connecting electrical points, you should definitely use distribution boxes, since they are, first of all, one of the ways to isolate connections
It is worth noting that the connection of the electrical panel to the power lines in the apartment should be entrusted to the electricians of the management companies, since this work must be performed exclusively by specialists in accordance with the requirements of legislative documents.
Grilling
Before you start dabbling, it is highly advisable that the walls and ceilings be plastered with a leveling layer of plaster. Firstly, you will not have further problems with the final installation of sockets, since all the sockets will be flush with the wall, and not recessed into it (which happens when they are installed before the walls are plastered). And secondly, gating will occur much faster, since in some places it will not be necessary to saw the monolith.
Check in advance the places where you will be trenching so as not to touch communications, such as old wiring and plumbing pipes. If you cannot determine where the old wiring goes, call an electrician , or simply disconnect it in the switchboard (if you are going to change it all). For ease of work, make yourself a temporary carrier (extension).
The hole for the socket boxes is drilled to the full depth of the crown. To quickly drill a hole in concrete, mark a circle with a crown, then drill the maximum possible number of holes around the circumference with any drill, no less than the depth of the crown. After which, the cutting with a crown will go noticeably faster, one might say – it will go like clockwork. If it gets on the reinforcement, it is best to use another crown; in extreme cases, you can knock it off with a spatula. It’s better to use a hammer drill for help (don’t forget about neighbors and the police).
Working with a wall chaser or grinder
Grooves for laying cables go from the socket box to the floor or ceiling. You need to lower the groove down so that the cable lies quietly in the screed and does not stick out in the corner, so you need to know the thickness of the future screed, the same with ceilings. It is best to have a wall chaser with a vacuum cleaner for these tasks, but in extreme cases you can get by with a grinder and a diamond disc for stone. In the case of an angle grinder, take care of your health, wear a respirator and goggles. Close all windows and doors to prevent dust from entering adjacent rooms.
Cabling
Laying the cable on the floor is not difficult; it is enough to hold it to the floor in any way so that it does not float up when they make the screed. Usually they lay the cable along the walls (at a distance of 10-15 cm from the wall) so that later they know exactly where the cable goes.
It is worth noting that it is better not to lay cables under doorways! To lay the cable along the floor, it is better to make through holes between the rooms. Otherwise, there is a possibility of damaging the cable when installing the interior thresholds.
Laying the cable in the groove is also not particularly difficult. You can secure the cable in the groove using dowel clamps or ordinary alabaster (construction plaster). Alabaster hardens quickly, so it is also convenient to use for installing socket boxes. But before you smear the grooves with it, you need to remove dust from them and moisten them with water.
If the cable is securely fastened in the groove and does not stick out anywhere, the grooves can be covered with ordinary plaster mixture; this will save a lot of time.
How to install socket boxes correctly is written in detail here
About junction boxes
Junction boxes (or distribution boxes) are necessary for switching (connecting) wires in them and branching lines, for example, for a switch.
Today, professional electricians will tell you that there is no need to install junction boxes in existing apartments ! They can play a cruel joke on your wiring. In the event of a short circuit, tearing, flooded neighbors, etc., you will need access to this very junction box. It’s easy to give up junction boxes - do all the switching in the socket boxes! To do this, you need DEEP socket boxes , in which all switching for lighting will take place. Typically, deep socket boxes are made for light switches, but if switching is needed to branch out socket lines, then deep socket boxes are also installed under the sockets.
When to change wiring
Of course, new wiring will be required in a newly completed apartment, but buying a new home is not the only reason when you should think about changing the wiring.
It is also worth paying attention to how electrical appliances are connected today in an existing apartment, in which the electrical network was located in accordance with established GOSTs. After all, then there was no expectation that very soon there would be so many electrical appliances that would be constantly in use, and they would constantly not have enough sockets.
Because of this deficiency, extension cords and new lines begin to appear in the house on top of the walls, which is not only aesthetically unpleasant, but can also be dangerous if you connect a lot of equipment at once. This is especially true for those situations where tees or even several tees at once are used, connecting to each other and to one unfortunate outlet. Such piles are a direct road to short circuit and fire.
*(The appearance of a similar picture in the house is a clear hint that it’s time to change the wiring).
Or another problem may arise - aluminum wires. Such, for the sake of economy, were often used in the construction of high-rise buildings, when there was a special boom in their construction several years ago. Aluminum conducts electricity well, but it has a couple of serious disadvantages:
- Aluminum is too soft. That is, it is very easy to deform under external influence, and it can even break completely. And for the same reasons, repairs are not easy to carry out, since it will not be possible to properly change only a section.
- Chemical reactions. When current constantly passes through aluminum, it provokes electrochemical reactions in the wires, which increase their fragility. And after 15–20 years, which is a very short period of time for electrical wiring, the wires can become so fragile that sudden breaks begin to appear in them. And if you try to repair the wire and make new twists, nothing will work - the wires will break in your hands.
- Corrosion. Aluminum is not as resistant to moisture as we would like, and then even a small amount of water will lead to electrocorrosion. And even if the wires look intact on the outside, they may already be so damaged on the inside that even a small load will cause them to break or spark.
*(To ensure wiring lasts as long as possible, it is better to choose copper rather than aluminum)
To sum up the issue with aluminum: if the wiring is made of this metal, it is better to completely replace it with copper, which is much more reliable. Of course, copper, due to its properties, is more expensive. However, wiring is not done annually, but once every few decades, so there is no need to save money here.
Electrical panel installation
The most budget option is to install all the circuit breakers on the staircase in a common panel, where your old circuit breakers and meter are already located. To do this, it is necessary to route all the cables into the access panel. If you want a shield in your apartment, then you need to choose a suitable place for it.
Built-in or overhead shield is up to you. The built-in one looks more aesthetically pleasing, but the overhead one is easier to install. All lines from the apartment go to the panel, and from it one thick cable goes to the entrance panel, the cross-section of such a cable must be at least 6 mm, that is, a three-core cable, for example VVG 3 * 6.
Program capabilities
Using specialized software, the following tasks are solved:
- calculate the parameters of the power supply system with voltage losses over long sections of the route;
- specify the cross-section of suitable conductors and other parameters of cable products;
- compile a list of consumables and other functional components.
The wiring diagram is created taking into account the needs of future users. Lamps, sockets, switches are installed in convenient places.
Installation of circuit breakers
Each individual line is equipped with its own circuit breaker, with a rating depending on the cable cross-section. According to the rules, you cannot insert more than two lines into one machine; if you are trying to power more than three lines from one machine, you must install a special branching bus.
Today there are many ways to protect electrical wiring, even at the household level. The most necessary condition is the installation of circuit breakers for protection against overloads and short-circuit currents (conventional single-pole circuit breakers). It is also recommended to install an additional residual current device - RCD (current leakage protection).
It is best to install RCDs on the lines of high-risk areas: wet rooms, children's rooms. There is no need to install one common RCD for the entire apartment! They install one common RCD only for the purpose of saving. The consequences of such savings are a complex diagnosis of a fault in the event of a leak, + the entire apartment is left without light when it is triggered. On some lines, for example, lighting or street lines, an RCD is not installed.
Installing additional types of protection is already a luxury: thermal relay (protection from cable heating), lightning protection, stabilizer or protection against voltage surges (saves from 380V), fire alarm, etc.
The principle of dividing the intra-apartment network - why is it necessary?
An input circuit breaker is installed in the distribution panel of a private house or apartment, to which the power cable is connected. This element controls the intra-house network.
When the switch is turned off, electricity stops flowing to all points. This is convenient when you need to quickly and indiscriminately disconnect the power, but it is extremely inconvenient when you need to turn off the lights only in a certain room.
For this reason, the intra-house network is divided into several groups.
Branching of the intra-house network
Most often, distribution is done by room, but there are other principles of division:
- Separate group for lighting.
- Connecting powerful household appliances.
- Separate kitchen line.
- Separate toilet and bath.
Moreover, the network can branch out at several levels, for example, a separate RCD is placed on an electric oven, which will allow you to leave other household appliances and lighting in the kitchen on if the protection is triggered.
Shield assembly
One of the most crucial moments is assembling the shield. If you are using a soft cable, then before inserting the wire into the machine, it must be crimped (to increase the contact area). Only phase wires are inserted into single-module machines (phase marking L - can be any color except blue and yellow), all others (zero N blue, ground PEN yellow-green) are inserted into their busbars. When using RCDs or difavtomats (automatic and RCD “in one bottle”), the neutral wire is inserted into its groove (marked N - neutral, blue. The common phase connects all the machines to each other, for this, instead of jumpers made of wires, it is better and more reliable to use special combs.
For all connections in the switchboard, it is very important to use wires of the appropriate cross-section, that is, it is best to separate the phases and neutrals across the circuit breakers using a cable with a cross-section of 4 sq. mm or 6 sq. mm. Also, after tightening all the cables and combs in the machines, it is necessary to check the reliability of their clamping. Since it often happens that the wire simply does not fit into the clamp, or does not hold well in it.