Connecting several devices to an Internet outlet at once is a necessity in most modern families, whose members cannot imagine their life without the Internet. And although most often subscribers within an apartment receive a network signal via a radio channel (Wi-Fi), in certain situations a separate wired line is still needed.
The need for it is explained by the instability of the signal transmitted over the air and the ability to work over wires at a considerable distance from the distribution point. An Internet socket with a LAN type connector may also be required in cases where the user is not satisfied with openly laid wires. That is, he would like to carefully lay them in the baseboards, making an output in the right place to the outside with the organization of a separate terminal connection.
In all these situations, you will need a physical branch in the form of a computer outlet , to which, if desired, any family member with their own device can always connect. In this regard, the user is faced with the question: how does the Internet cable connect to the outlet and what needs to be done for this? In this article we bring to your attention, we will try to understand all these issues.
Classification of sockets for Internet connection
It is known that when carrying out renovations in an apartment, electrical wires suitable for sockets are hidden in the walls or behind decorative coverings. In exactly the same way, the wiring for the Internet connector should be securely hidden so as not to spoil the interior of the rooms.
Internet sockets installed in an apartment or private house are manufactured according to a different standard and are called computer or information sockets. These products have different designs, but the most common are models equipped with an RJ45 connector (universal standard).
Connectors (contact blocks) installed in Internet sockets from different manufacturers are shown in the photo below.
Please note: The simplicity of the design of such a product allows you to independently connect it to an existing Internet network, without the help of specialists.
The features of this type of sockets include not only their unusual appearance, but also the presence of a connector with a large number of contacts, as well as a special connection method. Accordingly, Internet sockets are classified (by type of connector). In addition to the option already discussed, there are the following connection designs: RJ11, RJ14 and RJ48.
The first two names are positioned as special type connectors with 6P4C format contacts. They provide a reliable connection between the cable and the actuator. Their case is equipped with a special latch that prevents the case from accidentally falling out of the Legrand socket. The RJ14 connector, along with RJ48, is classified as an interface used for connecting to various models of computer equipment.
Any model of Internet outlet comes with the manufacturer’s instructions:
- Schneider Electric Unica –
- Legrand –
- Lezard
Depending on the method of installation on apartment walls, Internet sockets can be built-in or surface-mounted. The first ones are intended for hidden wiring and are recessed deep into the wall along with the supply cable. In this case, their front plane is located on the same level with the wall surface. Overhead products are attached to a smooth wall or any other hard surface using hardware included in the delivery set.
Depending on the number of sockets available on the front panel, such products can be single or double. In all of the listed models, the so-called “twisted pair” is used as a connecting wire.
Four-pair connection
When installing a computer outlet with a four-pair cable, do the following:
- The case is disassembled: the cover is removed. For example, for the popular Legrand Valena model, to do this you need to turn the Internet socket towards you with its back and turn the lock approximately 90º. In other products, as a rule, everything is intuitive.
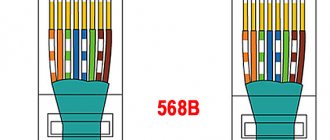
- The socket has grooves and stickers with a connection diagram. There are two options: T568A (type A) and T568B (B). In Russia, type B connection is usually used. It is preferable, although modern equipment is sometimes capable of not only recognizing the circuit, but even adapting to it. The connector diagram must match.
- The wires are inserted into the terminals (pinout). Their color matches the color of the contact. After trimming, 10–12 mm is left. Moreover, the insulation should begin above the latch.
- The wire is clamped and the signal is checked. You can use a regular electrical or cable tester.
- Excess pieces of wiring are cut off.
- The front part of the socket is put on.
- The product is mounted on the wall surface or embedded. There are special frames for installing the socket box. Recently, they are more often made from aluminum. The accuracy of the “fit” can be determined using an electrician’s level.
- Once again, the connection of the installed Internet socket to the network is checked.
How to connect an Internet cable to a power outlet
Having figured out which sockets and wires are suitable for Internet connections, you can move on to describing the process of their formation. The upcoming work, first of all, differs in the type of installation (open and hidden). In the first case, overhead-type products are used, and in the second, their built-in analogues are used. In addition, you will need to understand the type of cable connected to the outlets. For these purposes, a cable product is used, laid in special channels located in plastic skirting boards and not connected to power routes.
What is cable pinout and disconnection?
Before connecting an Internet outlet yourself, you will first need to understand the peculiarities of the procedure for crimping contact connectors. The main thing to pay attention to in this case is the order of the contacts on its connecting terminals ( pinout ).
Internet cable pinout diagram
Pinout (disconnection) refers to the sequence of crimping the lead wires on an Internet socket or RJ45 connector. The diagram according to which this operation is carried out is usually printed on a module with split contacts on both sides. In this case, color markings are used to indicate a specific contact connection.
The photo below shows a module from a Legrand socket with color markings for laying wires.
Modular connector for Legrand internet sockets indicating the color coding of the wires
Additional information: For sockets with an RJ45 connector, it is recommended to choose a 4-pair UTP cable from the “5E” series (photo on the right).
With its help, it is possible to provide a high-speed connection to the Internet (up to 1 Gbit per second at a distance of up to 100 meters).
Connecting the built-in socket for the Internet
With the hidden installation method, Internet sockets are recessed into a niche specially drilled into the thickness of the wall. A special socket box in the form of a plastic cup is pre-inserted there and attached to the alabaster. In this case, the supply wires are laid in grooves hidden under a layer of plaster, so that only the ends connected to the socket come out.
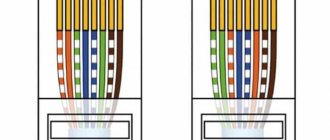
An Internet socket with an RJ45 connector can be connected to the Internet in two ways: according to standards “A” or “B” (user’s choice). The second option is most often used. In order to figure out where which wires are connected, you will need to carefully inspect the housing, remove the cover and study the markings. It must indicate the compliance of the contacts with the selected standard for the color of the conductor insulation.
The procedure for connecting an indoor Internet socket is as follows:
- First, a socket box is installed in the wall into which the socket will be installed.
- Next, a UTP cable is laid into the installed socket box, hidden in the wall. The free length of the cable for connection should be about 20 cm.
- After this, you need to remove the outer protective sheath of the twisted pair, being careful not to damage the insulation of the internal cores.
- The protective sheath of the cable is removed approximately 5 cm, after which the internal pairs of wires should be unwoven.
- The connection is made in accordance with the pinout according to the TIA 568 standard (A or B) according to color (the marking is indicated on the module with split contacts).
One side of the module should have the following colors:
- white- orange
- orange
- white- green
- green
On the other side:
- blue
- white- blue
- white- brown
- brown
Step-by-step instructions for connecting an Internet outlet
Detailed step-by-step instructions for connecting the socket are presented in the photo gallery.
Connecting an outdoor socket
Surface-mounted (external) sockets are connected in exactly the same way as in the case of hidden installation. In the same way, the insulation is removed from the wire outlet and the twisted pair is untwisted, the ends of which are stripped and prepared for switching at the contacts. The connection diagram for Internet outlets is selected depending on their type.
At the final stage of the work, all that remains is to install the Internet socket in place and securely fasten it to the wall.
Preparatory work
The first thing we have to do is acquire the necessary tool:
- Phillips and slotted screwdrivers - necessary for disassembling the socket and its subsequent installation in the socket box;
- A stripper or thin knife is a tool for removing insulation;
- The internet outlet itself.
Next, we need to cut off the excess part of the wire protruding from the socket. The fact is that a cable that is too long will not allow the installation to be carried out correctly, since it will take up almost all the free internal space of the socket box. It is advisable to leave about twenty centimeters so that you can work with it calmly.
The next step is to remove the outer insulation and “untangle” the wires. When stripping insulation, be extremely careful, since pressing harder with a knife or stripper can damage the internal wiring and thereby lead to repeating this operation and further reducing the length of the wire.
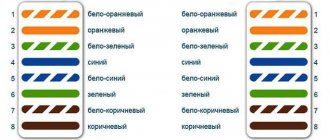
If you are going to connect a cable that was provided to you by your provider, then before cutting and throwing away the connector that was mounted at the end of the wire, be sure to remember the pinout of the wires (color sequence), since during installation it will be necessary to follow exactly this order. The figure below shows a typical cable pinout, but if the colors of the cores in the connector do not match those presented, then you should use your circuit, since on the other hand (in the service provider’s equipment) they are connected in exactly this way (something turned out intricately).
For connection, the T568B option is usually used
If you are going to connect the Internet socket with a cable laid by yourself or by a repair team, then on one side you should have it in accordance with the color scheme shown in the figure above, and on the other side a computer Internet socket should be connected in the same sequence.
In fact, you can finish the preparation here and move on to directly connecting the twisted pair to the outlet. Since there are many varieties of such accessories on sale, I will try to talk about all the stages of connecting the most popular models of Internet sockets.
Errors when connecting internet outlets
Before connecting an Internet outlet, be sure to familiarize yourself with the errors typical for this procedure. Their presence is indicated by the absence of a useful signal at the input of the connected device (no Internet connection). Typical errors include the following situations:
When the connector and modem purchased ready-made used one type of connection (“A”, for example), and when installing the socket, the “B” standard was taken as the basis.
After laying in the split contacts, cut off the excess wires only after closing the cover.
You cannot remove the external insulation of a twisted pair cable over a long distance, right up to the walls of the electrical outlet. The length of wires without insulation should be no more than 13mm.
When the first error is detected, you should check the switching standards and, if differences are found, bring them to the same type. In a situation where there is too long a section of the cable left without insulation, you should shorten it and re-make the connection.
And finally, a very unpleasant situation is possible when everything seems to be done correctly - but the outlet still does not work. This case is typical for a defective product that will need to be replaced.
Selecting a wire pinout diagram
The specific pinout of rg45 8 wire is determined by the variation in the connection of computer devices. Direct is mainly used to connect a network card to a switch (hub).
Cross order is used when there is a need to connect two network cards on different PCs. This configuration was used to switch older hubs.
At the current stage of development of digital technologies, the crossover scheme has actually become unclaimed. The reason is the development and gradual implementation of automatic detection of network type terminals.
How to crimp an RJ45 connector
The order of connecting the wires of the Internet cable by color
In order to correctly connect an information socket, you will first need to understand the markings of the twisted pair wires connected to it. To get acquainted with the connection principle, it is more convenient to consider a typical connection of a twisted pair cable with 4 wires to a socket with an RJ45 connector. The switching order for both standards (“A” and “B”) is shown in the figure below.
Procedure for crimping 2-pair twisted pair
It clearly shows which wire needs to be connected where to make the correct connection. It is also important to understand the following points regarding the number of wires in the Internet supply cable:
- Firstly, it can be not only 2-pair, but also 4-pair (the first is used at data transfer rates of up to 100 Mbit/s, and the second - at the same rate up to 1 Gbit/s).
- Secondly, today, in most cases, information flows are supplied to private consumers at speeds of up to 100 Mbit/sec. However, with the development of Internet technologies, sooner or later they will be calculated at higher values. That is why prudent users expand their home network in advance by laying a cable of 8 rather than 4 conductors.
- And thirdly, when the speed increases to 1 Gbit/sec, the information consumer will no longer need to redo anything. Previously connected equipment will automatically work with a large number of information channels (conductors).
Additional information: The difference in price between 4-core and 8-core cables is very small, and the sockets and connectors for them are already designed for maximum capacity.
But if the home network is already wired with a 4-core (2-pair) wire, you can use the same type of connectors.
Only in this case, after the first 3 conductors connected in the socket according to scheme “B”, two positions are skipped, and the green wire is brought in and fixed to the sixth contact (see photo on the right).
Only in this case, after the first 3 conductors connected in the socket according to scheme “B”, two positions are skipped, and the green wire is brought in and fixed to the sixth contact (see photo on the right).
After we have managed to establish the exact order of connecting each of the 4 supply wires, it’s time to move on to considering the question of how to crimp them correctly.
How to properly crimp a twisted pair cable into a connector
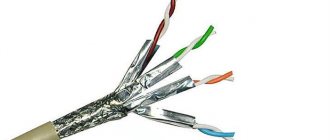
Before you familiarize yourself with the procedure for crimping an RJ 45 connector with pliers, you will have to understand the features of cable products intended for transmitting signals through information channels. The first thing to understand is that an Ethernet cable may or may not have an outer protective sheath.
The cable has an overall braided shield as well as an overall foil shield. But the twisted pairs are not shielded.
The cable has overall shielding and braiding. Twisted pairs are protected with foil.
The latter is made of aluminum foil or in the form of tinned copper mesh (braid). There are two types of such protection: general for all wires and covering each individual pair. Before starting the operation, you will need to remove the protective sheath, which will provide access to the twisted pairs.
Crimping principle
The essence of this operation is to correctly (according to the standard scheme) connect the wire of the connected device to the connector inserted into the Internet socket.
The fact is that any twisted pair must end with an RJ45 connector, to the grooves of which the cores of the network cable are connected. They, in turn, end with copper contact plates, across which there are special metal busbars.
When crimping with crimping pliers, the knives in them pierce the wire insulation, which allows reliable contact of the core with the copper plate. The quality of the resulting connection is comparable to conventional soldering, which is achieved only if the installation operations are carried out correctly.
Crimping procedure
Crimping of twisted pairs is carried out according to standard schemes, the slightest violation of which will lead to an undesirable result.
For crimping you will need special pliers of a special design with a socket for RJ45. Experts call them crimpers . When carrying out work, the connector with wires is inserted into the socket, after which the crimper is compressed until it stops. The figure on the right shows a universal crimper for crimping 8P8C/6P6C/6P4C/6P2C connectors.
Sequence of operations
In the process of crimping contacts, the most important thing is to perform the operations extremely carefully, trying not to damage the insulation of the twisted pair. In addition, you need to correctly distribute the conductors on the contact pad of the RJ45 connector. To do this, you will have to take into account the following points:
- to remove the insulating layer from a twisted pair, you can use a regular stationery knife or a special device for removing insulation;
- with its help, the outer sheath is only slightly cut, after which the cable itself is carefully bent at the point of the cut;
- if this is not done, it can be damaged, since the protective coating contains chalk (because of it, the insulating layer becomes fragile and breaks off if strongly bent);
- To remove insulation from individual wires, you can use side cutters or wire cutters (some experts use tailor's scissors for this).
Please note: With their help, it is possible to carefully remove the insulation and evenly trim the wires before laying them in the Internet connector.
All subsequent operations are carried out in preparation for final crimping. To do this you will need to do the following:
- First, the network wire is cut from the switched twisted pair cable to a length sufficient for cutting.
- Then its ends are carefully aligned.
- To remove the insulating coating, a shallow cut is made (at a distance of approximately 15 mm from its edge).
- Then the cable itself is carefully bent at the place of the cut (first in one direction, and then in the other).
- Next, the piece of insulation that has separated during bending is removed from it, and the screen underneath is cut off.
At the final stage of cable preparation, the twisted pair conductors are once again aligned (prepared for crimping). They are then laid out according to the selected switching pattern, after which they proceed directly to crimping. To do this you need to do the following:
- Insert the prepared ends as far as possible (they should rest against the far side of the RJ45 connector).
- Next, if necessary, cut off the excess conductors to length and align them again.
- Then you need to place the connector itself into a specially shaped socket on the pliers.
- After this, you will need to forcefully squeeze the handles of the crimping device while holding the Internet cable with your other hand.
- In this case, the latter is pressed against the connector socket, but not very tightly, so that the wires themselves do not bend.
Crimping the connector with a crimper
Upon completion of all these operations, it is necessary to check the resulting connection for reliability. To check, you can use a regular multimeter or a probe (a simple device for checking the “continuity” of the integrity of the wires.
Additional information: Specialists use a special device for these purposes, but at home, as a rule, they do without it.
Once again making sure that the wires are connected correctly, you just need to insert the finished connector into the network connector and, if necessary, configure the device. When the network connection icon appears, you can be sure that everything is done correctly, including crimping the twisted pair. If it does not appear even after several setup attempts, this means that you should start crimping the wires again.
Step-by-step instructions for crimping an RJ45 connector
Detailed step-by-step instructions for connecting a twisted pair cable to an RJ45 connector are presented in the photo gallery.
Design
Let's start by looking at typical model options available on the Internet accessories market. Conventionally, they can be divided into two main categories, which differ in the installation method:
- built-in;
- invoices.
Livolo socket block with HDMI
External mount models
Both options are widely used, with the first being more preferable at home, since it solves the problem of ease of use and aesthetic taste, which is especially important in an elegantly designed interior. Among them we can additionally highlight:
Among them we can additionally highlight:
- standard RJ-45;
- dual RJ-45 (for two parallel operating networks).
Dual RJ-45
Model with four network connectors
Otherwise the structure is almost identical, although there are exceptions to the rule that have additional USB ports and the like. But in this case it makes no sense to consider them, so let’s move straight to the main point.
Cable extension
When organizing a network signal output point (Lezard sockets with an RJ45 connector, for example), situations are possible when the existing wire needs to be expanded. A similar problem often arises if you need to extend the line to a loggia or balcony. There are several options for solving this issue (connecting a piece of cable). This:
- Using an electric soldering iron.
- Use of a special connector.
- Ordinary twist.
The most suitable method for home use is the use of the soldering method, which allows you to do without the labor-intensive operations of organizing a connector connection. In this case, each of the cores is first soldered to its continuation, and then the soldering area is wrapped with insulating tape.
If you use a special connector (a kind of adapter), you can get a connection that is as reliable as soldering. Such a transition element consists of two connectors (twisted pair connectors), into which articulated network cables are inserted on each side. The RJ45 connectors at the ends of the cables are pre-crimped in the same way as discussed above.
If you use a special connector (a kind of adapter), you can get a connection that is as reliable as soldering. Such a transition element consists of two connectors (twisted pair connectors), into which articulated network cables are inserted on each side. The RJ45 connectors at the ends of the cables are pre-crimped in the same way as discussed above.
Twisting to lengthen information conductors is used extremely rarely; it is only suitable for a temporary solution to the problem that has arisen. The Internet signal when using this type of connection will be weakened and may disappear regularly.
Introduction
To transfer data via wires between computers, a twisted pair cable is used. It consists of 4 pairs of copper wires woven together in thin insulation. Thanks to this structure, the cable is perfectly protected from interference - it can transmit data without loss over a distance of up to 300 meters at speeds of up to 1 terabyte per second.
The twisted pair plug and network card connector look exactly like this
To connect a twisted pair cable to a computer, two types of plugs are used - RJ-45 (installed at the end of the cable, male type connector) and 8P8C (located in the computer on the network card), this is the connector that is installed in the socket (female type) .
What are ethernet sockets for? The Internet or network works after connecting the cable. It often happens that the router and computer are in different rooms, or the cable comes into the apartment through the door and needs to be led into the bedroom. Laying it along the wall and floor is ugly and impractical, so it is recessed into the wall and a socket is placed in the right place. When you need to connect a computer or laptop, you simply plug the network cable into a power outlet and gain access to the Internet or network.
The principle of building and installing a local network
Before connecting the cable to the Internet outlet, we should create a local network at home or apartment. To do this, we need a router or router, as well as a sufficient number of cables and sockets to connect them. In this case, the connection diagram can only be star. This is a scheme where a separate cable goes from the router to each outlet.
So:
- The first question that will confront you if you are planning to make a local network with your own hands is where to install the router. For apartments, this place is usually the hallway or other place where the provider's cable enters the house. This is due to the possibility of replacing the provider without major changes in the cable layout.
- For your home, especially if it has a large area, it is advisable to install the router closer to the center of the house. This is due to better distribution of the Wi-Fi signal throughout the house, as well as a reduction in the level of interference on the network. After all, if the wire length exceeds 100m, then the drop in signal level is already quite noticeable. And the price of the cable required to connect all sockets from the most remote point can be quite significant.
- As for laying the wire, you should also adhere to certain rules. First of all, you should not lay information cables together with power cables. This is due to the fact that power cables are usually not shielded and the flows induced by them can cause considerable interference in the operation of information networks.
- In addition, our instructions do not recommend laying information cables near powerful power equipment, chokes used to turn on fluorescent lamps and electric motors. They can also significantly interfere with the operation of information networks.
- Internet sockets, or as most manufacturers call them, RJ-45 sockets, are also better placed not together with power sockets. And even if this is done, then at least place them along the edges, and not between power outlets or switches.
Laying “twisted pair” in/on walls
Let's move from theory to practice. If we are talking about laying cables and wires in a new building, then no special questions should arise: we put the twisted pair next to the rest of the communications, usually in corrugated tubes, and them in the cut-out hollows.
It is imperative to remember the number of wires inserted into the channel and their average diameter, and also take into account the channel diameter + 25% of the total sum of all cable diameters.
It’s another matter if we are renovating an existing room and creating new channels. It is necessary to take into account the material from which the walls are made: frame gypsum panels, brick, concrete, etc.
The hardest thing is to make channels in concrete/brick without damaging other communications.
To detect wiring in walls, you can use any available building electromagnetic wiring detectors.
If it is not possible to remove the furniture from the premises, then it is recommended to cover it with a protective construction film. Its thickness is no more than 1 mm, and the quantity is calculated by the formula: (height of the room * perimeter of the room) + 10%
It should be noted that there will be a lot of dust if you work in concrete. As a result of gating, abrasive dust and small pebbles will cover everything in the room: walls, ceiling, floor, furniture, equipment.
Therefore, you need to initially vacate the room or cover everything with plastic film.
We strongly recommend that the master wear the following set:
- thick overalls (jacket/pants);
- headdress (you can have a swimming cap or bandana);
- glasses (we recommend ski glasses or others with protection for the temporal areas of the face);
- thin and comfortable gloves, boots, personal respiratory protection equipment (protective masks, respirators, bandages, etc.).
To create grooves (forming channels in foam concrete or brick walls), you need to use the following tools: wall chasers, wall chasers, furrow makers.
As an option, it is still possible to use powerful “grinders” with cutting discs (diamond-coated). The cutting depth of the channel should be 30-35 mm, the width up to 25 mm exclusively for one or more twisted pair wires.
Absolutely all channels and gutters must be made at right angles - this is a mandatory rule for any construction repair.
To reduce the time for installing sockets and reduce labor costs, you can use plastic mounting boxes - cable channels
As for cavities for sockets, they are made using a bolt, an electric hammer or a drill/hammer with a socket attachment.
But initially, you need to determine the approximate placement of Internet outlets in the premises. As a rule, holes for RJ45 sockets are drilled at a height of 1000-1200 mm from the floor or 150-300 mm.
For residential premises, one or two sockets on opposite walls of the room are sufficient. For offices, they usually place one outlet near the future workplace.
In server rooms and rooms with similar functions, a different strategy is used - make 3-4 holes for modular socket blocks, two blocks on one wall and one on all other walls.
And the last thing you need to pay attention to in terms of laying wires is that sometimes it is possible to lay communications under the floor or in the ceiling of the room. In such a situation, the question of gating the walls does not arise; it is enough to run the wire under the floor or into the ceiling and bring it out in the area of the socket hole on the wall
In such a situation, the question of gating the walls does not arise; it is enough to run the wire under the floor or into the ceiling and bring it out in the area of the socket hole on the wall.
When connecting an Internet outlet, it is extremely important to perform the correct pinout. In the diagram on the left, two different options for wiring a socket with clamping contacts are indicated in different colors
In the right diagram, fixation is carried out using knife mechanisms
Features of twisted pair
An ordinary electrical wire, for example, VVGng 3*2.5, consists of three cores. This can be understood by removing the top polymer shell. A twisted pair (in other words, a network wire, an RJ-45 cable) can consist of one pair of wires or several.
Usually, ready-made patch cords are used - sections of cable of standard length (on average from 0.3 m to 30 m). On both sides, the factory cord is crimped with connectors - small 8-pin plugs that can be inserted into an Internet outlet, connector on a router, PC, TV and other equipment.
For home use, they offer single- and multi-core cables, but the latter are used more often. Twisted pair cables are sold in coils and sold by the meter
But it is also useful to have a piece of cable that has not been pre-crimped: for example, sometimes you need to pass the cable through a small, no more than 5 mm, hole in the wall. In this case, crimping is done after installation.
Characteristics of the RJ-45 Internet cable that may be useful:
Image gallery
Photo from
Copper core and polymer insulation
Color coding of external insulation
Number of cores in one cable
Internet cable shielding method
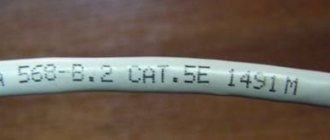
The bandwidth of an RJ-45 cable is determined by category. There are 10 categories in total - 7 main and 3 subcategories. The first four categories are considered obsolete because they do not support the required data transfer speed.
The most popular is category 5e, which can consist of 2 or 4 pairs of conductors. This is a more flexible and thinner cable than its predecessor - Category 5 Class D
Almost all the necessary information about the cable is located on the outer shell. The marking of different manufacturers differs, but such characteristics as category, brand code, shielding method (or lack thereof), number of pairs, and standard are usually indicated.
You can read about other types of cables that are used to connect to the Internet in our other article.
Basic Concepts
If you need to connect two computers to each other, you should use the Gigabit Crossover scheme, where the first end of the wire is crimped using type A, and the other by replacing all eight wires. Connecting a wall-mounted computer socket Almost all manufacturers of computer sockets place a connection diagram inside, indicating the order of placement of the wires, based on their colors.
Computer networks
The design features of twisted pair cables are determined by the required speed characteristics of information transmission
Crimping wires on the socket terminals is an important condition for high-quality switching. Review of products from well-known brands - manufacturers of Internet sockets. The famous brands Legrand, VIKO, Lezard, Schneider enjoy well-deserved authority in the world market
Video: installing an RJ socket for internal installation In the event that an open external installation method was chosen for mounting the socket, an additional element will be needed for fixation - a cable box that is mounted on the wall. Thus, if high local traffic is not planned, the wire consumption for building a network can be halved. Check the quality of work using a multimeter. For ease of connection, there are special sockets, thanks to which any cable can be hidden in the wall. If you feel that additional force is needed, then it is advisable to pause the crimping process and check everything again.
Test the sequence of wires with a special network tester. The sequence of actions is as follows: It is necessary to prepare the end of the cable for crimping. Here is the sequence of actions: The top layer of the winding is cut off. General picture illustrating the appearance of a 4-pin connector, cable, as well as its connection to the handset and device. Used to organize the connection of a telephone line. How to connect an internet cable.