SHARE ON SOCIAL NETWORKS
FacebookTwitterOkGoogle+PinterestVk
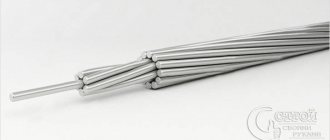
Any cable product has a current-carrying core, which is made of copper or aluminum. Since these materials are characterized by excellent current output and conductivity, during installation and connection there is often a need to connect them. How to connect copper and aluminum wires without making mistakes will be discussed below.
When moisture appears in the wire connection between copper and aluminum, electrolysis occurs, which can lead to aluminum burnout or fire
Terminal block
A fairly convenient way to connect an aluminum wire to a copper wire is to use a terminal block. This device is a clip made of polymer insulating material. Inside it there are several contact terminals that have outputs on different sides of the housing.
To connect the wires, their ends are stripped and inserted into opposite outputs of one terminal. In it they are fixed with clamping bolts located at each of the outputs. Therefore, to connect the stripped ends of the wires, you only need a screwdriver.
The block can be easily cut across with a knife or scissors, depending on how many wires need to be connected to each other. Each terminal has a through passage. Therefore, when fixing the wires, you should not insert them too deeply to prevent direct contact between copper and aluminum.
To prevent moisture from entering the terminals or accidental mechanical damage, the pads are installed inside protective junction boxes. You can do without it if you purchase a complex option - a terminal box, inside of which a ready-to-use block is mounted.
Main grades of copper for manufacturing
Pure copper-based alloys are used for production. According to GOST, the content of third-party elements should be less than 1%. Why such strict requirements? The thing is that third-party elements (even in small quantities) significantly worsen the electrical properties of copper. They reduce electrical conductivity, significantly increase resistance to electric current (which leads to unnecessary and even dangerous heating of the material), increase the likelihood of physical cracking, and so on.
Most often, the composition of a copper conductor includes various metal impurities - iron, silver, tin, zinc and others.
Copper grades
- M0b. This grade is copper that has been purified by a high-precision refining method. The total concentration of copper in the alloy is 99.96-99.98%. Contains a minimal amount of oxygen (on average 0.005%, but not more than 0.01%). In small quantities, the alloy may contain iron, phosphorus, arsenic, antimony, zinc and other elements.
- M1. This copper is the result of remelting cathodes under normal atmospheric air conditions. The total concentration of copper in the alloy is 99.9%. The oxygen content is 0.005-0.01%. May contain zinc, sulfur, lead, nickel, tin, antimony, and iron in very small quantities. Please note that in addition to the M1 variety, there is also an M1E variety. These brands are identical in chemical composition and physical properties. The only difference is that copper must be tested for electrical conductivity before use.
- M2. This copper is obtained by melting scrap (various rods, fragments of sheets, microcircuits, wires, and so on). The total copper concentration in the alloy is 99.7%. The brand may contain oxygen in a concentration of 0.007-0.008%. In addition to oxygen, the alloy may contain some other elements - antimony, lead, sulfur, arsenic, silver, zinc.
How to make a twist correctly
As mentioned above, direct twisting of aluminum wires with copper wires is unacceptable. However, in a number of situations, there is no other way out due to the lack of special connecting devices at hand. This method also has a number of advantages:
- Does not require the use of special tools.
- Fast and convenient.
- Makes it possible to quickly connect wires at home.
Connecting aluminum wires to copper wires by twisting is allowed as a temporary measure until special clamping devices are purchased. For more or less long-term use of twisting, a number of mandatory conditions will need to be met:
- The connection is made by mutually twisting two stripped ends. Simple winding of one core around another, straight one is not allowed.
- The stripped end of the copper wire should be tinned to reduce the electrochemical potential. For this purpose, tin solder is used.
- After twisting, the exposed parts of the cores are covered with a moisture-repellent coating, for example, varnish or silicone paste.
- The number of turns of twist also matters - the thinner the cores being connected, the more there should be. So, for wiring d = 1 mm, the minimum number of turns should not be less than five.
- On top of the twist, for its reliable fixation, special plastic cone-shaped tips with a spring inside are put on.
We use modern pads with spring clamps
Not long ago, modified terminals equipped with spring clamps were introduced to the market of electrical equipment and components. Disposable (conductors are inserted without the possibility of their further removal) and reusable (equipped with a lever that allows you to remove and insert cables) terminals are available.
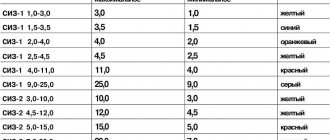
We use modern blocks with spring clamps. wago terminal blocks
| Terminal blocks wago | Current (A) | Number of connections wired | Conductor cross-section/(mm²) | Availability of contact paste |
| 222-413 | 32 | 3 | 0,08-4,0 | without paste |
| 222-415 | 32 | 5 | 0,08-4,0 | without paste |
Disposable terminal blocks allow you to connect single-core conductors with a cross-section within the range of 1.5-2.5 mm2. According to the manufacturers, such terminals can be used to connect cables in systems with currents up to 24 A. However, professional electricians are skeptical about this statement and do not recommend applying loads higher than 10 A to the terminals.
We use modern pads with spring clamps
Reusable terminals are equipped with a special lever (usually painted orange) and allow you to connect cables with any number of cores. The permissible cross-section of the connected conductors is 0.08-4 mm2. Maximum current – 34A.
To make a connection using these terminals, do the following:
- remove 1 cm of insulation from the conductors;
- lift the terminal lever up;
- insert the wires into the terminal;
- lower the lever.
Terminals without levers simply snap into place.
They are designed for connecting any types of single-core wires, including copper and aluminum wires with a cross-section from 1.5 to 2.5 mm2
As a result, the cables will be securely fixed in the block. The costs of making such a connection will be more significant, but you will spend much less time on the work and save yourself from the need to use any additional tools.
In a flat-spring clamp, the wire with stripped insulation is simply inserted into the hole of the Wago terminal until it stops. Electrical connectors with mortise contact
MDY busbar installation
CONTENTS 1. Connection installation instructions
- General Connection Instructions
- Extensions
- Busbar frame connection
- Busbar connections
- Installation of connecting casings
- Extending the busbar with flexible extensions
- Connecting the busbar to the panel
- Connecting the busbar to the panel from above
- Connecting the busbar to the panel from below
- Lifting the busbar in a horizontal position
- Lifting the busbar in a vertical position
1. Connection installation instructions
1.1 General instructions for making connections
When connecting busbar trunking to aluminum or copper busbars (input busbars of the panel, transformer poles and when extending busbar trunking), the following instructions are observed. Connecting an aluminum busbar to an aluminum busbar is carried out as follows:
Crap. 1; Attaching an aluminum bar to an aluminum bar
- Al. tire
- Bolt
- Leveling washer
- Belleville washer
- screw
In dry and wet areas, an aluminum bar can be connected directly to another aluminum bar using lubricant. The surfaces to be joined are ground and cleaned with a steel brush. Aluminum surfaces are cleaned using a lubricant, such as a steel brush with short bristles. Connecting a copper busbar to a copper busbar is carried out as follows:
Crap. 2; Connecting a copper busbar to a copper busbar
- Copper bus
- Bolt
- Leveling washer
- Belleville washer
- screw
Joining copper surfaces can be done without sanding or brushing.
Connecting a copper busbar to an aluminum busbar is carried out as follows:
Crap. 3; Connecting a copper busbar to an aluminum busbar
- Copper bus
- Aluminum tire
- Bolt
- Leveling washer
- Belleville washer
- screw
In dry rooms, the aluminum busbar can be connected directly to the copper busbar using lubricant. The aluminum surfaces to be joined are ground and cleaned with a steel brush. In addition, aluminum surfaces are lubricated with a brush. In damp rooms, a tinned copper gasket is installed between the connections.
Prim! When using tinned copper gaskets, do not use scratching tools.
Electrochemical corrosion
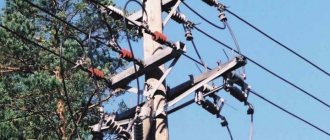
However, in the recent past, aluminum wires were widely used in construction. As a result, in most residential buildings built up to the 90s, the indoor wiring is aluminum - less expensive, but also less durable. If it is necessary to partially replace the lines of a household electrical network, or when laying branches from it, it becomes necessary to connect aluminum wires with copper ones.
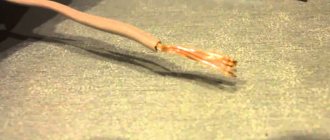
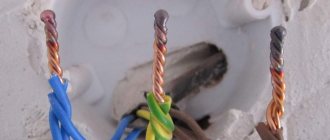
It would seem that what is so difficult about this? To make a simple twist of two conductive wires, you do not need to have deep knowledge of electrical installation. But, connecting copper and aluminum wiring is directly prohibited by the rules for installing electrical equipment. This is due to the phenomenon of electrochemical corrosion of metals.
This process is characteristic of all metals without exception, even the so-called “noble” ones. Only it flows through them with different intensities - some are covered with a destructive corrosive coating quite quickly, while others only over a long period of time. But under certain conditions, the process of electrochemical corrosion can increase many times over.
One example of this is the direct connection of copper and aluminum wire. Having different electrolytic potentials associated with different current conductivities, they act as catalysts for corrosion processes relative to each other. As a result of the operation of such bimetallic electrical wiring, destructive chemical reactions will occur at the junctions of different wires.
It is permissible to connect metal conductors to each other; the electrochemical potential at the junction does not exceed 0.6 milliwatts. Then corrosion will not quickly form at the connection site and the conductivity will deteriorate. The lower this indicator, the more compatible the conductors are with each other.
| Conductor metal | Copper and its alloys | Lead and tin | Aluminum | Duralumin mini | Plain steel | Stainless steel | Galvanized | Chrome plated |
| Copper and its alloys | 0,25 | 0,65 | 0,35 | 0,45 | 0,1 | 0,85 | 0,2 | |
| Lead and tin | 0,25 | 0,4 | 0,1 | 0,2 | 0,15 | 0,6 | 0,05 | |
| Aluminum | 0,65 | 0,4 | 0,3 | 0,2 | 0,55 | 0,2 | 0,45 | |
| Duralumin mini | 0,35 | 0,1 | 0,3 | 0,1 | 0,25 | 0,5 | 0,15 | |
| Plain steel | 0,45 | 0,2 | 0,2 | 0,1 | 0,35 | 0,4 | 0,25 | |
| Stainless | 0,1 | 0,15 | 0,55 | 0,25 | 0,35 | 0,75 | 0,1 | |
| Galvanized | 0,85 | 0,6 | 0,2 | 0,5 | 0,4 | 0,75 | 0,45 | |
| Chromium | 0,2 | 0,05 | 0,45 | 0,15 | 0,25 | 0,1 | 0,65 |
As we can see from the table, aluminum and copper give a potential of 0.65 mV when docked, which is unacceptable by the rules of the PUE. The connection between copper and aluminum will be covered with a layer of plaque, increasing the resistance directly at the junction. As a result, the wiring in this place begins to overheat, the braid melts, which is fraught with the most negative consequences - a short circuit and a fire. To avoid this, do not twist copper and aluminum directly. If the need for such a connection arises, you should use one of the methods below and connect the wires with cores of different metals.
Design and applications of the main grounding bus
Safety of working with electrical equipment is ensured by grounding. In the event of a leak, it diverts the current to the ground, so that a person will not be injured when touching metal parts. One way to create protection is the main ground bus. It is designed to connect several conductors for grounding and potential equalization. The tire can have different designs, sizes and installation methods. When working with it, you need to take into account a number of nuances so that installation and subsequent operation are carried out efficiently and reliably.
Connection via bolt and steel washers
One of the acceptable options for connecting aluminum and copper wires is to use a table bolt with a nut and washers separating different metals as a conductor for joining. The electrochemical potential at the junction of ordinary steel and aluminum is 0.2 mV, and that of steel and copper is 0.45 mV. Therefore, a steel bolt with steel washers is perfect as an intermediate conductor when connecting wires of different metals.
The docking procedure looks like this step by step:
- We twist the stripped ends of both wires to be connected into rings using pliers or pliers. Their size must correspond to the diameter of the threaded part of the bolt.
- We put the first wire as a ring onto the bolt until it stops, pressing it against the head.
- After this, a steel washer is put on, serving as a separator. Its width should be sufficient to prevent direct contact between aluminum and copper.
- Then we put on the ring of the second wire. It should be put on so that when tightening the nut, the ring does not tighten tightly around the bolt shaft.
- We put another washer on top, which will press the ring of the upper wire.
- To avoid loosening of contact over time, it is recommended to install an engraver between the nut and the top washer.
How not to combine copper and aluminum
We connect the wires by twisting
Twist
Most often, ordinary twisting is used to connect wires. This is a simple method that does not require the use of additional devices. At the same time, twisting is the least reliable option for connecting conductors, especially if they are made of different materials.
Every metal has a tendency to change its size somewhat with temperature changes. The thermal expansion rate varies for different metals. Due to this property of materials, a gap may appear in the connection when the temperature changes. It will lead to an increase in contact resistance, as a result of which heat will begin to be generated, the cables will oxidize and the connection will be broken.
Bandage twist
Of course, this takes many years, but if your plans include setting up a durable and high-quality network, it is better to abandon the twisted connection in favor of a more reliable option.
The method is suitable for connecting cables of different diameters. It is permissible to twist single-core and stranded wires, but in such a situation, a conductor with several cores must first be tinned with solder so that it turns into a single-core wire.
Connecting wires by welding
The cables are twisted, after which the connection is sealed. A protective varnish with water-resistant properties is well suited for sealing. To ensure the highest quality connection, it is recommended to tin the copper cable with solder before starting work.
Connecting wires by twisting
The number of turns in the connection is selected in accordance with the diameter of the cable. If the diameter of the conductor does not exceed 1 mm, we make at least 5 turns. When twisting thicker wires, make at least 3 turns.
Making a permanent connection of wires
The main difference between this option and the previously discussed threaded method is the inability to disassemble the connection without destroying the wires. In addition, you will have to buy or rent a special device - a riveter.
Actually, the wires are connected using rivets. Durability, affordable cost, simplicity and high speed of work - these are the main advantages of a permanent connection.
Heat shrink tubing for insulation twisting or crimping
The riveter works on an extremely simple principle: a steel rod is pulled through the rivet and cut. There is some thickening along the length of such a rod. As the rod is pulled through the rivet, the rivet will expand. Rivets of various diameters and lengths are available on the market, which allows you to choose a device for connecting cables of almost any cross-section.
Reliable connection of wires by crimping
We work in the following order.
First step. We clean the insulating material from the conductors.
Second step. We make rings at the ends of the cables slightly larger than the diameter of the rivet used.
Third step. We alternately place a ring of aluminum wire, a spring washer, then a ring of copper cable and a flat washer onto the rivet.
Fourth step. We insert the steel rod into our rivet gun and forcefully squeeze the handles of the tool until there is a click, which will indicate that the excess length of the steel rod has been trimmed. At this point the connection is ready.
How to connect wires correctly
You have become familiar with the basic methods of connecting aluminum and copper wires yourself. Each method has its own characteristics, disadvantages, advantages and preferred areas of application. Choose the most suitable option, follow the instructions and very soon all the necessary connections will be ready.
When using stranded wires and cables, you need to use special lugs for crimping or solder the ends of the wires
Good luck!
Wago Clamps
On sale today you can find clamps, original German ones from Wago, produced by other companies under license, or counterfeit ones. Accordingly, the quality of the devices will vary.
The stripped ends of the wires are clamped into them using spring-loaded terminals or elastically rigid steel plates. Inside the device there is an antioxidant paste that reduces the likelihood of corrosion when different metals come into contact. In this case, it is steel with copper and aluminum. According to their operational and technical features, Wago devices are divided into:
- Reusable. They can be easily removed by disconnecting the wiring if necessary. To do this, simply press the spring-loaded clamp or flip the latch. This allows you to quickly carry out any electrical work. However, in some cases there are complaints about insufficient joint density. As a result of loose contact, during peak load the conductor may heat up and burn out.
- Disposable. When a conductive core is inserted into the clamp, it is very firmly fixed in it. Removing the wire will require a lot of force, which can result in damage or even breakage of its clamped end. This option allows you to achieve a very tight connection, but during repair work, or when replacing part of the wiring, the old non-removable clamps are simply cut out and replaced with new ones.
Built-in buses
The design is created completely from scratch by a master. However, there is already a built-in ready-made device with grounding buses on sale. An example is a DIN rail that comes with a 220V switch to power the device. Also included are zero tires with an insulator. The maximum allowed simultaneous number of connections is 22.
Three types of such slats can be found on sale. DIN U3 is used for circuit breakers; this model is also available with a zero grounding bus. The third type is DIN U4 with additional functionality. All products have an anti-corrosion coating and are easy to install.