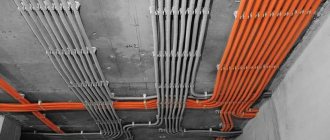
Now, when constructing overhead lines inside populated areas, having encountered a house along the way, there is no need to design a transition to an underground cable line or bypass this building, increasing the mileage.
You can safely use the walls and run SIPs along them. In this case, of course, you need to maintain all safe distances and use the necessary fittings. This will be discussed in detail in the article.
Most often, in domestic conditions, it may be necessary to lay SIP along the facade of a house in two options:
- the power line support for connection is located on one side of your house, and the electrical panel is on the other
- you need to lower the insulated SIP line to the electrical panel installed on the wall of the house at a height of 1.7 m
In the second case, there are two ways to perform this omission.
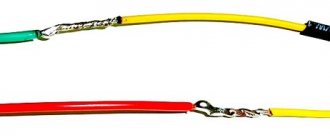
1)Make a transition to a copper cable at the place where the SIP is attached to the facade
2) Directly insert the SIP wire itself, without cutting, into the shield
It would seem that an unnecessary transition to a cable is not desirable, however, when you enter an aluminum SIP wire directly into the switchboard, and connect its cores to a machine or meter, you will encounter a lot of pitfalls that you had no idea about.
This is discussed in more detail in the article “Connecting a SIP to a machine.” So I would recommend the first option.
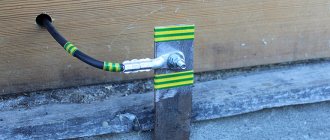
Attaching the introductory SIP to the facade
Before running the SIP along the facade, first of all you need to somehow secure it at the very first point on the wall, where the branch will be made. What do you need to know for this and what material will be needed?
Well, first of all, try to never mount a tension bracket on a side wall. Use a façade. This is explained by our winter operating conditions - snow falling off the roof, hanging icicles.
At one point, this may simply interrupt the SIP.
Measure the minimum height from the surface of the ground to the place where the input will be attached. For SIP it must be at least 2.5 m. If the height is less, it is necessary to install a pipe stand as for overhead lines.
Next, check the distance from the power line support to the wire attachment point on the wall of the house. It should be no more than 25 meters.
If this distance is greater, then you will have to install an additional support. Be careful, the network organization runs power lines only to the border of its responsibility and your site.
If you are installing a metering cabinet with a meter on the sealing support of the main line, and not on the facade or stand-alone support, then pulling the SIP from it and installing an additional support will be your headache.
You will also have to install additional support when a clearance of 5 meters above the road is not provided, even if the distance from the pole to the house is less than 25m.
General requirements
The external electrical line is laid along the architectural lines of the building. The use of armored elements with a flammable fibrous coating is prohibited. It is unacceptable to use both power and telephone wires within the same bundle. The distance between them must be at least 25 mm. When installing several conductors, you should try to make the smallest number of overlaps.
When laying SIP in accordance with the PUE, you need to maintain certain distances between it and certain parts of the building:
- above the window and door - 0.3 m;
- below the balcony and window - 0.5 m;
- height above ground level - 2.5 m;
- on the side of the window - 0.5 m;
- on the side of the balcony and door - 1 m.
When running the power cable along the wall, it is necessary to maintain minimum distances to windows
Types of SIP anchor clamps
The SIP is secured to the bracket itself on the wall using anchor clamps. Their brand depends on the cross-section of the wire and the manufacturer.
Ensto anchor IEK anchor KVT anchor Sicam anchor Niled anchor
Ensto anchor SO 243, SO 157.1, SO 158.1, SO 80
Anchor IEK ZAB and ZAB
Anchor KVT ZAB
Anchor Sicam GUKp
Anchor Niled DN 123
And the pivot table:
| Manufacturer | Anchor clamp brand |
| ENSTO | SO 243 - SO 157.1 - SO 158.1 - SO 80 |
| IEK | ZAB - ZAB |
| KVT | ZAB |
| SICAM | GUKp |
| NILED | DN 123 |
Important advice - for facade fastening it is better to use anchors with a lower destructive load.
For example, what is the difference between an SO243 and an SO80 clamp? Both seem to be suitable for a 16mm2 SIP section.
Imagine that your entrance to the house from the pillar passes across the road. And one fine day, a truck with an oversized cargo will catch the SIP, tightly secured to the bracket with a powerful anchor. The jerk will be so strong that it could easily tear out a piece of the facade.
And if there is an anchor clamp with less tensile strength, then it can simply tear the wire from the fastener, leaving the wall of the house untouched.
By the way, the same thing should happen on the sealing support.
Basic cable laying methods
Cables can be laid:
- in open areas;
- along the walls of buildings and structures;
- in the ground.
There are two ways to lay the cable: open and hidden. Open installation of the cable is allowed on special supports, poles, walls of buildings and other structures, provided it is protected from mechanical damage and laid at a height of at least 2 m. Open laying of armored cables underground is permitted. In other cases, only hidden cable installation is permissible:
- in boxes, pipes, reinforced concrete trays;
- in blocks or channels;
- in the trenches.
If the above requirements are met, it is allowed to lay the cable along the fence. The fence can be made of stone, reinforced concrete, plastic or wood. It is not recommended to lay the cable over a metal fence.
Mounting the bracket on the facade
The procedure for installing the bracket on the wall is as follows:
- place the bracket on the surface and mark the mounting hole marks with a pencil
Strictly observe the minimum distance from the corner of the house. It must be at least 100mm.
Otherwise, the fasteners will tear out along with a piece of the wall under strong wind loads.
- drill holes to the required depth, according to the selected anchor bolts
Take care of the tool first. Obviously you will need a hammer drill. It must either be battery-powered, or you will have to use a generator and a carrier.
- then hammer the dowels into the holes
- install and secure the bracket
If you have a frame house, be sure to consider the location of the internal studs. The bracket must be secured to the post or corner beam through a bolted connection or turnkey anchor bolts.
Therefore, I recommend fixing the bracket yourself, and entrusting power engineers with the installation of SIP from the support.
How to lay a cable along a fence according to the rules
Owners of country houses and household plots often have to deal with the problem of supplying power to consumers located in areas remote from their homes. This could be a pumping station, greenhouse heating devices, a lighting network, as well as a number of other economic facilities.
In such cases, the homeowner is faced with the question of how to route the power cable through the site without violating the Electrical Installation Rules (ERR), complying with all electrical fire safety standards, and also avoiding claims from control organizations.
The ideal solution to the problem would be to lay the wires underground in a cable channel or in a metal pipe, as well as suspend them on supports specially equipped for this purpose. However, these installation methods are very labor-intensive and can significantly hit the family budget.
In this regard, for summer residents and homeowners, laying cables along the fence is most relevant. We have provided below the installation methods and PUE requirements for laying the conductor.
Facade fasteners
Next, the SIP must be driven directly along the wall.
According to the rules of the PUE, SIP wires must be located at a distance of at least 60 mm from the surface of the walls.
This distance is ensured by special façade fastenings.
Here are their varieties:
Ensto IEK KW Sicam Niled
Universal clamp SO125 and multi-clamp SO90.1
Remote clamps SO71 and SO76
Facade fasteners IEK KFK
Facade fasteners KVT KF
Facade bracket Sicam SC 93-6 PC
SIP facade fastening Niled SF 50
Everything is installed very simply:
- a 70cm route is marked between the brackets
- holes are drilled
- Dowels are inserted into these holes
- after which a nail is driven in with a hammer or a screw is tightened
- if the wall is wooden, the plastic dowel needs to be cut to the limiting ring and just hammer in a nail
- the cap is covered with an insulating cap
Keep in mind that where there are turns, descents or ascents, that is, efforts aimed at pulling out of the wall, it is better to use facade fasteners not with simple nails, but with a screw dowel.
If other communications, such as water or gas pipes, run along the same wall, then a certain indentation must be made from them.
- from SIP to water pipelines must be at least 100mm
- to gas pipes at least 400m
Cable on the fence: what do PUEs say about this?
Actually, there is no such concept as a “fence” in the Electrical Installation Rules.
There is a definition: “...cables laid along structures and walls...”. For such cases, there are many rules and restrictions. At least one thing is clear: this will be an open gasket, with all the ensuing consequences. For example, geometry: depending on the height of the power wire route, it should have different degrees of protection. The material of the base of the wall (structure) also affects the laying conditions.
We will not try to find special privileges or restrictions for fence power networks. Let's look at the rules related to the definition of “construction...”.
Types of clamps for SIP
Most of the clamps allow you to simultaneously fasten two SIP wires. You just need to use an additional clamp. Saving materials and free space will make you very happy.
Just don't try to use regular cable ties for this. SIP clamps are thicker, wider and much stronger. They have a double reinforced clasp.
And most importantly, the plastic from which they are made is UV resistant. Such a clamp will hang on the street for many years without losing its qualities.
Ensto clamp IEK clamp Sicam clamp Niled
Clamp for SIP Ensto PER 15, PER 26, PER 14.1
Clamp for SIP IEK XC
Sicam CCD tension strap
Niled clamps
Some, in pursuit of savings, prefer to buy similar consumables for pipes instead of standard SIP facade fastenings.
This cannot be done, since these products, again, are not designed for outdoor installation. After a year of operation (winter-summer), the rubber seals will dry out and the edges of such fasteners will tear off the insulation. In addition, there can no longer be any question of any safe distance from the walls.
Advice from experienced people
Those who do this kind of work very often know some nuances that can help avoid unnecessary expenses and manipulations, so you can listen (take a closer look) to them. There are several tips that make both the choice of material and the work easier.
- For small cross-sections (1.5-4 mm2) and power, it is better to use VVG cables, and for medium or large ones - AVBbShv. It is possible to purchase VBBShV, however, on small sections its advantage is not so noticeable, and the cost of work (materials) will increase significantly.
- Products with paper insulation (such as AABL and the like) soaked in oil are not the best material for DIY work. The reasons are their rigidity, inconvenience in work. They require terminations, and testing of these cables is only possible with a megohmmeter.
- If possible, it is better to lay the wires in whole pieces. If it is not there, then coupling is undesirable, since without experience in such work it is difficult to guarantee the reliability of the resulting connection. An alternative is an overhead junction box.
- When there is a large tree on the way that you can’t get around, you can drive a pipe (metal, asbestos-cement) under the roots. It is then easy to lay the cable in it.
- The most undesirable types of wires for underground installation are PUNP and KG.
- Armored cable always requires armor grounding.
Laying a cable in the ground yourself is an operation that one would hardly call impossible or difficult, but such work requires maximum attention to detail, accuracy and responsibility from the master, because electricity is a form of energy that is often very expensive to mess with. In addition, a properly laid high-quality cable will not create problems for many years.
To make sure that the process is relatively simple, you can watch the video; everything is shown (and explained) in detail:
Installation of SIP on wooden walls and siding
What to do if your wall is not brick or concrete, but is made of siding or other fire-hazardous material?
Since SIP has flammable insulation, it cannot be laid openly over siding.
Here are the results of SIP burnout right inside the support clamps. Imagine this will be on your wall.
You can hide it in a metal sleeve, and then attach it all to the wall using clips with long self-tapping screws. To make it more beautiful, you can choose a metal hose with double insulation.
This option is widespread, but has both advantages and disadvantages.
Pros:
- the whole structure looks more aesthetically pleasing
- This option is applicable when you don’t want the SIP to protrude from the walls by as much as 6cm
- provides additional mechanical protection
Flaws:
- extra costs for a metal hose and fastenings to it
- No matter how hard you try, you will not be able to ensure sufficient tightness of the structure. Here is a real review from one of the users from forumhouse.ru
- By placing a SIP wire in a corrugation or pipe, you worsen its cooling conditions
At hot ambient temperatures and rated load, such a wire is no longer capable of passing the maximum possible current through itself without consequences. Which can lead to damage to the insulation.
Moreover, this will happen inside the corrugation and you won’t even see it. This applies primarily to main SIPs of large cross-sections.
Branch bushings into houses with a cross-section of 16 mm2 usually have a large reserve of rated current. For SIP 2*16 Inom=75A.
This is almost 2 times more than the input machine installed in most ASUs and metering cabinets (32-40A). To overheat such a SIP with a household load, you need to try very hard.
It is also important to remember that a simple SIP cannot be installed inside the house. To do this, it must be marked Ng-non-flammable. More information about such brands and their characteristics can be found in the article “Brands of SIP wires - differences, characteristics.”
The importance of applying standards
To avoid danger when installing electrical wiring, you need to correctly calculate the cross-sectional area of the wires, because the resistance depends on it. The greater the resistance, the more the wires will heat up. An important role is played by the correct selection of cable materials, connection of wires, choice of installation location, and insulating materials. It is necessary to correctly calculate the load and select protective devices, do not forget about grounding.
An error can lead to a short circuit, and as a result, a fire occurs. To prevent this from happening, you need to use rules and regulations. If the building was erected without complying with them, the insurance company will not pay insurance in the event of an accident. Material losses can be quite significant, not counting human lives, the loss of which is irreparable.
This is interesting: Automatic before or after the RCD - how to do it correctly
Laying options
It is advisable to consider options for how to route the cable along the fence if the height of the fence reaches 2 meters or higher, or the fence is less than 2 meters high and is made of corrugated board, wood or brick. Let's consider the rules for laying the line in each case.
The height of the fence is from 2 meters. The simplest option, in this case there is no need to arrange cable protection from mechanical damage. It will be enough to stretch a steel cable with a diameter of 1-2 mm between the fence posts, to which the conductor is secured with nylon clamps, approximately as in the photo below. This installation method is the simplest to implement, requires relatively low material costs, and meets fire safety requirements if the fence is made of wood.