It is difficult to imagine a house in 2022 that is not equipped with an Internet connection. Typically, providers themselves install a modem or router for use by one computer. However, if you want to create a local network and add IP television or several more computers to it, you will need to study the technology of laying Internet cables, which are otherwise called twisted pairs. I will tell you about the correct crimping of twisted pair cables without errors using a special tool or improvised means.
Crimping Tools
To create a fully functional patch cord, you will need a standard network cable, as well as two or more RJ-45 connectors. The installation tool kit includes:
- Press pliers (crimpers).
- Stripper is a device for removing insulation.
- Knife.
- Screwdriver.
- Wire cutters, pliers.
On the right is a cheap, inconvenient one, and on the left is a good, expensive crimper
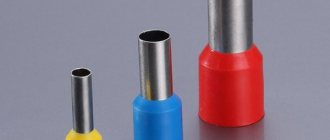
Two types of connectors - regular and with a metal casing.
Also, for crimping, prepare several adapters and plastic protection in case the cable breaks.
Stripper
Knife or “Stripper”
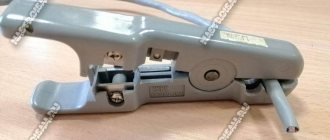
A stripper is a knife or wire cutters that removes insulation. There are many models of such tools, among them there are complex, expensive, simple and cheap ones, for example, the picture shows a multifunctional stripper.
The good thing about a stripper is that it carefully cuts off the insulation from the cable without damaging the internal conductors - just insert the end of the piece into the hole, lightly press it down, turn it around its axis, and then remove the cut part of the insulation with your hands.
It is not necessary to buy a stripper if your crimping pliers are equipped with a blade that performs the same function. You can use a regular sharp knife.
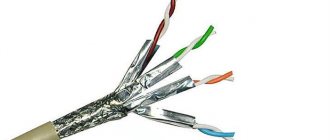
Attention! Strippers cannot be used to strip foil twisted pair (FTP) cables. Such cables are cut with nail scissors.
Possible schemes
There are 2 main schemes used for crimping Internet wires. To choose the appropriate option, you need to figure out which devices the cable will connect.
An old skein with broken connectors that we will use for experiments
Direct connection
This type is required for connecting the following devices and devices:
- Personal computer – router.
- PC – communicator;
- Router - communicator;
- Router – SMART TV.
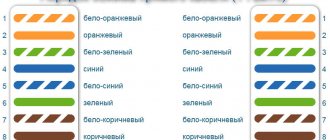
The main difference between direct pinouts is the identical arrangement of the wires of the two devices when connected to the connector of each. When connected directly, the wires are arranged in the following order:
- White-orange.
- Orange.
- White-green.
- Blue.
- White and blue.
- Green.
- White-brown.
- Brown.
You cannot swap colors at different ends, otherwise there will be no signal. Sometimes you can use not 8, but 4 wires. So, for data transmission at speeds of up to 100 megabits, only 1,2,3 and 6 numbers are used. Therefore, to save money, you can buy “cables with two twisted pairs” if you plan to connect low-speed devices. The same RJ 45 connectors are used for connection.
Cross connection
This type is used to connect two devices with the same operating principle: PC-PC, router-router. The difference from the first type of connection is that the first connector uses the same wires as for a direct connection. In the crossover, two pairs change places: orange - orange-white, green - white-green. The remaining positions do not change.
Crossover mode is used when connecting two computers to each other
This complicated scheme is used less and less often. The fact is that most new devices are equipped with an Auto MDI-X interface, which automatically recognizes the connection type and adjusts the optimal operating mode. This means that you will only need to connect the wire in a straight line.
Ready-made kits for crimping twisted pair cables
Network Builder's Kit
For those who use twisted pair crimping tools not only at home, it will be convenient to purchase a ready-made kit, which includes everything we discussed above, plus a carrying bag. However, a twisted pair cable crimping kit may include other useful things:
- Connectors RJ12, RJ45, RJ11;
- Nippers, side cutters;
- Network probe – a device for searching for cable breaks using sound monitoring;
- Crossing tool – seals the cable into the socket;
- Screwdrivers and stuff.
A ready-made set will cost a little more than buying everything separately, but the tools will be stored in one place and you will never have to look for anything.
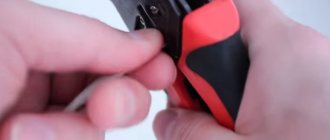
Using self-crimping connectors
I recently learned that there are connectors that do not require a crimper and a screwdriver for crimping. All you need are the tools to remove the top braid of the cable and align the row of wires. The operating principle is as follows:
- Remove the top braid.
- Unravel and straighten the wires.
- Open the lid of the device and add steam from the top. Each wire is in its own groove. Once connected, the clamps will prevent the wires from just flying out.
- Now close the lid until it clicks. The fixed knives will be connected to the wires, allowing the cable to be used to connect different devices.
The price of such a connector varies from 75 to 500 rubles, depending on the manufacturer. However, it is compensated by the fact that you do not need to purchase and use additional tools. This connector is considered reusable. If necessary, remove and install it back.
How to properly crimp an Internet cable?
To do everything well, with minimal time and effort, you still need a special tool. We will need:
We also need a cable of at least category five and a certain supply of RJ-45 connectors (“glasses”), I have several:
Let's get started. I have already crimped one end of the cord and if we turn the connector “tongue” outward, we will see how the wires are located in the connector itself. Direct crimp looks like this:
The first thing we do is cut off the insulation of the Internet cable about three centimeters from the end:
Then you need to unravel the wires according to the diagram (from left to right): yellow-orange, orange, white-green, blue, white-blue, white-brown, brown. This is the most time-consuming and thorough moment in this whole matter.
After the wires are selected, they all need to be cut evenly:
We carefully check the correct location of the wires according to the diagram; if you need more leveling, but so as not to cut off excess. Then, turning the RJ-45 with the tongue outward, we insert the wires into the connector until they stop, so as not to disturb their location:
Then we pull the wires back out of the connector to check; We make sure that the order of arrangement is not violated.
If any of the wires “jumped out” and looks shorter than the others, then we make sure that all the wires become the same length. This is critical!
This is what an “incorrect” cable crimp looks like; it won’t work:
And this is what the “correct” cable looks like:
If you succeeded well, then CAREFULLY insert our wires into the connector again until they stop. We inspect the transparent end - do all ends fit tightly? We take the pliers and just now crimp them.
The video clearly shows how to use the tools:
To check the finished cable, just connect it, but if you plan to do this regularly (at work, away, etc.), I recommend purchasing a special device (BNC indicator). It helps a lot and is indispensable when laying local area networks.
They can easily check already laid cables for serviceability; If one of the wires is damaged, you will immediately detect it.
Checking crimp quality
There are several ways to ensure cables are crimped correctly:
- Connecting devices for which twisted pair cables have been crimped. If the computers start interacting, then you haven't made any mistakes.
- Attach a multimeter to each wire on the connector, setting the level or minimum resistance. If there is no characteristic cracking sound when touched, then it needs to be replaced.
Set the switch to beep - Insert one end into the ethernet connector, and at the other, measure the resistance on each wire. If it is too large, then an error was made during crimping. Also, the resistance of both pairs should be approximately equal.
- When visiting a home, technicians use special LAN testers to assess the condition of communication lines. You can buy the same one and help your friends check it.
The design of LAN testers consists of 2 blocks, to which different connectors are attached. After connection, connect the device to the network and look at the indicator lights. If some of them do not light up, then these wires are not working.
Cable tester
Antenna for a computer to strengthen the Wi-Fi signal
If it was not possible to install the connectors on the cable correctly, this can be seen immediately by the non-functioning network connection. But there can be many reasons for network inoperability, including hardware failure or incorrect network settings. To exclude a non-working cable from this list, it needs to be checked. There are cable testers (LAN testers) for this purpose. They are divided into several classes:
The simplest testers
They operate on the principle of direct “dialing” of connections. Consist of two parts, connected on both sides of the crimped cable. The main and only advantage of such devices is their low price.
Advanced devices
They can show the type of damage and determine the connection diagram. Equipped with built-in tone generators for increased ease of use.
Multifunctional devices
In addition to the cable tester, they contain one or more devices. The kit may consist of a crimping device and a lantester, or a cable tester and a generator for “testing” individual wires.
Professional devices
The most expensive, but working with them is a pleasure. They will show the type of damage, the distance to it, and are equipped with protection against counter voltage. Information is displayed on the screen.
We use press jaws
If there is no other tool in the house, you can crimp the cable with press pliers. Regular pliers are also suitable for this task.
What the procedure looks like:
- take the wire, measure the required length, which will be enough for cutting and stripping;
- carefully remove the insulating layer on the wire with a knife or pliers. Please note: we do not touch the insulating layer of the cores;
- we establish a diagram according to which we will connect and lay the cores in the connector;
- places the wires in the connector according to the selected diagram, immediately cut off the excess ends so that the layer without insulation is completely immersed in the connector body;
- turn the case over so that the connector faces down, insert the stripped wires along the contacts until they stop;
- now the contacts should break through all the veins;
- carefully clamp the connector clamp using pliers or press pliers;
- if necessary, perform crimping on the second side of the wire.
We check the quality of work and functionality of the wire.
Let's sum it up
In this collection, we have collected all the necessary information, thanks to which it will not be difficult to crimp a twisted pair cable for one or another connection scheme with your own hands, using the necessary tools. The main thing is to adhere to the basic rules; it wouldn’t hurt to repeat them again:
- The crimping must be done in accordance with the color scheme.
- It is important to follow the cable cutting rules. Let us remind you that the wires must rest against the stop of the channels. The clamp must secure the cable without removing the insulation (see Fig. 8).
- The crimping procedure allows for direct and reverse methods, but it is unacceptable to connect a four-wire and two-wire connection circuit.
- Although smart hubs allow you to combine direct and cross-connection methods, it is recommended to stick to one type of standard.
- Checking the cable with a tester allows you to quickly detect the problem.
- A high-quality tool guarantees an appropriate result. You can also purchase Chinese crimpers, but in this case the quality of crimping and the service life of the tool will be up to the manufacturer.
Read related articles on the website:
Connecting a peripheral device
Advanced PC users need to know how to correctly pinout the RZh-45 connector for USB. This network structure is especially relevant in those industries where it is necessary to connect expensive server systems, as well as office equipment and cash registers. For such manipulations, it is better to prepare a regular soldering iron, but if it is not available, then you can get by with twists.
When the cable is completely crimped, the technician must strip the cut end by at least 5 cm. Next, any USB plug is carefully disassembled so that the connectors are ultimately freely accessible. It is worth noting that the black and red cables should be stripped down to the copper base, and after that they should be twisted together. If the RJ-45 and USB twisted pair is ready, then you need to perform the following steps sequentially:
- Solder the white-green wire from the third connector to the red-black twist.
- The green cable from the USB device is carefully connected to the blue wire from the fourth connector.
- All that remains is to twist the white-blue core from the fifth connector with the white cable.
The experts themselves claim that using a twisted pair cable with an RJ-45 connector is not difficult even for a beginner. Don't worry that the crimping may not be as good as in the store. The communication channel will not be lost and no short circuit will occur. Using unprofessional tools can only create slight interference on the line, which will not be noticeable on a cable up to 5 meters long. If the master is not confident in the quality of his work, then it is better to redo everything so that the network does not fail at the most crucial moment.
Screwdriver application
If you don’t have any tool at hand, you can use a screwdriver.
The procedure looks like this:
- straighten the wire, clean the area of the outer sheath;
- measure the distance of the cores along the connector plug;
- cut the wires so that their length is the same;
- install the wire into the end of the tip so that the cores are fixed until they stop;
- external insulation is placed under the connector body;
- then, using a standard flat-head screwdriver, the contacts are pressed into the cores;
- checking the installation.
Color coding rules
When the need arises for the master to efficiently distribute all the cable conductors, he must use a special layout scheme for the wire strands. This rule applies not only to four-pair products, which are designed to connect telecommunication modules of patch panels with an outlet, but also to multi-pair highways. Color coding is especially important in cases where one end of the RJ-45 twisted pair cable already has a factory plug, and the other end must be completed on site.
Manufacturers can pre-apply multi-colored marks on some switching nodes in accordance with established standards, which will serve as a hint during operation, but on other products this function is not provided. In accordance with the current code, pairs are marked with two shades: primary and additional. The first category includes red, white, yellow, black, and purple. But orange, blue, green, gray, and brown are used as auxiliary colors.
The main core is always installed first. Specialists regulated the sequence for 25 pairs (50 conductors). If the cable consists of ten or four cores, then the colors from the very beginning of the list are used (for example: for a twisted pair UTP 4 x 2, white-blue wiring is laid first, and white-brown wiring completes everything). Experts always divide products of larger capacity into dozens, due to which the red-gray cores are laid in them last.
How to crimp a 4-core Rostelecom cable for the Internet?
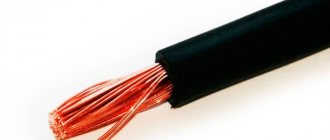
Rostelecom pleased me by leaving a certain amount of 4-core cable in reserve. Once upon a time, ADSL was connected to 8 wires, fiber optic is already to four... Probably, if there is no difference in speed within the network, then why pay twice as much for copper? So you decided to save money on purchases? Well, okay, let's see what's inside.
There are four copper wires inside instead of eight; white-orange, orange, blue, white-blue. The color arrangement of the cables is already different from what we saw. In such a cord, the pinout is in order (if the connector is turned with the tongue outward, from left to right):
- white-orange;
- orange;
- white-blue;
- empty
; - empty
; - blue;
- empty
; - empty
.
Arranging four wires in a row is much easier and faster than eight. It is critically important to cut the wires evenly, again we use a cutter.
We very easily insert the wires into place, first the blue one, then the other three. Here you no longer need to pull out the wires to check, everything is already visible. After making sure that everything is smooth and correct, we crimp the connector with pliers.
Straight and cross crimp
Now let's move on to crimping options. They come in two types:
- Straight, that is, both ends of the twisted pair are crimped according to the same standard.
- Cross, in this case one of the ends is crimped according to the T568A standard, the second - T568B.
Figure 12. Direct (A) and cross (B) connection
This specificity is associated with the connection diagram. There are actually three options:
- Router-router. In this case, a cross line connects two routers or hubs.
- PC-PC. Everything is clear here, a network cable is used to directly connect two personal computers.
- Router-PC. That is, a personal computer is connected to a network node.
Let's take a quick look at the listed connection diagrams.
Crimping twisted pair cables according to the router-to-router scheme
With this connection option, it is necessary to use a direct circuit (see A in Fig. 12). But, when using smart nodes in the network topology, this restriction does not have to be observed. That is, direct and cross connection schemes are allowed, since the router is able to recognize its type. But, it is considered correct to adhere to the selected standard for a particular LAN.
Crimping twisted pair cables according to the computer-to-computer circuit
A completely different situation arises when PCs are connected to each other. In this case, only a crossover circuit can work. This type of connection was demonstrated in Figure 12 (B).
Crimping twisted pair according to the router-computer circuit
This type of connection is usually performed in a direct manner. For smart switches (switches), this condition is not necessary, but nevertheless, it is considered “good form” to adhere to this condition.
Types of cable
Read also:
To understand how to crimp an Internet cable,
you need to know what options exist and what they are used for.
Cross – used to connect two identical devices to each other
.
For example, two personal computers or two .
Its peculiarity is that each side has its own set of wires.
Crimping methods do not differ between different types of wires. The only difference is what each of them is intended for.
Crimping Pattern Options
It got its name due to the compression method. It is the same for both wires.
But the user performs this manipulation once, since the second part of it is already included in and is with the provider.
For standard Internet with a speed of no more than 100 Mb/s, a connector with 4 cores is installed.
It is quite enough for this speed and for normal operation.
If you need a connection speed higher than that, then use a cord with 8 cores
. It is more expensive.
Today, it is convenient that gadgets have a built-in function that allows you to automatically determine the type of connector and automatically select and carry out the necessary settings.
This greatly helps users who do not have professional knowledge in the field of IT connections, but are trying to solve on their own the problem of how to crimp an Internet cable at home.
It will configure everything automatically and will work absolutely correctly and without complications.
It should also be noted that almost all current devices have the Auto MDI-X form.
This suggests that crossover cables are becoming obsolete and almost no one uses them anymore.
Only those who can recognize the type of connection and configure it themselves are being replaced.