It would seem that what could be simpler than connecting wires? After all, there are several ways to connect wires. This includes twisting wires, soldering wires, welding wires, crimping and connecting wires using a terminal block. Even a schoolchild knows the easiest way to twist conductors. You need to put the ends of the metal wires, called strands, together and twist them into one “pigtail”, and then wrap them with electrical tape. There is no need for a soldering iron, terminal block, connecting caps and other “unnecessaries”. Any “own electrician” has mastered this operation. And, when the need arises, he applies this method in his daily practice. For example, it splices the power cord wires of a household appliance, tablet or computer adapter after a break. Russian “technicians” use this technology for fastening wires everywhere. It’s just that the rules for the design of electrical installations of PES do not provide for “twisting”, all kinds of “bends” and “rivets”. There are no such electrical installation methods in other regulatory documents. Why?
Danger of twisting
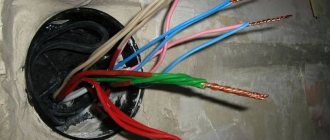
Connecting the cores to each other using the twisting method
In paragraph 21 of Ch. 2.1. PUE twisting is not prescribed among the methods of connecting wires. The rules allow the use of welding, soldering, and clamps. The danger of twisting electrical wires lies in the following points:
- increasing the contact resistance of the contacts when the cores are loosely tightened;
- weakening of the twisted section, leading to heating;
- increase in current with weak contact;
- melting of the conductor insulation protection;
- risks of short circuits, fire, electric shock to humans.
Despite the regulatory ban, most craftsmen resort to the twisting technique. This option is suitable for testing the operation of the line, running a short-term network, for the period of repair.
Use special terminal blocks to twist the wires.
But welding is still preferable
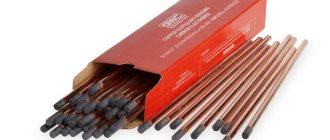
In terms of connection strength and contact quality, welding surpasses all other technologies. Recently, portable welding inverters have appeared that can be transported to the most inaccessible places. Such devices are easily held on the welder's shoulder using a belt. This allows you to work in hard-to-reach places, for example, welding from a stepladder in a distribution box. To weld metal cores, carbon pencils or copper-plated electrodes are inserted into the holder of the welding machine.
The main disadvantage of welding technology - overheating of the parts being welded and melting of the insulation - is eliminated using:
- Correct adjustment of the welding current 70–120 A without overheating (depending on the number of welded wires with a cross-section from 1.5 to 2.0 mm).
- The duration of the welding process is no more than 1–2 seconds.
- Tightly pre-twist the wires and install a copper heat sink clamp.
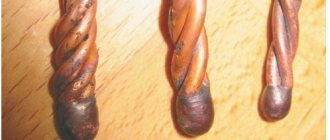
When connecting wires by welding, the twisted wires should be bent and the cut side must be turned upward. An electrode is brought to the end of the wires connected to ground and the electric arc is ignited. The molten copper flows down in a ball and covers the twisted wire with a sheath. During the cooling process, an insulating belt made from a piece of cambric or other insulating material is put on the warm structure. Lacquered fabric is also suitable as an insulating material.
Advantages and disadvantages
Using twisting, you can quickly connect wires.
The interweaving of conductors is not designed for connecting powerful appliances - kettles, washing machines, heaters, refrigerators, computers. Despite this, twisting has several advantages:
- fast organization process;
- if performed correctly - durability;
- no need for special tools;
- creation of signal contacts;
- additional reinforcement when using soldering technology;
- minimum costs for consumables;
- possibility of re-execution.
Among the disadvantages are:
- mandatory insulation of the twisted section;
- normal line operation only when connecting low-power consumers;
- inconvenience of implementation;
- risks of wiring fire if the algorithm is violated;
- constant voltage drops and overload of the twisted section.
Plexus is advisable when using low-power equipment - lamps, power adapters.
The need for wiring connections
Distribution boxes are used to branch the electrical network. But they are intended only to hide the connections of power network branches.
The need for wiring connections is found everywhere. They connect wiring in different ways in the house, electrical appliances, cars, in general, wherever there are wires.
Nowadays, several methods of connecting wiring are used. Each of them has its own positive and negative qualities.
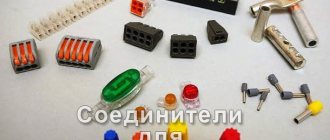
The most common ways are:
- Twisting;
- Soldering;
- Welding;
- Use of terminal blocks, blocks;
- Use of self-clamping terminal blocks;
- Use of connecting insulating clips (PPE caps).
Types of twists
Types of twists
By correctly twisting the wires, you can get a reliable and dense section. Craftsmen resort to various types of connections - safe and durable:
- Bandage - an additional one is applied to two sections and braided around them. This creates additional reinforcement of the area.
- Groove - with the parallel technique, one core remains motionless, and the second wraps around it. This type involves making 3-4 turns of one cable around the second. Then the first one is laid tightly parallel to the second one and 3-4 turns are made again;
- parallel connection. Two conductors with the insulation removed at the same level are laid side by side. The tips cross tightly and twist in any direction.
All types of twists can be used as temporary fastening.
Types of twists. Errors when twisting
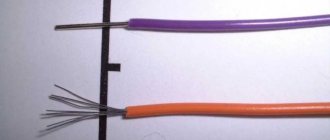
Firstly, remember that wires come in aluminum and copper. Copper wires are divided into monocore (one solid core) and multicore (flexible).
Monocores are used for stationary connection of equipment. Once I laid it under the plaster, behind the drywall and forgot about them. There is no longer any need to move or bend such wiring.
Multi-core cables are used for mobile devices or temporary connection of electrical equipment. Where wiring constantly needs to be moved from place to place, its location must be changed. These are home carriers, household appliances plugged into sockets. They are also used in the assembly of switchboards, where there is a shortage of free space, and the conductors have to be significantly bent in order to be inserted into the terminals of the devices.
Let's first consider how to properly twist wires from a single core. The process here is not complicated and is known to everyone. Take two wires, strip them at the ends and begin to twist each other.
The main features and rules in this process:
- ⚡
wires must be made of the same material (copper or aluminum) - ⚡
strip the core at least 3-4 cm, thereby increasing the useful contact area - ⚡
wires are laid parallel to each other - ⚡
both wires must be twisted evenly together - ⚡
When twisting, use some pliers to hold the place where you start stripping the insulation, and use the other to twist at the end. The insulated parts of the conductors must not be twisted together. - ⚡
the number of turns that should end up being five or more
Twists of aluminum and copper wires are performed in the same way. The difference is that you can unscrew and tighten copper ones several times, and aluminum ones 1-2 times. After which they will break off.
What if you need to twist more than two wires, say 4-5? The process is no different:
- ⚡
slowly twist the wires with your hands, only giving them the shape of the future twist - ⚡
take two pliers and, holding the twist at first, tighten the wires at the end - ⚡
the length of the stripped areas should also be 3-4cm
There are situations when it is necessary for the twist to take up as little space as possible. Either there is not enough space in the junction box, or it must then be pulled through a narrow hole. In this case, the technology is slightly different.
- ⚡
place the stripped wire strands crosswise in the middle of the stripping area - ⚡
and begin to twist them so that the ends after folding are equidistant from each other
In terms of quality and reliability, such twists are inferior to conventional ones.
Twisting of wires according to the PUE
The rules for electrical installations say that a section of 3-6 cm can be used for twisting. The standards allow the connection of stranded and single-core cables with the ends stripped by 4-8 cm. The stranded conductor must be laid on a single-core conductor and twisted by 4 cm.
PUE establishes the type of wire for the home line. The aluminum cable should have a cross-section of 2.5-4 mm2, copper - 1.5-2 mm2. The VVG and PV power cord is used only with a PVC sheath. Wire type ShVL and ShTB with a cross section of 0.5-0.75 mm2 - with rubber or PVC insulation.
Permanent connection of wires
In some cases, when it is not intended to connect the wires in the future, they can be connected in a permanent way. This type of connection is highly reliable and is advisable in hard-to-reach places, for example, connecting the ends of a nichrome spiral with copper current-carrying conductors in a soldering iron.
Connecting thin wires by crimping
A simple and reliable way to connect wire cores is crimping. Wire strands are inserted into a piece of copper or aluminum tube, depending on the metal of the wires being connected, and the tube is pressed in the middle with a tool called a press pliers.
Crimping can be used to connect both single-core and stranded wires in any combination. The diameter of the tube must be selected depending on the total cross-section of the conductors. It is desirable that the conductors fit tightly. Then the connection reliability will be high. If in a stranded wire the conductors are twisted together, then it is necessary to develop and straighten them. There is no need to twist the wire strands together. The prepared conductors are inserted into the tube and crimped with press pliers. The connection is ready. All that remains is to insulate the connection.
Crimping tips are available for sale, already equipped with an insulating cap. Crimping is performed by compressing the tube together with the cap. The connection is immediately isolated. Since the cap is made of polyethylene, during crimping it is deformed and held securely, ensuring reliable insulation of the connection.
The disadvantage of joining by crimping is the need for special press jaws. You can make your own pliers using pliers with side cutters. You need to round the side cutter blades and make a groove in the middle. After such modification of the pliers, the edges of the side cutters will become blunt and will no longer be able to bite, but only squeeze.
Connecting wires of larger cross-sections by crimping
To connect electrical wires with a larger cross-section, for example, in power panels of houses, special lugs are used, which are crimped using universal press pliers, for example, the PC, PKG, PMK and PKG types.
To crimp each standard size of tip or sleeve, it requires its own matrix and punch, a set of which is usually included in the set of pliers.
To crimp a tip onto a wire, the insulation is first removed from the wire, the wire is tucked into the hole in the tip and inserted between the matrix and the punch. The long handles of the press pliers are used to squeeze. The tip is deformed, crimping the wire.
In order to correctly select the matrix and punch for the wire, they are usually marked and branded press pliers on the matrix have an engraving for crimping what section of wire the matrix is intended for. The number 95 embossed on the tip means that this matrix is designed for crimping into the tip of a wire with a cross-section of 95 mm2.
Connecting wires with a rivet
It is made using screw connection technology, only a rivet is used instead of a screw. Disadvantages include the impossibility of disassembly and the need for special tools.
The photo shows an example for connecting copper and aluminum conductors. More details about the connection of copper and aluminum conductors are described in the website article “Connection of aluminum wires”. In order to connect the conductors with a rivet, you need to first put an aluminum conductor on the rivet, then a spring washer, then a copper one and a flat washer. Insert a steel rod into the rivet gun and squeeze its handles until it clicks (this cuts off the excess steel rod).
When connecting conductors made of the same metal, there is no need to place a split washer (grower) between them, but put the groover on the rivet first or second to last; the last one must be an ordinary washer.
The process of preparing veins for twisting
Stripping the insulation
To twist the electrical wires, you will need to de-energize the network by turning off the input circuit breaker. Next you will need:
- choose a tool with insulated handles and gloves made of dielectric material;
- remove the insulating coating from the conductors so that the metal part remains intact;
- soak a cloth in any degreaser (white spirit, acetone, nail polish remover) and wipe off the exposed parts;
- Use sandpaper to clean the area of the core so that it acquires a characteristic metallic sheen.
Twisting can begin only after preparation.
Why do you need a junction box?
Electrical wires, starting from the distribution panel, are carried through all rooms of the house or apartment. In each room, these wires are connected either to sockets or to lighting, which operates on the basis of electrical switches as well as lighting fixtures. The wires that are brought into a separate room first of all end up in a distribution box, and then go to their intended purpose - some wires connect sockets, and other wires connect lighting. It is in the distribution box that these wires are connected so that the electrical system works correctly - sockets and lighting must function independently of each other.
Electrical wiring rules
Electrical wires are routed throughout the premises so that they can be easily found in case of emergencies, and for this purpose rules are prescribed, 4 which are included in a separate section called “Rules for Electrical Installations” or abbreviated as “PUE”.
The PUE says that all connections and branches of wires are made in the junction box. The wiring is carried out at a distance of 15 cm from the ceiling level, after which, if it is necessary to make a branch, the wires are lowered at a right angle. At the branch points, distribution boxes are installed in which the wires are connected according to the connection diagram.
Some forms of junction boxes
There are distribution boxes for surface and also for hidden installation of electrical wiring. Hidden installation involves the formation of recesses at installation sites into which distribution boxes are installed so that the covers are flush with the wall. As a rule, distribution boxes are covered with finishing material (for example, covered with wallpaper) so that they do not spoil the appearance of the interior. If you know the wiring diagram, then finding a junction box if something happens is not so difficult. In some cases, which is rare these days, surface mounting is carried out. In this case, distribution boxes, like sockets, like switches, are installed directly on the wall (or on another base).
Distribution boxes are produced either round, which is much more common, or square. There are usually four terminals for connecting wires, but there may be more. The conclusions are made so that it is possible to connect wires placed in corrugated hoses or plastic pipes. This approach allows you to quickly replace wires in case of emergency conditions. Often, electrical wires are routed in grooves - peculiar recesses made in the walls. On the one hand, it’s simple, but on the other hand, if the wires are damaged, replacing them is very difficult. In any case, it is better to do everything as required by the PUE.
The use of distribution boxes allows you to:
- Increase the maintainability of electrical networks. Since all connections are accessible, the nature of the problem can be easily determined and the problem can be quickly resolved.
- Connection locations present the greatest potential for malfunctions. Easy access to connections allows for regular inspection.
- Reduce the level of fire safety, since constant inspection allows for a timely response to emergency operating conditions.
- Reduce the cost of purchasing electrical wires or cables. Electrical wiring made without junction boxes requires a lot of materials.
Options for twisting stranded wires
A stranded wire is a wire with a metal central part in the form of thin wires. The elements are intertwined with each other, forming a lay with external insulation. Manufacturers can coat the wiring with polyurethane and add nylon threads to improve strength. The protection complicates the process of removing the insulating layer.
Twisting of insulated stranded wires is performed in several ways.
Parallel connection
The simplest option is when two stripped wires are laid crosswise, one on top of the other. Only the area without insulation is allowed to twist. Parallel twisting ensures reliable contacts, but does not protect against forceful breaks.
The technology is suitable for copper conductors - one monolithic and one stranded. Aluminum conductors with different cross-sections can also be connected in parallel. In the case of a monolithic wire, you will need to remove more insulation than from a stranded wire.
After twisting, there should be a segment left from which an additional bend is created in the direction of fixation. This technique increases the strength of the connection.
In parallel, you can fix more than 2 wires.
Sequential seam type
You need to fasten the wires together so that each of them overlaps the other:
- the conductors are stripped of the insulating coating;
- the stripped elements are stacked on top of each other;
- twisting begins from the center so that one wire wraps around the second;
- The second contact is screwed in the same way.
Due to minimal reliability, the connection is suitable for two cables.
Bandage twist
The best way to fasten a stranded wire:
- two types of wire are selected - hard for fixing and soft for winding;
- the insulation is removed from the cores so that the length of the exposed areas is the same;
- conductors are laid in parallel;
- to fix the cores together, a third stripped wire is used.
For twisted products, you need to choose more than 2 rigid cables. Winding is organized using a flexible soft wire.
Why is it better to crimp (crimp) wires?
Wire crimping is one of the most reliable and high-quality methods of mechanical connections currently used. With this technology, loops of wires and cables are crimped into a connecting sleeve using press pliers, ensuring tight contact along the entire length.
The sleeve is a hollow tube and can be made independently. For liner sizes up to 120 mm², mechanical pliers are used. For large sections, products with a hydraulic punch are used.
When compressed, the sleeve usually takes the shape of a hexagon; sometimes local indentation is made in certain parts of the tube. In crimping, sleeves made of electrical copper GM and aluminum tubes GA are used. This method allows for crimping conductors made of different metals. This is largely facilitated by the treatment of the constituent components with quartz-vaseline lubricant, which prevents subsequent oxidation. For joint use, there are combined aluminum-copper sleeves or tinned copper sleeves GAM and GML. Wire connections using the crimp method are used for conductor bundles with a total cross-sectional diameter between 10 mm² and 3 cm².
Features of twisting single-core wires
Technique for removing insulation from wiring
To twist single-core wires tightly and correctly, a parallel connection is suitable. When performing work you must:
- remove insulation at an angle of less than 90 degrees;
- act carefully if the cable material is aluminum;
- strip the insulation for the connection to a length of 3-4 cm;
- lay two cables on top of each other 1.5-2 cm above the bare area at an angle of 45 degrees;
- holding the area above the cut with your left hand, begin to twist the veins;
- work so that first there is a twist with insulation, and then a bare section;
- finish the twisting process with pliers for additional density.
The finished twist does not need to be covered with insulation right away. The line should operate for 2-3 hours. After this, you need to turn off the machine at the input and check the temperature of the node. Heating indicates that the fastening is unreliable - it will need to be redone. In the absence of heating, the conductors can be insulated.
TV coaxial cable connection
It is possible to extend or splice a coaxial television cable in three ways: – TV extension, commercially available from 2 to 20 meters – using an adapter TV F socket - F socket; - soldering with a soldering iron.
You can familiarize yourself with step-by-step instructions for connecting a coaxial television cable by visiting a separate article on the site “Connecting a TV cable.”
Connecting tinsel wire by twisting with a single-core or stranded conductor
If it is necessary to give the cord very high flexibility and at the same time greater durability, the wires are made using a special technology. Its essence lies in winding very thin copper ribbons onto a cotton thread. This kind of wire is called tinsel.
The name is borrowed from tailors. Gold tinsel is used to embroider the ceremonial uniforms of high-ranking military officers, coats of arms and much more. Copper tinsel wires are currently used in the production of high-quality products - headphones, landline phones, that is, when the cord is subjected to intense bending during use of the product.
In a cord of tinsel conductors, as a rule, there are several and they are twisted together. It is almost impossible to solder such a conductor. To attach tinsel to the contacts of products, the ends of the conductors are crimped into the terminals with a special tool. To make a reliable and mechanically strong twist connection without tools, you can use the following technology.
The insulation is removed from the 10-15 mm tinsel conductors and the conductors with which it is necessary to connect the tinsel to a length of 20-25 mm with a shift using a knife in the manner described in the site article “Preparing wires for installation.” The tinsel thread is not removed.
Then the wires and the cord are applied to each other, the tinsel is bent along the conductor and the wire core is tightly wound onto the tinsel pressed against the insulation. It is enough to make three to five revolutions. Next, the second conductor is twisted. You will get a fairly strong twist with a shift. Several turns of insulating tape are wound and the twisted connection of the tinsel to a single-core wire is ready. Thanks to shear twisting technology, the connections do not need to be separately insulated. If you have a heat-shrinkable or polyvinyl chloride tube of a suitable diameter, you can put on a piece of it instead of insulating tape.
If you want to get a straight connection, you need to rotate the single-core wire 180° before insulating it. The mechanical strength of the twist will be greater. The connection of two cords with tinsel-type conductors to each other is carried out using the technology described above, only for wrapping, a piece of copper wire with a diameter of about 0.3-0.5 mm is taken and at least 8 turns must be made.
Wire Twisting Tools
Heat shrink tubes for wires
To properly twist the wires together, you will need:
- stationery or kitchen knife;
- nippers or side cutters;
- stripper;
- hydraulic or manual crimping machine;
- soldering iron - for removing insulation;
- heat shrink tube;
- construction hair dryer;
- screwdriver
Instead of a soldering iron, you can use an electric burner.
Method - twisting wiring with protected ends
Expose the wires by at least 5 cm, cross the ends not protected by insulation, clamp the resulting cross with pliers and twist them together using a rotational movement.
Bend the resulting twist so as to direct it parallel to the wire, and insulate everything.
Operating procedure
Stripping wires
A step-by-step twisting algorithm can be considered using the example of weaving a stranded and monocore cord. In this case, it is better to work using the branching technique:
- Stripping the area from the end of the conductors - 3-4 cm long with a stripper or a stationery knife.
- Placing heat shrink on one of the cables.
- Degreasing sections without insulation with a special agent.
- Bend the single-core end 180 degrees to further press the twist.
- Twisting a multi-core cord over a single-core one. It will take 5-6 turns clockwise.
- Using pliers, grasp the bent single-core tip and press it against the joint.
- Place heat shrink in place of the twist and fix it using a hair dryer.
The heat shrink should secure the twist tightly.
How to connect headphone wires
Sometimes the cable near the plug breaks off in working headphones, but there is a plug from faulty headphones. There are also other situations in which it is necessary to connect the wires in the headphones.
To do this you need:
- cut off a broken plug or an unevenly torn cable;
- strip the external insulation by 15–20 mm;
- determine which of the internal wires is common and check the integrity of all conductors;
- cut the internal wiring according to the principle: leave one alone, common by 5 mm and the second by 10 mm. This is done to reduce the thickness of the connection. There can be two common conductors - each earphone has its own. In this case they are twisted together. Sometimes a screen is used as a common conductor;
- strip the ends of the wires. If varnish is used as insulation, it will burn off during the tinning process;
- tin the ends to a length of 5 mm;
- put a piece of heat-shrink tubing on the wire 30 mm longer than the expected length of the connection;
- put pieces of thinner heat-shrinkable tube 10 mm long on the long ends, do not put on the middle (general) ends;
- twist the wires (long with short, and middle with middle);
- solder the twists;
- bend the soldered twists outward to the unprotected edges, slide pieces of thin heat-shrinkable tubing onto them and heat it with a hairdryer or lighter;
- Slide a larger diameter heat-shrinkable tube onto the joint and warm it up.
If everything was done carefully and the color of the tube was matched to the color of the cable, then the connection will be invisible and the headphones will work no worse than new ones.
Connection insulation means
The resulting assembly must be insulated efficiently. For this purpose, three technologies are used.
Insulation tape
Insulating tape Adhesive
backed tape is made from polyester and epoxy film, fiberglass and mica, acetate material and paper. To insulate a household electrical network, tape with PVC film of class P and a rubber adhesive side is suitable. The material has good adhesion, elasticity and density. Closing the twist with electrical tape is carried out step by step:
- Winding begins 2-3 cm above the bare area, on top of the wire insulation.
- The tape is wound at a slight angle towards the end of the twist.
- At the tip, the material is folded around it and wound in the opposite direction.
- After the winding point, the tape is trimmed with a stationery knife or scissors.
A two-layer coating with insulating tape will ensure reliability and maximum tightness of the contact connection.
Electrical tape is suitable for twisting electrical cords located in a dry room.
Heat shrink tube
Heat shrink for wires
Thermal tube is made from special polymers, which compress and expand when blown with hot air or exposed to warm water. Heat-shrinkable material can be placed on top of objects with complex terrain. When working with twisted wires, the products provide high-quality insulation and protect against ruptures.
The isolation process is carried out as follows:
- A piece is cut from the tube, 1 cm larger than the bare area.
- The piece is put on 1 wire before the seam begins.
- The cable is twisted.
- After twisting the wires, the thermotube is pulled into place where it was twisted.
- Use a hair dryer or lighter to heat the tube at a distance of 1-2 cm. Under the heat jet it will shrink and press tightly to the area.
Conductors insulated with a thermal tube, according to GOST, can be laid in a bathroom, immersed in soil or water.
Construction Insulating Clamp
When organizing home or apartment wiring, it is advisable to use special PPE caps. The products are put into place for insulation after twisting. The tip of the cap is cut off, and the PPE itself is forced onto the wire. Special springs on the surface will expand and tightly grasp the connection. For added strength, you can turn the cap clockwise.
When using PPE, the twisted section does not need to be soldered.
Terminal blocks are the most ergonomic electrical installation products
The PUE rules, clause 2.1.21 provide for the type of connections using clamps (screws, bolts). There is a connection directly using hanging fasteners, when a screw and washer are threaded through the loops of each wire and secured with a nut on the reverse side.
This installation is wrapped with several turns of electrical tape and is considered quite practical and reliable. Electrical installation products called screw terminal blocks are more ergonomic. They represent a contact group housed in a housing made of insulating material (plastic, porcelain). The most common way to connect wires using terminal blocks is in junction boxes and electrical panels. To connect the wire, you need to insert it into the socket and tighten the screw; the clamping bar will securely fasten the wire to the seat. Another connecting wire is connected to the mating socket, short-circuited with the first one.
In self-clamping terminal blocks of the WAGO type, the wire is snapped into the socket; for better contact, a special paste or gel is used.
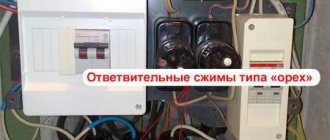
Branch clamps are a permanent version of a screw terminal block with several short-circuited taps; they are used mainly outdoors and in places with unfavorable environmental conditions.
The connecting clamps are an insulating cap with a thread inside; it is screwed onto the twist, simultaneously compressing and protecting from mechanical stress.
Recommendations from professionals
Experienced electricians give some tips on how to apply twisting and consider all the risks of such a connection.
PUE allows
Use of soldering
Standards cannot completely prohibit twisting. It can be used in combination with technologies:
- welding: twisted wires are additionally soldered to ensure continuous contact;
- Soldering: Solders cannot impart mechanical strength to a joint. For this reason, the wires are twisted, soldered, insulated and placed in a junction box.
For additional density of twisted cores, use screw terminal blocks.
Connecting conductors from different materials
The result of connecting copper with aluminum
It is prohibited to combine copper and aluminum into one twist. A galvanic couple arises between them, which undergoes electrolysis under the influence of moisture and chemical processes. The resistance of damaged contacts increases and then disappears. As a result, the seam heats up and burns.
The difference in the coefficients of thermal expansion of the material will lead to weakening of the seam after cooling. Resistance begins to grow more intense.
The appearance of an oxide film
Aluminum is a material on the surface of which an oxide film always appears. It increases cable protection, but at the same time the contact resistance increases. To eliminate it, the cores are coated with quartz-vasilin paste or special terminal blocks with this filler are purchased.
Twisting, as a type of connection of conductive wires, can only be used as a temporary measure. Under constant operating conditions, the seam can lead to fires in the wiring and fire hazard situations.
A quick connection with big consequences
We often don’t think about the consequences of such a “simplification”. Meanwhile, an unreliable contact will fail at the most inopportune moment; the power supply to consumers/power receivers can always be cut off. Voltage “surges” cause breakdown of the elements of the power cascades of complex SBT household appliances. Even special protection devices used in the most “sophisticated” models of foreign manufacturers cannot save you from breakdown.
The induction of short electromagnetic pulses with a voltage of several thousand volts onto the electronic filling causes “harmless” sparking at the joints. At the same time, the standard protection equipment with which apartments are now equipped (RCDs, circuit breakers, fuses) do not “see” such short low-current pulses, so they simply do not trigger them, and we do not accept installing special devices for this. Uninterruptible power supplies for computers also did not become a panacea for transient impulses. The occurrence of “poke” causes malfunctions in the operation of electronic equipment and computer equipment, leading to failure of electrical components and expensive functional modules. Overheating at the site of a poor connection leads to even more catastrophic consequences; when current passes, the weakened connecting node becomes red-hot. This often causes fires and fires, causing enormous damage to the owners of the premises. Statistics show that 90% of all electrical wiring faults occur due to twists and poor contact connections of conductors. In turn, the very malfunction of electrical wiring and equipment, according to the Ministry of Emergency Situations, is the cause of one third of the fires that occur in Russia.
However, it so happened historically that several decades ago, in conditions of a shortage of electrical accessories/copper conductors, twisting aluminum wires was considered the main method used in electrical installation work. Twisting as a connection can be used in electrical engineering when carrying out repair and restoration work.
detailed instructions
First, let's consider the simplest option, when it is necessary to connect two single-core conductors of the same metal (for example, copper).
The technology looks like this:
- We carefully strip both cores of insulation to about 4-5 cm. You can also use a special one for this.
- We wipe the exposed contacts with a rag soaked in acetone (degrease).
- Using sandpaper, sand the ends to a metallic color.
- We cross the conductors with each other and carefully wind one of the wires onto the other using pliers. The number of turns must be made at least five.
- We wind the second one using a similar method, 5-7 turns.
- We insulate the finished twist using electrical tape. It is also recommended to use a heat-shrinkable tube - cambric, which reliably protects the exposed area from the external environment.
As you can see, there is nothing complicated. The peculiarity is that it is necessary to expose the veins by at least 5 cm and twist them with pliers so that there is continuous and reliable contact.
I would also like to give a couple of tips about a more complex situation when it is necessary to twist single-core and stranded wire. In this case, first repeat points “1” and “2” from the instructions provided above. Next, you need to cross the products and carefully wind the stranded wire around the middle of the single-core wire (at a distance of 2.5 cm from the end). When all the turns are wound, the free end of the single-core conductor must be bent with pliers towards the turns, as shown in the photo below. After this, the connection is insulated and placed in the junction box. By the way, in the same way you can make a good twist of two stranded wires.
You should draw your attention to the fact that twisting aluminum and copper is highly not recommended by experienced electricians, not to mention GOST standards. This is due to the different resistance of metals, as well as the fact that during interaction, copper and aluminum oxidize, which significantly worsens the electrical contact. Another disadvantage is that twisting of different metals (according to physical properties) will occur: hard and soft, which also worsens the contact.
These are the diagrams you can use when twisting wires with your own hands:
Stranded copper wires - bonding idea
An interesting device will allow you to quickly fasten:
An interesting tool for an electrician
To make wire twisting reliable, durable and safe, which is most important, we recommend that you consider the following recommendations:
It is important to note that none of the above options makes the twist waterproof, so if you decide to fasten the conductors under the plaster in the wall, without a box, be sure to insulate the connector with cambrics.
That's all you need to know about how to properly twist wires with your own hands. We strongly recommend that you use more modern methods, and use twisting only when installing temporary electrical wiring! Do not twist under tension under any circumstances, because Today there is no such safe method. Any electrical installation work must be done with the lights turned off!
Materials
Let us remind you that twisting wires when connecting two sections of an electrical network is an operation prohibited by the PUE. But, as practice shows, twists are the same as they were done, and it is no longer possible to do anything about it. They are used by both ordinary people and experienced electricians. Of course, we cannot say that even the best twist is the most reliable contact, but we will assume that this type of connection will be like the first stage in the soldering or welding process. So, our task is to consider the question of how to twist wires correctly.
There are several types of wire twists that guarantee high quality contact. And if this type of connection is carried out “just how,” then there is a high probability that the so-called transient contact voltage will begin to form at the connection point. There are two reasons for this:
- at the points of contact of two wires, the contact area decreases due to the formation of bulges in the wires themselves during their twisting;
- An oxide film will begin to form on the bare wires, which will act as an insurmountable barrier to the passage of electric current.
It should be added that all metals except noble metals have an oxide film. That is why very often contacts in electrical and radio electronics are most often made of silver.
It is clear that contact resistance causes the connection of the two wires to begin to heat up. And this again leads to increased resistance. In this case, the heat inside the insulation is practically not removed, which leads to an increase in the temperature of both the wires and the twist. This process, like a geometric progression, increases like an avalanche. So it's not far from a fire, which is usually diagnosed as a "fault in the electrical wiring."
But the most interesting thing is that no protective devices react to this. This refers to circuit breakers and various fuses. But the whole point is that these devices react to an increase in load, which in this situation is not present in the network. The current strength is still the same without changes, the bad contact just heats up.
From all of the above, we can conclude that a well-made twist is necessary only for one single purpose - not to change the value of the transient contact resistance. This indicator should remain stable.
Before moving on to analyzing the position of how to twist wires correctly, you need to prepare the wires themselves.
- First, the insulation is removed from the cores.
- If the metal conductor is dirty, it must be cleaned with a clean cloth soaked in solvent or white spirit.
- After which the bare wire itself must be cleaned to a metallic shine. This can be done with sandpaper or a wire brush.
After which you can start twisting, for which you need to use pliers.
The simplest twist is winding one wire onto another. To do this, bend one end at an angle of 90º, approximately at a distance from the edge of the insulation equal to 7-10 core diameters. Then, using pliers, make 5-8 turns around the core to be connected. In this case, the coils are compacted by pressing the tool (you don’t need to press very hard). The end of the second wire must be bent in the opposite direction and screwed in the same way, followed by clamping with pliers.
In order not to deal with each species separately, we offer a drawing where these types are already shown.
As mentioned above, this is the first stage of connecting two electrical sections. After which the connection can be soldered or boiled. Many people don’t do this, but soldering or welding is the key to a high-quality joint. Although it should be noted that both of these processes are serious things. Not everyone can do this with their own hands. Therefore, most often, insulating PPE caps are put on the twist.
PPE caps are a kind of insulation that is selected according to the twist section. They also create a slight pressure that presses two elements against each other inside the twisted wires. In addition, PPE caps are selected by color, indicating phase, neutral and grounding circuits according to the PUE, which makes it easy to recognize loops in a bundle of cables laid according to the building diagram. They isolate each area.
We will not prove to you that twisting wires is a good connection method. Yes, it can be done well and insulated. It is also perfect as a temporary option. But according to the rules of electrical installations (PUE) in order to connect a wire or cable, ordinary twists are not recommended. Nevertheless, we will talk about it, and in very detail. Firstly, because, contrary to the PUE, most connections are made using this ancient “old-fashioned” method. Secondly, because correct twisting is the main stage of the most reliable methods of connecting wires - welding and soldering.
Twisting method with winding
Strip the wires at the ends and bend them slightly in the middle, hooking the wires together at the bend. Next, alternately wrap the ends of one wire around the other.
To fix the windings and make the connection more reliable, use pliers, tighten everything and carefully insulate it.
It is important to know and apply, but why?
Electric current is a source of increased danger. Neglecting the rules for installing an electrical network can lead to the following consequences:
- electric shock;
- poisoning from toxic smoke from burning insulation;
- fire.
Poor quality twisting is one of the reasons for such consequences. In places of poor connection, the passing current experiences increased resistance. The resulting thermal energy does not have time to dissipate and excessive heating occurs. As the load increases in this section of the circuit, the resistance increases even more and a short circuit occurs.
Twisted connections made in accordance with the rules guarantee safe operation of the network. At the point of contact, resistance will not increase; current will flow through the conductor. Connected electrical wires can be hidden in a box or under plaster. There will be no consequences if you follow the twisting instructions.
Basic methods
Wires made of the same metal, for example copper wires, can be twisted together directly. The most common are the following:
- simple twist;
- bandage;
- twisting with a groove.
The simple correct twisting of electrical wires is known to every electrician who has once connected them with his own hands. For two cores with a cross section of more than 4 square meters. mm. you need a bandage method, in which you tie it with a third wire. Trough twisting is a method of connecting aluminum wires when the ends are bent with a hook, re-hooked and wrapped.
When connecting copper and aluminum, which have different resistances, an additional conductor is required. This could be a brass tube, a connector block, or a slip-on terminal. Threaded connections are also used with the obligatory use of additional slotted washers. In such connections, it is necessary to increase the contact area, which is achieved by flattening the cores and reducing the resistance of the passing current.
Soldering iron to help
In addition to twisting, soldering is used at the joints. This method is used in places of high humidity, where the requirements for resistance of wires to oxidation are most important. The pre-made twist is melted with rosin, after which solder is applied to it. At the same time, the power of a regular household soldering iron is sufficient; it is important to prevent the formation of sharp burrs on the solder. After drying, they are removed with a file, because there is a risk of damage to the insulation.
The use of solder helps to connect thin stranded wires that are twisted together. The contact surface after processing with a soldering iron increases, therefore, the contact area of the connections becomes larger. It is worth considering that the load on the connected wires, regardless of the use of soldering, is calculated based on the cross-section of the smallest of them.