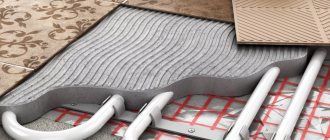
The main criterion for choosing a mat rather than a heating cable as a heated floor is the condition of pouring the screed. That is, the level of raising the floor above the heating element.
If your conditions allow it to be raised by 10-15mm, then you can successfully install a heating cable. If the level of floor elevation is minimal, literally a few millimeters, then your choice should only look towards the mat.
Moreover, if you choose it with a single-core cable, then the thickness of the entire heating surface can generally be no more than 2.5 mm.
Here a lot will depend on which manufacturer you choose - Devi, Electrolux, Ensto, Rehau or some others.
You can view the current prices for various brands of heated floors and their components here.
Preparatory work
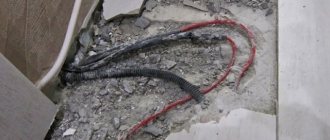
But before installation and connection, it is necessary to carry out preparatory construction work. First, groove the walls to lay the power cable from the panel to the distribution box in which the thermostat will be mounted.
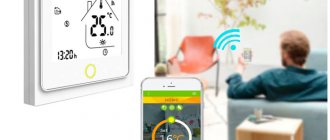
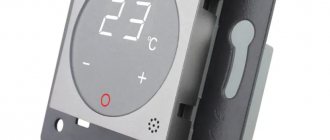
If a heated floor is installed in a bathroom or toilet, according to the rules, the thermostat should be located in an adjacent room where there is no moisture or dampness. The installation height of the regulator is not lower than 30cm from the floor level.
After that, groove the wall down from the electrical box, and drill a through hole into the bathroom. The cold end and a temperature sensor for connection to the thermostat will be placed through it.
Keep in mind that if you have made the sand screed very recently, it will need to be allowed to sit and set for 72 hours.
Only after 3 days can you begin installing the heating mat.
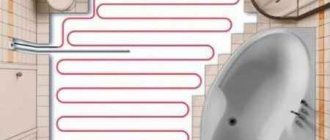
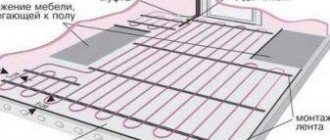
Using markers (chalk, pencil, colored tape) mark the areas where the heating mat will not be installed. Such areas include places where the bathtub, toilet, various cabinets, washing machine, etc. will be located.
In addition, it is necessary to take into account the distances from the walls (minimum 5cm) and heating pipes or radiators (20cm). There will also be no heated floor in these places.
Before direct installation, determine the serviceability and integrity of all elements and the heating cable. To do this, you need to measure its resistance using a multimeter. Look at the Ohm ratings on the packaging or label. It is usually attached to the cold end.
The measured resistance should match, or at least not differ much (up to 10%), from the data indicated there.
However, remember that with the tester, you are actually checking the integrity of the heating core, but not the insulation resistance. Most electricians consider this to be the most important parameter, on the basis of which they can give a confident guarantee of the performance of heated floors.
It often happens that the multimeter shows “everything is fine”, but for some reason the automatic switch in the control panel is knocked out. This indicates poor insulation and the presence of leakage current. To measure insulation resistance, you must use a megger with a voltage of at least 500 Volts.
The insulation is connected between the 220V working conductors and the grounding conductor (if there is one) or shielding braid. The readings for a new cable, as electricians say, should “tend to infinity” or be the maximum possible for the measuring device.
Independent choice of heating cable: self-regulating and other options
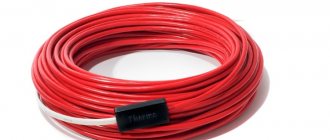
The right choice depends on the specific tasks. Domestic pipelines - sewerage, drains and drinking water sources do not require impressive systems. A completely reasonable solution would be to purchase a wire with a power of 50–60 W/m. The parameter is given with a margin. Buying a heating cable for a water supply with large values means overpaying for the consumption of unnecessary electricity. The indicated numbers are stamped on the cable insulation; it is difficult to get confused and buy a product that does not correspond to the parameters.
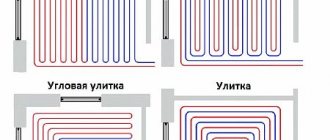
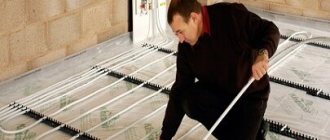
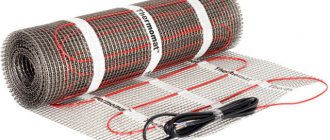
Laying the heating mat mesh
It is necessary to begin the installation of the grid from the point where the cable exits to the thermostat box. Unroll the roll and lay it out on the surface. In this case, it is necessary to bypass the areas previously marked with marker tape.
During installation, you can walk on the heated floor (via wires) if you have shoes with soft soles. Some even press the mesh to the base of the screed in this way, but you shouldn’t overdo it.
When unwinding the roll, it is advisable to hide the end section of the cable inside so that during installation it does not twist or touch foreign objects.
In the place where it is necessary to rotate the heating element, a section is cut.
However, do not try to cut the heating cable itself.
It is enough to free it from the net. Glue the tail that turns out when turning to the floor with aluminum tape. In addition to fastening, it also helps distribute heat over this area of the surface.
If you have a sectional resistive mat, where there are independent sections connected from the power cable running along the edges, then when turning, you can cut one of the outer wires.
But not the heating element! Don't even think about cutting it.
After installation, it is necessary to connect these cut strands. To do this, you will need a copper installation wire PuGV with a cross-section of 1.5 mm2.
Measure the required length and trim the ends. After which, you thread heat shrink through them. The PuGV core and the outermost supply core of the mat are connected to each other using a pressed GSI sleeve.
Select the sleeve according to the cross-section of the wires.
Next, move the heat shrink to the crimping area and heat it, reliably insulating this area.
After which, do the same with the second end.
In this way, single-core power wires on mats are connected to independent sections.
What does the starting current depend on?
- Turn-on temperatures. The lower the ambient temperature at which the heating system turns on, the higher the starting current and the greater the starting power.
- Heating cable lengths. The longer the section, the greater the CT of the system. For a resistive cable, it is determined by the internal resistivity Ohm/m of the heating core and is calculated and controlled during the manufacture of the section at the factory. A self-regulating heating cable can be roughly represented as a set of parallel resistors (resistances) connected to one power source. The resistance will decrease as the line length increases, and the inrush current will accordingly increase.
Excess or lack of mat length
If you do not have enough grid centimeters to reach the end of the mark, then you can proceed as follows. On most mats, it is painless for them to cut the base mesh and, by sliding it apart through one loop, increase the total length of all sections.
And if there is excess left, is it possible to cut off the unnecessary piece?
This cannot be done, as you will thereby violate the running capacity of the heated floor per square meter.
As a result, the temperature on the elements will be higher than the calculated one and the mat will overheat. Which will ultimately lead to its failure.
What to do if there is a surplus? The simplest option is to place extra centimeters of mesh in those areas where it was not originally planned to lay them (for example, under cabinets).
However, it is still not recommended to install sections under the bathtub or washing machine itself. This will significantly reduce the service life of both the heated floor and household appliances. If there is a large surplus, they can be mounted on the wall.
The second option is to partially or completely remove the cable from the base of the mesh and reposition it yourself with a smaller step than the factory one. Or make additional bends in several places.
What is a self-regulating heated floor?
In a warm field with a self-regulating function, the cable is similar to a simple insulated two-core wire, in which two parallel conductors are closed in a circuit. It is equipped with tires that help distribute tension along the entire length.
The design features of the floor protect it from overheating. And the presence of a conductive matrix makes it possible to cut the cable so that there are no cold zones.
In cases of overheating of the matrix, the number of conducting connections is reduced, thereby cutting off the flow of electricity. When the floor cools down, the supply is resumed.
The peculiarity of a self-regulating floor is that it can regulate the power supply itself, based on the degree of heating.
Find out how to call or repair electric heated floors yourself.
Connecting the cable to the thermostat
After laying all sections, the supply conductors at the very end of the mat should be plugged and insulated. It all depends on your cable.
For example, if you have a two-core one, which at the beginning has one cold end and an end coupling, then the conductors in it are connected to each other at the very end.
And if there is a single-core heating mat that has two cold ends on each side, then both of these ends must be brought in and connected to the thermostat.
The third option is independent sections connected from power wires laid along the edges of the mesh. Here you need to insulate each end separately with a thermotube, without connecting them to each other.
Next, proceed to connect the cold end of the heating mat to the thermostat. To do this, take a copper power cable KGVVng. Measure and lay it in the next room to the place where the thermostat is installed.
Then connect it to the power wires. To do this, strip the wires, put on heat shrink and connect the ends using a connecting sleeve.
After crimping, slide the heat shrink and heat it with a hair dryer.
It is recommended that the cold end connection sleeve be placed in close proximity to the end coupling. That is, the place where the heating cable ends.
If any problems arise, and they most often occur at the joints, you will only need to open one tile and will not have to dismantle a couple of square meters at different ends of the room.
The service life of the heating cable itself is more than 50 years, so all accidents and problems arise precisely at these sleeve connection points.
The other side of the cable, which comes out of the installation box, is stripped, and the stranded cores are crimped with NShVI lugs. At the same time, in order not to confuse the wires, it is better to mark them.
- phase conductor - Ltp
- zero core (blue) - Ntp
Introduction
Currently, industrial electric heating systems have become widespread for heating process facilities in the oil and gas industry. Many specialists of various specialties are involved in the implementation and subsequent operation of these systems, but this issue is not sufficiently covered in the technical literature, to put it mildly.
In this article we will not try to cover all types of heating elements used to build electric heating systems, but will focus on the features of the use of self-regulating heating cables (tapes), as the most rapidly developing and currently popular sources of thermal energy. All available information about self-regulating heating cables is often obtained by specialists from design and operating organizations only from manufacturers of this type of cable, who unanimously say: “Our products are of excellent quality and are practically free of drawbacks, with the possible exception of a slightly high cost in relation to other types of heating elements! Let's try to figure out whether this is really so, and what disadvantages are inherent in self-regulating heating cables.
Considering the importance of the operation of electrical heating systems of industrial facilities in the overall infrastructure of the enterprise, the question of understanding the main technical features of the use and operation of self-regulating heating cables will allow responsible operation specialists and design organizations:
- As a result of design and construction, obtain a technically sound, safe and uninterruptedly operating electric heating system.
- Reduce the cost of purchasing cables and auxiliary products.
- Reduce costs for subsequent operation of the system.
- Reduce energy costs as part of the facility's energy conservation program.
Temperature sensor installation
Lay and secure a corrugated pipe in the groove from the box to the heating mat section. Select the diameter according to the size of the sensor.
The bending radius of the tube near the wall must be at least 5cm.
Pass the temperature sensor itself with wires through it. In this case, certain distances must be maintained:
- there must be at least 0.5-1 meter between the sensor and the wall
- the sensor itself should be located exactly in the middle between the turns of the heating elements
The pitch between the turns in the mats is maintained within strictly specified parameters (most often 7.5-8 cm). Due to this spread, the so-called “thermal zebra” under the tile is compensated.
That is, the heat is completely and evenly distributed over the surface of the tile, and with your bare feet you will never feel temperature dips between the cable lines and the empty space where there is none.
The cores from the temperature sensor are also stripped and crimped with tips. For the convenience of their further connection, mark them - DT.
To prevent the mortar from going into the corrugated tube, a plug is installed at its end. If it is not included in the kit, you can get by with electrical tape.
Sometimes a special brass tip is included. Many people have no idea what it is for. And it is precisely intended for installing the sensor head inside it.
After completing all the above work, be sure to measure the resistance again. What if you broke or shorted something during the installation process?
Price
SELF-REGULATING HEATING CABLE SM-2CR (80 W) – the element is used primarily in various anti-icing systems. Can be used for heating roads, sidewalks, roofs of houses and various communications that are critical to low temperatures. Price – 600 rub/meter.
SELF-REGULATING HEATING CABLE SRM/TGS-2CR (40 W) – this element is ideal for protecting household pipes from freezing. The element has high reliability and economical energy consumption. Price – 400 rub/meter.
SELF-REGULATING HEATING CABLE SRL/GWS-2 (16 W) – the element consumes a minimal amount of electricity and is used to heat water and sewer pipes, which allows them to be laid at a depth above ground freezing. Price – 200 rubles.
Areas of use
Heating cables are used for various needs:
- in construction - for heating the concrete solution;
- in industry - for the purpose of heating tanks with diesel fuel and chemical liquids;
- in everyday life - to prevent icing of roofs, stairs, paths.
It is possible to install it inside greenhouses - this way you can maintain a constant positive soil temperature. Pipelines are also often wrapped with heating wires, especially those parts that run outdoors - a little heating reduces heat loss.
Requirements for floor coverings when using heated electric floors
When designing an electric floor heating system, it is often forgotten that not all coatings can work with it. And this issue must be treated with the utmost care and seriousness. Which coatings are contraindicated for using heated electric floors:
- Linoleum on a rubber or felt basis.
- Thick or rubber-backed carpets.
- Plank floor more than 25 mm thick.
When choosing linoleum, laminate, parquet boards or carpet, you should definitely ask whether these coatings can work with a heated floor system. Leading manufacturers always indicate this on the labeling and in the accompanying documentation.
These icons indicate floor coverings that can work with heated floors.
To control the heating of wooden floors, as well as thin floors, it is recommended to use thermostats with two sensors: floor surface temperature and room air temperature. If the thermal resistance of the RT flooring is known, which can be indicated in the documentation, then it is better to follow the following rules:
- With a power density of 150 W/m2, the maximum thermal resistance (RTmax) can be up to 0.13 m2*K/W.
- At Pud=125 W/m2 – RTmax no more than 0.16 m2*K/W.
- At Pud=100 W/m2 – RTmax no more than 0.18 m2*K/W.
If multi-layer coatings are used in the floor construction, for example, laminate with a backing, then their thermal resistances are added up and compliance with the above conditions is checked.