A heating element is a water heating device in a washing machine. Under the influence of various factors, it may stop functioning. To extend the life of the device, you need to know how to check the heating element on a washing machine and troubleshoot problems in a timely manner.
Where is
Find out the location of the machine's heating device from the instructions. Depending on the model, it may be located in different places on the device. If the instructions for the car have not been preserved, you can find the element at home yourself:
- The device must be placed on its side. The required element may be at the bottom.
- The location of the heating element is indicated by the large dimensions of the rear panel. To ensure that the device is located at the back of the appliance, the panel can be removed.
- The search for the heating element is also carried out through the drum. To make searching easier, you can use a flashlight.
Calculation of indicators
Before checking the TEN, you need to know very clearly how to ring it and what data is considered correct.
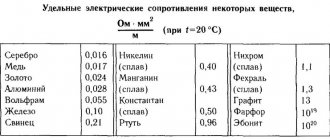
To calculate resistance, you need to rely on:
- U is the voltage supplied to the heating element. In our household electrical networks, it is usually 220V.
- P – water heater power. You can find out this parameter by referring to the manual. If the manual doesn't say so, Google it and find your SM model.
Next, using a simple formula, as in a physics lesson in 7th grade, we calculate the resistance in Ohms:
R= U²/P.
If the resulting figure is displayed on the tester screen during testing, then the heating element is working.
So that you do not make mistakes in calculations using this formula, we will give a practical example.
Let's say the heater power is 1800 W. We substitute the values into the formula and get:
R=220²/1800=26.8 Ohm. As a result, the working heating element should show 26.8 Ohms. Remember this mark and you can start checking.
Why does the breakdown occur?
One of the most common causes of heater failure is scale, which occurs due to constant contact with water. The scale layer gradually turns into a heat insulator, preventing heat transfer. If the deposit is not removed in a timely manner, it will destroy the top layer of the heating device, leaving the electric coil exposed.
As a result, the machine will spend more time washing, which leads to increased energy consumption. Stains may appear on the laundry that were not there before washing. The device becomes dangerous for further use due to an increased likelihood of a short circuit.
To avoid damage, it is necessary to check the heating element. The electric heater should be periodically wiped with special descaling agents. It is advisable to control the chemical composition of the water. The greatest danger to the heater is calcium bicarbonate.
Features of gas connections
When connecting gas stoves, water heaters and other types of equipment, flexible hoses are also used. Unlike water models, they are yellow and are not tested for environmental safety. For fixation, end steel or aluminum reinforcement is used. There are the following types of devices for connecting gas appliances:
- PVC hoses reinforced with polyester thread;
- made of synthetic rubber with stainless steel braid;
- bellows, made in the form of a corrugated stainless steel tube.
The Santekhkomplekt holding offers engineering equipment, fittings, plumbing fixtures and devices for connecting them to communications. The assortment is represented by products and materials from well-known foreign and domestic manufacturers. Discounts apply for bulk purchases, and product quality is confirmed by standard certificates. For information support and assistance, each client is assigned a personal manager. The ability to arrange delivery within Moscow and to other regions of the Russian Federation allows you to quickly receive the purchased goods without unnecessary hassle.
How to check the heating element of a washing machine without a device
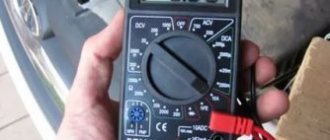
To check the functionality of the water heating element, it is not necessary to remove it. Experts use a tester called a multimeter.
However, if it is impossible to check the heating element of a washing machine with a multimeter, you need to monitor the operation of the device. The machine does not work properly if:
- It takes longer to heat up the water. The speed of the washing process in such cases is reduced.
- Damage appeared on the housing above the heating device. Damage includes darkening, swelling, and cracks.
- After washing, the laundry is cold to the touch. This means that the items were washed in cold water.
- During washing, a short circuit occurs and the running machine generates electric shock.
- A message appeared on the display stating that the water does not warm up during operation. If there is no display, special lights will indicate the malfunction. Washing will proceed as usual.
- The machine does not run the installed programs.
- The door of the operating appliance does not heat up.
- Washed items have a specific smell, but the dirt does not come off.
To find out when diagnostics of the heating element is needed, you need to run the device at full power and pay attention to the operation of the meter. If the rotation of the disk has increased, the element being tested should be considered operational.
Step
- How to ring the heating element correctly^
- take a multimeter;
- disconnect the heating element from the electrical circuit;
- remove the wires that go to the heating element;
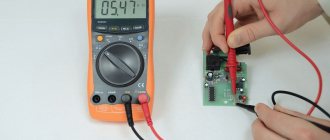
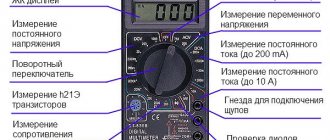
- set the multimeter to a mode in which you can measure the resistance in Ohms;
- Now we connect the multimeter to the terminals and measure.
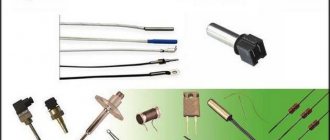
Operating principle of the heating element. =»ltr»>
The heating element looks like a curved tube. Inside this tube is a spring (usually a conductive nichrome thread) that heats up when a current is applied to it. This tube also contains a special material that is capable of transferring heat from the spring to the walls of the tube. Over time, the heater coil wears out and may burn out. The thermally conductive insulating layer around the coil may crack. All this leads to failure of the heating element. If you often use a washing machine, it would be a good idea to pay attention to the performance of this part.
When the water in the machine stops heating or there are suspicions based on other signs that the heating element is out of order, check whether this is actually the case.
How to call
You can check the serviceability of the electric heater by ringing it with a tester.
Before testing the heating element, the element must be heated by turning on the machine for 15-20 seconds.
Then you need to disconnect it from the network and disconnect the wiring. The multimeter switch is set to 200 ohms. The probes of the device are applied to the terminals of the device. Possible tester indicators:
- Zero or close to zero. The heater is not suitable for further use due to a short circuit.
- Unit. The heating element needs to be replaced.
- Value close to the calculated indicator. The device is ready for use.
Checking the heating element using a multimeter - step-by-step instructions
A tubular electric heater is an effective means of heating. But its malfunction is a common problem. It is especially common to buy a new heating element for a boiler.
When a household appliance breaks down, it is important to make sure that this part is the source of the breakdown.
Multimeter and heating element - how to check
Any heating element can fail. But most often, malfunctions occur with tubular electric heaters that are exposed to water from the water supply. Checking the heating element using a multimeter includes the following steps:
Visual inspection - external assessment of the condition of the part is important. In some cases, visual signs indicate that the heating element is faulty. To inspect the element, you need to turn off the device, disassemble the equipment body and remove the heater.
Before making a conclusion based on external signs, clean the surface of the heating element.
- We determine the resistance value - if external signs indicate that the part is in good condition, then before checking it is necessary to calculate its resistance. To do this, take the network voltage (squared) and divide it by the power of the heating element (the value is indicated in the product data sheet): R=U2/P.
- We check the resistance - in the multimeter we select the mode for checking the resistance and touch the contact terminals. A normal working heating element has a resistance value above 20 Ohms. If the device shows “0” (short circuit), then the heating element needs to be changed. Sometimes it happens that during the testing process a network break occurs - then the multimeter shows the value “1” or tends to infinity.
Breakdown - this test is carried out in buzzer mode. One probe goes to the contact terminal, the second one goes to the body of the heating element. If there is no sound signal (squeak), then the heating element is working.
A multimeter is a multifunctional device that any of us can use. Without this measuring device, unfortunately, it is impossible to reliably state that the tubular electric heater is faulty. Then is it necessary, for example, to look through the catalog of heating elements for washing machines?
Basic knowledge and a multimeter will help you quickly and easily test any tubular electric heater.
How to change
Repair of household appliances and replacement of non-functional elements should be entrusted to a specialist. When carrying out repair work yourself, you must be careful. To replace the electric heater, the owner of the device should:
- Buy heating element. You need to choose a device that suits the brand of car.
- Disconnect the wires. To avoid mixing up the wires when installing a new element, you should first photograph the fastenings of the old heating element.
- Unscrew the nut located in the middle part of the heating device.
- Disconnect the heater. This must be done by prying up the heating element with a screwdriver, swinging the device from one side to the other.
- Clean the elements adjacent to the electric heater from scale.
- Attach a new heating element using photographs taken in advance.
- Attach the wires.
After this, you need to start the device to check the functioning of the new heater. If the newly attached device comes into contact with the drum, the element is not installed correctly.
Procedure for replacing an electric heater
Having made sure that the heating element does not work, they begin to dismantle it. During the disassembly process, it is recommended to photograph the main stages - this will make it easier to return the new heater to its original place. The procedure for replacing a burnt heating element is as follows:
- Unscrew the fastening nut - it is located in the center of the block and attracts the grounding wire.
- Press the released bolt inward, which passes through the rubber plug and rests its head against the pressure plate. In a compressed state, this design ensures the tightness of the tank at the point where the heating element enters it. When the bolt is released, the plug returns to its original shape, coinciding with the contour of the seat.
- Use a knife or screwdriver to carefully pry up the heating element so as not to damage the tank. Remove the heating element to replace it with a new one. Limescale deposits and rust complicate dismantling - you need to pull out the tubular structure one by one from each side, moving a fraction of a millimeter.
- Installing a new heating element is not difficult: the rubber retainer of the heater easily fits into the socket, where it is clamped with a fastening nut. Excessive force is inappropriate here - you cannot squeeze the sealant or break the thread.
Do you turn off the water tap after washing?
Oh yes! No.
Upon completion of the heater change, the CMA tank is checked for water leakage through the installation socket. After this, the power wires and grounding are connected. The previously removed panel is installed in its original place, the machine is connected to the electrical network and other communications, and a test run of the washing mode is performed.
You should not delay checking the serviceability of the water heater: a breakdown can develop into a major accident, which will entail the need for expensive repairs. Self-diagnosis is available to many home craftsmen, and the information provided here will help you replace a faulty heating element.
Checking the water heater safety valve
The safety valve is an important part in the operation of the water heater.
What kind of lighting do you prefer?
Built-in Chandelier
You can check the operation of the safety valve as follows:
- First you need to turn on the water heater and make sure that the hot water supply tap is not open until the water is heated to its maximum. If the valve is working properly, excess water should begin to drip through it.
- If water does not drip from the valve, then most likely it is faulty and will have to be replaced.
Do not proceed with replacement without checking the hot water tap. It should not leak, since excess water can leak through it, and therefore the valve will not work.
The valve may not work if the thermostat is installed incorrectly, namely for incomplete heating of the water, and also if water is drawn from the water heater, which reduces the pressure in it.
Checking the heating element, thermostat, ouzo, water heater safety valve for serviceability
It is necessary to know the resistance value in order to compare the results obtained during testing with it.
Expert opinion
Viktor Pavlovich Strebizh, lighting and electrical expert
Any questions ask me, I will help!
After removing it, turn on the resistance measurement mode in Ohms on the tester, set the selector to 200 Ohms and connect the ends of the tester to the terminals of the water heating element. If there is something you don’t understand, write to me!
Checking the water heater thermostat
- Then you need to set the maximum temperature and measure the resistance at the thermostat output and input contacts. The thermostat is broken and malfunctioning if the system does not respond at all.
- If the thermostat is working and the system has responded, then the regulator flag must be set to the lowest value and the tester contacts must be connected to the boiler contacts.
- Finally, you need to heat the tubular element of the thermostat using a lighter. If the system turns out to be working, the resistance indicator will increase greatly.
To check the thermostat you will need a multimeter, which was used in the first case; it is very functional.