PUE clearly speak about the need to use grounding - this allows you to obtain the maximum degree of protection from electric shock and simply improve the quality of operation of sensitive electrical equipment. There are several ways to connect a grounded outlet, and which one to use depends on the initial presence or absence of a grounding wire in the network.
How does grounding protect an outlet?
fire due to short circuit
The most unpleasant thing that can happen to electrical wiring is a short circuit - contact between the neutral and phase conductors. At this moment, the current strength increases abruptly and if a person touches a part of the device that is not a dielectric, then the probability of receiving an electric shock of increased power is very high.
If there is grounding in the outlet, this means that the outer parts of the electrical appliance capable of conducting electric current are directly connected to the ground - in fact, a conductor of unlimited capacity. Since it is more convenient for electric current to run along the grounding wire (its resistance is an order of magnitude lower than that of human skin), in the event of a short circuit it will go exactly there. If the electrical wiring is done correctly - there are circuit breakers and RCDs in the circuit, then when voltage hits the body of the electrical appliance, the electricity will turn off in about 0.3-0.5 seconds. Even if there is a short circuit, the wires will probably burn out, but the person will remain unharmed.
As a result, it would be more correct to say that a grounded outlet protects not so much itself as the person who uses it. Moreover, this protection in most cases is needed for a split second, which is necessary for the automation to disconnect the damaged section of the wiring from the network.
On the issue of safety
Please note once again: it is better to invite an electrician to check the functionality of grounding in sockets. He will take measurements and give a conclusion based on the results. But if you still decide to try one of the methods of self-checking, you need to be well prepared and take all possible precautions:
Avoid touching exposed wires and metal parts with your hands.
- Place a rubber mat under your feet.
- Handle only isolated parts.
- Don't check alone. So that “if something happens” there is someone to react.
But as we have already said several times above, it is better to call an electrician. You may be able to connect a grounded outlet yourself, but it’s better to entrust the quality of the work to a professional.
Sources
- https://kak-sdelano.ru/elektrica/kak-podklyuchit-rozetku-s-zazemleniem
- https://ichip.ru/sovety/ekspluataciya/nuzhny-li-doma-rozetki-s-zazemleniem-719392
- https://YaElectrik.ru/elektroprovodka/kak-podklyuchit-rozetku-s-zazemleniem
- https://ProFazu.ru/provodka/ustanovochnye/rozetka-s-zazemleniem.html
- https://sovet-ingenera.com/elektrika/rozetk-vykl/kak-podklyuchit-rozetku-s-zazemleniem.html
- https://odinelectric.ru/wiring/rozetki-i-vyklyuchateli/kak-podklyuchit-rozetku-s-zazemleniem
- https://elektroznatok.ru/provodka/podklyuchenie-rozetki-s-zazemleniem
If the wiring already has a ground wire
This may well happen if modern renovations have been made to an old house. Initially, there was no grounding in the corridor panel, and the electricians installing the wiring could install Euro sockets and lay grounding wires, but not connect them. If, in accordance with the plan for improving the electrical wiring, grounding is connected to the access panel, then the internal wiring made “for growth” becomes relevant.
grounding bus in the electrical panel
In this case, the installation task is simplified as much as possible and consists only of correctly connecting all the wires. The grounding wire in the entrance panel is connected to the PE bus and in apartment sockets it is connected to the corresponding contacts. To do this you need to do the following:
- Turn off the input circuit breaker or turn off the power to the outlet itself, if there is a separate switch for this.
- Take a socket with grounding contacts. If the old one already has them, then you just need to connect them.
- Remove the cover from the old socket, loosen the fasteners holding the inside of the socket in the socket and pull it out.
- If the old socket has a grounding contact, then screw it to the appropriate mount. If you need to install a new one, then the wires are removed from the old one and the required socket is installed in its place.
- After connecting the wires and turning on the input circuit breaker, you need to check whether the grounding is working correctly.
When the grounding wiring is connected correctly, when checking it, the RCD circuit breaker will trip if it is installed on the phase and neutral wires.
Connecting correctly
Before installation, you need to determine what type of wiring is in the wall. This step requires removing the old outlet, which will expose the number of wires. If there are only two wires, there is no grounding, and we see only the neutral wire, as well as the phase.
Important: before installing a grounded outlet, it is recommended to ensure that you have the necessary tools for an electrician: an indicator screwdriver and a multimeter.
For correct connection, all stages of work must be followed:
- Turn off the power supply at the panel;
- Carefully inspect the panel and make sure that the electricity is turned off;
- Next, using a special indicator (the so-called indicator screwdriver), you need to make sure that there is no phase on all 3 wires, or more precisely on their bare parts;
- Unscrew the screw on the body, loosen the tabs, remove the old product;
- If the socket box is in poor condition, it can be cleaned or replaced with a new one;
- Remove the external insulation;
- We clean the ends of the wires.
A very important point - always leave a supply of wires, because you will connect them to the outlet BEFORE installing it in the wall!
- Connect the cables to the socket and tighten the screw;
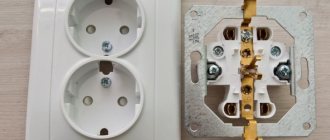
- We connect the third cable to the socket - grounding to the terminal marked as “PE” or with a special sign:
- We fix the case with screws;
- Screw on the housing cover.
Attention! The ground wire is usually colored yellow-green, but always confirm the final conclusion with an indicator screwdriver.
How to ground a double outlet
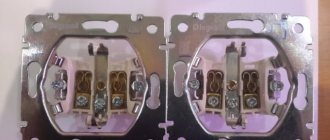
The procedure for connecting a double socket is exactly the same as for a regular socket, if it is a model for one socket. It has one grounding contact for both sockets, so the part that is inserted into the socket box is no different from the standard device.
laying a grounding wire when connecting several outlets
It’s another matter if a double socket is made up of two ordinary ones located next to each other. In this case, grounding should be considered as made for two separate points and the installation of the grounding wire is carried out somewhat differently than phase and neutral. The difference is that often the connected block of sockets is connected to each other by a cable, when the wires go to the next point from the contacts of the previous one.
If a wire burns out in any place, the next sockets in the circuit will not work. This is not a potential shock hazard like a ground wire that fails. To avoid this, before connecting a double socket made from ordinary ones, the grounding wire is laid in one piece to the last connection point, and twists are made opposite the previous ones, from which the grounding is already applied to the grounding contacts.
Choosing an installation location
There are no general guidelines for installing products. They are mounted in a place where it will be convenient to use them. European regulations indicate that they should be installed at a height of 30 cm from the floor. But this is not always true. The most correct solution is in the place where electrical devices and equipment are installed and at the height where it will be most appropriate.
The number of outlets in a particular room also depends on the devices being installed. If there are no such instructions, then proceed as follows: in small rooms (up to 12 sq.m.) install at least 2 products, and in large ones - 4 or more. It is better to have more of them initially than to add the missing ones after electrical installation and finishing work.
If there is no ground wire in the outlet
It all depends on where exactly you need to connect the outlet with grounding - in a private house or an apartment building. In the second case, you still need to find out whether there is a grounding bus in the floor panel - the situation may well be the opposite of the previous one - when the wiring in the apartment is old, and the floor panel has already been converted to new standards and has a bus for connecting a PE conductor.
If there is no grounding bus in the floor panel, then you will not be able to ground the outlets yourself. More precisely, it can be done, but it will be a violation - interference with the approved layout of the house, etc. As a result, if there is no grounding, then all the residents of the house need to get together and write a collective statement so that the housing office employees carry out all the necessary work. There are no other options to do everything legally.
Also, the choice of connection method depends on whether you need to ground one outlet or ground all of them in the apartment. If one outlet can be grounded using external wiring, then if it is necessary to remodel all points in the apartment, large-scale work will have to be carried out to replace the electrical wiring, which is usually done only during major repairs. They consist of removing the old wiring from the wall and installing a new one in its place, which, among other things, will also have a grounding wire. In this case, it is not worth considering the option of simply adding a grounding conductor. The wiring itself is most likely old, plus, there is usually no precise wiring diagram inside the wall, so making new grounding grooves without damaging the old wires is quite problematic.
Determining the wiring type
Installation of a grounded socket is carried out in those houses where three-wire wiring is laid. In homes with wiring that includes only two cores, there is no point in installing such a grounding outlet, since it will not perform its intended task.
Therefore, the first thing to do is determine what type of wiring is in the apartment. If the electrical wiring in the house is outdated two-wire, it will have to be replaced with a three-wire analogue. Modern three-wire wiring meets all safety standards in all respects.
Replacing wiring is an additional expense item, but the costs will certainly be recouped by the long “life” of electrical appliances and the safety of household members
You can find out whether the electrical panel has a grounding bus from the electrician servicing your entrance or house. The type of wiring is also determined by the number of wires. If a two-core cable is connected to the connection point, then only “phase” and “neutral” are available.
If the socket line is laid from the switchboard with a two-wire cable, you only need to connect a third grounding wire from the electrical panel to each point. But this procedure can only be performed if the shield is equipped with a grounding bus.
Clause 1.7.127 of the current PUE clearly states that the grounding conductor must be made of insulated copper wire with a cross-section of at least 2.5 sq. mm.
To introduce a new line of sockets, it is worth using a ready-made three-core cable, already equipped with a ground wire
It is not advisable to lay a cable with a cross-section of 1.5 mm2 from the junction box to the socket. Indeed, in this case it is impossible to “power” a powerful device from it. For a single-phase network, it is better to take a cross-section with a margin of 2.5 mm2.
To organize electrical wiring in apartments and private houses, choose cable marked VVG, for wooden buildings and fire-hazardous premises - VVGng.
The main requirement for a protective conductor is that there should be no disconnecting devices in its circuit. Therefore, it is installed in addition to any fuses, circuit breakers and circuit breakers.
According to clause SNiP 3.247, it is prohibited to connect protective conductors in series; each new point should be connected with its own cable
Serial grounding is fraught with the risk that in the event of an emergency, electromagnetic incompatibility may occur. Connected electrical installations will create interference, which can lead to undesirable consequences in which the protective circuit will not cope with its task.
When you can’t, but really want to
There are quite a few ways to install a grounded outlet, bypassing the provisions of the PUE. All of them are, to a greater or lesser extent, a violation - to use them or not - this decision is made at your own peril and risk, but in any case you need to be aware of the possible consequences. The fact is that many of these methods are used happily ever after, but sooner or later something happens that is why they were banned. As a result, neglect of electrical safety rules endangers the life or health of not only the owner of such wiring, but also other people living with him in the same house.
Zeroing
This is one of the most common ways to ground an outlet if there is no separate PEN conductor. To make a grounding, you need to connect the working zero to the grounding contact - this is done by installing a jumper in the socket itself. The connection diagram for this method of “protection” is based on the fact that even in old wiring, the working neutral conductor is grounded in the distribution transformer. After short-circuiting the zero and grounding, if a phase appears on the device body, a short circuit will occur and the input circuit breaker will turn off the electricity.
Disadvantages of zeroing:
- When a phase “breaks through” the housing, the device, although not for long, is still energized and if at that moment a person touches it, he will receive an electric shock.
- If on the way to the socket the neutral wire in the wiring burns out (a fairly common fault in electrical wiring), then in most cases there will be a phase on the body of the devices. To do this, a single light bulb or power supply of any device that is not turned off is enough. In this case, the circuit breaker does not operate.
Read more about the dangers of zeroing in this video:
Connection to a lightning rod
If there is a lightning rod installed on the roof of the house, and the metal strip that connects it to the grounding passes close to the apartment window, then in this case you can connect to the grounding loop and conduct grounding to all sockets.
An excellent way to solve the problem, as a result of which the apartment will be connected to high-quality grounding. This method has only one drawback - grounding works well until the lightning rod is used for its intended purpose, or more precisely, until lightning strikes it. It is better not to know and not experience from personal experience what voltage will appear on the housings of devices connected to ground.
Grounding through heating pipes or water supply
Another common way to ground an outlet yourself is to strip a piece of water pipe and connect a grounding wire to it. On the one hand, it would seem a logical solution - the pipes in any case have contact with the ground. On the other hand, it is unknown to what extent this contact meets the grounding requirements, and if voltage appears on them, then there is a possibility that the current will not go into the ground, but will hit the person who is holding onto the pipe (washing his face or drawing water from the tap).
An additional disadvantage of this solution is the plastic water supply, which is often laid instead of rusted iron pipes. If the pipes on the fifth floor are metal, and on the third floor they are already plastic, then instead of grounding the pipes will simply be energized.
Connection point installation technology
Connecting a grounded outlet does not require any complicated manipulations. Anyone with only basic electrical installation skills can complete the task.
First, let's look at the process of connecting a surface-mounted socket to a cable hidden hidden in the baseboard box.
Preparing the necessary materials
In addition to the socket itself, it is also necessary to purchase a socket box in advance to install the “core”. The socket box for the future connection point is selected based on the type of building materials that will have to be worked with.
The main difference between models designed for installation in plasterboard walls and their counterparts for installation in brick and concrete surfaces is the presence of spacers. Fixation of standard socket boxes into the cavity of a concrete wall is carried out by applying gypsum or alabaster mortar into the prepared hole.
Installation and connection of a grounding electrical outlet cannot be performed without a set of tools.
- For installation you will need:
- test screwdriver or multimeter;
- perforator equipped with a crown;
- side cutter or cross-cutting knife;
- chisel.
To install the socket box, a hole is drilled in the wall using a D70 mm crown. The space under the “glass” is cleared of remnants of building material. After the socket box is installed, begin wiring.
Determining wire ownership
Before installing and grounding the outlet, the first step is to turn off the power to the electrical panel. The technician’s task is to remove voltage from the distribution box feeding the lines with the socket to be replaced. Wires laid from the electrical panel in an open or closed way are led into the cavity of the socket box. Using an electrical tester, they determine where “phase” is and where “0” is.
When working with electrical wiring equipped with a ground wire, it is still better to use a multimeter. This multifunctional device, even of the simplest design, will become an indispensable assistant in detecting a broken wire and determining the integrity of radio and electrical components.
If you do not have an indicator screwdriver or a multimeter at your disposal, standard markings will help determine the identity of the wires. In order to create safe conditions when performing electrical installation work and to facilitate the process of connecting contacts, the rule has been adopted that each wire core has a characteristic insulation color.
According to the current PUE, the insulation of wires in a three-phase electrical network is distinguished by color:
- zero working contact “N” has a blue or light blue braid;
- the “L” phase most often has a bright color (brown, black, white, orange);
- grounding “PE” is painted yellow-green.
Sometimes you have to deal with non-standard markings. In this case, it will be a little more difficult to determine the “phase”, but the color of “0” will not change in any case.
Device connection diagram
The main core of the cable laid from the shield to the socket is stripped to a height of 7-8 cm from the edge. The ends of the wires placed inside it are cleaned with a knife from the braid to a height of 10-12 mm from the edge.
The work should be carried out as carefully as possible, since the slightest damage to the insulation of the neutral core can provoke a “phase” short circuit to the device body.
As a result, if the neutral wire breaks, the electrical appliances connected to the point do not work, and the outlet appears de-energized and seems safe at first glance.
The protective wire is connected to additional contacts located separately from the power ones. The neutral and phase wires are connected to the power contacts. The order of their installation does not play a significant role.
When connecting all three conductors, it is important to ensure high reliability of the contacts. This is explained by the fact that at the point of poor contact the contact resistance increases, which leads to heating. And the greater the current in the circuit, the more the connection will heat up. Which can ultimately lead to equipment failure or even fire.
Checking the correct connection
Checking allows you to verify the quality of the grounding. It is performed using the same multimeter or test screwdriver. The end of the tester is immersed one by one in the holes of the socket and observed: when it touches the “phase” it should light up. If the tester also reacts when it touches the ground, this indicates an incorrect connection.
- Lack of voltage may indicate:
- between “phase” and “N” indicates the presence of a break in the latter;
- between “ground” and “phase” indicates the absence of voltage;
- between “ground” and “N” indicates that the wires have been connected through an installed jumper.
When taking measurements with a multimeter, one probe is applied to the “ground” - the top or center of the socket. In parallel with this, the second probe is alternately immersed in the holes. If an incorrect grounding is detected, do not rush to correct the error yourself. It is best to consult a qualified electrician.
Grounding in a private house
To fully imagine how to connect a grounded outlet, you need to consider the entire process from start to finish, using the example of a private house, if there was no grounding wire there initially:
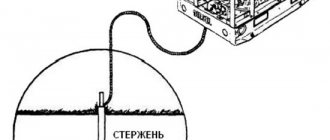
- Installation of a grounding loop. It consists of metal pins driven into the ground, connected at the top points by metal strips welded to them. The length of the pins is 1.5-2 meters, and the length of the metal strips, depending on the type of contour: triangle, ribbon, square or round. To install the circuit, you need to dig a trench 0.5 meters deep.
- Ground connection to the distribution panel. It is made with the same metal strip as for connecting the pins.
- Replacing two-wire wiring with three-wire. If it did not exist before, then it is imperative to install an RCD that guarantees a power outage when voltage appears on the grounding conductor.
- Installation of sockets.
Useful video on the topic
A lot of interesting information is in the video.
Leave a comment Cancel reply
Related Posts
What do you need to know about a circuit breaker in order to choose a reliable and, most importantly, safe model?
Height and placement of sockets in the kitchen in a modern apartment
A few simple rules for choosing sockets and switches
What is the difference between RCDs and differential circuit breakers and what to choose for the panel equipment
Which grounding method to choose
It is possible to correctly connect grounding to sockets in an apartment or house only if there is a grounding bus in the distribution panel. If it is not there, then you can’t do anything on your own - you need to seek connection from the appropriate authorities. All work must be carried out by services servicing the house, and their results are entered into the electrical wiring diagram.
In the private sector, you can make a separate grounding circuit, but it is better to solve this issue during the construction of the house, since in addition to installing the grounding bus itself, you will have to additionally redo the finished wiring.
Classification
Plug sockets differ in design features, electrical circuit, number of terminals and other parameters. Let's take a closer look at each of the signs.
By type of design
Structurally, the device comes in two types:
- Hidden installation. It goes deep inside the wall, and outside there is only the outer part with a place to insert the plug. The assembly is fastened using claws, which on one side rest against the elements of the device, and on the other against the base (for example, a wall or installation box). To adjust the fastening, a special screw clamp is used.
- Outdoor installation. Unlike the type discussed above, the structural elements of such a unit are located outside. For fastening, screws are used to hold the product to the surface. The electrical part is reliably protected by a plastic housing. Additional options include backlighting, a childproof lid, a shutdown timer, etc.
- Portable. Essentially, these are extension cords, which are a plug and a socket connected by a cord of a certain length.
According to the electrical diagram
Plug sockets differ in the presence of a contact connecting the metal part of the electrical receiver to grounding.
There are two types:
- With grounding (three contacts). It is used in apartments, houses or other objects where there is a grounding circuit with low resistance. The design is made in such a way that grounding occurs before voltage is applied to the plug and the equipment itself. This feature is due to safety requirements. Used to connect equipment with a metal body: washing machine, electric stoves, etc.
- No grounding. They can be easily identified by the presence of two contacts. There is no grounding connector provided here, which reduces the level of safety when using the device. If a phase comes into contact with a conductive body, a person may become energized.
By number of pads
Structurally, plug sockets differ in the number of terminals for connection.
They are:
- Single rooms. Used to turn on only one device. To increase the number of connectors, you can use carriers or tees.
- Doubles and more. In such electrical units it is possible to connect two or more devices. The most common option is double and triple sockets.
By wire clamp type
An important point when choosing is the type of input contacts.
They are:
- Screw. The degree of tightening of the wire is regulated by a person.
- Screwless. A special feature is the clamping of the wire using special springs. They are considered more reliable, because during operation the compression ratio does not decrease due to vibrations or other influences.
Additional features
In addition to the characteristics already discussed, plug sockets are classified according to other parameters:
- By the number of poles - two and three poles.
- With or without protective contact. A special feature is the presence of metal elements connected to the ground loop.
- According to the presence of curtains. A special feature is the presence of special flaps that protect children from voltage. They open only with simultaneous strong pressure on both elements.
- Based on the material of output and input contacts. Made from brass or bronze.
- With and without a switch (RJ-45). Some models have a connector for connecting network equipment.
- By the presence of a toggle switch. Structurally, a switch is provided with which you can apply and remove voltage from the contact connections.
- For portable lamps. It is used to supply reduced voltage (12 V, 24 V) and has a different design to avoid mistakenly connecting a portable light bulb to a 220 V network.
- By the presence of backlight. Such devices have an LED light source, making it easier to connect in complete darkness. Often installed in the bedroom, hallway or living room.
The above classification allows you to understand the variety and importance of plug sockets and quickly decide on a purchase
Checking work
If it is necessary to clarify the presence of grounding, a visual inspection of the electrical outlet itself is performed.
Self-checking the operation of the ground loop in old and newly installed sockets:
- unscrew the top cover (in the old socket);
- make sure that there are additional antennae or wires in addition to the main pair (in the old outlet);
- measure resistance values with a tester or multimeter.
The simplest option for checking functionality is to use a homemade probe based on a light bulb socket and a pair of wires. The tester wires are inserted into the socket, after which the probe light lights up. Then one wire is connected to the metal part. A light that does not light up indicates a lack of grounding.
A reliable method for assessing the quality of grounding work is to perform a test using modern instruments, while measuring the voltage with a voltmeter to ensure the presence of 220 volts.