Requirements for installation of end fastenings and installation features
Never attach end pieces to decorative building siding or roofing components. Devices intended for heavy loads are fixed on both sides of the load-bearing wall with steel plates fastened with through bolts. As shown in the picture for the tension bolt with hook. They must be located above pedestrian passages at a height of at least 2.7 m, and above vehicle passages at least 6 m. Anchors for strings with lighter loads can be secured with simple anchor screws for concrete.
Ideally, tension anchor devices are installed in the wall during the construction of buildings according to the project. In practice, this is not always provided for; then you have to drill into the walls with a hammer drill. Under the end fastening, a metal plate with a bolted contact is attached at 20-30 cm for grounding the cable. It is connected by a welding joint to rolled wire with a cross-section of at least 16 sq/mm, which goes to the common ground loop. In some cases, grounding is performed with a separate copper wire with a cross-section of at least 2.5 sq/mm using bolted connections.
Laying the cable on a cable when connecting to a wall
| Option A - direct connection of the cable to the ground terminal | Option B – grounding the cable with a separate wire. |
| 1 – tension anchor; 2 – loop with a cylindrical clamp; 3 – wire rod going to the ground loop; 4 – grounded end of the cable; 5 – bolted grounding contact. | 1 – tension anchor; 2 – loop with clamping plates on bolts; 3 – wire going to the ground loop; 4 – bolted connection of the copper grounding wire with the cable; 5 – stranded copper wire with a cross-section of 2.5 sq/mm or more; 6 – bolted connection of the wire to the ground loop. |
Elements for fastening the cable to the cable
To securely fix the cable with the cable, there are several devices:
The simplest method is twisting the cable with stretching using ordinary aluminum wire Ø 2.5 - 5 mm with insulation. At connections every 50 -80 cm, 7-8 turns of wire are made, tightly turn to turn. To prevent the cable insulation from being pressed through by the fastening wires, the fastening point is wrapped with a rubber plate, and the wire is wound on top. It is recommended to use rubber for gaskets from old car inner tubes;
Plastic tie for securing the cable. The device is attached to a guy wire, the cable is laid in a groove, covered with a strap, which is threaded into the lock, tightened and securely fixed. The lock is designed in such a way that the strap cannot be pulled out in the opposite direction; to remove it, you can only cut it.
Plastic tie for securing the cable.
Metal clamping plates with loops for cables and guy wires. Plates are produced with loops of different sizes. One plate is put on the cable and the other on the cable. In the center of the plates there is a hole with a thread for a bolt; they are aligned and tightened with a bolt.
Metal clamping plates with loops for cable and guy wires
All connections, regardless of the design, are installed after 50 - 80 cm.
Advantages of open wiring
Corrugated
Wiring done openly, that is, located in boxes, corrugation or something else, has a number of advantages:
the wiring is protected from deformation and accidental damage; no one will connect something of their own (unless, of course, they guess to open the box lid or cut the corrugation); a metal hose used in fire hazardous areas not only protects against fire, but also secures the cable so that it does not come out of it; if necessary, you can leave a supply of wire in the cable channels; the aesthetics of the installation are preserved, which is important, because no one wants their utility room to look like a barn.
For more detailed information on box installation, you can watch the following video below:
Installation and tension of the cable
After installing the terminal fastenings, the cable is attached to the guy wire on the ground, lighting fixtures with junction boxes are fixed and connected. The assembled structure is delivered to the installation site and unwound along its entire length from one mounting anchor to another.
The length of the cable must be at least 2 m greater than the distance between the end anchors. The reserve will be needed to seal the fastening to the terminal devices and bring the ends to the grounding terminals, which are located below the anchors. The end loops of the cable are attached to the tension anchors, after which they regulate the tension. The tensile force should be up to 100 kg/cm for light structures with cables with a cross-section of 4-10 sq./mm. For heavy cables with a cross-section of 16 – 25 sq./mm – up to 500 kg./cm. This parameter is measured by a dynamometer, which is installed between the anchor and the tension loop.
After tensioning the cable, the ends of the cable are grounded, the cable is inserted into distribution devices and connected to protective circuit breakers.
Distribution boxes and lighting devices for cable mounting
To fasten distribution boxes, special galvanized iron plates with cut-out shapes are used. A part of the plate is bent from the cut-out shape, a cable and a box are inserted, after which everything is fixed with bent elements.
An example of attaching a junction box to a cable
To fasten lighting fixtures, galvanized plates of a special shape are used, but the principle of fastening remains the same, shown in the figure.
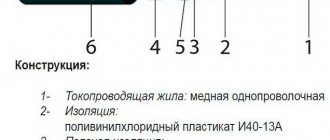
- Cable;
- Plate;
- Cable;
- Junction box;
- Lampshade with lamp socket.
Selecting the diameter and material of the cable
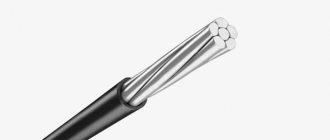
Determine the weight of the cable and other elements that will be attached to it. If the distance between the supporting fasteners is 5-6 m and the weight of the wire is not significant, you can stretch galvanized steel wire with a diameter of 2-3 mm. When the distance is more than 10 m, the cable is heavy, especially if the cable structure is used with lighting elements, galvanized steel cable with Ø 4-6.5 mm is used. Such a cable will withstand any cable with a wire cross-section of up to 10 mm/sq.m; larger cables are not used in private households due to limited power consumption. You can also hang up to 5 pieces on such a cable. lighting lanterns in a lightweight housing.
The cable can be wound and weighed on ordinary scales, or calculated by knowing its brand according to the characteristics table, which is included with the sale. The weight of the cable per 1 meter is indicated; you need to multiply the specified weight by the number of meters to get the total weight of the segment that is used for fastening to the steel cable.
For domestic conditions, in order not to waste money, you can hang the cable that was used for hidden wiring. In order for the insulation to last longer, lay it in a corrugated pipe; its weight is not significant. There are reference tables indicating the brand and weight of the cable. You can look it up on the Internet; some sites have calculators for calculating the length and weight of wires and cables.
Table indicating the cable brand and weight in kg. by 1 meter
For high current loads, it is better to use special cables for overhead cable structures:
- AVT, AVTS, APT already have a built-in supporting steel cable;
- AVRG, ANRG, APVG, AVVG are suspended from a supporting steel cable.
Supporting and tensioning elements of cable wiring
These products are installed on the walls of buildings, structures between which tension is stretched. Depending on the material and diameter of the cable, the fastening design is selected:
- Tension bolt, hook and tension anchor are used for flexible multi-core industrial cables carrying heavy loads; rolled wire with a diameter of up to 6 mm can be used.
- Anchors for tensioning strings with a small diameter are designed for light wires with a cross-section of up to 6 mm at a distance of up to 10 meters, without lighting elements.
- Anchors for industrial cables and wire rods are capable of supporting heavy cables and lighting elements at a distance of up to 12 m without additional supports.
- Fasteners for stringing parallel lines are often used for dual purposes, for power supply to structures and placement of lighting lanterns. A power cable with a wire cross-section of 10 -35 mm/sq. is laid along one cable; on the second, lighting outlets and distribution boxes with copper wire 2.5 - 4 mm are laid.
Types of end fastening elements
All these structures have individual characteristics when installed on the walls of buildings.
Preparatory work
First, you need to accurately determine the type of wiring: open or hidden. In the first case, the installation of electrical wiring is carried out outside the walls and other surfaces; in the second, the wires are laid inside the channels of the slabs, in the voids of the walls, floors, or under the plaster. In the garage you can make it a simple open type, but in an apartment or cottage it is better to hide it so as not to spoil the appearance. Hidden wiring can be either replaceable or non-replaceable. In the replacement cable, it will be possible to frequently replace cables without destroying walls, floors and purchasing finishing materials.
Everyone chooses the laying method themselves, based on aesthetic criteria, structural features, and financial capabilities. You can also install cable wiring, that is, hang protected cables on a supporting galvanized cable.
Installation of electrical wiring in any room or building begins with various preparatory work: drawing up a diagram of the future electrical network, marking, punching work. It is necessary to decide before installation where the power cable will enter the building, and think over the location of the electrical panel. It is recommended to place it close to the doors, at a height of one and a half meters from the floor, and always in a warm place. Later, you will need to draw up an electrical and wiring diagram, and in accordance with it, mark out the places where you will have sockets, lamps, and electrical appliances.
Do-it-yourself electrical wiring installation must be carried out with knowledge of regulatory documents. In electrical installation work, the main ones are SNIP (building codes and regulations) and PUE (rules for electrical installations). Fire and safety requirements are also important.
The rules for installing electrical wiring PUE and SNIP to wooden dachas are the strictest. Any cables in such buildings must be in special tubes made of fire-resistant materials. The requirements for brick or concrete buildings are softer - in them it can easily be built into the structural details
It is only important to lay them vertically, and also to maintain a minimum distance from the ceiling - 250 mm. The finishing layer can be laid over cables by 15 mm
In any method of electrical wiring, the requirements of PUE and SNIP must be taken into account. For example, wiring installation cannot be carried out at all according to SNIP if the air temperature is below 15 degrees. You can also highlight the advantages of open wiring: ease of installation, maintenance, ease of replacement, savings in finishing materials. Having familiarized yourself with the requirements of the PUE and SNIP, you can proceed directly to the start of electrical installation work.
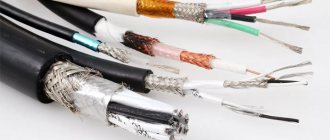
Wires for wiring.
For external wiring, as well as for internal wiring, you can use VVG, NYM, ShPVVP, PVS wires; in addition, for external wiring, wires with textile braiding are used - retro cables. If the wire will be located outdoors, the wire must be stranded and its cross-section must be greater than 2.5 mm². Cables VVG and NYM are hard, and SHPVVP and PVS are soft, this is taken into account when wiring.
Different wires are braided in different colors, which makes them easier to choose when purchasing. Wires with copper conductors are better than aluminum ones. They conduct electric current better, last longer, in addition, they are less chemically active, but they have the disadvantage of oxidizing very quickly in air.
Scheme
First you need to think about the route along which the wiring will go through the building or apartment. Try not to cause major damage to the room. Cables can be laid in special pipes or along building structures (in the voids of the ceiling or floor). The gaps between the tubes will need to be sealed with non-combustible materials (cement, clay).
Make a drawing of the house, indicate all the places where you are going to install sockets, switches and lighting points
Also pay attention to points where there will be a large amount of equipment. Electrical wiring involves determining the required number of energy-consuming devices and how to connect them
The wiring diagram determines the distance, number of wires and accessories.
In general, the wiring and installation diagram in the building can be drawn up arbitrarily, but with recommendations. Try to ground the sockets for powerful household appliances (stove, boiler, washing machine), that is, make the wiring three-phase. Light fixtures can only be grounded in the bathroom.
Having marked the connection nodes, mark the wires leading to them. There are several simple rules, in accordance with the requirements of SNIP and PUE for electrical installation work, which should be followed when marking the circuit:
- installation of electrical wiring on trays, boxes, sockets should be carried out in easily accessible places so that replacement later does not cause trouble;
- switches are placed 1.5 meters above the floor or 70 cm. The distance to gas stoves and batteries is at least 50 cm. One socket is needed per 6 square meters of room. In the kitchen, their number is calculated based on how many household appliances there will be. It is advisable to install an isolation transformer in the bathroom for an outlet in this room. It is prohibited to install sockets in the toilet;
- During electrical installation work, wires are placed on the walls vertically or horizontally, on the ceiling - at the shortest distance to the lighting point;
- groups and individual sockets, lighting points are connected to the distribution board, where auto switches will be installed. The power of the machine is calculated based on the maximum power of consumers: for individual sockets or groups - 16, 25, 40 A, and for lighting groups 10-16 A.
Cable wiring
First, you must secure anchors in the selected area. In most cases, they will resemble metal plates that are pulled together on both sides. To ensure fastening, special rings are welded to them. Tension fastenings must be made to completely protect yourself from the anchors falling out. This will also help you distribute the load evenly.
Now the cable should be secured with special loop cable clamps. On the other hand, the cable should be tensioned as much as possible and also secured.
The height of the suspension you are constructing should not be lower than 2.75 meters. The height above the car passage should be 6 meters. All standards for overhead electrical wiring can be seen in the diagram below:
After the bandage is completed, the strings simply need to be secured with a bandage. To hang cable wiring outdoors, you need to use special plastic clamps. The distance between the bandage should be 50-80 cm. If you are interested, then read about self-drilling walls for wiring.
How to properly secure the cable?
The base must be strong and reliable, well secured. The cable and cable are installed using anchor fasteners. They are fixed on both sides of the wall or other base using bolts or studs. This allows you to evenly distribute the load and eliminate the possibility of fasteners falling out of the wall. The distance between anchors that are located in close proximity to each other should be less than 100 meters. To ensure greater reliability of fastening, additional anchors are installed every 30-40 centimeters. Between the cable suspensions the step is from 70 to 90 centimeters. The design provides a special loop clamp and a screw coupling, a manual winch or a pulley. They are located on opposite sides. The presence of these elements allows you to lift and tension the cable, as well as change its strength and stability. He is grounded. Under no circumstances should it be used as grounding. The degree of tension should not be maximum. The cable should not sag. You also shouldn’t be too zealous when pulling the cable. Overvoltage that occurs when exposed to low temperatures can cause it to burst.
Laying the wires
Before installing sockets and switches, you need to lay the wires. When starting to lay out the wires with your own hands, you first need to check the pre-drawn diagram, and then start working, guided by the following rules:
- We retreat from the floor and ceiling at least 10 cm.
- The wires are laid parallel to the ceiling or floor.
- You can't make bevels. To make bends, you need to bend the wires at an angle of 90 °.
Here you can feel the significant difference between copper wires and aluminum. Copper wires can be bent as many times as you like, while aluminum wires can break after just a few bends.
Electrical wiring can be laid in several ways:
- Open - now used quite rarely and only in cases where it is not possible to make hidden electrical wiring. In addition, open electrical wiring can be used for design reasons, because for loft-style rooms it is an integral element.
- Hidden is the most common type of electrical wiring. With this installation, the wire is laid inside the wall or under a layer of plaster. To lay the wires, you can use a corrugated pipe, or you can lay the wire directly into the wall without additional protection.
- Combined - the wires are laid openly, but hidden in cable channels.
If the wiring is hidden, then you need to prepare the walls. To do this, draw lines with a pencil along which we will make indentations. The size of the recess will depend on the diameter of the corrugated pipe in which the wire will be hidden - it should be completely hidden and should not stick out. Holes in the wall for wires are drilled with a drill or hammer drill.
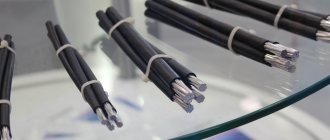
Rope cable laying technology
There are situations during electrification when it is necessary to supply electricity to a separate room. At the same time, it is not possible to lay the cable in a trench due to the complexity of the terrain or architecture. Therefore, along with such types of external laying as trays, cable ducts, pipes, corrugations, wall mounting, there is such a type of laying as cable wiring. In this article we will look at the technology of installing a cable on a cable with your own hands.
Application area
According to Chapter 2.1 of the PUE, this method is applicable for networks up to 1000 volts. Most often, cable wiring is used in places where organizing an overhead line does not make sense, and it is enough to throw a cable attached to the cable, and this will be enough to electrify the facility.
In this way, lighting networks and electrical wiring for sockets in warehouses, power cables in production workshops, and also between two separate buildings are installed.
For a home craftsman, this wiring method is of particular interest. This is because with the help of simple technology it is possible to electrify outbuildings in the country. Thanks to cable wiring, it is possible to conduct light from the house to a bathhouse, garage, shed, gazebo and other buildings and lighting devices located at some distance around the plot.
Preparatory work
First you need to decide on the wire and its cross-section. We talked about how to calculate cable cross-sections in the corresponding article. After this, you need to measure the length, taking into account the entire route of wiring from the machine to the distribution panel. When choosing a cable and suspension elements, you need to take into account the weight of the wire in a given area, with a threefold safety margin.
Since in difficult weather conditions the load on the suspended structure increases, it can cause breakage and loss of power. Mostly galvanized steel cable with a diameter of 4.6 to 6.8 mm is used.
In cases where the length of the suspension is short and the weight is such that it can be neglected, instead of cable wiring, string wiring can be used (galvanized steel wire or varnished hot-rolled wire from 5 to 10 mm is pulled).
Installation technology
First you need to secure the anchor and the fastening elements of the cable wiring to the selected area. For the most part, these are steel plates pulled together on both sides of the wall with studs and rings welded to them for hanging the cable. The tension of the fastenings is done to strengthen and avoid their falling out, distributing the weight of the load evenly along the wall, and not at the fastening points.
Next, you need to secure the cable on one side with special loop cable clamps, on the other side, tighten it as much as possible, and use screw couplings to get it to the state of the string.
The height of the suspension should not be lower than 2.75 meters above the pedestrian area, and not less than 6 meters above the vehicle passage. All standards for overhead electrical wiring, including the distance between supports, are indicated in the diagram:
After installing the strings, they begin tying the cable with a bandage. To hang cable wiring on the street, you can use plastic clamps, galvanized iron strips, and galvanized binding wire. The distance between the bandage is 50-80 cm.
Recommendation from practice
When using a binding wire, it is necessary to prevent the core from cutting into the insulation; for this purpose, a gasket is made between the bandage and the wire made of insulating material. The winding area of the bandage should be distributed as much as possible by laying 7-10 turns of the bandage. When using plastic clamps, check their operational data. Otherwise, in frosty winters or very hot summers, you will find scattered clamps.
When laying the cable externally along the cable, it is also necessary to protect the line from the influence of the environment on the insulation, so it is recommended to stretch it in a corrugation, as shown in the photo below. This will then reduce the cost of operation and restoration of cable wiring.
If the span is short or there is no possibility of attaching the cable to the cable at the installation site, it is possible to assemble the suspension on the ground. The already prepared structure can be stretched and attached.
By following our instructions, you can independently conduct electrical wiring to separate buildings in the country. We also recommend watching a useful video that shows how to make a loop on a cable with your own hands:
That's all I wanted to tell you about how to install cable wiring with your own hands. As you can see, laying a cable along a cable is a rather labor-intensive task, but it is still within the power of a home handyman!
It will be interesting to read:
Application area
According to Chapter 2.1 of the PUE, this method is applicable for networks up to 1000 volts. Most often, cable wiring is used in places where organizing an overhead line does not make sense, and it is enough to throw a cable attached to the cable, and this will be enough to electrify the facility.
In this way, lighting networks and electrical wiring for sockets in warehouses, power cables in production workshops, and also between two separate buildings are installed.
For a home craftsman, this wiring method is of particular interest. This is because with the help of simple technology it is possible to electrify outbuildings in the country. Thanks to cable wiring, it is possible to conduct light from the house to a bathhouse, garage, shed, gazebo and other buildings and lighting devices located at some distance around the plot.
Preliminary measures before installation
At the first stage, it is necessary to determine how much power will be consumed by electrical appliances in the structures that are planned to be provided with electricity. Based on the power consumption, the cross-section of the cable wires is calculated, its length and weight are taken into account. These parameters determine which fasteners to use, the diameter and material of the cable. To calculate power consumption and cable cross-section, a more detailed study of a separate topic is required. In simplified form it looks like this:
The power of all electrical appliances that are supposed to be used in the calculated network is summed up. The power of each device is indicated in product passports or nameplates on the housing. The simplest example of a lighting lamp is always written 40 on them; 60; 75 or 100 or more watts.
∑Р = P1 + P2 +…Pn = 3.7 kW. (3700 W) – Total power.
Determine the maximum possible current in the circuit
I = ∑Р/ U=3700 W/220 V = 16.8 A. – Maximum current.
U – network voltage.
To determine the cross-section of wires in a cable, use the table
In our case, we choose a maximum current value slightly greater than 19A, taking into account that additional household appliances may be used in the future. According to the table, we obtain a power of 4.1 kW, which corresponds to a copper wire cross-section of 1.5 mm. You need to understand that the cross section is not the diameter, it is calculated using the formula:
Formula for calculating wire cross-section
Experienced electricians are well aware of the standards of cables and wires and determine the cross-section by eye. For ordinary consumers, there are tables for determining the cross-section by diameter; it is enough to measure the diameter of the wire with a micrometer or caliper and determine its cross-section using the table.
Determining wire cross-section by diameter
The next stage of preliminary work is measuring the length of the cable from the distribution board in the house to the switchgear (switchgear) on the building to which the cable structure is stretched. This can be done with a regular tape measure,
Is it possible to replace a cable with a rope?
Often, some people decide to use a rope rather than a cable. Such a replacement cannot be made, since it does not have the required properties. Fabric fibers are easily destroyed under the influence of external negative factors. The rope easily stretches, frays and even breaks. Loss of strength can lead to sagging. If the wire breaks, it will create a dangerous situation where the electrical current could kill someone nearby.
FEDERAL UNIT PRICE FOR FARMS 08-02-149-01
| Name | Unit |
| Cable up to 35 kV, suspended on a cable, weight of 1 m of cable: up to 1 kg | 100 m cable |
| Scope of work | |
| 01. Installation and removal of the winch. 02. Installing and removing the drum. 03. Installation and removal of rollers. 04. Installation and dismantling of intercom. 05. Laying cable and cable. 06. Checking the condition of cable insulation before and after installation. 07. Marking. |
The price does not contain overhead costs and estimated profits; accordingly, the direct costs of work for the period 2000
(prices of the Moscow region), which are calculated based on
2009
. For further calculations, this cost must be multiplied by the conversion index to current prices.
You can go to the pricing page, which is calculated based on the 2014 edition standards with additions 1
| Total (RUB) | Workers' compensation | Machine operation | Pay for drivers | Cost of materials | Labor costs (person-hours) |
| 3975,25 | 164,5 | 2360,25 | 216,68 | 1450,5 | 17,1 |
TOTAL PRICE: RUB 3,975.25.
Look at the cost of this standard at current prices open page
Look at the resource part of the price in the GESNm standard 08-02-149-01
When used in an estimate, the price requires indexation to translate into current prices. The price is based on the GESN-2001 standards, as amended in 2009.
in
2000
.
Installation
Basic elements of the box
In the case of a cable channel, everything is simpler than ever - the channel itself is attached, then the wires are laid in it and everything is secured with a lid (the well-known plastic box that is commercially available). The main thing is to use a level or tape measure when attaching it, measuring equal distances from the floor or ceiling to the box - but provided that the level of these surfaces is the same over the entire area, otherwise the channel will lie crookedly.
If a corrugation or pipe is installed, then the wire is not laid in it, but pulled through using a broach already lying there. The length of the corrugation is measured along the stretched length of the wire. First, you should carefully cut the corrugation, then pull it up and, holding the wire in your hands, slowly bite it so that both ends remain in your hands. The unnecessary part of the broach is bent over the bay, and with the help of the second we stretch the cable, tying it to it. To prevent the wire or sharp edges of the cable from resting against the walls of the corrugation, they can be bent back, if the cross-section allows. The assembled structure, measured in advance, is attached to the walls.
Features of fastening methods
The use of a design in the form of a tray, box or pipe allows for additional protection of the wires from the harmful effects of the environment. This fastening method is advisable to use where the cable is directly affected by both low and high temperatures. Metal fasteners are less versatile and require additional precautions. They should not violate the insulation of the cable being laid. In other words, it is necessary to use additional elements placed under steel and iron buckles, for example, insulating material.
The cable is fastened directly to the cable using various fasteners - galvanized iron sheets, steel strips, plastic clamps. The first two fastening options are considered preferable. Plastic elements are selected taking into account operating conditions so that they do not require replacement every season.
Products for installation of cable wiring
The K1016U3 earring is used for fastening the rope to metal structures, beams and ceilings for cable electrical wiring. The earring is attached between the corners of metal trusses between the floor slabs by turning and wedging into the crack. Cable diameter up to 8 mm. Permissible load 1.2 kN.
Manufacturing material: steel with metal coating Technical specifications: TU 34-1445-82 Climatic version: UZ
Anchor K675 M is used for fastening cables (diameter 6-8 mm) to structural metal structures of buildings. The K-675 M anchor is secured using welding and bolts. Permissible load - 16 kN.
Manufacturing material: steel with metal coating Technical specifications: TU 34-1445-82 Climatic version: UZ
The K-809 walk-through anchor is used for fastening cables (diameter up to 10 mm) to building metal structures and building walls. The K-809 anchor is secured using welding and bolts. Permissible load - 16 kN.
Material of manufacture: steel with paint and varnish coating Technical specifications: TU 34-1445-82 Climatic version: UZ Weight: - 1.51 kg
Tension coupling K-798, K-804, K-805 - used to tension the cable (diameter 2-8 mm) for cable wiring. Tension coupling design: body, hook and screw with nut. The hook attaches the coupling to the K809 through anchor, K675 anchor, K1016 UZ earring, etc. The cable is tensioned by rotating the coupling body around the screw.
Manufacturing material: steel with metal coating Technical specifications: TU 34-1445-82 Climatic version: UZ
| Type | Permissible load (P), N | Screw stroke, (L1-L) | Dimensions | Weight | |||
| L | L1 | A | d | ||||
| Clutch K-798 U3 | 1200 | 50 mm | 150 mm | 200 mm | 13 mm | 6 mm | 0.094 kg |
| Clutch K-804 U3 | 5000 | 100 mm | 265 mm | 365 mm | 20 mm | 12 mm | 0.55 kg |
| Clutch K-805 U3 | 16000 | 300 mm | 550 mm | 850 mm | 27 mm | 20 mm | 3.47 kg |
Caps K5A, K6A
Caps K5A, K6A serve as fastening of insulators to hooks KV-22A of overhead power lines with voltages up to 1000 V. Caps K5A, K6A secure the insulator without additional sealing, ensuring a reliable connection.
Manufacturing material: plastic Technical specifications: TU 36-1438-85 Climatic version: UHL1
| Type | Dimensions, mm | Permissible loads, N | Weight 1000 pcs., kg | ||||
| H | d | D1 | D2 | along the axis | perpendicular to the axis | ||
| Caps K-5A | 35 | 24 | 26,1 | 18 | 300 | 4000 | 9,3 |
| Caps K-6A | 43 | 32,5 | 35,9 | 22 | 735 | 2000 | 21,0 |
Cable boxes U230, U231
Cable boxes U230, U231 serve as a distributor of main lines from cable wiring. Execution with 3 or 4-core cable. It is possible to connect up to 3 electrical receivers and hang lamps up to 5 kg, with voltage up to 380 V.
Material of manufacture: steel with paint and varnish coating Technical specifications: TU 36-1908-83 Climatic version: UZ
| Type | Wire cross-section, mm2 | Method of securing wires to a cable | Lamp connection method | Weight, kg | |
| main | branch | ||||
| Cable boxes U230 | 4-10 | 1,5-2,5 | Using an anchor | To box clamps | 1,54 |
| Cable boxes U231 | 16-35 | 1,5-4,0 | 2,10 |
Cable boxes U245, U246
Purpose: Cable boxes U245, U246 serve as distributors of main lighting lines. It is possible to hang lamps up to 5 kg, with voltage up to 380 V. Material of manufacture: steel with paint coating Technical specifications: TU 36-1460-2003 Climatic version: UZ
| Type | Cross-section of main wires mm2 | Section of branch wires mm2 | Method of fastening on a cable | Lamp connection method | Number of squeezes | Weight, kg |
| Cable boxes U245 | 4-10 | 1,5-2,5 | using a bracket | to branch compressions | 2 | 0,54 |
| Cable boxes U246 | 16-35 | 1,5-4,0 | 7 | 1,16 |
Box U256, U257
Box U256, U257 is used to connect one or two lamps to the lighting network. Connection is carried out using a plug and socket 10A 250V GOST 7396. 0-89. The cross-section of main conductors is up to 25, branch conductors are up to 4 mm2.
Specifications: 36 -1460-82.
Climatic version: UZ, TZ
| Type | Cross-section of main wires, mm2 | Section of branch wires, mm2 | Weight, kg |
| Box U256 | up to 25 | up to 4 | 1,52 |
| Box U257 | 1,27 |
Rope clamp K-296, K-676
Cable clamps K296, K676 are used for connecting and tensioning cables with a diameter of up to 8 mm. Clamp K296 connects vertical wire hangers, guy wires, etc., permissible load 7.2 kN. The K676 clamp is used to secure loops at the ends of a cable with a diameter of 6-8 mm. Permissible load 16 kN
Material of manufacture: steel with metal coating Climatic version: ultrasonic
| Type | Load (P), N | Weight, kg | |
| acceptable | test | ||
| Clamp K-296 | 7200 | 9000 | 0,185 |
| Clamp K-676 | 16000 | 20000 | 0,76 |
Installation of switches and sockets
After the wires are laid, you can begin installing switches and sockets. The number of outlets in the room must be calculated in advance, based on the number of electrical appliances used. Installing a socket with your own hands is not difficult, but to make the task easier, it is better to first purchase a special crown for drilling a hole. Using a crown, drill a hole of the required diameter. The wires should go through the center of the hole. Next, we mount the installation box under the socket or switch and securely fix it.
Now you can install the outlet itself. We insert the wires into the terminals and fix them there. The socket is then inserted into the installation box and secured with screws using a mounting plate or mounting tabs. The overhead socket is installed on top of the wall and screws are fixed.
Single switches are installed according to the same principle as sockets. But there are two exceptions: these are two-key switches and pass-through switches. You can find out how to properly connect a two-key switch from this article.
Pass-through switches are used to control lighting from different places. Detailed instructions and connection diagrams for pass-through switches can be found here.