The light switch has stopped turning off the light (that is, whether it is on or off, the light remains on). According to the advice, I replaced the switch (or switch) with a new one and stripped the wires. The problem remains the same - the light just stays on! Help - what could be the next question?
24 comments
Need more information on this issue. Did the switch work, and then suddenly stopped, or after replacing the wiring and installing it, did it stop performing its functions due to improper connection of the junction box. Maybe you have a chandelier with a remote control and the relay unit is simply soldered?
Good afternoon I came home and the light is on in the bathroom, although I remember exactly that I turned it off, and when I flip the switch it doesn’t go out, tell me what could be the reason?
The key on the switch works but the contact is not disconnected, it is stuck, this has happened before. The key can turn off, but the contacts have not opened.
You need to inspect the wires in the distribution box. Perhaps they are stuck to each other.
What if after replacing the switch nothing has changed? Is the light still on?
You need to inspect the wires in the distribution box. They stick to each other over time.
Good evening! Yesterday I turned on the switch (light), but could not turn it off! I had to unscrew the light bulbs, but the switch remained on! What should I do?
Disassemble the switch and see what’s wrong with it, and repair if possible. Or just replace it.
Tell me this is the problem, I changed the spotlight, mistakenly set it to 12 V instead of 220 V, when I turned it on, the lamp exploded, and the switch is always on. and the light from the switch does not turn off. (When pressed, it returns back to on). How to treat?!)
Good afternoon! My daughters were playing with a parrot, suddenly everything went out.. The plugs were knocked out.. We turned on everything, but the light in the children's room does not turn on.. Tell me how to fix it!
Hello! You need to disassemble the switch, look at its contacts, maybe they are stuck. As a last resort, replace it with a new one. You can start by deliberately removing the switch in another room, replacing it with the one with the problem, and if the problem is solved, then buy a new light switch.
Kind. Single-key switch in the bathroom with indicator. 4 ice lamps and a fan are connected. It worked for a year without problems. But one day I unintentionally hit the switch with static electricity with my hand. And that's it, the 4 ice lamps are on constantly, and the fan is on only when this switch is turned on. What about him? Thank you.
I have a similar problem. When the light was turned on, something banged. The light went out, the shield on the distributor was knocked out. I looked at the light bulb - it was burned out. I tried to change it - it was on, but now the light does not turn off. I don’t understand what the problem is, something with the wiring or the switch. I'm afraid that the walls won't have to be hammered, only the renovations have been done, the wiring is all new.
First, try removing the wires from the switch - the light will go out, which means the switch is stuck in the on position - it needs to be replaced.
Expert opinion
Viktor Pavlovich Strebizh, lighting and electrical expert
Any questions ask me, I will help!
For those who have never installed switches or done electrical work, it is recommended that you carefully consider your actions. If there is something you don’t understand, write to me!
The LED in the switch is blinking
- After turning off the power supply at the breakdown site, you should carefully check the switch a couple of times for the presence/absence of current supply using a multimeter or an indicator screwdriver.
- After making sure that the mechanism is de-energized, you should carefully disassemble the switch. To do this, first use a screwdriver or other tool to pry the buttons of the mechanism and remove them.
- Remove the plastic rim of the switch housing and put it away.
- Check the terminals of the device being dismantled for the presence of current using an indicator screwdriver.
- In the case of disassembling a two-key switch, you need to use a marker to identify the wire that is common for two types of switching.
- Next, using a regular screwdriver, you need to loosen the 2 bolts that are located at the edges of the mechanism body, and then remove them from the plastic socket.
- After this, the bare wires supplying current to the device are cleaned using previously prepared fine-grained sandpaper and wrapped with insulating tape.
- This completes the repair process.
Examples of calculations
Since our task is only to illuminate the switch and achieve maximum viability, we take the LED current 30% of the nominal - 6mA
Resistor current limiter
Usd=3.5V, Isd=20mA (0.02A) - We do the calculation at 6mA (0.006A);
R1= (330-3.5) /0.006=55000 Ohm (55 kOhm). In order to reduce heating, the resistor value can be doubled to 100 kOhm.
Resistor power P=Ur1I=3270.006=2W.
It is better to mirror a 1000V diode in parallel with the LED.
Troubleshooting procedure and safety measures
Before you begin repairing light switches in your apartment, it is advisable to thoroughly prepare for this procedure. First of all, you need to stock up on working tools that can be used to repair products of this class. The set includes the following items:
Disassembling and cleaning contacts
Before you repair the light switch, you will definitely have to disassemble it to the point where the fault is clearly visible. It is recommended to start repairing a broken device in the following order:
What kind of lighting do you prefer?
Built-in Chandelier
- Completely remove the voltage from the linear branch of the supply line or from the entire apartment at once.
- Disassemble the switch, for which you first need to remove all the keys.
- After removing them, the switching mechanism with the rocker arm will be “exposed”, the condition of which is used to judge the nature of the breakdown.
If, even before completely disassembling the device, loose contacts were found in the places where phase conductors are supplied and discharged, they should be tightened firmly, first installing the locknuts.
If at this stage of dismantling it is not possible to detect traces of a malfunction or the damage is too serious, it is best to completely dismantle the device from its installation location.
Chandelier repair
To repair a chandelier, disassemble its body and check the joints between the wires. Also pay special attention to the condition of the insulating layer. A common cause of a malfunction is a short circuit, after which one of the conductors burns out.
In addition, lamp sockets are subject to mandatory inspection. Elements made in China especially often fail. If the reason is in the cartridge, it cannot be repaired, this part is replaced with a new one.
If the ballast capacitor fails, strip the wire coming from it and connect a multimeter. A normal voltage level indicates failure of the series lamp chain. If the voltage deviates from the norm, replace the capacitor.
Advice! If replacing the lamp does not give a positive result, it is recommended to treat the board with a degreasing solution.
If the chandelier does not turn on, the control relay may be the cause of the problem. The functionality of the device is checked with a multimeter with a conductor from the relay connected to it. If a fault is found, replace the relay with a new one.
Other problems
The most common faults are described above. However, those who decide to repair the chandelier themselves are faced with others:
- Incompatibility of new lamps with old chandelier models.
- Poor quality twisting of conductors. Insufficiently twisted conductors prevent normal contact, which leads to lighting problems.
- The power of the screw-in lamps does not match the needs. For example, a chandelier is designed for four 60-watt light bulbs, and four 100-watt light sources are installed. For this reason, not only power supplies fail, but also transformers.
- Fuses blown. In the housings of modern chandeliers, fuses are used to break the circuit in the event of a short circuit. Repair work in this case consists of finding the blown fuse, dismantling it and installing a new component.
- Broken chandelier. A break occurs due to mechanical impact on the device or in case of poor-quality hanging (weak fastening).
Expert opinion
Viktor Pavlovich Strebizh, lighting and electrical expert
Any questions ask me, I will help!
If at this stage of dismantling it is not possible to detect traces of a malfunction or the damage is too serious, it is best to completely dismantle the device from its installation location. If there is something you don’t understand, write to me!
Other causes of flickering
The above methods for eliminating the flickering of lamps with LED lamps are related to the switch. But there are exceptions when the light flickers and the switch is compliant.
- Low-quality energy-saving light bulb. It is more often observed in cheap Chinese-made products, when the lamp is defective from the factory. You'll have to spend money again and buy a good lamp.
- The service life of the diode lighting device has expired. The microcircuit element may have failed. As a result, the lamp glows, but blinks and crackles. There is no need to think that if the manufacturer provides an almost 10-year service life for the product, the lamp should work all the time. The service life of even a high-quality device is significantly reduced if voltage drops periodically appear in the network or the device operates at temperatures outside the standards determined by the designers.
In conclusion, it should be noted that if you postpone the search for a solution to the cause of the flickering light bulb, the energy-saving device will soon fail.
LED lamps are designed in such a way that each blink means the device is turned on. The service life of the lamps is tied to the number of switches on/off: the more often it flickers, the faster it will burn out. While repairing the lighting fixture, you can replace the LED with an incandescent lamp or temporarily install a regular switch.
To perform basic electrical work, it is absolutely not necessary to call a specialist. Knowing how to connect an LED switch, you can install it yourself. Agree, this skill will be especially useful if there are major repairs and updating of electrical wiring.
We will tell you about the connection diagram, installation method and difficulties that may arise during installation. You can also improve an ordinary switch with your own hands by making it backlit.
Repair of halogen chandeliers
Lighting devices with remote controls often break down. The main signs of failure of such chandeliers:
- despite transmitting a signal from the remote control, the lamps do not light up;
- Some modes do not function, the chandelier switches off spontaneously;
- the same modes do not work when controlled from the remote control, but function when switched manually;
- flickering occurs that is not caused by any human action, and spontaneous switching between modes occurs.
The listed problems are the most common, but a combination of several of them is rare. Typically 1 or 2 components of a remote control chandelier need to be replaced.
The search for a problem in a lamp with a remote control begins with checking the batteries. If new ones are installed, but the chandelier still does not work, the next possible cause of the malfunction is the controller.
Different groups of lamps are most often connected in separate blocks. These elements are connected using a controller. A common situation is that it launches only some modules of the device. In this case, it will need to be replaced.
It happens that the light does not turn on either using the remote control or when pressing the switch. In this case, you should pay attention to the number of non-working components. One lamp may burn out. However, when all the bulbs do not work, the likely problem is in the electronic transformer. This element is replaced with a new one, while working with clean gloves.
Why do energy-saving lamps blink?
The LED switch is not compatible with energy-saving lamps. A device conflict manifests itself in a short-term flashing of the lamp when it is off or in the so-called smoldering mode, when the lamp does not turn off completely, but barely glows.
This happens because inside the fluorescent lamp there is an electronic converter (capacitor), which, gradually recharging from the current passing through the backlight lamp, flares up.
A similar phenomenon occurs with LED strip power supplies, which also have a capacitor and are powered by a small current coming from the backlit switch.
Manufacturers of energy-saving lamps indicate that the use of their products is not compatible with the use of LED switches and dimmers.
You can get around this limitation by controlling the operation of the lighting device using a relay. From the switch, the command first goes to the relay, which directly controls the lighting.
The relay is produced by many manufacturers of electrical goods: Schneider Electric , ABB , Siemens . You can place it under the chandelier cap, behind the cornice in which the LED strip is installed.
You can use another solution to the problem - disconnect the neon lamp or LED from the power supply. This can be done by disconnecting the backlight wires from the terminals. But then the LED switch will lose its advantages.
Let's consider solutions that still allow you to combine lighting and the use of energy-saving lamps.
How the switch works
The backlit switch is designed quite simply: in addition to the main element - the key, so that you can turn on or off the power of the lamp, it includes an LED or neon with a resistor. The latter is connected to the terminals of the device, bypassing the disconnect button. Thanks to this scheme, the entire electrical circuit is in a closed state.
However, the resistance of additional lighting is significantly lower than the main source, so ideally the latter does not work when turned off, but only the LED works. When the switch closes the main branch (to the chandelier), the current passes to the main resistance (light bulb) and the LED element turns off.
Note! For various reasons, in practice it happens that even when the lamp is turned off, the lamp in the lamp flickers. The main reason for this is the LED switch. Therefore, it must either be modified, completely removed or temporarily disabled.
Expert opinion
Viktor Pavlovich Strebizh, lighting and electrical expert
Any questions ask me, I will help!
If you are not particularly friendly with electricians and are afraid to get into the wiring yourself, another way to deal with backlit switches would be to install a regular incandescent lamp in the chandelier. If there is something you don’t understand, write to me!
Alternative Methods to Fix LED Lamp Flickering Problem
In order not to turn off the LED in the switch completely, since it is very useful in the dark, you can use alternative solutions to the problem of eliminating the flickering of the light bulb. Two methods are used:
- Increasing the resistance of the additional circuit.
- Adding a capacitive shunt to the circuit.
Increasing backlight resistance
Using the first method, you need to find a resistor in the lighting system of the switch, which serves as the main resistance for the diode or LED element. It needs to be replaced with an analogue with a higher denomination. As a result, the flowing current will become even weaker, which will allow the light bulb driver in the chandelier to be turned off for a natural reason.
The whole difficulty of this method lies in the technical inconvenience and the need for precise selection of the resistor. For example, a standard switch uses a neon module with a 150 kOhm resistance. To eliminate the blinking of the LED, it must be replaced with a 220 kOhm and a 1 N 4007 diode. The latter is used as a diode bridge. Such devices can only be removed, for example, from 220-volt energy-saving lamps. These elements are simply installed in the switch circuit instead of the standard 150 kOhm resistor.
If a three-millimeter diode is used as an indicator, the resistor should have a nominal value of 650-700 kOhm. The problem is that the LED in the switch must match the resistance in the resistor. Otherwise, it may simply turn off the backlight.
Capacitive shunt
The second method, which is simpler, is to use a resistive shunt. Such a device may be an ordinary incandescent lamp with a power of forty watts. The resistance of its non-working spiral is one hundred ohms, which is quite enough to turn off the LED driver in the chandelier. However, in this case, you will have to install different light sources in one lamp or correctly distribute them in different corners of the room within the same scheme.
Important! Spontaneous lighting of LEDs and energy-saving light bulbs can also be caused by incorrect wiring. Only phase should pass through the switch, not zero. In addition, low-quality fixtures may also constantly flicker regardless of the switch.
LED backlit switch as the reason for the lamps blinking
If there are no other ways to get rid of the flickering lamp lamp, you will need to completely turn off the LED or neon lighting on the switch. Let's look at how to do it yourself and what are the main stages of this procedure.
Preparatory stage
For those who have never installed switches or done electrical work, it is recommended that you carefully consider your actions. Pre-requisite:
- Disconnect the general power supply in the apartment/house from the switchboard switch (by checking its absence with an electrical probe or an indicator screwdriver).
- Prepare a set of necessary tools (mostly a flat-tip screwdriver).
Advice! The switch with the LED is energized at 220 V. Therefore, before starting work, you need to turn off the power to the network. Many circuits still have plug fuses. You can turn them off by unscrewing them from the shield.
Operating principle of the lighting device
What turns on the light
All LEDs and fluorescent lamps operate on direct current. Therefore, at the beginning of their case, a special driver is installed, which includes two required elements:
Step-by-step instructions for disabling
Instructions on how to turn off the LED in a household switch consist of the following steps:
- Dismantle the switch or remove the top panel with keys.
- Having understood the circuit, find the LED and conductors connected to the contacts.
- Disconnect the indicator from the terminals, using wire cutters if necessary.
- After making sure that the main conductors and contact points are in good condition, reassemble the switch in the reverse order.
Parsing the circuit
Everything is quite simple here. A voltage of 220 volts is supplied from the AC mains to the diode bridge through a fuse. It is designated “F1” in the diagram. After the diode bridge, a constant current with a certain small ripple comes out. To smooth out the ripple, a capacitor is installed in the circuit. It is designated as "C4".
So this capacitor is the very reason, mind you, the main reason why the energy-saving lamp blinks after being turned off. True, this is not the only reason why these lighting devices blink after being turned off, so let’s look at them all in order.
Reason #1 – switch illumination
To quickly find the switch at night, manufacturers install neon bulbs or LEDs on them. It is convenient from all sides. So the backlight is connected in parallel to the contacts of the switch itself. Moreover, any electrical circuit has a certain resistance. In our case, with an LED it is 100 kOhm with a power of only one watt, with neon backlighting it is 1000 kOhm and a power of 0.5 to 1.0 W.
So why is the light blinking? The thing is that when the switch is on, the current load goes entirely to the energy-saving lamp through the contacts. Once the switch is turned off, the circuit connecting the lamp and the network is broken. But a small bridge in the form of LED (neon) lighting remains. The current passing through it has a small load value, but it is enough to charge the filter capacitor in the lamp connection circuit.
As soon as the capacitor collects the required amount of electricity, it will begin to try to turn on the circuit of the lamp itself. But its charge is not enough for this. That is, I collected a charge, gave it to the lamp, discharged, and again it takes time to charge. But in reality it turns out that the energy-saving light bulb blinks all the time.
What to do
- The easiest option is to remove the switch backlight by disconnecting the connecting wires between the contacts and the backlight source.
- If the switch operates on several light sources at once, it is recommended to replace one energy-saving lamp with a regular incandescent light bulb. In this case, a small current passing through the neon or LED will be spent on heating the filament. But this current is not enough, so nothing will blink.
- If the switch only works for one energy-saving lamp, but you do not want to change it, then you can install it in parallel directly in the chandelier with a resistance of 50 kOhm and 2 W. Essentially, this resistance will perform the functions of an incandescent lamp. Let's face it - it's a crazy idea that shouldn't even be used; it's better to buy a switch without backlighting.
Reason No. 2 – incorrect installation
What does incorrect installation mean? This is when the switch is supplied not with phase, but with zero. That is, the light source will always be under low voltage. In any case, it will be enough to recharge the capacitor. In this case, there is only one way out - to swap the phase and zero in the switchboard.
I would like to add that the energy-saving lamp will blink even if the wiring in the house is in poor condition. What to do in this case? There are two options here:
- Change all wiring. This is long and costly, in any case, you will have to wait for the next major overhaul. Although it is possible to carry out the replacement in an open way.
- Install an RCD and ground the network in sections.
Reason #3 – poor quality
The third reason why an energy-saving lamp blinks is its low quality. To be honest, there are a huge number of energy-saving lamps on the market that do not meet state standards. These are not only Chinese-made devices, domestic manufacturers are also guilty of this. Therefore, these devices installed in the home lighting network sometimes not only blink, they simply do not light up.
Therefore, my advice is to purchase lamps only from branded manufacturers who have proven the reliability and high quality of their products. Although it should be noted that such manufacturers also have defects. So no one is immune from this.
Illuminated switch
The most common reason for a lamp to glow after being turned off is backlit switches.
Inside such a switch there is an LED with a current-limiting resistor. The LED lamp glows dimly when the light is turned off, because even when the main contact is turned off, voltage continues to flow through them.
Why does an LED lamp burn at full heat and not at full power ? Thanks to the limiting resistor, the current flowing through the electrical circuit is extremely insignificant and insufficient to light an incandescent electric lamp or ignite fluorescent lamps.
The power consumption of LEDs is tens of times lower than the same parameters of an ordinary incandescent lamp. But even a small current flowing through the backlight diode is sufficient for the LEDs in the lamp to glow weakly.
There can be two lighting options. Either the LED lamp lights up continuously after turning off, which means that sufficient current flows through the LED backlight of the switch, or the light flashes periodically. This usually happens if the current flowing through the circuit is too small to cause a constant glow, but it recharges the smoothing capacitor in the power supply circuit.
When sufficient voltage gradually accumulates on the capacitor, the stabilizer chip is triggered and the lamp flashes for a moment. Such blinking must be definitely combated, no matter where the lamp is located.
In this operating mode, the lifespan of the power board components will be significantly reduced, since even the microcircuit does not have an infinite number of operation cycles.
There are several ways to eliminate the situation when the LED light is on when the switch is off.
The simplest is to remove it from the backlight switch. To do this, we disassemble the housing and unscrew or bite off with wire cutters the wire going to the resistor and LED. You can replace the switch with another one, but without such a useful function.
Another option would be to solder a shunt resistor in parallel with the lamp. According to the parameters, it should be designed for 2-4 W and have a resistance of no more than 50 kOhm. Then the current will flow through it, and not through the power driver of the lamp itself.
You can purchase such a resistor at any radio store. Installing the resistor is not difficult. It is enough to remove the lampshade and fix the resistance legs in the terminal block for connecting the network wires.
If you are not particularly friendly with electricians and are afraid to “interfere” with the wiring yourself, another way to “fight” backlit switches can be to install a regular incandescent lamp in the chandelier. When turned off, its spiral will act as a shunt resistor. But this method is only possible if the chandelier has several sockets.
Expert opinion
Viktor Pavlovich Strebizh, lighting and electrical expert
Any questions ask me, I will help!
But if the presence of lighting is important and there is a pass-through switch in the pantry, then you can eliminate the flickering of the lamp with its help. If there is something you don’t understand, write to me!
Subscribe to the newsletter
Switches with an indicator (backlit) are convenient devices that allow you to quickly find the switch in a dark room. Illumination is carried out using a neon lamp installed in the switch housing.
With their appearance, the functionality of the switches has increased, but the problems have not decreased. After all, each mechanism has its own characteristics.
How does the switch work?
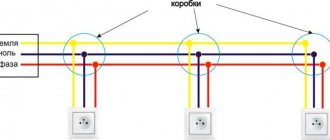
The phase coming to this switch is connected to L - the incoming contact (Fig. 2), and from the outgoing contacts it goes to the lighting lamps. The moving contacts are closed to each other.
A backlight circuit is installed, which includes a resistor and a “neon” - a neon light bulb, and is soldered to contacts L1 and L. Thus, when contacts L and L1 are open, the neon light bulb is lit, and when the light is turned on, these contacts are closed by a moving contact, which eliminates backlight circuit diagrams.
What should you pay attention to?
When choosing a switch with an indicator, it is necessary to operate with the power consumption of all lighting devices connected to the switch. The markings and rated current (maximum permissible) current are indicated on the inside of the switch. Basically, switches are manufactured for currents of 10 and 16 A and, accordingly, the maximum connection power for them is 2.2 and 3.5 kW.
It should also be noted that you should not use backlit switches to work with energy-saving (fluorescent) lamps. Because when turned off, the energy-saving lamp flickers, and this “behavior” of the lamp is unlikely to please anyone.
Currently, there are special types of lighting devices - a flickering candle lamp, which imitate the fluttering of a flame in the wind.
Why does the lamp flash when installing an illuminated switch?
Many users have problems with energy-saving lamps when installing a switch with an indicator, and the question arises as to why the energy-saving lamp is blinking. The fact is that when the switch is in the off state, the current passing through the signal circuit of the neon or LED light bulb charges the electronic ballast capacitor, which is located inside the lamp. This is a common reason why energy-saving lamps flicker - the voltage reaches the trigger value and the lamp flashes, after which the capacitor is discharged and the process is repeated again as it charges.
If the switched-off lamp blinks, you can remove the backlight from the switch or place a resistor or another capacitor in parallel with the lamp.
Currently, some manufacturers of lighting devices have taken into account the problem when the lamp blinks after turning off, and solved it by shunting the lamps or increasing the turn-on delay time - soft start.
Many users have problems with energy-saving lamps when installing a switch with an indicator, and the question arises as to why the energy-saving lamp is blinking.
This solution to the problem when the LED lamp is blinking is optimal. Technologically, 1-2 seconds are allotted for increasing the power of these lamps, however, the disadvantages of these lamps include reaching full brightness only after 1-1.5 minutes.
Another reason why lamps flicker may be an incorrect connection, when zero and not phase goes through the switch. Thus, if the LED lamps flicker, you can reconnect the switch yourself or call a specialist for this. In addition, if a fluorescent lamp flickers, this may not depend on the quality of the lamp itself. In this case, you need to try turning off the indicator.
Thus, when purchasing a switch with an indicator, it is best to choose lamps with smooth switching on, and during installation, carefully check that the wires are connected correctly, in which case problems when the energy-saving lamp flashes after turning off will not be terrible.
The illuminated switch is very practical. In the dark, you won’t have to search for it at random to turn on the light. However, in practice, such a device sometimes creates a great inconvenience - blinking of ice- or energy-saving lamps when turned off. Therefore, we will consider how to turn off the LED in the switch with our own hands, what main parts it consists of and what is the principle of its operation, as well as what are the main stages of the procedure for de-energizing the indicator.
Using the glow for good
Let me make a reservation right away: only “smoldering” lamps will do; it’s unlikely to work with blinking lamps. I personally witnessed the long operation of lamps in this mode, but I do not rule out that these experiments can significantly shorten the life of the lamps. There are too many different lamp designs and not enough data to make clear conclusions.
So, a weak glow can be used as a feature, an additional lighting option. A night light in the corridor, a romantic twilight in the room - “smoldering” can be used effectively. The main thing is to learn how to properly control this glow.
Good results will be achieved by proper “correct” wiring and switches without backlights. That is, when the lamp is turned off, it does not glow at all.
If the lamp glows initially, you can try connecting a capacitor in parallel with the lamp to eliminate it, and another capacitor, but of a larger capacity, to the second switch key. In general, you will have to experiment. But overall, I think this idea is quite interesting.
In all my experiments with the “night light” I used non-dimmable
lamps. The photo below shows two types of cheap lamps that “smolder”.
Reasons why the light bulb in the chandelier does not light
Prompt round-the-clock service by a professional electrician is what we do. Read and write reviews about our work
Expert opinion
Viktor Pavlovich Strebizh, lighting and electrical expert
Any questions ask me, I will help!
Quite rarely, but similar processes can occur without your intervention, then the insulation is broken and a fully functional switch does not affect the lighting at all. If there is something you don’t understand, write to me!
neon indicator
Many switches use a neon light bulb as an indicator; it is most often a glass container filled with neon, in which two electrodes are placed at some distance from each other.
The gas pressure is very low - a few tenths of a millimeter of mercury. In such an environment, a so-called glow discharge occurs between the electrodes when voltage is applied to them - ionized gas molecules glow. Depending on the type of gas, the color of the glow can be very different: from red for neon to blue-green for argon.
Neon lamp
The figure shows a miniature neon light bulb; in electrical engineering they are most often used as indicators of the presence of current.
Causes and solutions
Causes of LED light bulbs flickering and how to fix them.
Reason 1
If inexpensive LED lamps are installed, look for the problem there first. Such products, especially those of unknown origin, are made using low-quality components. For this reason, charge accumulation and flickering may occur even when the power is turned off.
To make sure that the problem lies in the low quality of the lamp, try changing it. In 25% of cases the blinking stops. But do not exchange it for the same one purchased from the same batch, but try to install a lamp from a different manufacturer.
Reason 2
If replacing the lamp does not help, check that the switch is properly connected to the network, especially if the electrical installation was done yourself and not by a professional electrician.
The standard connection diagram assumes that the phase wire goes to the switch and is broken by it. When the phase is connected directly to the LED lamp, it will blink in half the cases when the power is turned off.
Please note: when using an indicator probe, only grasp the handle; touching the working part will cause an electric shock.
Reason 3
To eliminate the problem, remove possible sources of electric or electromagnetic fields from the lamp. Disconnect the wiring sections in the junction box one by one. If you find an area where, when disconnected, the LED lamp stops blinking, think about replacing the wire in this area of the apartment network.
Reason 4
Similar flickering can also occur if there is poor contact in the socket or connector with which the LED lamp is connected. Unscrew it and check the condition of this part. In the presence of oxides, conditions are created for the occurrence of current leaks, which cause short-term switching on. Regular cleaning of contacts in most cases solves the problem.
Please note that such work must be performed only with the plugs removed or the machine turned off.
Main reason 5
But mainly the problem of blinking LED light bulbs is encountered when it is connected through a backlit switch. The reason is this:
- To smooth out the ripple of the electric current after rectification on the diode bridge, a capacitor is used in the drivers. You cannot refuse it, as this will cause an increase in the pulsation rate of the LED itself, which is what is found in cheap models of LED light bulbs.
- The backlight installed in the switch ensures the presence of a constant, albeit minimal current in the circuit.
- As a result, the charged capacitor activates the process of turning on the LED, but its energy is only enough to supply the required voltage to the lamp for a short time.
This is what causes the LED lamp to periodically blink. Moreover, this problem is also typical for luminescent housekeepers. The frequency of short-term switching on of the light bulb depends on the capacitance of the driver capacitor.
Expert opinion
Viktor Pavlovich Strebizh, lighting and electrical expert
Any questions ask me, I will help!
On the one hand, this phenomenon has a positive side, if the lighting is in the toilet or corridor it can be used as night lighting. If there is something you don’t understand, write to me!
How to properly connect a two-key light switch and avoid mistakes
Before purchasing and installing a two-key switch, you first need to decide what it is for? And it is designed to control two lighting circuits from one point.
Don't confuse it with pass-through switches, which have different roles. They differ in the number of contacts. Therefore, when choosing, look first of all not at the front panel, but at the back of the switch.
two-key pass-through light switch
two-gang simple switch
Let’s say if you have 2 or more light bulbs in a chandelier, using a two-key switch you can make it so that when you press one key, only half of the lamps turn on, and when you press the second, all the rest turn on at once.
It can also control two different lamps located at separate points from each other - for example, sconces at different ends of the room or in another room altogether.
The two-key switch differs from its single-key counterpart not only in the number of switches, but also, most importantly, in the number of contacts. There are only 3 of them here. One common and two outgoing. Through them, the phase is separated and then returned to the junction box via separate wires or directly goes to the lamps.
Please note that to install a double switch you will need at least a three-wire wire, even if you do not have a PE protective grounding conductor in your apartment wiring.
There is nothing complicated in the connection diagram and in the process of installation, installation and connection of wires to the switch contacts. First of all, the switch needs to be disassembled. To do this, remove the keys themselves. If you can’t do this manually by simply pulling them towards you, use an ordinary screwdriver, prying the keys off from the side.
Next comes the insulating decorative backing; it can either be snap-on or screwed on. Remove this frame.
As a result, what you have in your hands is the body itself with the fastenings on the sides and the internal contact part. The main task is to supply voltage from the phase conductor to the common contact. Further, when two keys are closed, this phase will diverge into one or the other lighting circuit.
To find the central contact, look at the marking, since it may not always be located alone and in the center.
What to do if you don’t understand the inscriptions or they are erased and painted over? Then you need to use a contact screwdriver with a battery-powered tester with a continuity test function. Insert any metal object (nail, screw) into the supposed common contact. You wrap your fingers around it and touch the other two contacts with a screwdriver.
When you press the keys one by one, that is, turn on one - check, then turn off the first and turn on the second - check, the screwdriver LED should light up each time. If this does not happen, then this is not a common contact.
When you have dealt with the contact part of the switch, take the three-core cable VVGng 3*1.5. It is desirable that the colors of the cable cores correspond to the color markings according to GOST. How to determine by color which conductor should be phase and which should be neutral by reading the article “How to distinguish wires by color.”
To connect the common contact, use the gray conductor phase coming from the junction box. Strip the end of the core, insert it between the contact plates and tighten the screw with a screwdriver.
Next, connect the other two wires in the cable to the outgoing contact connectors.
Connecting the conductors directly to the two-key switch itself is now complete. Insert the housing into the mounting box and tighten the mounting screws.
Then you tighten two spacer screws, which help the mounting fork with teeth to rest as much as possible against the walls of the box and firmly hold the switch body inside it. After this, you can return all the decorative frames and the keys themselves to their place.
Repair of a chandelier with a remote control: breakdowns and their repair
- The maximum permissible voltage must be at least twice the value in the network, that is, 440 V. 630 V capacitors are suitable for these purposes.
- If this could not be found, a 400 V capacitance will also do, but it should be connected according to a circuit with one series and additional shunt resistance in accordance with the following circuit.
Useful tips Connection diagrams Principles of operation of devices Main concepts Meters from Energomer Precautions Incandescent lamps Video instructions for the master Testing with a multimeter