Accurate knowledge of the polarity of an electrical appliance is extremely important. After all, if you connect electrical equipment with incorrect polarity, it may either not work or be completely damaged. In most cases, the “plus” and “minus” of wires and contacts in such devices are indicated by letters, symbols or colors (on the case near the contacts there is a “+” and “-” marker, and the wires are black for minus and red for plus) .
But sometimes it happens that it is not possible to visually determine the poles. To do this, you can use either an ordinary polarity tester or improvised means.
Determining polarity with a multimeter
Sometimes it happens that a new electrical device that needs to be connected does not have polarity markings, or it is necessary to re-solder the wiring of a damaged device, and all the wires are the same color. In such a situation, it is important to correctly identify the poles of the wires or contacts.
But if you have the necessary instruments, a logical question arises: how to determine the plus and minus of an electrical appliance with a multimeter?
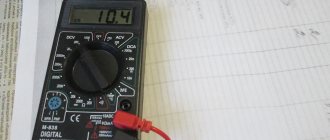
To determine the polarity, the multimeter must be turned on in the mode for measuring direct voltage up to 20 V. The wire of the black probe is connected to the socket marked COM (it corresponds to the negative pole), and the red one is connected to the socket with the VΩmA marker (it is, accordingly, a plus).
After this, the probes are connected to the wires or contacts and the device, the polarity of which needs to be determined, turns on.
If the multimeter display shows a value without additional signs, then the poles are determined correctly, the contact to which the red probe is connected is positive, and the contact to which the black probe is connected will correspond to the minus.
If the multimeter shows a voltage value with a minus sign, this will mean that the probes are connected to the device incorrectly and the red probe will be a minus, and the black probe will be a plus.
If the multimeter used to measure is analog (with an arrow and a display with gradations of values), if the poles are connected correctly, the arrow will show the actual voltage value, but if the poles are reversed, then the arrow will deviate in the opposite direction relative to zero, that is, it shows a negative current value.
Security measures
When working with electric current, the following precautions must be taken:
- Use devices only for their intended purpose;
- Do not turn on equipment with damaged wires and plugs, do not use faulty sockets;
- Do not touch wires or outlets with wet hands or while standing on a wet floor. When working in a room with high humidity, you need to use rubber gloves and a mat;
- Do not bend wires and cables;
- Before starting work, it is worth disconnecting the entire network;
- If the equipment sparks or starts to catch fire when turned on, do not touch it. It is necessary to turn off the power through the panel;
- If you have any doubts or fears, it is better to contact a specialist or choose a safer option, for example, determining the polarity using a potato rather than connecting to a device.
Determination of polarity by alternative methods
If it happens that you don’t have a multimeter at hand, but you need to find the polarity, you can use alternative and “folk” means.
For example, speaker wiring charges are checked using a 3-volt battery. To do this, you need to briefly touch the wires connected to the battery to the speaker terminals.
If the cone in the speaker begins to move outward, this will mean that the positive terminal of the speaker is connected to the positive terminal of the battery, and the negative terminal to the negative terminal. If the diffuser moves inward, the polarity is reversed: the positive terminal is connected to the minus, and the negative terminal to the plus.
If you need to connect a DC power supply or battery, but there are no polarity markings on them, and you don’t have a multimeter at hand, plus and minus can be determined by “folk” methods using improvised materials.
The easiest way to determine polarity that you can use at home is to use potatoes. To do this, you need to take one raw potato tuber and cut it in half. After this, two wires (preferably of different colors or with any other distinctive sign) with their bare ends are stuck into a cut of potato at a distance of 1-2 centimeters from each other.
The other ends of the wires are connected to the constant current source being tested, and the device is turned on (if it is a battery, then after connecting the wires, nothing else needs to be done) for 15-20 minutes. After this time, a light green spot will form on the potato cut around one of the wires, which will be a sign of a positive charge on the wire.
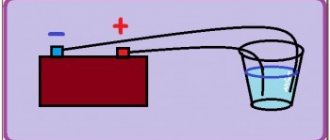
The second method also does not require any special devices or tools. To determine the polarity of the wires of a DC source, you will need a container of warm water into which two wires connected to the power source are lowered.
After connecting the device to the network, gas bubbles (hydrogen) will begin to appear around one of the wires - this is the process of electrolysis of water. These bubbles form around a source of negative charge.
The following method is suitable if you have an unused, working computer cooler. The method for determining polarity using this method is that the cooler must be powered from the uninterruptible power supply being tested. But often there are three wires in coolers:
- black, responsible for negative charge;
- red, responsible for positive charge;
- yellow is the speed sensor.
In this case, the yellow wire is ignored and is not connected anywhere. If, after connecting the cooler to a constant voltage source, the cooler starts to work, then the polarity is determined correctly, the plus is connected to the red wire, and the minus is connected to the black. And if the cooler does not work, this will mean that the polarity is incorrect.
Also, if a multimeter is not available, the positive and negative contacts of the battery can be determined using an indicator screwdriver.
To do this, you need to touch the indicator to one of the battery terminals, press your finger to the back of the indicator (to the contact on the handle), and touch the second terminal of the battery with your hand.
If the indicator starts to light, then the charge of the tested terminal with which it is in contact has a positive value, and if the indicator does not light up, the terminal is negative. But this method of determining polarity has one drawback.
If the battery is discharged or damaged (broken), the indicator will light up when in contact with both terminals, making it impossible to determine the battery poles.
Accurate knowledge of the polarity of an electrical appliance is extremely important. After all, if you connect electrical equipment with incorrect polarity, it may either not work or be completely damaged. In most cases, the “plus” and “minus” of wires and contacts in such devices are indicated by letters, symbols or colors (on the case near the contacts there is a “+” and “-” marker, and the wires are black for minus and red for plus) .
But sometimes it happens that it is not possible to visually determine the poles. To do this, you can use either an ordinary polarity tester or improvised means.
Tuesday, March 15, 2011
Charging a car battery is easy!
In the first case, the battery cannot be helped and it’s time to replace it with a new one. For the rest, a car charger will help, which can be purchased at any auto store. Usually it looks something like this:
Preparing to charge
- Connect the red charging clamp to the positive terminal of the battery (+).
- Connect the black charging clamp to the negative (-) terminal of the battery.
Note: If you have a so-called serviceable battery, then before charging you need to check that the electrolyte level covers the battery plates. If they are open, you need to add distilled (not from the tap) water until they are closed by 5-10 mm.
Determining polarity with a multimeter
Sometimes it happens that a new electrical device that needs to be connected does not have polarity markings, or it is necessary to re-solder the wiring of a damaged device, and all the wires are the same color. In such a situation, it is important to correctly identify the poles of the wires or contacts.
But if you have the necessary instruments, a logical question arises: how to determine the plus and minus of an electrical appliance with a multimeter?
To determine the polarity, the multimeter must be turned on in the mode for measuring direct voltage up to 20 V. The wire of the black probe is connected to the socket marked COM (it corresponds to the negative pole), and the red one is connected to the socket with the VΩmA marker (it is, accordingly, a plus).
After this, the probes are connected to the wires or contacts and the device, the polarity of which needs to be determined, turns on.
If the multimeter display shows a value without additional signs, then the poles are determined correctly, the contact to which the red probe is connected is positive, and the contact to which the black probe is connected will correspond to the minus.
If the multimeter shows a voltage value with a minus sign, this will mean that the probes are connected to the device incorrectly and the red probe will be a minus, and the black probe will be a plus.
If the multimeter used to measure is analog (with an arrow and a display with gradations of values), if the poles are connected correctly, the arrow will show the actual voltage value, but if the poles are reversed, then the arrow will deviate in the opposite direction relative to zero, that is, it shows a negative current value.
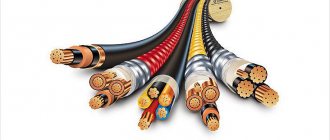
Wire Classification Options
Conductors have two types of markings - color and alphanumeric. Using these designations, you can understand what the product is made of, what the purpose of the core is, what material it is and other important parameters.
Wires can be classified according to the following indicators:
- Number of cores Depending on the number of cores, the conductor can be used to provide power to an electric motor, distribute electrical wiring, and transmit electric current in power networks. The flexibility of the product also depends on the number of cores.
- Material. Copper is predominantly used to create current-carrying conductors, as it is more resistant and has good characteristics. Previously, aluminum was used - it quickly deteriorates, has a short service life and is inferior in properties to copper devices.
- Insulating layer. The conductor may or may not have insulation. It is made of dielectric material and protects the product from mechanical damage, external influences, and also protects people from electric shock.
- Section. The load that the cable can pass through itself depends on this indicator.
- Other indicators. Power, voltage, operating temperatures, operating conditions are also important for choosing a conductor.
Thanks to these properties, you can choose the right wire for different purposes.
Determination of polarity by alternative methods
If it happens that you don’t have a multimeter at hand, but you need to find the polarity, you can use alternative and “folk” means.
For example, speaker wiring charges are checked using a 3-volt battery. To do this, you need to briefly touch the wires connected to the battery to the speaker terminals.
If the cone in the speaker begins to move outward, this will mean that the positive terminal of the speaker is connected to the positive terminal of the battery, and the negative terminal to the negative terminal. If the diffuser moves inward, the polarity is reversed: the positive terminal is connected to the minus, and the negative terminal to the plus.
If you need to connect a DC power supply or battery, but there are no polarity markings on them, and you don’t have a multimeter at hand, plus and minus can be determined by “folk” methods using improvised materials.
The easiest way to determine polarity that you can use at home is to use potatoes. To do this, you need to take one raw potato tuber and cut it in half. After this, two wires (preferably of different colors or with any other distinctive sign) with their bare ends are stuck into a cut of potato at a distance of 1-2 centimeters from each other.
The other ends of the wires are connected to the constant current source being tested, and the device is turned on (if it is a battery, then after connecting the wires, nothing else needs to be done) for 15-20 minutes. After this time, a light green spot will form on the potato cut around one of the wires, which will be a sign of a positive charge on the wire.
The second method also does not require any special devices or tools. To determine the polarity of the wires of a DC source, you will need a container of warm water into which two wires connected to the power source are lowered.
After connecting the device to the network, gas bubbles (hydrogen) will begin to appear around one of the wires - this is the process of electrolysis of water. These bubbles form around a source of negative charge.
The following method is suitable if you have an unused, working computer cooler. The method for determining polarity using this method is that the cooler must be powered from the uninterruptible power supply being tested. But often there are three wires in coolers:
- black, responsible for negative charge;
- red, responsible for positive charge;
- yellow is the speed sensor.
In this case, the yellow wire is ignored and is not connected anywhere. If, after connecting the cooler to a constant voltage source, the cooler starts to work, then the polarity is determined correctly, the plus is connected to the red wire, and the minus is connected to the black. And if the cooler does not work, this will mean that the polarity is incorrect.
Also, if a multimeter is not available, the positive and negative contacts of the battery can be determined using an indicator screwdriver.
To do this, you need to touch the indicator to one of the battery terminals, press your finger to the back of the indicator (to the contact on the handle), and touch the second terminal of the battery with your hand.
If the indicator starts to light, then the charge of the tested terminal with which it is in contact has a positive value, and if the indicator does not light up, the terminal is negative. But this method of determining polarity has one drawback.
If the battery is discharged or damaged (broken), the indicator will light up when in contact with both terminals, making it impossible to determine the battery poles.
This time we’ll tell you how and why you need to check your car with a multimeter before buying. The methods can be used directly when meeting with the seller and inspecting the car. To make things go faster, practice the day before in a friend’s or acquaintance’s car.
First of all, you need a multimeter in order to notice a current leak on the machine in time. Because of this, the engine may run unevenly and the emissions will become more smelly. The wiring may short out, which will damage the radio, electronic control unit and other devices. Or the iron horse simply won’t start.
Marking of wires for alternating three-phase current
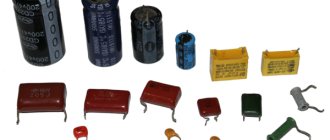
How to determine the polarity of a capacitor
The special color designation of the shell helps to determine the purpose of individual lines even without studying the accompanying design documentation:
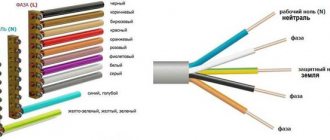
- gray, purple, orange or red wire – phase;
- yellow and green stripes – grounding;
- blue or a combination of white and blue stripes is neutral.
Standard color marking of shells in three- and two-phase networks
Such designations simplify installation operations when laying power lines during the assembly of electrical panels. It is especially important to eliminate errors when hidden installation of communications inside building structures is used. In this case, correcting incorrect actions will be accompanied by increased costs.
How to check current leakage on a used car with a multimeter
The check includes:
- Turn off the engine, remove the key. Close the doors, but open the windows - the battery will not work continuously, and the car may be locked with a central lock.
- Make sure that the additional lighting and radio are turned off.
- Remove the negative terminal from the battery.
- Place one probe between the negative terminal and the negative terminal of the battery - the device will show the leakage current value.
The normal value is 15-70 mA. If the numbers are higher and you and the seller have time, try to find the reason. To do this, also connect a multimeter, then start removing the relays and fuses one by one.
The readings have returned to normal - you have found the cause of the current leak. Perhaps further repair or replacement of a part, or even the entire wiring, will be required. You can confidently ask the car seller for a discount or refuse the purchase altogether.
There may be several reasons for the leak. The following may be involved:
- battery;
- sensors;
- high voltage wires;
- generator.
Each element can be checked using a multimeter.
Self-labeling
There are times when markings are erased or missing/mixed up. Then, after ringing each conductor, you should independently indicate which core is responsible for what.
If sections of the wire are completely replaced, you can purchase cables of the required color. If it is not possible to purchase a suitable shade, you can make a mark on the ends using colored electrical tape or heat shrink tubing. The rules allow marking the conductor not along its entire length, but only at the points of connection to the busbars.
Correct identification of conductors is needed to solve various practical problems. If you correctly determine the “red black plus minus” correspondence, the normal functioning of the audio speakers will be ensured. Errors in power networks when determining “phase” and “zero” are accompanied by significant damage and emergency situations. The information presented below will help eliminate incorrect actions during installation work.
How to test a car battery with a multimeter
Testing a car battery with a multimeter involves connecting two probes at once. Also turn off the engine before taking measurements.
Place the red probe against the “positive” terminal, the black one against the “negative” terminal. If you mix it up, it’s okay, the device will show the current numbers, just with a minus sign.
Look at the device screen. The normal battery charge ranges from 12.6 to 12.9 volts.
The operation of the battery can also be checked with the engine running. When checking the car battery with a multimeter, you will also find out how the battery works in conjunction with the generator, as well as whether the voltage regulator is working properly.
Normal numbers with the engine running are 13-14 volts. If the multimeter shows less, the battery needs to be charged, or there is a current leak.
Remember: a multimeter will show the battery charge, but will not tell you everything about its operation. There are other devices for this. For example, a load fork.
How to check car sensors with a multimeter
The reason for the “death” of the battery, voltage surges, and unnecessary values on the instrument panel can be various sensors in the car. According to the experience of motorists, 5 types of sensors most often cause problems:
You can understand where they are located from the instructions for the car, on car enthusiast websites, and various forums.
To check your car's sensors with a multimeter, you will also need information about the normal voltage readings specifically for your car. It can also be found in the instructions or on the Internet.
ABS sensor
It is checked by two parameters: voltage and resistance.
To start measuring, select the appropriate mode on the multimeter. If you want to know the resistance value, for most the norm is 1.2-1.8 kOhm. Connect the device to the sensor and start taking measurements. At the same time, shake the wires going to the element. If the numbers on the screen change and become higher or lower than normal, there is a problem with the sensor.
Measuring voltage is a little more difficult - this can only be done with a jack or in a car service on a stand. You need to spin the car wheel to 40-50 rpm and monitor the multimeter readings. On any machine it should output 2 volts.
Wire colors in electrical wiring
The color identification scheme is convenient not only for installation. As a rule, different contractors install and operate electrical wiring. Compliance with standards prevents errors during repair work and in the modernization process.
Something to remember! Domestic standards have changed several times over the past decades. Currently, the markings discussed above are used.
Color of zero working and zero protective wires
The color options for the shells will help you recognize the intended purpose of the conductors:
- blue – working zero;
- transverse or longitudinal combinations of yellow and green stripes - protective zero;
- main blue with a change to a combination of yellow and green stripes at the junctions - combined working and protective zero.
For your information. The last universal option can be done in the reverse way. The main part of the line is created from a combination of yellow and green stripes, with blue color applied at the junctions.
Oxygen sensor
Determines whether oxygen remains in the exhaust gases. Before taking measurements, also inspect it - it may be damaged and a multimeter will not be needed at all. Then the element just needs to be replaced.
If everything is in order, measure the voltage and resistance as with the ABS sensor. The algorithm is the same. Start the car and watch the device. After start-up, the numbers 0.1-02 volts will appear on the screen. When the car warms up, the device will show up to 0.9 volts. If you didn’t notice that the indicator has changed, the sensor is most likely faulty.
If the voltage test is successful, find out the resistance readings. The norm ranges from 10 to 40 ohms.
Knock sensor
Determines the shock wave during fuel combustion. The resistance indicators for each car are individual - look for information in different sources.
It's a little easier with tension. First remove the sensor. Connect the plus probe to the signal wire, the negative probe to ground, closer to the mounting bolt. Next comes the fun part - hit the sensor against a wall, chair or table. This is the only way the multimeter will record the voltage reading. The norm on most cars is from 30 to 40 millivolts.
How to check high-voltage wires on a car with a multimeter
If you feel a loss of car power, see increased fuel consumption, the car shakes, and the idle speed fluctuates, it’s time to check the high-voltage wires. More precisely, measure the resistance in them. Remember the procedure:
- disconnect the wires from the machine or disconnect one wire on both sides;
- turn the device into ohmmeter mode and place the probes on both sides of the wire.
The normal resistance value is 6-10 kOhm. If the device shows less, down to zero, do not be alarmed. The multimeter numbers are influenced by many factors, for example:
- quality of wire insulation;
- length;
- presence of microdamages;
- wire type.
If your car's performance is outside the normal range, it is better to contact a car service center, where the resistance will be measured with professional and more accurate instruments.
Ground wire color
Modern standards regulate the yellow-green color of the earth. The coloring can be done in the form of transverse yellow-green stripes or as yellow insulation with one or two longitudinal green stripes.
Some manufacturers produce a ground wire that is bright green or yellow. In this case, it is not difficult to identify the ground, since such colors are prohibited to indicate the phase. Similar markings are used on electrical circuits. Letter designation – RE.
Some experts incorrectly call the ground the “neutral and protective” wire. This may confuse others; you need to understand that under this name it is the earth wire that is hidden. It is, by definition, protective, as it helps protect a person from electric shock in the event of an emergency.
How to check a generator on a car with a multimeter
Checking the generator is similar to measuring other elements of the car that cause current leakage.
- Traditionally, turn off the ignition, take out the key, turn off the radio, and so on.
- Connect the multimeter to the battery.
- Measure the voltage. A fully charged battery will produce between 12.5 and 12.9 volts.
- After this, start the engine, turn on the heated windows, seats, heater, and low beam.
And measure the voltage again. The norm is 13-14 volts. Maximum - 14.8 volts. In these cases, the generator works like a clock. If the multimeter shows lower numbers, the generator is not charging the battery. So, get ready to pay a decent amount for replacing or repairing the unit.
Instead of an afterword
When buying a used car, it is useful to know how to find an electrical leak and understand its cause. Take a multimeter to inspect your car - you will save yourself from unpleasant surprises, such as a suddenly dead battery, power surges or burnt wiring.
For the same purpose, check the car's history. This can be done directly during a conversation with the seller. It’s convenient to use the Autocode service - monitor information from 13 sources at once: traffic police, RSA, EAISTO, banks, tax and other services. The verification will take 5 minutes.
Afterwards you will find out the actual mileage, number of owners, history of fines, as well as information about theft, participation in an accident, restrictions on car registration and much more. Be carefull!
Having fully studied the online report, it is still worth taking a closer look at the technical nuances of the car when purchasing. And if you are not confident in your knowledge, or it is not possible to go for an inspection, order an on-site inspection service. The specialist will conduct a diagnosis for you and make a detailed conclusion from a professional point of view.