Every major overhaul necessarily requires high-quality electrical wiring. And under it it is usually necessary to groove the walls for wiring. Even if almost the entire apartment is covered with plasterboard, there is still a need to make grooves in some places. You will learn how to properly tap walls in this article.
Do-it-yourself methods for slitting walls
There are 4 of them in total. They differ in the type of tool used and how they work with it. Operations are carried out using one of the options shown in the table:
Each tool for wall gating has advantages and disadvantages. They are shown below:
| Tool | Strengths | Weak |
| Hammer and chisel | Cheapness and availability | Inconvenience of work. Curve furrows are obtained Very long process |
| Hammer | High speed. Cleanliness of the process. | The result is stripes with curved edges |
| Bulgarian | Quickly achieve levelness | Abundance of dust |
| Wall chaser | Dust-free chipping Faint noises. Precise evenness of the edges of the grooves High dynamics of work | High price tags |
Hammer
It is also called an impact drill. I’ll explain how to drill walls for wiring using a hammer drill:
- Mark a line on the wall, and along it, in increments of 2-3 cm, create holes of the required depth.
- Remove the drill and place the spatula.
- Turn on the “no drilling” option and bring the unit to the wall, tilting it 45 degrees.
- Create a groove by removing any remaining wall material. This is the so-called chiselling.
The result is a furrow with significant grooves and other defects. They are plastered or puttied.
An abundance of dust and small debris is formed here. To ensure dust-free gating when working with your own hands, use a powerful vacuum cleaner (construction modification) and involve an assistant. He will hold the nozzle of the device near the treatment area.
And I recommend using a tool with three modes, including a chiseling option. And you should not use particularly powerful devices and weak household versions. The first ones create too large depressions, the second ones break after 2-3 hours of work.
If you don’t have a hammer drill, what can you use to tap a concrete wall for wiring? The answer is a regular drill with a pobedit bit. Also, holes are made along the created line, only every 1-2 cm. And the process takes much longer.
Bulgarian
This is a very popular option, but it is quite dusty and has an imprecise cut. In addition, they have to walk along the designated line twice to form the width. And then the furrows are hollowed out using a hammer drill.
To work with an angle grinder without dust, you need to hire an assistant. It will hold the vacuum cleaner's suction tube near the cut area. The assistant should wear a respirator, since dust will still enter the room.
How else can you grind with a grinder without dust? I recommend the following solutions:
- Wet cut Constantly wet the work surface. But do not spray on a functioning disc. The wall is moistened before starting the tool. This ensures dust-free grinding with an angle grinder. But there is a high probability of flooding of neighbors.
- Special vacuum cleaner. This version does not require an assistant. A special device is purchased that is connected to the instrument. It allows you to grind with an angle grinder without debris and dust.
Wall chaser
Its main cutting components are a pair of diamond discs mounted on a moving shaft. The distance between them varies up to certain parameters. This sets the width of the planned groove.
The instrument also has a protective casing with a pipe. This is the contact link between the device and the vacuum cleaner. Dust flies out from under the discs and accumulates in the casing, then is discharged into a reservoir or bag.
If you are interested in a reliable option for how to groove walls for wiring without dust, then this is a wall chaser.
It is also easy to work with and produces smooth edges of precise dimensions. Moreover, it forms only the boundaries of the furrow. The remaining material between the slots is eliminated manually, with a hammer drill, or a hammer and chisel.
Before work, a diagram of the cable positions is indicated on the wall. The discs are placed in the tool, the cutting dimensions are set, and the vacuum cleaner is connected. The wall is processed smoothly, the tool follows exactly along the marked lines.
Hammer and chisel
They are required to knock out material remaining in the slots in the wall. This is a suitable option for cutting short sections (up to 2 m). But the work is long and laborious.
And the result is a furrow of poor quality and inaccurate dimensions. The repair composition corrects the situation.
Chiselling with a hammer drill
If you only have a hammer drill, then it is quite enough for laying grooves of small length and size. The only difference is that the work time and technology will increase. Having outlined the contours of the grooves, with a regular drill, begin to drill (perforate) holes every 2 - 3 centimeters at a right angle.
Afterwards you need to perform the same operations, only with a slope of 450, knocking out the remaining concrete or brick. Hollowing out niches for distribution boxes is also done with a hammer drill, since the groove has specific dimensions.
Grooving for wiring in walls: features of work on different surfaces
Different surfaces behave differently when grating. The most difficult thing is to make a groove in concrete - here you cannot do without a hammer drill or wall chaser! If you need to conduct wiring in a wooden wall (a relatively soft and pliable material), the lines are marked with a grinder, and the grooves are laid with a hammer and chisel.
Recesses in porous concrete are made with a special tool (wall chaser). If the wall is brick, you can do without gouging out grooves by attaching the wiring with dowels.
If it is necessary to place the cable in a metal casing, horizontal grooves are carried out with a chisel or grinder. Owners of a hammer drill with a “drill” or “pike” type attachment can use it. Brick walls, if possible, are grooved along the seam, since the cement mortar is softer and more pliable than the brick itself.
Simple rules for gating:
- Vertical grooves should not be deeper than one third of the total wall thickness.
- Horizontal grooves are made with a depth of less than one-sixth of the wall thickness.
- The grooves are drawn in a straight line, parallel to the floor line; they should not intersect. This requirement is based on common sense - if the groove is too deep, the strength of the wall will deteriorate. If the grooves intersect, the solidity of the wall suffers.
- The grooves are drawn either strictly vertically or strictly horizontally; tilting is permissible only on indirect walls.
No. 6. Laying cables across rooms
The cross-section of the wiring cables depends on the load that will be placed on them. This is the subject of serious calculations, but you can also use tables in which the cross-section of the wires has already been calculated depending on the current, power and voltage.
Open wiring in cable channels
Before starting work, it is best to mark the future locations of sockets and switches. For safety and aesthetic reasons, it is best to install open wiring in cable ducts in a wooden house. They are made of self-extinguishing plastic, are a box with a latch, the size and color may vary. The wiring process in this case is as follows:
- choose a cable channel that corresponds to the number of wires and their cross-section;
- remove the cover and attach the channel box to the surface with self-tapping screws;
- Distribution boxes are installed at the cable connection points;
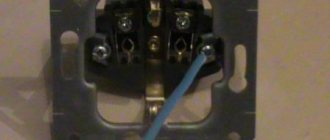
- the base of sockets and switches (only those intended for external wiring are used) are fixed to the designated places;
- the cable is laid in the channel and covered with a lid;
- The ends of the cables will be connected in junction boxes. Connect the cable to sockets, switches and circuit breakers.
Internal wiring in a metal pipe
If you decide to install hidden wiring in a wooden house, then the procedure will be as follows:
- preparation of grooves and installation of open junction boxes; they must be freely accessible even after wall cladding;
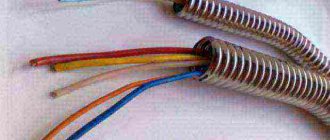
- The passage of wiring through the walls is made using metal pipes, which are called feed-through sleeves. First, a hole of the required diameter is prepared in the wall, then a sleeve is placed; it should have a plastic sleeve at the edges. Special metal sleeves are placed under sockets and switches;
- The diameter of the pipe is chosen such that after installing all the cables, there will be 60% free space left in it. Preference is given to copper pipes, which bend well and are easy to cut. After cutting, the ends of the pipes are well ground or provided with plastic rims. Pipes are attached to a wooden surface with clamps, to metal sleeves - thanks to the flaring of the pipe inside the sleeve;
- pull the cable through the pipe and check the insulation;
- connecting cables in junction boxes and connecting to sockets and switches.
Connecting wires
In junction boxes, wires can be connected in one of the following ways:
- gray connection. These are special insulating caps that allow you to connect two wires that have been previously stripped by 2-3 cm and twisted together. The caps are very easy to put on and are inexpensive;
- The wagami connection is no less simple, but more reliable. A cage with the appropriate number of holes for the wires is selected, and the cables are inserted into them until they click;
- crimping with sleeves is one of the most modern methods, but special equipment will be required;
- It is better not to use the old-fashioned method of twisting followed by insulation with electrical tape in a wooden house.
All that remains is to install sockets and switches. For a wooden house, fittings made to look like wood are best suited, but this is not necessary. This is followed by work on connecting all groups of wires to the panel, installing a meter, RCDs and automatic machines.
You will also need to perform grounding. To do this, a hole is dug near the house in the shape of an equilateral triangle with a side of 1 m. The depth is at least 30 cm. A metal corner or pin 3 m long is driven into the vertices of the triangle, they are connected to each other with a corner 1 m long using welding. A hole is made in one of the corners and a grounding conductor is secured in it using a bolt and nut, it is brought out into the distribution panel and connected to the grounding bus, and the grounding conductors of the cables are also connected to it.
After completion of all installation work, electrical laboratory specialists are called in, who carry out all the necessary tests and issue a protocol confirming the correctness of the wiring and its safety. It is recommended to stick the wiring diagram on the inner surface of the panel door - this will make it much easier to navigate in the event of an accident.
It is necessary to carry out all work on installing electrical wiring in a wooden house only if you have the appropriate knowledge and experience. If you have the slightest doubt, it is better to call specialists - the safety of the house and its residents depends on the quality and correctness of all stages of work.
Wiring markings
Grooving walls for wiring requires having a plan for electrical wiring throughout the entire apartment, including those areas that you plan to remodel. If you have difficulty creating something like this, then contact the professionals. The price of this work is rarely overpriced, which cannot be said directly about the wire stretching and gating itself. You can do this yourself and save a lot of money.
- Draw a path on the walls where your wiring will go. For clearer and more regular lines, use a level.
- Mark the location of outlets and switches.
- Check for hidden wiring under the designated areas. For this purpose, special detectors are used. This point of preparatory work is very important, as it will protect you from electric shock.
- Cover the doorway of the room where the work will be carried out with a damp cloth or cellophane to protect the rest of the apartment from dust.
Checking for hidden wiring is necessary even if you have a plan for previous wiring. Take care of your life!
Popular options for hiding wiring in an apartment
You can hide wires and cables from view using improvised means that are found in almost every apartment. Stores also sell special devices and solutions to this problem.
In decorative boxes
There are special decorative skirting boards that differ in their special design and performance characteristics. They have a cable channel in which the cords are located. The materials from which skirting boards are made can be different:
- Plastic - located at the base of the floor, there are special separating cells on the profile rail, thanks to which several types of wires are laid.
- The tree is quite rare. As a rule, wooden boxes are made to order. Their insulation class must be appropriate to avoid fire during use.
- Aluminum is most preferred. It is highly resistant to fire and accommodates a large number of powerful wires.
Hide the junction box
According to the rules, the junction box cannot be hidden under finishing materials. Access to it must always be free for maintenance and repair. Therefore, the white lid can be painted to match the color of the walls or covered with wallpaper. So that the plug does not stand out from the overall interior, it is also painted with automotive enamel to match the tone of sockets and switches.
When working with a distributor, it is important to observe technical safety so as not to cause a short circuit or electric shock.
Where to hide under the floor or near the baseboard
Wires lying around on the floor can be hidden under the floor. But this is done during repairs, because lifting floorboards or covering elements separately is a labor-intensive process.
Many people prefer the finish in its original form.
Wiring is often hidden in a special panel; it is mounted on the wall along the baseboard and is not noticeable.
In addition, it can be decorated or painted.
If masking occurs during repairs, then a hole is made in the floor using a hammer drill, then the wire is inserted into the corrugation and laid in the hole made. After which the floor is filled with cement.
How to remove wires from a TV, tuner
In many cases, the TV is mounted on the wall. A decorative box will help hide trailing wires from a TV or tuner. Construction stores offer a wide range of different models of cable channels that will match the color and design of any interior.
If the TV is located on a stand or table, then you can nail the cords with a construction stapler to the legs or back wall of the piece of furniture. It is better to install the socket behind the TV, or vice versa. As a last resort, cut a groove in the wall behind the TV and run electrical wiring along it. Then fill the groove with plaster and finish it.
Where to put the wires on the floor
Cords lying on the floor are not only unsightly, but also unsafe. Boxes are convenient for hiding extension cords to which many devices are connected. For example, under the desktop, where a desktop computer and its peripherals are located. A regular shoe box will do for this. You need to make several holes in it for the wires and place an extension cord there. If desired, the box can be decorated with decorative elements or covered with paper.
For these purposes, there are ready-made solutions - boxes made of durable plastic, the bottom of which is rubberized for stability on the floor. On the top cover there are holes for cords, and inside there are fasteners, and a long wire is wound around them. It can be placed on the floor or mounted on the wall.
Socket outlets and distribution boxes
The methods for cutting wires are described above, but they need to be slightly modified to prepare holes for distribution boxes, sockets and switches. Let's take a closer look at how they are made:
- Make a small hole with a punch in the center of the intended circle. It should be about 8 mm in diameter.
- Using a crown saw, you outline the outline of the future round hole.
- Using a hammer drill, you need to drill thin holes along the intended contour.
- Use a crown to remove the excess from the hole.
If, when removing the material, you notice fittings in the opening for a socket, junction box or switch, do not remove it under any circumstances, even if it interferes with installing the box. This may damage the building structure. The best solution would be to move the outlet or switch to another location.
Grooving for sockets is as simple as drilling regular furrows.
What types of grooves are there?
A groove, groove or groove (according to the PUE, that is, the rules for the construction of electrical installations) is a groove of a certain type made in a panel, monolithic concrete or reinforced concrete, masonry, cement floor base and other surfaces for laying utilities.
Depending on the type of communications, there are:
- shallow grooves of arbitrary cross-section for single cables - electrical wiring to sockets, switches, and other electrical appliances;
- medium-sized grooves, usually of square, rectangular or semicircular cross-section, for laying several ordinary or low-current cables. They are used for routing highways, connecting individual elements of the electrical supply of an apartment or house to the meter/input of the electrical network, and small-diameter pipes;
- recessed grooves of a semicircular or other cross-section for laying pipes.
General rules for installing grooves (furrows) according to SNiP 3.05.06-85:
- the radius (depth and width) of the groove must exceed the diameter (maximum cross-section) of the installed communication element by 5...10%. For communications with volumetric fastenings, the size is accordingly increased so that the fastenings do not protrude beyond the plane of the structure in which the furrow is laid. Protruding fragments are permissible only for open grooves in rooms that are not being finished. The maximum cross-sectional size (depth and width) should not exceed 250 mm;
- cutting furrows is carried out only in straight lines. For electrical communications, cutting at an angle to the horizontal is permissible; for pipelines, the maximum slope of the groove coincides with the permissible slope of the pipe. So, for water supply beds in an apartment or house, a slope of 2...5 degrees is applied;
- changing direction and crossing the grooves is carried out strictly at an angle of 90 degrees. Exceptions are allowed only in private housing construction for low-responsibility networks;
- the groove depth should not exceed the maximum cross-section of the communication element by more than 2...3 mm, otherwise weakening of the building structures is possible;
- for monolithic reinforced structures, the gating depth should be 2...3 mm less than the depth of the reinforcement from the surface;
- permissible distances from the elements of the room - for horizontal grooves no less than 150 mm from the ceiling or floor, vertical grooves no less than 100 mm from corners, edges of door and window openings, niches and columns;
- It is unacceptable to lay the groove closer than 400 mm to the existing gas pipeline.
In addition to these rules, there is a strict ban on making grooves in concrete floors, as well as in panels. For panel houses, all building elements are load-bearing (except for partitions), so any grooves in them weaken the structure and can lead to the collapse of the building. The same applies to concrete floors.
Even in private housing construction, gating with cutting the reinforcement of a monolithic structure of load-bearing walls is unacceptable, since it significantly weakens its load-bearing capacity.
If it is necessary to conceal communications in panel houses, on concrete floors, grooves are laid along horizontal and vertical seams between load-bearing elements, going deeper into the surface no more than permissible (see above).
Some final tips
- Wall grooves for wiring are performed parallel to the ceiling or walls, the angle is strictly 90.
- A minimum distance of 10 cm must be made from corners and windows, 40 cm or more from the gas pipe, and 15 cm from the ceiling.
- The maximum permissible groove depth is 25 mm.
- It is prohibited to lay grooves into load-bearing walls, columns and beams of multi-storey buildings.
- It is unacceptable to cross wires during their installation.
- If the wiring is planned through the bottom of the walls, and switches and sockets will be low, then you can make grooves in the floor or run the electrical cable through the baseboard.
- Scoring ceilings is prohibited as it can cause serious damage to the building structure.
Stage No. 3 - checking the walls for old wiring
Hammering with a hammer drill
From a safety point of view, you cannot drill or hit walls if the location of the existing hidden wiring is unknown. You can detect it using special devices:
- detector for detecting fittings, cavities, wood and hidden wiring. Such a device is not cheap, and it is expensive to buy it for private repairs. But with the help of this detector you can determine: the location of the electrical wire;
- depth;
- the strength of the current passing through the wire. This indicator also determines whether a power or low-current wire runs in a given location;
- the wire is located at a depth of more than one and a half centimeters;
Marking walls and preparing them for work
Before starting gating, it is necessary to find out whether there are hidden electrical cables along the planned route. This can be done using a special device - a locator, which will quickly determine the location of the wire. This way you can avoid the risk that the tool will fall into a live cable during operation.
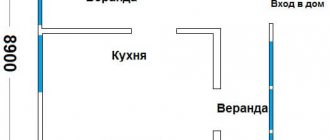
After this, the wall needs to be marked along the route of laying the future groove.
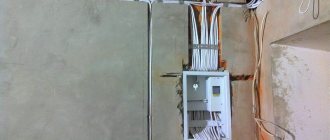
The marking should begin from the distribution box, and then lead it to the places of future installation of electrical devices (sockets, lamps, switches).
Before you pierce the wall, take a damp cloth and cover the doorways with it to prevent dust from scattering throughout the room.
Is gating always necessary?
This process can be chosen by those apartment owners who do not want to engage in full renovations. The choice of this method is due to the desire to save on building materials and hiring specialists.
Replacing wiring without gating can be done in the following ways:
- open method;
- use of old grooves;
- old wiring.
In the first case, the wire is placed in the baseboards. Corrugations and cable ducts are widely used in the repair process; install boxes. Wiring in an apartment without gating can be done by a specialist for a small fee. But laying channels in the wall for electrical wires will entail significant financial costs. In addition, you will have to allocate funds for the purchase of finishing materials. Having a professional plasterer will also incur expenses.
You can make grooves manually or using equipment. It is best to use a wall chaser with an industrial vacuum cleaner connected to it. The disadvantage of such a device is its high cost, so at home you can use a grinder with a diamond blade to lay channels. Wiring is possible without gating the walls. Many apartment owners will be attracted to this option due to the lack of dust.
Is it prohibited to tap into a load-bearing wall?
The most important question that worries everyone is whether it is possible to cut and groove load-bearing walls. And what do SNiP and GOSTs say about this?
As stated in GOST R 50571.15-97, installation of electrical wiring should not reduce the performance of building structures.
There is also another document that experienced electricians refer to and adhere to its recommendations - Moscow government decree 10/28/11 “On the procedure for renovating premises in residential buildings on the territory of the city of Moscow.”
Although it was signed for Moscow, its recommendations are followed in other regions. Specifically, clause 11.11 says: “Making grooves in HORIZONTAL seams and under internal wall panels is prohibited. It is also prohibited to make grooves in wall panels and floor slabs.”
It turns out that it is impossible to cut grooves in the ceiling in any direction.
There, use only external cable fastening using clips and corrugations.
In monolithic panels, it is possible to cut grooves only in the plaster layer, without going deep into the wall itself and without weakening its surface. As for other load-bearing walls, only vertical grooves are allowed there, but even then the integrity of the reinforcement inside must not be violated.
This is why electricians say that the plaster should always go before the electrics, and not vice versa.
You thereby get the necessary head start, a couple of extra centimeters of the plaster layer. And when cutting a furrow or drilling out a socket box, you simply won’t reach the fittings.
Just imagine that in the load-bearing wall in the photo below, you will cut a niche for recessed socket boxes 6 cm inward! And the same amount on the back side in another room.
What if your neighbors below and above do the same? How long will your high-rise building last and who will be to blame if one day it collapses like a house of cards?
Of course, this is the most extreme and unlikely case. However, most often such houses, after 10-15 years of operation, are considered unsafe.
What to do if you can’t do without socket boxes in a monolithic wall? In this case, place plasterboard there and mount the socket box in the plasterboard wall without disturbing the monolith.
As for panel houses, where virtually all the walls are load-bearing, the standard option in them is to use factory-made voids in the slabs. Otherwise, you will have to run the electrician along the ceiling (on clips) or along the floor (in a screed).
At the same time, categorically refuse horizontal gating and drilling of niches with damage to the reinforcement. This means either a sufficient layer of plaster or false walls made of plasterboard.
Features of working on different surfaces
Different surfaces behave differently when grating. The most difficult thing is to make a groove in concrete - here you cannot do without a hammer drill or wall chaser! If you need to conduct wiring in a wooden wall (a relatively soft and pliable material), the lines are marked with a grinder, and the grooves are laid with a hammer and chisel.
Recesses in porous concrete are made with a special tool (wall chaser). If the wall is brick, you can do without gouging out grooves by attaching the wiring with dowels.
If it is necessary to place the cable in a metal casing, horizontal grooves are carried out with a chisel or grinder. Owners of a hammer drill with a “drill” or “pike” type attachment can use it. Brick walls, if possible, are grooved along the seam, since the cement mortar is softer and more pliable than the brick itself.
Simple rules for gating:
Tags: machine, beat, sconce, vaga, view, house, , grounding, cable, like, computer, , tray, installation, load, external, connection, rule, checking, wire, laying, start-up, vacuum cleaner, , work, size , calculation, repair, socket, row, garden, connection, ten, type, current, triangle, , installation, photo, shield