Very often, even at the beginning of design work, many people forget that they need to find out the dimensions of the frames for sockets. This is all done in order to choose the optimal location. The most difficult thing is to decide on the model range, because everyone’s dimensions differ significantly from each other. Before the renovation is completed, many people will change their minds about the design several times, so it will never be possible to achieve optimal accuracy.
Select sockets immediately before starting all installation work. All main dimensions are always formed directly by the frame. It must be universal to fit all components - this applies to switches, dimmers and switches.
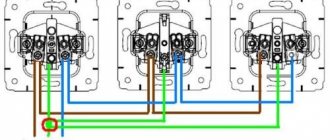
You can't do without your favorite outlets. All free frames here are called posts. If you want to install two pieces at once, but the frame will already have two posts.
Current sizes
If you are not going to take the coolest designer options with bells and whistles, then it is best to take a closer look at the most ordinary samples with universal spare parts. Expensive models often have a non-standard frame, which causes additional problems during installation.
Check out the leading positions, but still choose a balanced option for your space. Then you won't have to deal with adjustments later.
Very often they order fashionable glass frames for sockets if they suit any interior. Here the manufacturer is no longer as important as the appearance and shape. Differences of a few centimeters are usually not critical. Check the double and triple options separately. There are some nuances during installation.
Grounding
Sockets are available with or without grounding pins. The latter are cheaper.
Some home appliances have a special plug for them without grounding. For example, table lamps or floor lamps.
Mistake #6
Is it worth calculating a separate number of sockets with and without grounding based on this?
Of course not. The socket must be universal. And such versatility is provided only by those with grounding “ears”.
The seat and contact groups for both copies are absolutely identical.
Kinds
Most often they take a beige sample, which is installed in almost all new apartments. This is such a universal soldier who does not stand out and serves faithfully. Such a beautiful plastic thing. That’s why there are already almost identical white colors.
An amateur is unlikely to distinguish polar white from snow white. The electrical outlet looks great against this background. Very often they can be found in bathrooms and kitchens.
There are also rare black and silver shades, they are ideal for specialized interiors. Pay close attention to shapes and materials
The eternal question: install socket boxes before or after plastering
If the surface is covered with plasterboard, there is no such problem. What to do when installing socket boxes in a brick or concrete wall?
In fact, from a technical point of view there is no difference. You can accurately calculate the planting height: the main thing is that the socket box does not stick out, even by 1 mm. If the edge is recessed by 3–5 mm, this is not a problem. The mounting pad of the socket will rest against the wall, and use longer screws for fastening.
The problem is rather psychological - it’s a shame to drill into a plastered surface.
When choosing a sequence (before or after plastering), one nuance should be taken into account: if the edge of the installed socket boxes protrudes above the plane of the wall, how will you apply the plaster evenly?
Therefore, the best option is to drill out niches, then plaster the walls (there will be holes for sockets with uneven edges), and then carefully clean the edges of the holes. Before installing the socket boxes, you will have to restore the markings.
Next - nothing new. We mount the socket boxes on alabaster and wait until it dries. All that remains is to trim the edges a little.
Simple advice for beginning craftsmen: To prevent alabaster or plaster from hardening too quickly, add PVA glue to the water. After mixing, the solution takes 2–3 times longer to crystallize.
True, you will have to wait several hours for final drying. But the mixture will be many times stronger.
Materials
Glass models are now actively being produced on the market. Such decorative frames for rosettes are most often produced with dark colors, but there are also light samples. You can take not only rectangular shapes, but also round ones. In monoblocks, the frame and all components are specially installed at once. The front side is all glass.
In electrical accessories, glass products not only attract with their appearance, but also with a price that is significantly lower than wooden sockets. If you decide to do the repairs yourself, saving on the cost of a crew, then you can safely choose even such small parts at a slightly more expensive price. Any person can afford this. The main thing here is a thoughtful approach and following the instructions.
There are no special rules or requirements for installing the socket frame. They are not that fragile. In many strength characteristics they are not inferior even to plastic.
The only thing is that when transporting it is better to wrap everything well with cloth. There is also a danger that if it is skewed, the load will increase, but here you just need to take the installation itself seriously, then such a problem will not arise.
Inexpensive plastic is always ready to forgive small “jambs” when connecting all the elements. Glass does not forgive the mistakes of designers. You should carefully follow all the instructions and do everything according to the standards.
Stock
Never buy electrical equipment exactly as much as you need. Always do this with a minimum margin.
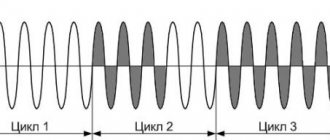
Even the highest quality and most expensive sockets and switches, with a declared switching cycle of 50 thousand, periodically break down and fail.
This may not happen immediately, but after 5 or 10 years. The longer the period, the worse it is for you.
You come to the store and find out that the manufacturer has already discontinued this collection, and it is not possible to find an identical one. Therefore, always add a few pieces in reserve.
How much exactly? For an apartment up to 100m2:
- 3 sockets + 2 single-gang switches
- 1 pass-through + 1 changeover switch
- frames – 2 single + 2 double + 1 triple + 1 quadruple
This will be more than enough and will be enough for you to live a calm, trouble-free life for many years to come.
Prefabricated and collapsible options
Everything is quite simple here. Frames are almost always sold separately. This is how it is in the market. Choose an adequate number of posts to combine the elements you need into a network of up to 5 products. It is better to buy frames with a color that you have already chosen from the mechanism itself, so that later you do not have the desire to change everything.
There is one more clarification. Often, external panels, calipers, mechanisms, and more are also produced separately. Why is this done? Manufacturers, who are all accustomed to the same standards, like this. The buyer will choose the best option from different series and models.
Many have frames and faces that vary significantly. As a result, you can make something unique and inimitable, so that later all the guests will even want to take a photo of the frame for the sockets.
After a while, if you are already tired of the option that was noted several years ago, you can always make a quick and adequate replacement of any component. Everything will look no worse than it did after the first renovation.
Do the installation, feel free to experiment, but don’t forget about safety precautions. Before installing an outlet, you should always turn off the power to the entire room so that no emergency situations arise.
Choosing a location for installing built-in socket modules
At the stage when the number of required connection points will be calculated, it is worth deciding on the location of the outlet blocks. First of all, you need to pay attention to the convenience and good accessibility of sockets.
If built-in units will be installed in the kitchen, it should be taken into account that household appliances can be located on three levels.
- The lower level is the area of floor cabinets, next to which a washing machine, dishwasher and oven are installed. Sockets for these devices are usually installed individual stationary, and mounted 150÷200 mm from the floor surface. For powerful equipment, as a rule, separate lines are provided with a cable of the appropriate cross-section, equipped with both a grounding loop and an RCD. Of course, you shouldn’t connect such equipment to sockets built into countertops.
Average level of placement of household appliances in the kitchen.
- The middle level is a countertop with small household appliances placed on it, which include a food processor, electric kettle, coffee maker, blender, etc. That is, this is exactly our case - built-in units are perfect for these devices. Moreover, ordinary sockets installed on the kitchen “apron” will only spoil its design. That's why many owners try to hide connection points by building them into the countertop.
- The third level runs approximately 800÷1000 mm above the tabletop. There are not many appliances located here - a range hood and a microwave oven. If they are located in the same row as wall cabinets, then pull-out or rotating units can be built into the walls or bottom of the latter. You can install sockets for connecting the above-mentioned devices above the wall cabinets, 100÷120 mm away from their surface. These connectors are also suitable for connecting a fan or air conditioner. That is, they usually make do with stationary sockets again.
On a desktop (computer) desk it’s a little easier. It takes into account the number of possible peripheral devices that require connection to a power supply or other switching (IP, HDMI, USB, etc.); the location is selected for reasons of maximum convenience for the user. Since there should be no contact with water, there are no other restrictions.
Safety precautions
It should be correctly understood that the very essence of built-in retractable and rotary socket blocks is that they are used to connect devices with low power, and as the need arises. The rest of the time the module is in a hidden state. That is, as already mentioned, always-on appliances such as a refrigerator, microwave, washing machine or dishwasher, stove or oven, desktop computer or TV must be connected to regular sockets specially placed for them in a convenient location.
- You cannot install built-in units so that, when open or closed, they are above or below the hob, sink, or on the countertop, but too close to these kitchen areas.
These requirements are determined by safety rules, since water or steam entering the module can lead to a short circuit, and overheating of the block can lead to its melting and deformation. The distance that must be maintained between the named devices and the socket block is at least 600 mm.
- In addition, you should be aware that water spilled abundantly on the unit cover can still penetrate inside the mechanism. Therefore, before sliding the device under the tabletop, do not forget to press the button to turn it off from the network - this will protect it from short circuiting in the event of an emergency.
- If water got inside the unit when it was turned off (with the key), it should be completely disconnected from the network. Then you need to invite an electrician to determine the serviceability of the device and the possibility of its further operation.
- You should not set the maximum load to the outlet, especially if the manufacturer of the product is unknown, which means there is no guarantee of its quality.
- When turning the plug into the retractable vertical unit on and off, it should be held with your hand. Otherwise, you can quickly damage the “mechanics” of the module.
In product data sheets, manufacturers always give their own recommendations for the safe operation of such devices. Never skimp on these tips!