Photo: bidouillesikea.com Lighting is one of the main components of any interior. The correct supply of light, the play of shadows and reflections - all this fills the house with extraordinary coziness and comfort. A lampshade for a lamp made by yourself is a special detail that will add a touch of exclusivity and set your home apart from all others. In this article we have put together a selection of 15 ideas on how to quickly and easily make a lampshade with your own hands!
Original bottle lamps
If after the holiday you still have empty wine bottles, don’t rush to throw them away - you can “give” them a second life by decorating them with lampshades. Such pendant structures will look great in the kitchen, especially as lighting for the bar counter.
The most labor-intensive part is cutting the bottom. This can be done using a glass cutter or thin rope. A rope, previously soaked in any flammable liquid, should be wrapped around the bottom of the bottle and set on fire. When the flame has completely bypassed it, lower the bottle into boiling water and then into ice water. After this procedure, the bottom will break off.
Now all that remains is to install the socket with the electric cable, screw in the light bulb with a beautiful spiral and enjoy the pleasant soft glow.
Photo: remont-samomy.ru Photo: drova-darom.ru
Decoration of fabric structures
The simplest ones are plain fabric lampshades. But there are additional decoration possibilities.
Provencal style
It is distinguished by the use of pastel colors, checkered patterns, and lace. For decoration, you can cut a strip of fabric, which is wrapped around the upper part and additionally tied in a bow. Another strip can be wrapped around the bottom and fringe attached to it.
Fabric flowers
You can make small fabric flowers that decorate the bottom of the lampshade in a circle. If you have the desire and patience, you can cover the entire body of the product with flowers.
Product decor with fabric flowers.
Shreds
Using pieces of different fabrics provides an interesting result. You need to take a plain, preferably white fabric for the base, and sew the scraps onto it. They can be in the form of squares, horizontal, vertical or diagonal stripes. Non-standard geometric shapes can also be used.
Decoration with pieces of different fabrics.
Unusual materials
The decor of the lampshade is limited only by the imagination of the master. You can use different fabrics for the lampshade: burlap, jeans, lace napkins. Additionally, you can decorate the surface with sewn buttons, pockets, and bows.
Lamp made of ribbons
Ribbons are a great way to update an old lampshade. First, get rid of the old coating and prepare the material. The lampshade can be made one color or use ribbons of different colors. The color is selected to match the tone of the interior or, vice versa, contrasting, to create an accent zone.
Attach the ribbon to the inside of the lampshade (to the top rim) and start wrapping from top to bottom. The winding density depends on how soft the glow you want to get. If you let the tape overlap, the lampshade will create a warm, diffused glow, and with intervals you will get interesting lighting effects.
The frame can be pre-covered with fabric for density, and the ribbons can be woven in a checkerboard pattern. You will get a nice Provencal lampshade.
Photo: azbukaplavania.ru Photo: liveinternet.ru Photo: vannadecor.ru
Braid, ribbons, lace
This is a very romantic and delicate type of lampshade that will look great in a young girl’s room. In order to make it, a wire frame will be enough. Cover it with fabric and glue beautiful lace on top, or place lace ribbons directly on wire rings.
The fabric must be chosen either in a contrasting color or to match the lace.
This will look more impressive. The lace may not be located along the entire perimeter, but only along the edge, this will be even more interesting. Tulle and all kinds of ruffles and bows are suitable as additional decoration.
The most interesting thing about such lampshades is the delicate shadows that they will cast. You can use multi-colored ribbons or beautiful braid as the main material.
- To do this, fasten the edge of the first tape to the lower ring and pull it to the upper one, make one turn around it and follow it back to the lower ring.
- Continue in this manner until you have filled all the empty space.
- To avoid gaps, overlap the previous tape by at least 1/3 of its width.
- Carefully glue the edge of the last tape on the inside, and to hide the imperfections, make a turn along the upper and lower edges of the lampshade with a wider tape.
Such a bright lampshade will resemble a rainbow and glow in different colors.
If you have knitted lace napkins and you don’t know where to put them, you can do the same with them as in point 4. Soak it in glue, place it on the ball and let it dry. They will take the shape of a sphere and will look completely different.
Wire lampshade
A laconic wire lamp will perfectly suit any modern minimalist style (loft, hi-tech, modern). These lampshades can be used to decorate an ensemble of pendant lamps, for example, above a bar counter or other light sources.
All you need for the job is wire, pliers and a regular watering can, the height of which will determine the dimensions of the future lampshade. If you are planning a group of lamps, you can make them in the same or different colors.
Take a watering can and, starting from the top, wrap it with wire all the way to the bottom. Use pliers to cut off the remainder and push the switch through. The lampshade is ready!
Photo: ya-superpuper.com
Photo: ars.ru Photo: furnilux.ru
Where to get the frame
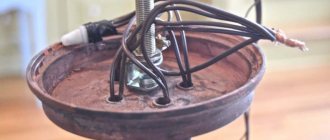
If you want to remake an old lamp, floor lamp, sconce whose old lampshade has become unusable, you can simply use the existing base, stripping off the old material. Before starting work, take a good look at the frame; if there is rust or damaged coating somewhere, maybe it’s worth stripping everything off and painting it again? At the same time, the color can be changed. If there are no old frames, you can buy an inexpensive lamp (in a store or at a flea market) and do the same operations with it. By the way, good lampshades can be made from waste baskets. There are wire ones and there are plastic ones. The main thing is to find the right shape and size. Then make a hole in the bottom for the cartridge. Then it’s a matter of decoration/plating, but here there are a lot of options.
Homemade lampshades amaze with the variety of shapes and materials
If this method is not available, you can make a lampshade without a frame (there are some) or make the frame yourself. The material for making a frame for a lampshade with your own hands is: wire, wood (wooden or bamboo sticks, specially cut elements), plastic bottles.
How to make a frame for a homemade lampshade from wire
The wire for the lamp frame needs aluminum or steel. Aluminum is easy to work with, but it wrinkles easily. This is not very important when the lampshade is already in use, but this fact must be taken into account during work: the shape can be ruined. On the other hand, such plasticity allows you to easily and simply make changes to the shape during work. So it's a good option. Aluminum wire can be “mined” from electrical cables. You will have to remove the protective shell and you can use it.
Steel wire is more elastic, so it retains its shape well. You can look for it on the construction market. It's more difficult to work with. It is advisable to have strong male hands nearby.
Shapes of lampshades that you can make with your own hands from wire
In addition to the wire, you will need powerful wire cutters and pliers for the job. The lampshade frame usually consists of two rings and posts connecting them. The shape of the future lampshade depends on the size of the rings and the shape of the stands. Questions may arise regarding the number of racks and methods of their fastening. The number of posts depends on the size of the rings and how “round” you want the lampshade to be. The more stands, the smoother the fabric will lie. So it’s up to you to choose, but the optimal distance between the posts in the bottom circle is about 5-6 cm.
Techniques for creating a wire lampshade frame
How you attach the stack to the lampshade rings depends on the thickness and type of wire, as well as the tools you have. The easiest way is to make a small hook at the end, then clamp it tightly. To prevent the ring from sliding left and right, first sand the wire at the attachment point with coarse sandpaper. This is an option for thick aluminum wire. If the wire is steel, with a diameter of 1.2-2 mm or more, the best method is welding. Thinner wire can be bent and wrapped around a ring or also made into a hook.
If you make hooks and wrap wire, the appearance is far from being as ideal as that of factory frames. But this imperfection will be covered by the lampshade itself. If you still care about it, find a ribbon of a suitable color (usually matched to the color of the lampshade) and carefully wrap the resulting frame. It will get much better. The tape can be coated with PVA glue and, wet, tightly, turn by turn, wrapped around the frame.
Wire mesh
If you can find a mesh of thin wire, you can quickly make an almost perfect cylindrical lampshade for a floor lamp, table lamp, night light, lampshade for placing a candle, etc. All you need to do is cut a piece of mesh of the required length and width, roll it into a ring and secure the wires by wrapping them around the posts.
Cylindrical frame for lampshade made of wire mesh
To prevent the mesh from straightening out, when cutting a piece, cut so that there are long free ends on both sides. We will use them to fasten the cylindrical lampshade. And the imperfection of the upper and lower rings can be masked with a ribbon of the desired color.
From a five liter plastic bottle
An interesting shaped lampshade can be made from a large plastic bottle. There are bottles for 5-6 liters and even 10. These are what you can use. Cut off the top or bottom of the container, depending on what you like best. In the cut off part we make a ring for the cartridge. If the top is cut off, a neck can be used for some cartridges. For those with a larger diameter, it will have to be cut off.
Lamp made of plastic bottles
Then we cut out the excess plastic and form the rims and pillars of the lampshade. To avoid mistakes, you can first draw all the lines with a marker. It will be easier to cut. Everything is elementary. Then we just decorate. And yes, it is necessary to cut out the plastic, otherwise the warm air will have nowhere to go.
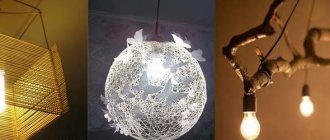
Homemade chandelier made of threads
There is nothing easier than making an air lamp from threads. Inflate the balloon to the desired size and wrap it in cling film. Next, take the thread, dip it in glue and wrap it around the ball.
Now you need to wait a little until the structure hardens, then pierce the ball with a needle and remove it along with the film. The level of illumination will depend on how tightly the thread is wound.
Photo: m.brilio.net
Photo: vse-otoplenie.ru
Options for frameless lampshades
Frameless lampshades are well suited for hanging structures. They are lightweight and have an unusual appearance. Different materials are used for their manufacture.
Knitted napkins
Making a lampshade from knitted napkins.
Needed: inflatable balloon, glue, knitted napkins, neck from a plastic bottle. Napkins are glued to a flat surface, then the entire composition is moved to the ball. The neck of the bottle is used to secure the cartridge. At the end the balloon deflates.
Master class: Lampshade for a chandelier made of toilet paper.
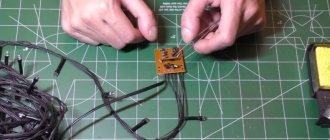
Weaving with clothesline
To make it you need: a ball, a clothesline, glue. The weaving method allows you to obtain the desired shape and patterns; a rope is woven around a ball, which gives the shape of the future lampshade. Additionally, you can treat the product with glue, it will fix the shape.
Video: 5 homemade clothes cord projects.
Application of threads
To make it you need: a ball, a thread, PVA glue, a bottle neck for a cartridge. Threads soaked in adhesive are wrapped around the inflated ball. After the glue has dried, the balloon can be deflated. Density and light transmittance will depend on the number of layers of threads.
Lampshade made of wicker
Wicker lamps made of wicker.
Vine is a durable material with good flexibility, so you can make a lampshade without a base in the form of an inflatable ball. A weaving method is used that allows you to create almost any shape.
Thematic video.
Lampshade with fringe
Using two metal hoops (you can take a hoop) and a fringed braid, you can construct a two-tiered lush chandelier.
To fix the hoops, use a strong fishing line, and it is better to secure the fringe with a glue gun.
Photo: justpick.ru
Photo: pinterest.com Photo: thesweetestoccasion.com
Other variations with threads
If you wind the thread not in straight turns (like a ball), but in loops, you can style the lampshade as lace. Dense threads or twine can be laid out in close rows. This completely modifies the idea of a cocoon.
Note!
- How to make a backlit mirror with your own hands: necessary materials, tools. Tips for choosing lamps and LED strips
- A simple and beautiful DIY bathroom shelf made of MDF, glass, plasterboard: straight and corner options. Photo instructions, tips, video master class
- How to make a computer desk with your own hands from wood or chipboard. Photo/video master class + description of models
Fluffy knitting yarn allows you to make lampshades that resemble light clouds or cute sheep. With appropriate design, you can create a cute lamp for a child's room.
Lush balls
This homemade lamp will perfectly decorate a child’s room or kitchen, creating a soft, pleasant glow. It can be made in any color palette at your discretion.
To work, you need to prepare glue, colored paper and a Chinese lantern (they are now sold in many stores). Instead of paper, you can use loose fabric.
Cut out circles of the same size from paper (fabric) and cover the flashlight with them. The parts must be glued overlapping, starting from the bottom - creating a semblance of scales.
Photo: remont-bil.ru Photo: ars.ru
Choosing a lampshade depending on the style of the room
In the interior of a room, a chandelier can be an inconspicuous addition or a bright accent. In any case, it should fit the overall style of the room. There are several stylistic trends for which making a lighting fixture yourself is not so difficult.
Matte light sources will fit well into Provence, which comes from the French provinces. This style is characterized by delicate shades, so natural fabrics for lampshades should be light and preferably with floral patterns. It is acceptable to use lace
Minimalism requires conciseness and simplicity. Such an interior should be free of flashy shades and unnecessary details. Therefore, chandeliers should be of simple geometric shapes and neutral colors.
The white matte or glossy surface of a lampshade made of paper, fabric or glass will be an excellent solution for the interior of a modern apartment in a minimalist style. Modest wire shades will also work
Minimalist Scandinavian style is not so limited in form. Strict lines and laconic figures are not necessary here, but the design should be simple and elegant. Such restraint looks very modern and relevant.
It is advisable to use natural and predominantly light materials (most often designers choose white shades). Bright lighting is required, so it is important to correctly position the lamps and correctly determine their number
If you are not confident in your handicraft skills and are afraid that the appearance of the lampshade will immediately tell others about its non-manufacturing origin, then pay attention to the loft. For this style, it is normal for the imperfections of objects to be brought to the fore.
To create lampshades, you can use metal utensils, wire, transparent bottles and jars. Untidy, seemingly unfinished structures give a home a special charm.
Lamp made of glass jars
Simple and, at the same time, quite original lampshades can be made from ordinary liter jars, which every housewife has. It is better to take jars with screw-on lids - then it will be much easier to change the light bulb.
First of all, we make a hole in the lid, insert a socket, a light bulb, and mount the electrical cable. The lid together with the cartridge can be painted gold or silver.
The jar can be pre-decorated - cover it with twine, napkins, or simply paint it. In any case, you will get a beautiful and exclusive chandelier.
Photo: brightlight67.rf Photo: furnilux.ru
How to update an old chandelier
The frame needs to be painted. To do this, disassemble the lamp, removing light bulbs, shades, etc. Wash the product, and if the old coating comes off, clean it off. The surface is degreased with a solvent and painted. It is more convenient to spray from a can, but you can apply it with a piece of foam rubber (from a sponge). The composition does not apply evenly with a brush.
First, a primer is applied, and then two, sometimes three layers of paint are applied, allowing each to dry. This results in a uniformly colored surface. The chandelier is varnished so that the color does not suffer during wet cleaning. Depending on the overall style, choose glossy or matte.
You can additionally paint it with patterns and ornaments, and decorate it with various decor. Glue or hang images of butterflies or flowers on a fishing line. The individual parts are wrapped around beads strung on a strong thread.
Lamp made of wood strips
A wonderful veneer lampshade will be a stylish decoration for any interior. To make this beauty yourself, you will need veneer strips, glue and large clamps.
We bend the strip to form a circle, glue the joints and secure them with a clothespin. We do the same with the rest of the ribbons, forming a spherical figure.
During assembly, several ribbons need to be intertwined with each other in a checkerboard pattern. Try not to place the parts too closely together, otherwise the light from the lamp will be very dim.
Photo: designplusyou.blogspot.com
Photo: znaikak.ru
Photo: furniture catalog54.rf
Material selection
When making a chandelier, it is difficult to single out one material that would meet all the requirements.
Each of them has its own individual characteristics and features. For example, paper, which is the simplest and most accessible material, lends itself well to transformation. Lamps made from glass shards and strips of metal have a dazzling shine and beautiful appearance. Wood and fabric add warmth and comfort to the interior. Lace lampshades are distinguished by their special beauty, captivating everyone at first sight.
Old toys, dishes, unnecessary storage containers, boxes, jars, glass and plastic bottles, small pebbles, tree branches, decorative ropes, beads, leather, braid, paper napkins, lace and other improvised materials, all this can become necessary and useful when creating a beautiful chandelier.
In a word, you can make a chandelier with your own hands from anything, the main thing is to be smart and use your imagination in time.
Step-by-step instructions, with a description of each step, will help you make from available materials incredibly beautiful and unique lamps that will be an excellent addition to your favorite interior.
Lamp made from kitchen appliances
A wonderful lampshade can be assembled using simple spoons and forks. All that is required of you is to place a dozen devices around the light bulb on a suspension and secure it well with wire.
Since the sizes of such lampshades are small, it is better to decorate several pendant lamps with them, forming an ensemble. For the same purpose, you can use other kitchen utensils - for example, graters.
Photo: museum-design.ru Photo: zen.yandex.ru
What is it for?
Even something as simple as a lampshade can create a special atmosphere in a room.
A lampshade is a component of a lighting device (lamp, chandelier, sconce) designed to protect the eyes from bright electric light.
The lampshade for the lighting fixture is necessary for:
- adjusting the brightness level of lighting
- diffusion of light indoors
- changing warm and cold shades of lighting due to the color of the base
- creating a cozy, relaxed atmosphere in your home or apartment
- decoration, room decoration, creating a color accent
Lamp with butterflies
You can decorate your child’s room with a wonderful homemade chandelier with fluttering moths. Involve your child in its creation and the process will turn into an exciting time together.
You will need a sheet of Whatman paper. It is necessary to measure the required height of the lampshade and the length of the sheet with which the frame will be wrapped. Cut out the workpiece. Next, on the reverse side, draw butterflies in any order and cut them out using a sharp construction knife. These beauties will serve as pendants for our chandelier. Additionally, you can cut more of these moths from a separate sheet.
We wrap the frame with whatman paper and complement the composition with butterflies suspended on a fishing line. In the evening, when the chandelier emits light, many shadows of various moths will appear on the walls and ceiling.
Photo: zen.yandex.ru
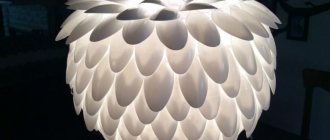
Leaf chandelier
This is a very original product made from plastic bottles. The material for production has a lot of colors, which allows you to approach the process of working with your imagination and show your creativity.
Step-by-step instruction
- From plastic bottles, we cut out blanks in the form of leaves of different shapes and sizes.
- Using a soldering iron, you need to make the characteristic veins on the leaves and make the edges a little more round, which will create a natural effect.
- Using a hot needle, we make holes at the base of the leaves so that we can connect them.
- We make a frame of metal wire and strong branches, previously formed from leaves.
This technology can also be used for lamps that will complement the chandelier, creating a whole set of lighting items in the same style.
Lamp made of knitted napkins
An openwork lampshade can be made from knitted napkins. Its stunning reflections will create home comfort and a warm, peaceful atmosphere in the interior.
To form the frame you will need an inflated balloon, glue (it’s better to take wallpaper), napkins and a brush. The ball must be fixed in a suspended state. We dilute the glue according to the instructions.
We carefully lubricate each napkin with glue on one side and press it to the ball. The parts must touch. After complete pasting, let the ball dry. Then we burst it and carefully remove it. We have a wonderful knitted lampshade!
Photo: ollandstudio.ru Photo: hockey-samara.ru Photo: ollandstudio.ru
Shabby chic style
To make lighting in this style, you will need fabric and beads. Such lampshades look elegant and amaze all guests of the house with their sophistication.
Necessary materials:
- metal carcass;
- cartridge;
- beads and beads of different sizes;
- threads and chains for decoration.
In fact, such work does not require special skills. But you will need patience, because the process will take a lot of time. Usually, for lampshades, three rings of iron wire are taken, of the same or different sizes. If they are the same, then we get lighting in the Art Nouveau style.
It is important to consider that before you start decorating the product, you need to paint it and stretch the material around the frame.
Finished lampshade, trimmed with beads and beads, to your taste. If desired, you can decorate with rhinestones.
As you can see, there are quite a lot of options for hand-made chandeliers. At the same time, such an interior element will decorate any room and make its furnishings original and unique, which will show the original nature of the housewife. With this lighting of your home, you can decorate any room and your guests will certainly admire your talent and originality of taste.
Globe lamp
A wonderful homemade lampshade for a children's room can be made from a very ordinary globe. Cut it in half into two equal hemispheres. Make a small hole in the upper part of one half, insert a socket with a light bulb and holder. The chandelier is ready!
After installing the cartridge, you can glue the two halves back together, resulting in a glowing ball. A more creative option is to make small holes in the globe, “outlining” the contours of the continents. Such a lamp will bring a lot of pleasure to the child and will help in studying geography.
Photo: domnomore.com Photo: braccialini-bags.ru Photo: realestate.com.au
How to make a chandelier with your own hands from thread tassels and hoops
What do you need
- Yarn;
- small photo frame;
- scissors;
- 3 sets of wooden hoops of different diameters;
- 3 identical short and 1 long metal chains;
- pliers;
- bulb;
- lamp pendant.
How to do
1. Wrap the yarn around the photo frame many times and cut. Take a small piece of thread and tie it on top of the yarn so that the ends remain. Cut the threads on one side, where the frame hole is located.
2. Remove the yarn from the frame and fold it in half. Place the knotted thread in the middle so that its ends are at the bottom and the loop is at the top. Details are in the video below. Cut another piece of thread and use it to tie a tassel just below the loop.
3. Make the rest of the tassels in the same way. The quantity depends on the diameter of the hoop. The threads should frame them tightly.
4. Remove the center hoops from all hoops - you won't need them. Open the large hoop and put some of the tassels on them by the loops.
5. Close the large hoop. Place the tassels on the rest in the same way.
6. Make nine pieces of thread. Place the middle hoop into the large one and tie them in three places at the same distance from each other.
7. Place a small hoop inside and tie it to the middle one in three places. These threads should be located approximately in the middle between those that connect the large and medium ones.
8. Turn the structure over and straighten the tassels. Tie short chains to a large hoop at equal distances from each other.
9. Using pliers, open the end link of a long chain. Place the attached chains on it and close it.
10. Attach the pendant to the ceiling, screw in the light bulb and thread the lampshade through the bottom. A long chain can be hung, for example, on a hook mounted on the ceiling next to the base of the chandelier.
Tree branch lampshade
For an eco-style apartment or cottage, a multi-lamp chandelier made from an ordinary thick branch would be an excellent solution. It’s not at all difficult to make, but the effect will be charming.
The wood must be washed, cleaned, dried and varnished (you can pre-impregnate it with stain to get the desired color). Next, fasten the branch to the ceiling surface with dowels, randomly hang it with light bulb sockets, fixing them with long wires. The lampshade is ready!
Photo: syndychoksmechtami.blogspot.com Photo: electrifikacia.ru
Lamp selection
The intensity of lighting in each room is individual, this also needs to be paid attention to.
In order to select lamps, you need to take into account the size of the room and reflective objects. Also, if you are going to make a lampshade for a chandelier from paper, you should not choose an incandescent lamp.
Lampshade from a hat
What could be simpler and at the same time original than making a lampshade out of a hat. Such a headdress is probably in the bins of grandparents. It is enough just to clean it thoroughly and string it onto a holder with a cartridge.
A lampshade-hat will be a good thematic decoration for a hallway or dressing room.
Photo: goodhouse.ru Photo: nikastroy.ru
Fabric lampshade - an interior classic
The variety of fabrics also determines a wide range of finished works made from them. Fabric lampshades can be romantic and delicate, practical denim, or classic with a printed small pattern, as in the photo. How to make a lampshade is described below.
To work you will need:
- ready-made or homemade frame;
- two types of fabric;
- threads with a needle;
- scissors.
The first type of fabric is cut into strips. The length of the strips is equal to the height of the frame, taking into account allowances. Along the edges of the strips, a little thread is taken out to create a small fringe. Each strip is sewn to the top and bottom of the rim, overlapping the previous one.
Having covered the entire frame with stripes, the work is completed with another fabric. Its strips on double-sided tape are attached to the rims of the frame, hiding the seams.
Note!
- Do-it-yourself wardrobe: a review of ways and methods on how to build a stylish and original wardrobe (video and 145 photos)
Do-it-yourself furniture restoration - removing chips and scratches, restoring surfaces. Instructions with photos and video tips
- DIY ottoman: how to make it at home. The best ideas, master classes. Photo + video review of beautiful ottomans
Lamp-teapot
It is quite possible to find a use for an old kettle by turning it into a useful piece of furniture - a lighting fixture. To do this, you will have to cut out the bottom and arrange a seat in the lid for a socket with a light bulb. The pendant must be attached to the handle.
Paint the teapot in a bright color, paste it with a pattern or coat it with a bronze composition, which will give the product a vintage touch.
A homemade lampshade made from a teapot will become a real decoration for the interior of a kitchen or country house. If desired, you can keep him company with pendant lamps with lampshades made of cups and saucers. It will turn out very beautiful!
Photo: artikel.rumah123.com
Photo: kasvs.ru
Paper butterfly chandelier
This is an incredibly beautiful handmade chandelier. It is done very simply and does not require material costs. After all, the material from which it is made is paper.
Step-by-step instruction
- As a base, you can take the lampshade of an old chandelier or make a frame in the form of a circle out of metal wire.
- Using paper templates, cut out butterflies of different sizes. Ideally, take a velvet type of paper. Such butterflies look great, and with the help of a vacuum cleaner, they can be easily cleaned of dust.
- Using a fishing line and a needle, we string the butterflies, forming stripes of them. If desired, they can be fixed with glue; the choice remains with the master.
- The finished strips are fixed to the frame and the butterflies are distributed, creating the appearance of their accumulation.
Additional tricks
To make a floor lamp with your own hands, you will have to find wood, plastic or metal pipes. But to create a cape, a variety of products and materials will do.
If only at least a little light was sifted through them:
- Wine or beer bottles;
- Iron cans for canned corn;
- Hoop for sifting flour;
- Cups with bowls;
- Kitchen graters.
It is very beneficial to arrange the listed products inside a kitchen or bar - several units in one row on a suspended platform in the form of a wooden board.
And if you need to beautifully illuminate a garage or workshop, then a do-it-yourself floor lamp with a shade in the spirit of steam punk would be an excellent solution. This style is achieved by wrapping a balloon with wire and then welding or gluing washers and gears onto this braid.
Once you've finished your lampshade, we recommend visiting a landscape lighting store.
How to choose fabric for a lampshade
First of all, you need to choose a suitable fabric for the lampshade. You can use light, hard or dense material. If desired, you can even make a lampshade from wool, it all depends on the creator’s idea and the interior of the room.
If the frame consists of ordinary wire, it is better to use an opaque material to cover it. Dark silk, cotton and taffeta are suitable.
It is also worth remembering that the color of the fabric can give both cold and warm light. In the first case, you can use blue or green fabric, and in the second, yellow, orange or red.