A failed socket is one of the most unpleasant situations for the owner, as it requires almost immediate intervention. To fix all socket malfunctions, you can call an electrician or use your own hands. The second option is more economical, but without electrical knowledge it is more dangerous. Do you agree?
We will tell you how to replace or repair an electrical outlet with your own hands. We describe the work process in detail. Taking into account our recommendations, even a person ignorant of the intricacies of electrical installation can cope with this matter.
For a clearer understanding of the information, we have included useful diagrams, photo collections and video instructions.
Basic socket malfunctions
First of all, let's figure out what signals may indicate that the outlet requires urgent repair.
An appliance plugged into the outlet suddenly stops working or does not function properly. For example, a lighting fixture blinks, a fan starts and stops, etc. In this case, no other symptoms of a malfunction are detected. To make sure that the problem is really in the outlet, and not in the equipment connected to it (there may, for example, be a malfunction of the plug or power cord), you can conduct “testing”. A multimeter that is set to alternating voltage (ACV ˃ 300 V) is suitable for this purpose. If there is voltage, the device should show it in volts.
Checking the presence of voltage in the outlet using a multimeter
If the tester is silent or the voltage readings are clearly unstable, then the problem most likely lies in the outlet.
It is clear that not every home has a multimeter (although it never hurts to have one). And a regular indicator screwdriver in this case may not give an objective picture. For example, it can show the phase, but this does not mean that everything is in order with the socket. True, the absence of a phase will immediately indicate a problem. But the problem may also be in the conductor or on the zero contacts. How to check in this case?
Check with a screwdriver - indicator. If there is no phase, the malfunction is obvious. But the presence of a phase does not mean that the outlet is fully operational. The problem may also be on the neutral conductor.
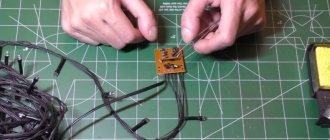
To do this, some device is connected to the outlet, the owner is 100 percent sure of its functionality. And it is best that it is not any complex electronics - power surges can “kill” it. The optimal solution is a socket with an incandescent lamp, to which a piece of power cord with a plug at the end is connected.
The simplest way to monitor the presence of voltage in an outlet
Making such a “tester” yourself, which, by the way, can still be useful for cutting later, is something that does not require much expense and time. But the picture turns out to be objective. The presence of voltage is immediately visible, and by the evenness of the glow, the absence of blinking or flickering, one can judge the degree of reliability of the contacts in the socket. If there is no voltage, or it is unstable, you cannot do without repairs.
The second sign that requires immediate response. The device connected to the outlet works normally, but the outlet clearly smells of burnt insulation. This may be a symptom of the “beginning of the end.” Most often this happens if the load connected to the outlet exceeds the permissible load. The wires approaching it begin to heat up, and from here it’s already one step away from a serious accident.
Thus, you should immediately “detect” what exactly was connected to the outlet at the time such a sign appeared. A common reason is that a tee or extension cord is connected, and to it there is a whole “garland” of devices, the total power of which for some reason the owners do not care about. Alas, this attitude of many owners towards connecting electrical appliances is a fairly common occurrence. A clear prerequisite for the outlet to fail.
If the problem is eliminated when the overall load is normalized, then most likely the socket is working. And all that is required from the owners is prudence in its further exploitation. And if the load does not initially seem excessive, you will have to look into it further. But in any case, the outlet will have to be at least “inspected”.
- The third group of signs, or rather, clear signals that not everything is in order with the outlet. This includes not just the smell that appears, but the smoke rising from the outlet. The work is accompanied by sparking, which is manifested by characteristic crackling and light flashes. The socket body clearly heats up, sometimes to such temperatures that the plastic begins to “float”.
Why markup
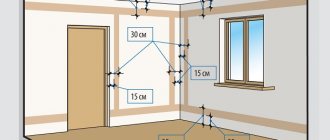
If you install one single outlet in a concrete wall, then by and large there is no need for markings. There is not much difference if it is located plus or minus a centimeter. It’s another matter if there are other sockets nearby and the owner of the premises has the “view of a perfectionist.” Some people have this developed by nature, and if any thing is out of the general picture, it will cause irritation.
As a result, it is better to spend an extra few minutes to calculate and draw on the wall the location of the future outlet. This must be done when installing a block of sockets that will be located close to each other. A level will come in handy here, although if the floor in the room is crooked, you will have to think about how to make the markings - level or parallel to the floor surface.
A correctly made marking “drawing” is a horizontal line on which the centers of the holes for the socket boxes are marked. To monitor whether the crown has jumped off the mark, the marking should be slightly larger than its diameter. The most reliable way to calculate the distance between centers is to put the socket covers together and measure the distance between their centers.
Preparatory measures for repairs
Repairs should be made only after preparation for them. Even to correct the most minor problems, you should turn off the power to the apartment and make sure that the switches are turned off. After a power outage, you should check the voltage in the network with an indicator screwdriver - it should be absent in phase.
What will be needed for repairs
Every electrician has a set of tools. If a complete set is not available, then its individual components will have to be purchased to repair the electrical outlet.
In addition to the indicator screwdriver, you will need the following materials and tools:
- flat screwdriver;
- Phillips screwdriver;
- pliers (pliers);
- insulating tape (vinyl);
- sharp knife for stripping wires.
In case of some breakdowns, a soldering iron may be useful.
Important! The best electrician's tools are those with rubberized handles.
Repair sequence
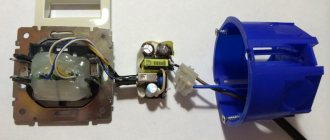
To fix an electrical outlet that has come loose from the wall, just tighten the fastening screws. They are accessible by removing the protective cover. The screws are visible on the sides of the block. There are cases where the socket becomes loose, leading to it falling out of the wall. This usually happens with a structure secured without a cup holder. The sockets are secured with spacer plates.
They are metal, fastened with tightened bolts. The sharp teeth on the outer edges of the spacers cut into the concrete bed of the rosette. In old houses, building materials may crumble. How to fix a fallen socket? A cup holder is added to the old design. It is advisable to strengthen the bed around it with cement mortar. If the old socket is broken, the action algorithm is as follows:
- The bolt on the front panel is unscrewed.
- The front panel is removable.
- Contacts and wiring are inspected.
- If there are wires that have fallen out of the socket, they are returned to their place and clamped.
- If melted or scorched ends of the wiring are detected, they are cut off. The tops of the remaining wires are stripped.
- Oxidized contacts are protected with sandpaper.
- The structure is assembled by closing the front cover.
If you decide to repair the outlet yourself, you may encounter difficulties. It may, for example, require extension of wires. After burning and stripping, their length is not enough for connection. We have to build up new cables.
The wire strands on both sides are extended and twisted and covered with electrical tape or caps. You can connect the extended wire to the original one using terminals. However, they rarely enter the socket box.
The problem of extending wires often arises when deciding how to fix an outlet if it sparks. A short circuit in the structure leads to heating and charring of the cables. Internal contacts can literally fall apart. In this case, repair is impossible. The socket needs to be replaced.
Ways to solve the problem
It is logical that you cannot leave the outlet in this state. Firstly, it is not aesthetically pleasing. Secondly, it is dangerous, especially if there are small children or pets in the house. The simplest and most correct option is to install a new outlet, but you may not have such an electrical appliance at hand. This kind of work is quite dusty and requires special tools and skills. The second method of solving the problem is to repair the old socket that falls out of the wall, with further strengthening of the frame.
Quick screwing of the socket
You need to understand that the cause of the socket falling out is faulty claws that no longer hold the device in the wall. If there is no time for a full repair, then you can try to bend these legs so that they press the socket more tightly to the wall surface.
First of all, you need to turn off the power to the outlet and get rid of the front panel. Look how tightly the screws are screwed; if they are loose, they should be tightened
It is important that the spacer tabs fit snugly to the device. Often such measures do not help, since it is not possible to fix the electrical appliance in the old socket box. In this case, you can use fixing gaskets made from scrap materials.
You will need leftover linoleum, rubber gaskets for plumbing fixtures, sandpaper or wood fragments
In this case, you can use fixing gaskets made from scrap materials. You will need leftover linoleum, rubber gaskets for plumbing fixtures, sandpaper or wood fragments.
The prepared materials at hand are cut into a rectangular shape. After this, paper, linoleum or wood are smeared with glue and inserted deep into the socket box. In total, you will need two such gaskets, installed opposite each other so as to be located at the level of the spacer legs. After this, all that remains is to press the socket tightly against the box and tighten the screws that adjust the spacer tabs. The final stage is screwing the front panel.
Loading …
Major repair of the seat
Often the reason for the socket to loosen and fall out lies in an incorrectly mounted socket. In this case, a major modernization of this element will be required. To do this you will need to arm yourself with the following tools:
- box for mounting a socket measuring 6.8 by 4.5 cm;
- gypsum;
- construction knife;
- polymer-based primer;
- spatula in the form of a small spatula.
Work must begin by disconnecting the device from the network. If this is your first time doing this, you should mark the wires with a marker in advance so as not to confuse them after the repair. After this, the socket with the drop-down contact group is dismantled. Next, you need to unscrew the screws, remove the plugs and pass the wires into the box. The bottom of the box will probably get in your way, so you need to cut it out first.
After this, you can begin installing the socket base into the box. Maximum fit will avoid further problems with the electrical appliance falling out. Next, the inaccuracies are corrected and the location of the seat is outlined. All that remains is to prime the outside of the box and wait for it to dry. Next, plaster is diluted, which is used to treat the wall and seat. The mounting box is inserted into the prepared cavity, then the material is removed and the gaps are filled. It takes approximately 15 minutes for the gypsum mortar to set. After this time, you can install a new socket by first wedging the base and tightening the adjusting screws. The final stage is installation of the front panel.
If several outlets do not work
Typically, sockets are connected to circuit breakers in the panel in groups, since installing a separate circuit breaker on each of them is very expensive and not always justified. Accordingly, you need to make sure that the corresponding machine is not turned off. You need to try turning it on. If it turns off immediately, then there is a short circuit somewhere on the line. It needs to be localized and eliminated.
Often, the wires from the outlets run through one or more junction boxes. You need to check the quality of the connections in them.
Possibly where there is a twist that has weakened over time, causing the contact to disappear. Today, twisting is prohibited, so you should resort to soldering or welding connections. You can also use crimp sleeves or terminal blocks. When drilling walls, there is always a risk of breaking the wire with the drill. In this case, you will have to replace the damaged section of the line to restore the functionality of the sockets.
DIY wiring
Nowadays, hidden wiring is mostly used, and this is not at all surprising, since modern trends in the design of residential premises simply do not allow the use of open wiring. Hidden wiring is technically easy to organize, both on brick and wood walls. If the walls are brick, then grooves (grooves) are made in them, into which the wires are laid, and then they are covered with mortar or putty. If you use drywall, grooves are not needed, but then you will have to use corrugated sleeves that are attached to the wall using clamps. If the house is made of wood, then you can do the same, covering all the “art” with finishing material.
How should internal wiring be laid? In a private home, when installing it yourself, you must follow all the rules
In any case, it is necessary to adhere to a number of requirements that are aimed at the reliable and safe operation of electrical wiring. These rules include:
- The wires are laid either strictly vertically or strictly horizontally, without beveled or rounded corners.
- All connection points must be located in junction boxes.
- Horizontal wiring should be at a height of 2.5 meters from the floor level. Vertical wiring should run along the line of sockets and switches.
Such rules, as well as a saved diagram of the electrical wiring of the house, can help in the future if repairs are required. Then, even without a diagram, you can easily determine where and how the wires go and how they fit into sockets, switches and other devices. Secondly, such a scheme will help you avoid getting caught in the wires if you have to drill holes in order to mount some decorative element or some piece of furniture on the wall.
How to connect wires correctly
A fairly common problem that arises with unreliable electrical wiring is related to poor contacts resulting from poor wire connections. Wires are connected:
Using twists. As a rule, this connection method is not used when connecting copper and aluminum wires. To make a connection, the ends of all wires are stripped of 4 cm of insulation, after which the required ends are securely twisted. After this, the twisted areas are insulated using electrical tape or heat-shrink tubing. Although such a connection is considered unreliable, this connection method is used quite often. This is not surprising, since this type of connection has a number of advantages.
Using terminal connections. To do this, you need to use special distribution boxes that have metal terminals. Wires are clamped with screws
This connection method is considered more reliable, and the terminals allow you to connect copper and aluminum wires, which is very important. Using pads with springs
Reliable contact is ensured by a spring
Using pads with springs. Reliable contact is ensured by a spring
To make such a connection, it is enough to strip the end of the wire about 1 cm and insert it into the socket.
Despite these methods of connecting electrical wires, soldering and welding are considered the most reliable, although it is not always possible to do this, especially when it comes to welding.
THE MOST RELIABLE WIRE CONNECTION. All types of wire connections. How to connect the wire.
Watch this video on YouTube
Whatever type of connection is used, the main task is to fulfill the basic requirements, which is the key to reliable and safe, in all respects, operation of DIY electrical wiring.
An equally important stage is checking the correctness of all connections, as well as checking for short circuits and insulation integrity. Often, uncertified products of dubious quality are sold, which is impossible to determine visually. As a rule, low-quality products will ultimately cause various emergency situations. Commissioning is possible only if the electrical wiring is checked by specialists from the electrical laboratory, who, after checking, will issue a test report with signatures and seals indicating that the electrical wiring in the house can be used.
If there is no voltage in all outlets
Most often this happens during a power outage initiated by the power supply company. It is necessary to check the presence of voltage at the terminals of the input circuit breaker in the electrical panel. You can also ask your neighbors if they have electricity?
The input machine itself may be faulty. If there is voltage at the input terminals, you can try turning off and turning on the machine again. If there are no changes, the input machine should be replaced, as it is probably faulty.
You also need to check the integrity of the line connecting the apartment electrical panel to the one installed on the landing. In the case of a private house, you should make sure that everything is in order with the overhead line connecting the house to the power line.
Installation of a socket box
The installation box is mounted in several ways.
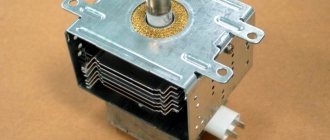
If you have an old metal socket box
In such products, the socket is secured only by means of spacer tabs, which is why it often becomes loose. A modern plastic mounting box with a standard outer diameter of 68 mm easily fits into an old metal socket box, and this should be taken advantage of.
Use one of the mounting methods:
- screw the new plastic socket box to the old metal one using three self-tapping screws;
- if it is not possible to use the first method, glue the new socket box to the old one with Liquid Nails glue. The composition hardens within 24 hours.
The front end of the new socket box should be in the plane of the wall surface. If it does not fit completely into the metal socket, cut off the bottom.
If the socket itself is loose, but the socket is held firmly in it
If the socket itself is loose, proceed as follows:
- carefully remove the socket box;
- sweep dust and crumbs of solution out of the hole;
- prepare an alabaster solution: it sets quickly, so you should not hesitate;
- prime the walls of the hole or at least spray them with water: this measure ensures good adhesion to the solution;
- coat the socket box with alabaster mixture;
- return the glass to the hole.
The solution will set in 1-1.5 hours, and the socket box will be firmly fixed.
If the socket box is missing or needs to be replaced
The part is removed, the hole is widened if necessary and a new socket is installed on the solution, as described above. In addition to alabaster mortar, gypsum and plaster are used. Before using the solution, wrap the exposed ends of the wires with electrical tape to prevent them from getting dirty.
How to ring a socket
Now, having a sufficient amount of information about the faulty socket, you can start calling the wiring. Usually, at this stage you already know for sure that, for example, a Phase is missing and you need to localize the location of the electrical circuit damage. But, as I wrote earlier, diagnostics can be started immediately with dialing, it’s just that this method is less effective and, accordingly, longer.
A continuity test with a multimeter or tester does not require the presence of electric current in the network to carry out measurements. Be sure to turn off the automatic protective equipment, de-energize the controlled line before starting diagnostic work, and make sure that there is no voltage in the outlet.
Turn off the dialing or resistance determination mode on the tester (which is basically the same thing) and proceed according to the following plan:
How to determine a short circuit in an outlet
First of all, we call for the presence of a short circuit between phase and zero. To do this, follow the following step-by-step instructions:
- The electrical current supply is turned off at the test site
- Select the Vertebrae mode on the multimeter
- The red probe is placed in the left socket of the socket, and the black one in the right. It can be the other way around; there is no fundamental difference for the purity of the experiment.
Then two results are possible: You will hear a beep from the multimeter and on the display a value close to “0”, or anything other than one. This means the socket is faulty! The contacts of the mechanism or the electrical wiring that goes to them are shorted in some place.
Most often, in this case, your circuit breaker for this group probably triggered and did not turn on, signaling a short circuit (link to article). In this case, it is necessary to look for the place where the neutral and phase conductors are closed.
If there is no sound signal, and “1” is always displayed on the screen. This is a good sign, it means that parallel wiring lines do not intersect and most likely, one of them has broken somewhere. Proceed to the next step.
Required Tools
For simple wiring work that can be done at home, you need a very small set of tools:
- Voltage indicator. Electric current is invisible to the eye, and not everyone can determine its presence by touching a conductor without consequences. For a preliminary assessment of the condition of the wiring, the simplest indicator will do, but it is better if it is a sensitive device that responds to an electromagnetic field - sometimes you need to find out which way the wire goes from the socket.
- Dielectric pliers. It is generally accepted that they are distinguished by the presence of rubber covers on the handles, but now even standard plumbing tools are equipped with these so that they do not slip in the hand, so on paper those that have been verified are considered dielectric, but in practice they are simply insulated. If you only have old pliers at home with non-insulated handles, then you just need to wrap them with electrical tape. In this case, you must first apply a couple of pieces of tape crosswise to the lower part of the handle, and then wrap it around the main part.
- Screwdrivers - Phillips screwdrivers are most often used, but a regular straight screwdriver can also be useful.
- Knife. The smallest one will do - it is only needed for cleaning the insulation from the wires.
- Hammer and pry bar. They are needed as a last resort if you have to poke around the walls in search of distribution boxes, but as practice shows, they will come in handy in any case - at least as stands.
This set should be enough, but if a standard probe is used, then you will also need some small device to additionally check the socket - at least a table lamp. You can also prepare a piece of wire so that it will last from the outlet to the far end of the room - you may have to ring the wires one at a time.
The culprits of the breakdown
Most household fires occur due to problems with electrical networks. Trouble could have been prevented at an early stage by determining what caused it and where to look. For convenience, the culprits of the breakdown were divided into 3 volumetric groups.
Fork
The socket gets hot very often, but the reasons lie in other devices. The faulty component sparks when connected to the network. During prolonged operation (10 minutes or more), the temperature of the plastic case, cable near the base and metal plugs increases. The causes of the problem may be:
- loose contacts;
- loose connections;
- loosened bolts.
Changes at the fork cause loose fit. The malfunction occurs when several devices with different plug sizes are connected to one source. Constantly changing design parameters weakens the device, so the sockets get hot.
The device heats the outlet Source 220.guru
Often a malfunction is caused by a high load when working through an extension cord, especially a homemade one. The culprit of the breakdown may be a low-quality finished model. To prove the plug is defective, professionals recommend connecting the element to another network. If after 15 minutes the case or metal parts are warm, then the problem is with the device.
When to ask for help
It is not uncommon to have to replace an electrical outlet or part of the wiring in your home. Not everyone can do this, so if in doubt you will have to call a specialist. You cannot do without a technician if all the steps described above did not produce results, the malfunction remains unclear.
The easiest way is to contact the management company - they always have full-time electricians. The master will carry out all the work safely and reliably, you will be able to use the equipment in the apartment without fear.
Source
Tips and tricks
When working with electrical equipment, safety precautions must be observed.
During repairs, it is necessary to stop supplying voltage to the apartment and turn the circuit breakers to the “Off” position.
Failure can be hidden or obvious. The latter are visible to humans - the body is melted, there is an unpleasant smell or an uncharacteristic sound, sparks.
In this case, the device is opened and inspected.
Socket failure can be caused by various factors.
Power overload, short circuit, lack of power in the apartment - this leads to inoperability of the device. Repairs should only begin after the cause has been determined.