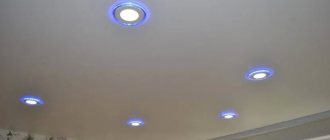
A modern family now has a couple of televisions, set-top boxes, DVD players, and computers. And not all of this abundance is ready to work without cables via Wi-Fi, and the signal strength with a bunch of devices will simply not be enough. Therefore, the good old cable and television outlet have a legal “registration” in an apartment or house.
If you are starting a renovation, then it’s time to think about hiding all the cables in the walls so that the apartment does not resemble the lair of a cybernetic spider.
Therefore, let's figure out what sockets are needed for a TV. How many of them to take, where to put them, what to pay attention to and how not to get confused in the tricky names.
Installing a TV outlet is a must!
In a modern house there are often 2-3 TVs, and it is no longer fashionable to entangle the TV with cables in the room. Previously, when there was one collective TV antenna and one TV, residents put up with a TV cable through the entire apartment. As a last resort, the antenna cable was laid in or under the baseboard.
Now, in the age of television and the Internet, there are too many wires to not take care to keep them out of sight.
I preach the following truth to my clients: it is better, along with electrical wires before plastering (the first stage of electrical installation work), to lay an antenna cable, as well as wires for connecting the telephone and the Internet, and other low-current devices, such as security, fire, video surveillance and smart home. At the same time, given that this is planned to be done “forever,” the low-current wires must be of high quality and laid accordingly. I recommend laying the cable for the TV signal SAT 703, or another high-quality one (ask in the store, just not RG-6 and especially not RK), it can be laid under the plaster without additional protection.
It is better not to do this on your own, without experience, but to call an electrician or an antenna specialist.
Since the article is about the antenna cable and antenna sockets (sockets for a TV), for example, the photo below shows the installation of wires going to the installation site of the TV - antenna, for the TV socket, and power supply, for the 220V socket.
Laying the TV antenna cable
Not the best example, and not because of the method of fastening and the quality of the photo, but because it is better not to lay the signal antenna cable and the power cable next to each other in parallel, the distance between them is better to be at least 3 cm. Although, in modern TVs, 50 Hz interference is easily cut off , better to play it safe. If you use a high-quality antenna cable with good braiding, this requirement is not very critical.
After completing the second stage, this place for connecting the TV looked like this:
Installation of sockets for the TV - power and antenna.
If you need more 220V sockets (connecting an additional tuner, player, etc.), then the place where the TV is mounted may look like this:
TV socket and 2 power sockets on the Viko wall
Or this, if funds allow:
TV socket and 2 power supplies on the wall Visage deluxe
Well, if there is a lot of equipment, then behind the large-diagonal TV there will be the following collection of sockets:
TV socket and 5 power points on Visage wall.
Why is the antenna socket separate in the last photo? It's simple, because there is no frame for 6 points. Although, such an installation makes sense, because it is generally better to conduct a low-current (HF signal) separately from the supply networks.
How to choose a TV cable
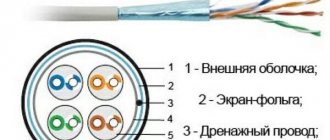
Definitely in terms of signal transmission quality and insulation strength. The attenuation in the cable should be minimal, and the insulation should reliably protect the core from external influences. For hidden installation, only the best representatives are suitable. These are cables SAT 703, SAT 50, DG113, F1160BVM COMMSCOPE (RG-11).
| SAT 703 cable | SAT 50 cable | Cable F1160BVM COMMSCOPE (RG-11) |
These are single-core copper cables with an insulating foam layer and a durable sheath that will feel great under plaster.
An RG-6 cable is suitable for outdoor installation, but if you want to get a better signal, choose cables from the first list. An RG-6 cable can be used to connect the TVs themselves to sockets.
How to connect a TV cable to an outlet
The power antenna cable is connected to the socket in a special socket using a screw. The central core is carefully removed from the insulation and secured in the hole. For better fixation, a part of the braided cable is secured with a second screw through a special plate. This ensures that there is no movement and protects the central core from fracture.
Helpful advice! If you are far from electricians, then it is better not to lay television cables yourself. Trust the specialists with the job, they know all the tricks and subtleties. For example, they will not forget that distances must be maintained between antenna cables and power supplies. Lay at intervals of at least 3 centimeters. Otherwise there will be interference, especially on cables like RG-6 and similar.
Connection diagrams for TV sockets
Connecting TV sockets according to the “star” scheme
There is only one entrance to the apartment, but there are 2-3 TVs in a modern apartment. To connect two or more TVs, use a special splitter device - splitter , which has one input and 2-3-4 outputs. Then the connection diagram for TV sockets for televisions will be called star :
Connection diagram for TV antenna sockets with a star
It is assumed that the apartment is supplied with a cable with a cable television signal, in which the signal is quite strong. If you want to connect 2 or more TVs, it is better to ask your cable TV provider (or your neighbors) in advance whether the signal strength is enough. The signal level can be raised at your request; usually there is a resource for this. In addition, in some places you have to pay for connecting additional TVs, and for unauthorized additional connection you have to pay a fine.
If there are concerns that the power may not be enough, then it is necessary to provide space and power for installing a TV amplifier. It is indicated on the connection diagram with a star and a dash as an optional element. It is best to place the amplifier as close as possible to the signal source - at the entrance to the apartment or, better yet, at the television distribution panel in the entrance.
The “Star” scheme for connecting several TVs to one antenna is most widely used, as it has the following advantages:
- Cables to all sockets come out of one junction box, which is convenient for installation and maintenance,
- Minimum attenuation of the television signal,
- If one of the signal lines or sockets malfunctions, the rest operate normally.
The only downside is the high consumption of the antenna cable, which is insignificant, especially with optimal wiring. The peculiarity of this scheme is that the input and output cables should not lie next to each other so that there are no problems with signal quality.
Antenna splitter box. The antenna cable outputs for 3 TVs are at the top. On the side is the antenna input and, in the future, the Internet input. Everything is done with SAT 703 cable. Everything is then plastered, with only a cover on top for access to the splitter.
By the way, the same star connection scheme is used when wiring power supply circuits, and is the most preferable.
Connecting TV sockets using a pass-through design
This connection is also called a “ daisy chain ” connection diagram.
Connection diagram for TV antenna sockets with a cable
If the sockets are not shown with a star on the diagram, then they are required in the pass-through diagram. TV sockets in a daisy chain circuit must be used only through ones . The last socket in the daisy chain connection must be the terminal socket .
It is logical that the signal at the input of the first TV will be more powerful than the last one. But you don’t need to worry too much about this. The fact is that the cable television signal level is high enough to support all televisions. When using a high-quality television cable and the correct connection (F - connectors), the picture on the screens will be indistinguishable in quality.
In addition, modern televisions have a long-established amplification and automatic signal level control circuit.
How to install a TV socket
Yes, just like any other, neatly and in its place.
Let's start with the height where to put it darling. Let’s say right away - drive away the advisers, lovers of European standards and their “15 centimeters from the floor.” Our task is to hide the tails of the power and antenna cables behind the TV so that it is beautiful and convenient. And according to the European standard, you will then have to hang the TV on the floor and watch from there.
Of course, there are also those who like to set up home cinemas, but there are far fewer of them than those whose TV hangs at a normal height.
Therefore, focus on the edges of the TV screen so that no sockets or cords stick out. And if, in addition to the TV set, other devices will be connected, install sockets in convenient accessibility. Or you will have to pretend to be a monkey, trying to reach the treasured food point.
Connecting digital television (IPTV)
In addition to connecting to analogue television, many television providers now have the opportunity to connect to digital television. The quality there is much higher. Digital television connection diagram - star only.
The fundamental differences are that a digital (computer) cable is used, a star connection; instead of a splitter, a digital splitter (router or hub) is used, which has one input and several outputs. One TV is connected to one output. The TV must understand the digital IPTV signal - have a CAM module. If your TV does not receive a digital TV signal, you need a special SD set-top box. In both cases, a smart card is purchased from the provider for charging and managing services.
Ask your provider if digital television (DVB) is the future. In apartment buildings in large cities, analog television will last a couple more years.
And the ethereal antennas have already died. Remember, 5-10 years ago all the windows, balconies and roofs of apartment buildings were covered with antennas?
Checking the functionality of the device
The TV cable is checked for the following reasons:
Check procedure:
- The power to the TV is turned off and all electrical wires are pulled out. If you are checking the cable of a collective antenna, then you need to check the serviceability of the tip located in the apartment. This circuit does not have a separator, and it is very difficult to access the other end of the wire.
- The resistance level is checked. Resistance is checked between the pin and ring outputs and the value should be at least 20 ohms. This error is created by an amplifier located in the electrical circuit. In the case of low voltage or its complete absence, the likelihood of a short circuit increases. These nuances mean that the cable is broken. A more reliable check is carried out if both ends of the cable are accessible.
- Connecting a resistance meter. First, disconnect the cord from all electrical appliances. Then the measuring element of the ohmmeter is connected to the main core and braid of the TV cable. The measuring device should show the value of infinity. After this, an ohmmeter is connected to the second end of the wire. The device readings should be close to zero.
- Visual assessment of the integrity of the television conductor. Testing is carried out for external deformations and damage. Next, an ohmmeter is connected at one end, and a jumper is placed at the other. If there is a short circuit, a jumper is not needed.
Such a cable is also checked by pressing it in some areas, and the resistance meter readings may change. After all defects have been eliminated, the jumpers are removed and the ohmmeter is turned off. The test is carried out by connecting the TV cable to the TV.
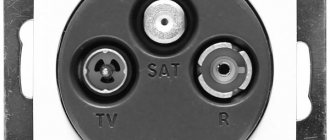
Types of TV sockets
There are three types of television sockets: pass-through, terminal and single (simple).
Pass-through TV sockets have an input, an output (socket for connecting a TV) and another output to the next socket. Each pass-through socket introduces attenuation into the branch signal, which is approximately an order of magnitude greater than that of the end socket.
Final and simple TV socket - what's the difference?
In a star circuit, terminal or simple (single) TV sockets are used. There is no difference between them if a TV is connected to them. If the TV is not connected, then in the case of a simple socket, distortion of the image on the screen in the form of repetitions is possible. This happens because the terminal socket has a line impedance of 75 ohms. But a simple one does not have it, and the resistance in the line is equalized due to the input resistance of the connected TV. It does not matter at all whether the TV is connected to the 220 V power supply or not.
The terminal sockets are structurally designed to have a characteristic impedance equal to the characteristic impedance of the line, 75 Ohms.
Connecting the cable
To connect the cable, remove the insulation from the central core by 6-8mm. In this case, you need to retreat another couple of millimeters from the edge of the outer shell to the point where stripping begins.
Next, insert the TV wire into the socket and check through the viewing window that the central core goes all the way into the connector.
In the Unica series it is self-clamping, there is no need to tighten anything here. Other brands may have a clamping screw, which will need to be loosened first and then tightened with a screwdriver.
Pay special attention so that the “hairs” of the screen do not touch the central core anywhere.
All that remains is to tighten the cable itself with the central screw and put the outer cover in place.
If something is not clear and does not work out, you can always refer to the instructions.
Installation and connection of a TV outlet
The photo below shows how to connect a TV outlet with your own hands. In this case, this is the terminal socket. Step-by-step photos are provided; installation features depend on the specific design.
Installation boxes for antenna socket and 220V power socket
Installation boxes for antenna socket and 220V power socket. 220 socket installed
Preparing the TV cable before installing the socket
Preparing the TV cable before installing the antenna socket. 2nd stage of cleaning. The latch is pre-attached, but on the wrong side)
Preparing the TV cable before installing the TV socket. Third stage of cleaning
TV cable installation
Installing a TV cable - connecting a socket for a TV cable. Step 2
Installing a TV outlet - final installation of the cable. The black latch is now seated correctly
We carefully roll up the excess length of the cable without sharp bends. Could have left less.
That's it, all that remains is to put on the frame
Installing a TV outlet. Repeat of the photo shown at the beginning of this article
Below is another option for installing sockets for a TV. It’s clear that it’s better to hide everything behind the TV, isn’t it?
TV sockets - installation option
Fastening
The assembled socket is secured with spacer legs, which are included in the design. Additionally, mounting screws are suitable. Before these actions, you need to make sure that the product is level and, if necessary, adjust the legs.
Hide the “extra” cable in the socket - do it in such a way that there are no creases or kinks, otherwise the signal will become much worse. Many users are wondering at what height to make a TV socket - everything is extremely simple here.
It is necessary to calculate in advance at what height the receiver will be located, as well as its dimensions. Your task is to make all the wires invisible and from here select the desired position of the device.
If you plan to mount the TV on a bracket, make a small margin so that the structure is installed without any obstacles.
- Pump control cabinet
Elevators. Device.
Office furniture. What do you need to buy?
Antenna socket device
And finally - photographs of the terminal socket in disassembled form.
TV socket disassembled from the front
TV socket assembly rear view
TV socket disassembled rear view
That's all I wanted to tell you about installing TV outlets . If anything is not clear or you have something to add, ask and write in the comments. If you are interested in what I will publish next on the SamElectric blog, subscribe to receive new articles.
PS I consulted Legrand salespeople by phone about the difference between simple and terminal TV sockets. They said the following. “ Terminal sockets are used in conjunction with pass-through sockets, and simple sockets are used if with a splitter.” To be honest, I cannot confirm the information, since I have always installed only passing and end ones. And when asked about simple TV sockets, sellers look surprised and say that such things have never been on sale. All the better.
Myths about installation requirements
The established requirements are basic when installing sockets and switches in residential and other premises. In this case, you can use a free arrangement method, that is, fix the elements in an order that is comfortable for the user. This option is often considered the only one, but we must not forget about the standards that ensure safety.
Video: DIY installation of switches indoors
All elements of the electrical circuit are important and require safety during installation and operation. Compliance with requirements and standards is a decision necessary to achieve high quality work.
Option 2 – Pull-out sockets
Retractable hidden sockets provide a chance to reliably hide access to electricity from children and pets and thus not spoil the ideal interior. Also, devices built into the countertop or furniture body significantly save space and make it possible to connect a large number of devices.
You can install models of this type yourself:
- Read the instructions included with the built-in kit;
- Mark the dimensions of the hole where the hidden structure will be installed;
- Carefully cut a hole;
- Secure the sockets with special fasteners, which are necessarily included in the kit;
- Pull out the cord and plug into the nearest power source.
- Check functionality.
How to determine the height of the location
As a rule, the TV socket is mounted at approximately the same height as the TV. If the TV is placed directly on the wall, then it is advisable to hide the socket behind it. This also solves the aesthetic issue: connectors and wires will not be visible. Safety measures will also be observed: the socket will not become a subject for children to play with, and pets will not be able to chew the wires. Be sure to watch the video on how to install sockets behind the TV:
It is customary to place such equipment based on the eye level of the person sitting on the chair. On average, this is a height of 130 cm from the floor to the outlet. In some rooms, such as kitchens, this figure is slightly higher, this is due to the fact that the TV is placed in a free space, saving work space.
If you need to buy a television socket, then you should pay attention to high-quality products produced by well-known manufacturers. You should not buy TV and audio sockets at a more attractive, reduced price. Such equipment will not be able to provide a good signal. In addition, in order for the sockets to fit harmoniously into the interior, they must all be from the same collection of a certain manufacturer.
Source
Installation methods
The steps required for successful installation of a socket box into a plasterboard wall are extremely simple, but do not forget that the required order must be followed, otherwise the installation may result in the loss of a sheet of plasterboard, and its replacement is a costly procedure (financially and in terms of time).
The first action that needs to be taken when installing any products (electrical ones especially) is applying markings. First of all, this is necessary in order to connect wires or other communications to this place, as well as for ease of installation and calculation of the material.
We will need logic, knowledge of the location of communications, a pencil, a tape measure and a level (to save money, you can also use a ruler, the main thing is to catch the point). It is worth noting that markings must be applied taking into account what type of socket or switch there will be (for how many consumers).
In SNiP there are no restrictions on the height of the socket, but there is a restriction on its distance from doorways (at least 20 cm), as well as on its distance from the tabletop (20 cm). It is also recommended not to make sockets that are too low (at least 20 cm from the floor) due to the risk of short circuits from moisture. In turn, a short circuit can lead to a fire.
Next, we proceed directly to the manufacture of the technological hole. Drywall is soft, so you can use a regular paint knife, but it is best to use a drill with a special round attachment. This must be done to avoid unnecessary chipping or damage to the sheet.
Drilling with a ballerina must be done extremely carefully, since there is a possibility of breaking a sheet of drywall if you press hard on the tool. This is due to the fact that we press on a certain point with a sharp object with a large area, which can lead to a break.
Another method is drilling. It consists in the fact that (instead of a special ballerina attachment) a regular drill is used. The material is drilled along the contour indicated in the previous paragraph, then it needs to be sanded so that the hole is perfectly smooth and of high quality. When the connector is ready, throw the wires into it. It is worth drilling carefully, at minimum speed.
Now we proceed directly to the installation of the socket itself. We lead the wires into the openings of the socket box, specially provided for by the design on the back side of the product, after first removing the plugs. After installing the wires, we begin installing the socket box. To do this, we press the box tightly, tightening the screws clockwise (each evenly) until they are completely fixed, but do not squeeze, because this can also destroy the sheet and form a chip or crack.
For better fixation, you can drive two additional screws into special holes. There are no tabs there anymore, so you need to use ordinary drywall screws (wide thread pitch).
If you are not going to move on to the next step right away, it is better to tape the ends of the cable or put special caps on them to protect the cable from corrosion, which can negatively affect the quality of the wiring.
At this point, the installation of the socket box in the gypsum board is completed. The next step is installing a socket and switch. The principle is no different from how electrical devices are installed in a regular socket box. The only special condition is that you should not hammer into the socket, as you can break the sheet, which will lead to its replacement and the installation of a new socket box.
Anyone can install a double or 3-post socket box correctly if you follow our advice. You just need to insert it correctly and secure it.
Important to know before starting work
Safety conditions
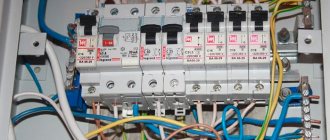
It is important to do all work on installing sockets and switches, laying electrical communications only after a complete shutdown of the current in the network. Turn off the machine or traffic jams
And do not connect until the installation work is completed.
Take the indicator and make sure that the outlet or wiring you are going to work on is de-energized. Professionals suggest using two indicators at once. This will ensure that unwanted consequences are avoided.
Points to consider
- You should monitor the condition of the wire insulation and do not use damaged wires.
- It is strictly prohibited to cut live wires with wire cutters.
- In places where wiring has already been laid, you cannot chisel, drill or cut walls.
Any contact of a screwdriver with the zero and phase wires inevitably provokes a short circuit in the network.
Socket installation standards:
- not lower than 20 cm from the floor;
- for every 6–10 sq. m. of living rooms, one socket is made.
Rules for installing sockets and switches
In order for the installed system to serve for a long time, it is important to choose the right wires and cables to be connected and lay them out correctly
To do this, you should take into account:
- The power of all future energy-consuming appliances in an apartment or house. The performance of all devices is simply added together. It is necessary to know what the maximum power allocated by the network is.
- The choice of wire or cable type depends on the method of laying it: open or internal. It is necessary to decide which gasket is suitable for a specific electrical installation location.
- When laying wiring, do not lay the wires in bunches.
Installation of socket boxes in drywall
To work with drywall, you will need a special type of mounting box with a special claw, which will allow you to press it to the sheet like a vice or clamp. To carry out installation, you need to drill a hole. This can be done with a special core drill for drywall. You can cut a circle with a mounting knife. Since the wires are hidden behind the drywall, no gating is required. The embedded cable should be pulled out into the resulting hole and inserted into the broken window of the socket box. You need to insert the mounting box into the wall and tighten the screws, retracting the clamping tab.
Fastening the socket box in plasterboard