How to make a left socket. How to ground an outlet
If you pick up a socket and see, in addition to two contacts, a third one, then you have a grounded socket in front of you.
When there is no grounding wire (indicated in yellow-green color) in the electrical wiring of a home, then “grounding” can be done. This is done like this: the neutral wire is connected to the third contact of the socket. You need to determine it using an indicator screwdriver, on which the light will light up when you touch the phase.
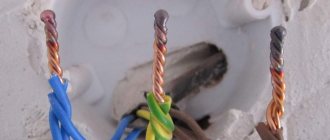
Note: the better the wires are clamped, the better the contact will be, and, as a result, the greater the load it can withstand. This socket will last longer.
How to make a left socket
Most often, this trick is done like this: take one wire from the left socket and plug it into the phase socket (it is determined by the indicator) of the working socket, and the second “left” electrical wire is connected to the heating battery (must be made of pure metal). After this, the counter will stop. The left socket, like all the left wiring, is made invisible to the eye. View the diagram for the left socket and by
Preparation
Before making sockets in the apartment, you need to draw up a diagram that should indicate:
- installation location;
- load power and number of connections;
- wiring supply;
- connection method.
The places where the sockets will be installed depend on the location of the electricity consumers: TV, computer, refrigerator, washing machine, electric stove, etc. Where many pieces of equipment are concentrated, it is advisable to install socket blocks (up to 5 pieces). It is necessary to ensure the convenience of connecting temporary devices: power tools, vacuum cleaners, chargers for gadgets. At high humidity, sockets are used with connection through an RCD from the control panel. An indicator that the sockets in the rooms are installed correctly is the absence of extension cords and tees.
A socket so that the meter does not turn. Left socket outside a private house
In order to determine the location of the left socket, you need to find out the entire wiring path to the electric meter. The cables are routed along poles, from where they enter the house. The cord can be routed into private property in two ways:
Before you make a left socket in a private house using grounding, you need to study the wiring diagram in detail. More often, houses are connected to the network over the air, due to its cheapness and simplicity.
The cable is usually laid underground to preserve the landscape of the yard. Owners of such property usually do not care about saving energy. But still, services can often see the left line to the underground wire.
The connection diagrams for both lines are different, but they have the same thing. To install a power point, you need to have basic electrical knowledge or skills. But someone who knows how to hold a screwdriver and pliers, following the instructions, will also be able to install the left socket.
Connecting to an overhead line
This connection method can only be used to a house that is located deep in the yard. The wiring must be visually invisible. The inspector will immediately notice an illegally connected power line if he has access to the yard and the wires connecting to the house. Since most homes are connected to the power grid via air, many have difficulty wiring the left power point. Superimposed wires are usually clearly visible, which makes it impossible to draw an additional line.
- For such a connection, you need to use a bare aluminum wire with a steel core. If the wiring to the house is also carried out with a non-insulated cable, then connecting to it immediately creates the possibility of installing an outlet.
- The insulated wire must be cleaned of insulation in two places.
- Connect the left line to it.
- The exposed part can be covered with cambric.
Connection to an underground line
The method for making a left socket in a private house according to the underground scheme is invisible. It is almost impossible to detect such electrical wiring without a thorough inspection of the equipment. Such a connection requires large-scale excavation work.
In the ground, the cord is affected by various factors that interfere with uninterrupted operation. The wiring must be insulated from moisture, acidity, rodents and various microorganisms. Inattentive insulation will lead to the need for repair work after some time. First you need to carefully dig out the line.
- The input line must be exposed to connect the left one.
- After twisting, the connection point must be carefully insulated. You can make an insulation coupling yourself or buy it in a store.
- Then the wiring is buried back, and an additional wire is brought out for a separate outlet.
Left socket inside a private house
The principle of connecting the left line in the house is almost the same as connecting an outlet to an underground cable. In this case, you need to break the wall so that the left wire can hide. Otherwise, an illegal outlet can be quickly detected.
- First you need to gain access to the input cable. To do this, part of the wall is broken where the line in front of the electric meter is laid.
- A piece of wire is exposed and a new cable is screwed on.
- The connection must be completely insulated.
- After this, the hole in the wall is sealed.
- The left wire is laid into a pre-drilled recess for the cable route.
- All recesses are sealed, and the wire is connected to the desired outlet.
If all repair work is carried out efficiently, such a left socket will not be noticeable. Reliable insulation of connections is quite important.
One of the main electrical elements in an apartment or house is a socket. Without it, it is difficult to connect a household appliance to the network. Every owner should know and also be able to install it, since the process is quite simple and can be mastered by anyone without special skills. The ability to use simple tools is enough here. In addition, it is necessary to have a basic understanding of electrical safety.
Basic operating techniques
If you are thinking about how to make a socket, every little detail will be important to you. One of them is to remove the insulation, which should be done by biting it with side cutters without touching the copper. It is important to develop a skill here so as not to leave a bite on the metal, where corrosion and local heating from the load subsequently occur. For a beginner, a puller-plier with adjustment to the diameter of the wire is a good choice.
Sockets often have to be moved to another location. To do this you have to splice the wires. Despite the fact that modern installation methods do not recommend doing this, there is a reliable way to create such a connection. It is necessary to remove the insulation from the ends of the wires and twist them together with pliers. Then apply cold solder to the twist and immediately put on the insulating cap. After the paste has hardened, the sealant is squeezed into the socket. The problem of how to make sockets correctly is first solved depending on whether it is installed in a wall or in a plasterboard partition.
Left electrical connection. Creating a line underground
To lay the left cable, large-scale excavation work will have to be carried out. They will be required to ensure uninterrupted operation of the additional system. It is worth understanding that the soil, its moisture, and various rodents negatively affect the wires. Therefore, the power line is dug up, the insulation is removed from it, the wire is laid and the junction is insulated. Insulation is made by a coupling. It can be either homemade, with epoxy resin poured into it, or purchased, treated with a special compound. All work is performed under voltage, so you need to be careful.
It is almost impossible to detect such a design, but some owners are let down by lack of forethought. Controllers can easily find the left wire laid away from the main line using ultra-sensitive equipment. To prevent this from happening, it is better to lay part of the wire together with the main one, which is constantly energized, and direct part of it to a branch and mount it in the starter. In this case, the control phase is necessarily located near the input machine. It turns out that if you turn off the electricity in the house, it automatically disappears into an alternative outlet.
There is one more nuance that owners of private houses miss when installing an additional electrical outlet. Many people use grounding rather than a home neutral for it. It turns out that when the “zero” phase is turned off, electricity remains only in the left structure.
Installation Rules
It is recommended to install sockets at a height of 80 cm. It is possible lower, but not less than 30 cm. If there is protection from moisture and an RCD is used, the installation height can be reduced. Nowadays even the baseboard is made with a socket if the wiring is done through it. So, it is convenient to connect floor-standing devices. In this case, there is no need to groove the walls. In children's sockets along with switches are installed at a height of 150-170 cm so that children cannot reach them. It is customary for electricians to place the phase contact in the socket on the window side. If the wall is without it, the phase is on the left when you stand facing the socket.
During installation, a small supply of wire is left in case of thermal deformation. The cable is passed under the terminal block. If the thickness is large, the outer shell is removed. If wires are routed around the block, the phase is carried out separately. It is allowed to insert two wires into the terminal when creating a group or module. Connecting wires through the socket to other stationary consumers is not allowed. For this purpose, a socket module with a built-in terminal block is used.
How to make a left socket in a private house. How to make a left socket in a private house yourself.
Today, every person thinks about how to save on electricity consumption. Will we really have to give up the benefits of civilization? Our answer is no. You can get electricity completely free, but you have to cheat to do it. A common way to use light economically is to connect to the meter using “bypass” routes. How to make a left socket in a private house, install it correctly and safely for life, read on.
About ways to create
In fact, only one way is known about how to make a left socket in a private house: attach an additional cable to the input wire immediately before connecting it to the electric meter. Thus, the left cable outlet must be connected to the meter. There are no other options for creating an alternative and free power supply line.
Another question is which method and where to connect the additional cable. Each home owner must decide for himself regarding the individual location of electrical objects. The left cable can be located in two places - outside the house or inside.
In this case, the choice of location must be safe, hidden from prying eyes, since the left socket is illegal. If it is discovered by inspectors, then this is fraught with a fairly substantial fine!
Features of connecting the socket
Let's start with a way to connect an alternative cable outside the house. First you need to determine the place where the left socket will be located. To establish this accurately, you need to examine the path along which the wiring reaches the electric meter. Electricity is supplied to a private house via a cable with branches attached to poles. Based on this, it is clear that the wire goes in two ways: through the air or underground. The first option is used due to its simplicity and affordability of installation. The second option is used by people who take care of the landscape of their site and do not want to spoil the appearance with concrete pillars. However, in the latter case, it will be difficult to install an alternative cable to a private plot in the future.
Creating a line over the air
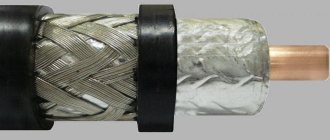
When laying power transmission over the air, bare aluminum wires with a steel core are used. Directly to a private house, branches of the main line are made from the same wires or from wires with an insulated core. If we have the first option - non-insulated wiring, then this is great luck. Before us is an almost finished unaccounted for outlet. To complete the job, you should throw a regular wire over the incoming cable. This allows you to bypass the meter and get an additional outlet with free electricity.
By the way, this type of fraud is used when a welding machine is connected to the network. It is very difficult to notice such a design, so it is considered the most reliable and safe. However, it is worth understanding that the wire line should not be visible from the street. When the branch of wires to the house is visible along its entire length, there is no need to talk about secrecy. Also, if the house is located close to the road, then there is a chance that someone may notice this illegal structure. Those whose house is located deep in the yard are lucky - a small view will hide the outlet.
The procedure for installing branches in a socket box
Often they connect a group of sockets to one three-core cable and connect them with a cable, that is, in parallel. With a parallel connection, the requirement for continuity of protective grounding is not met. Connecting two PE conductors with a loop on one terminal reduces the reliability of the contact.
A cable connects all three conductors in each socket (phase, neutral and ground). Connection with a loop is done in the case of light consumer loads and under normal operating conditions. A cable is also used if it is necessary to quickly add sockets.
Connecting sockets with a cable without breaking the PE protective grounding using the crimping method
When connecting with a cable, to increase the reliability of contact, the ends of the wires must be bent under the ring and soldered. It is advisable that the terminal have a rectangular washer to ensure tight contact. However, the correct connection of the PE grounding conductor must be without a break and have a branch.
The ends of the grounding wire are connected by crimping to the branch terminal. After crimping, the sleeve is insulated with a special cap. This grounding connection is made for each socket in the socket box. Crimping is considered the most reliable connection and ensures continuity of the ground wire.
The tap reduces the load on the terminal. Some experts recommend using a tap-and-crimp connection, not only for grounding, but also for the phase and neutral conductors. There is enough space for laying branches and crimping in modern socket boxes. They make a daisy chain connection when adding one or two sockets, with minor repair work.
How to connect the socket from the meter. Action plan
Electrical wiring in a private house is done before finishing work begins. The frame of the house is out, the walls and roof are ready - it's time to start work. The sequence of actions is as follows:
- Determination of the input type - single-phase (220 V) or three-phase (380 V).
- Development of a scheme, calculation of the capacity of the planned equipment, submission of documents and receipt of the project. Here it must be said that the technical specifications will not always determine your declared power; most likely they will allocate no more than 5 kW.
- Selection of components and components, purchase of meters, machines, cables, etc.
- . Performed by a specialized organization, you need to decide on the type - overhead or underground, install an input machine and a counter in the right place.
- Install electricity into the house.
- Laying cables inside the house, connecting sockets and switches.
- Ground loop design and its connection.
- Testing the system and obtaining a certificate.
- Electrical connection and operation.
This is only a general plan; each case has its own nuances and features, but you need to start by obtaining the technical conditions for connecting to the electrical network and the project. To do this, you need to decide on the type of input and the planned power consumption. It must be remembered that the preparation of documents can take six months, so it is better to submit them even before the start of construction: two years are given to fulfill the technical conditions. During this time, you will probably be able to build a wall on which you can put a machine and a counter.
Kinds
A new outlet is selected based on a number of important technical parameters.
type of instalation
There are two options:
- mortise: installed in a hole drilled with a crown;
- overhead: screwed onto the wall with self-tapping screws.
Mortise ones in combination with hidden wiring (cables are hidden in grooves and sealed with mortar) are installed in residential and other premises with high aesthetic requirements.
Invoices with open wiring are used in garages, country houses, etc. - they are easier to install.
Presence of grounding contact
Grounding household electrical appliances is desirable because it protects the user from electrical injury. But it can only be implemented in houses with a grounding system organized according to new standards (type TN-CS).
In older houses with a TN-C system, grounding is not connected to sockets; therefore, you should purchase a product without a third contact.
Even if the house has a modern TN-CS grounding system, you should not rush to buy an outlet with a grounding contact. Since it was decided to power the new point from an existing outlet, you first need to make sure that a 3-wire wire is connected to it.
If it is connected with a 2-wire wire, then even if there is a grounding contact on it, there is no point in buying a socket with grounding.
Socket diameter
There are two types of sockets:
- Soviet model;
- Euro sockets: with sockets of increased diameter.
The choice of outlet depends on the type of plug on the electrical appliance. The error is not critical: there are adapters for connecting Soviet-style plugs to European sockets and vice versa.
Terminal type
This determines the quality and reliability of the contact in the socket. If the contact is poor, the wire becomes very hot, which can lead to burnout or fire.
Sockets are equipped with three types of terminals:
- flat spring. The most reliable variety;
- screw with pressure plate. To fix the wire in the terminal, tighten the screw against the copper plate. The terminals are flat spring, inferior in reliability, but quite acceptable;
- screw without pressure plate. The option where the cores are simply pressed with a screw is the worst; purchasing such a socket is not recommended.
Wiring bypassing the meter. How to steal electricity from an apartment
In Russia, illegal connection to the power grid is quite common, through which electricity is stolen. Electricity is stolen from private and apartment buildings. There are several ways to steal electricity from the network.
- Remake the counter;
- Affect the operation of the meter.
With certain skills and knowledge of the design and operation of meters, you can remake them in such a way that they begin to count electricity by 30 - 50% less. For this purpose, these devices are equipped with additional elements.
To come in
Already registered? Sign in here.
There are currently 0 users on the page
There are no users viewing this page.
Many people have thought about how they can save on energy consumption. You can get electricity for free by cheating. The most common way is to create a left line that is not connected to the electricity meter. There are several ways to make a left socket in a private home.
The goal of all methods is the same - connecting an additional cable to the input power line before connecting it to the electric meter. The difference between the methods is in the location and method of connection. The choice depends on personal desire and the method of conducting electricity to the house. The electrical cable can be located:
- outside the house;
- inside the house.
The choice of location also depends on service checks. Such wiring inside the house is much more invisible, but it happens that this option is unsafe.
About ways to create
In fact, only one way is known about how to make a left socket in a private house: attach an additional cable to the input wire immediately before connecting it to the electric meter. Thus, the left cable outlet must be connected to the meter. There are no other options for creating an alternative and free power supply line.
Another question is which method and where to connect the additional cable. Each home owner must decide for himself regarding the individual location of electrical objects. The left cable can be located in two places - outside the house or inside.
In this case, the choice of location must be safe, hidden from prying eyes, since the left socket is illegal. If it is discovered by inspectors, then this is fraught with a fairly substantial fine!
Features of connecting the socket
Let's start with a way to connect an alternative cable outside the house. First you need to determine the place where the left socket will be located. To establish this accurately, you need to examine the path along which the wiring reaches the electric meter. Electricity is supplied to a private house via a cable with branches attached to poles. Based on this, it is clear that the wire goes in two ways: through the air or underground. The first option is used due to its simplicity and affordability of installation. The second option is used by people who take care of the landscape of their site and do not want to spoil the appearance with concrete pillars. However, in the latter case, it will be difficult to install an alternative cable to a private plot in the future.
Creating a line over the air
When laying power transmission over the air, bare aluminum wires with a steel core are used. Directly to a private house, branches of the main line are made from the same wires or from wires with an insulated core. If we have the first option - non-insulated wiring, then this is great luck. Before us is an almost finished unaccounted for outlet. To complete the job, you should throw a regular wire over the incoming cable. This allows you to bypass the meter and get an additional outlet with free electricity.
By the way, this type of fraud is used when a welding machine is connected to the network. It is very difficult to notice such a design, so it is considered the most reliable and safe. However, it is worth understanding that the wire line should not be visible from the street. When the branch of wires to the house is visible along its entire length, there is no need to talk about secrecy. Also, if the house is located close to the road, then there is a chance that someone may notice this illegal structure. Those whose house is located deep in the yard are lucky - a small view will hide the outlet.
You should carefully mask the insulators, which often give out left cables. Please note that in this case safety comes first, so you need to regularly inspect the wires for hot spots. They are often created by thrown wires. Alternatively, you can use homemade clamps that cling to the wire. This device protects the cable well from melting. It will not be difficult to remove them when the inspector visits.
The next option is to connect to insulated wiring. Here you need to remove the insulation from the cable, otherwise it will not be possible to lay an additional socket. Then everything is done as in the previous version. It is better to remove the insulation close to the insulators, and be sure to hide the bare area in a cambric made of a rubber hose. An important point is that when inspecting the cable, the inspector may suspect fraud if he sees a bare section. However, you can always plead ignorance. Stripped insulation is not a violation.
Creating a line underground
To lay the left cable, large-scale excavation work will have to be carried out. They will be required to ensure uninterrupted operation of the additional system. It is worth understanding that the soil, its moisture, and various rodents negatively affect the wires. Therefore, the power line is dug up, the insulation is removed from it, the wire is laid and the junction is insulated. Insulation is made by a coupling. It can be either homemade, with epoxy resin poured into it, or purchased, treated with a special compound. All work is performed under voltage, so you need to be careful.
It is almost impossible to detect such a design, but some owners are let down by lack of forethought. Controllers can easily find the left wire laid away from the main line using ultra-sensitive equipment. To prevent this from happening, it is better to lay part of the wire together with the main one, which is constantly energized, and direct part of it to a branch and mount it in the starter. In this case, the control phase is necessarily located near the input machine. It turns out that if you turn off the electricity in the house, it automatically disappears into an alternative outlet.
There is one more nuance that owners of private houses miss when installing an additional electrical outlet. Many people use grounding rather than a home neutral for it. It turns out that when the “zero” phase is turned off, electricity remains only in the left structure.
other methods
The left wire can be laid in the apartment. The same installation principle is used here as when creating a line underground. However, this will be more difficult to do than in a private house. The whole problem rests on the fact that the cable in residential high-rise buildings runs inside the wall.
How to crimp a telephone cable - 2 and 4 wires
Despite the fact that the world has almost completely switched to cellular communications, wired telephony still occupies a significant market share. Moreover, it is with its help that Internet access using ADSL and SHDSL technologies is organized in small towns and rural areas. And while the crisis is gaining momentum, there is no need to wait for the transition to fiber optics. At the same time, very often in residential buildings, as well as in various institutions, room wiring is in an unsatisfactory condition: the telephone cord is pinched by chairs, crushed by heels, cats, dogs and even drunk people chew it (this is not a joke, but a real case from practices). Therefore, sooner or later, the question arises of replacing the wire with a new one, for which they usually call an installer and pay money. You can do all this yourself, the main thing is to get the right tool and buy the wire of the required footage. But very often everything comes up at the moment when you need to crimp the telephone cable into the RJ-11 connector. We will talk about this procedure today.
What do we need?
Firstly, the telephone cable itself is 2- or 4-wire. Personally, I don’t like the SHTLP telephone cable (aka CLT) because I didn’t live there alone and if you need to make a twist, sometimes you’ll have a hard time with it. Therefore, in my practice I try to use the cable for signaling KSPV-2 or KSPV-4. There are no problems with crimping it either. Secondly, we will need a stripping tool in the form of a stationery or construction knife. Thirdly - crimping tool. By the way, many of them, like mine for example, have a special knife for cutting cables. Well, RJ-11 connectors, of course, into which we will crimp the telephone cable for the Internet or wired telephone.
Sequencing:
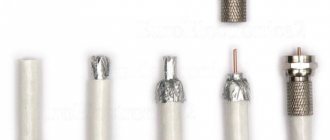
We strip the end of the telephone wire from the outer braid, about half a centimeter:
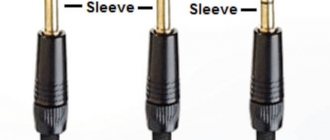
There is no need to strip the cores themselves - they will be cut through by the connector blades. The cable layout is simple. In regular telephony, only 2 cores are used. The connector has two middle contacts:
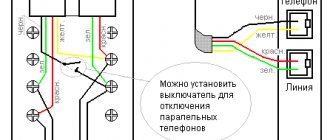
With a four-wire wire the situation is a little more complicated. The point here is that abroad, due to the widespread use of mini-PBXs and faxes, a cross-over layout is often used - that is, the wires in pairs are swapped (see diagram on the right):
Here in Russia, we use a straight layout, as in the diagram on the left. Therefore, cables that come to us from abroad often have to be re-crimped. After you have cut and prepared the cable, you need to insert the wires all the way into the connector:
From the front side of the connector, make sure that the wires reach the end of the channels:
Now carefully insert the connector into the crimping tool and clamp it:
We remove the crimped telephone wire from the crimp and make sure that the knives in the connector go in all the way. If necessary, you can clamp it again. Now you know how to crimp a telephone cable for the Internet or telephone with your own hands,
Connection diagram of switches to the network
One of the main electrical elements in an apartment or house is a socket. Without it, it is difficult to connect a household appliance to the network.
The ability to use simple tools is enough here. In addition, it is necessary to have a basic understanding of electrical safety.
To prevent this from happening, prudent craftsmen pull part of the wire next to the main one, which will always be energized, and if it is necessary to make a branch, they place a starter there. In this case, the control phase, which keeps it in the on state, is taken after the introductory machine. It turns out that when there is a power outage in the house, it also disappears in the left outlet.
When installing in a concrete wall, you need to know the thickness of the finish. The edge of the socket box should be flush (parallel) with the wall. The device is mounted in drywall using special socket boxes with sliding supports.
For a long time people have been interested in how they can save on electricity; perhaps everyone has long known these methods, which I will now tell you about.
Garage Conversion Costs for 2022: Your Personal Guide
Last updated April 9, 2022
Converting an existing garage into a living area is a great way to free up valuable space in your home. With home prices continuing to rise and the cost of moving high, buying a new home is very expensive.
However, you may already be living in your dream home; you just have to change a few things around to figure it out!
There are many ways to extend your home, including building an extension, adding a conservatory, or going up and moving into the loft.
But since the cost of garage conversion is affordable for many, it is often the best option. A project like this makes even more sense if you don't maximize the space in your garage and use it more as a junk room.
Benefits of garage conversion
There are a number of advantages to choosing a garage conversion as a way to extend your home, the main one being that it is quite cheap. If you're lucky enough to have a two-car garage, you could even convert half the space, leaving room to park your car while still getting the benefit of a new room.
One of the great things about converting an existing structure is that you don't have to lay a new foundation or build walls from scratch; something that will save a lot of money. Plus, many garages already have electricity, and this will further reduce the cost of your project.
Compared to the average extension, a garage conversion is the obvious choice. For example, a new extension measuring three by four meters could cost more than £17,000. However, a typical garage conversion should cost between £4,995 and £7,500.
Structural changes and construction costs
The cost of a garage conversion is minimal since you are working with an existing structure. However, some major changes will need to be made, so before you start collecting quotes, consider some of the following points.
- Garage Doors The most obvious change would be to remove the garage door and install a waterproof replacement. This is relatively easy to do because in most cases the space only needs to be blocked off. If you also add a small window this should cost around £1,300.
- Doors and Windows Doors and windows are integral parts of what makes your garage an extension of your home. The size, type and location of the room will determine how many are needed. On average a door or window will cost between £500 and £600, although you may pay more if you are looking for a bespoke and high quality finish.
Price comparison can save you up to 40%: Click to get a quote
- Floors Even if you want plush carpet or are going to install a nicely tiled floor, you'll probably have to pour new concrete first. This is especially true if the garage is old and the floor is uneven. Having a new slab professionally installed will cost around £1,000.
- Walls In most cases, interior frame wall construction will be built inside your garage to create your new room. Insulation can then be added between these walls and the existing structure to improve energy efficiency. The average frame wall costs £750 and your construction costs will depend on how much you need.
- Utilities One factor that can increase unexpected build costs is the need to run new utilities when converting. Many garages have electricity, but most do not have gas or water. If you're converting your garage into a bedroom or living room, you'll only need to factor a few extra outlets into your budget. However, if you are planning a new large bathroom or kitchen, plumbing and gas pipes may need to be installed. Installing a new electrical socket shouldn't cost more than £100, and if you use contractors from Ratepeople.com you can negotiate a good price if more work is required. Gas or water connections become more expensive and if you need to move pipes the job can cost between £1,000 and £3,000.
Quotes
To get garage conversion quotes from dealers near you, simply click the button below:
Compare quotes can save you up to 40%: Click to get quotes
Other Considerations
The exact cost of a garage conversion will depend on a variety of factors, including the new use of the extension and the quality of finish desired. For example, while you can get a great new living room for around £6,000, if you're installing an expensive kitchen or bathroom the costs will be much higher.
There may also be administrative costs involved;
for example, if you are paying for an architect and a project manager. You should also factor in any additional costs of borrowing, not just the initial fee, but also the ongoing interest. However, since the cost of extending your home is so high, a garage conversion remains a fantastic way to gain more space without having to move. Compare quotes can save you up to 40%: Click to get quotes.