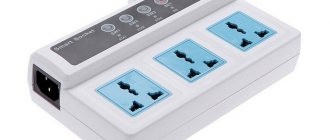
They are also called “smart plugs” in another way. You've probably heard this phrase before, as these small electrical devices are becoming increasingly popular. Today I will tell you what a Wi-Fi socket is and what it is needed for. I'll tell you how it is connected, controlled and what models are on sale.
I myself live in a country house, and, as it turned out, later it becomes much more difficult to live there without this thing. Wi-Fi sockets, in short, help to remotely turn off and turn on the electricity supply to certain devices.
You install a smart socket like this, connect a lamp there, for example, and you can turn it on or off via the Internet from anywhere in the world. This is especially convenient when you are away on vacation. This way you can confuse the criminals who have their eyes on your goods.
Management occurs through a special application on a smartphone, which can be easily downloaded from Google Play and the AppStore. The interface is very clear, but, most importantly, you can control such an outlet anywhere in the world where there is Internet. The sockets themselves have access to the Internet by connecting to a home Wi-Fi router or via a SIM card to the Internet of a mobile operator. But most often the first option is used.
Appearance and varieties
There are two types of sockets:
- External - looks like a block made of high-quality durable plastic. A standard plug is used for input, and a socket is used for output.
- Internal - externally similar to a regular wall socket.
They all have a Wi-Fi module inside that connects to the home router. There is also a smart control system. If the device is expensive, then there may be additional sensors.
They can also be divided by connection type:
- Wi-Fi – connects to the Internet through a router.
- GSM - a SIM card is inserted into it, and control is performed using SMS. Oddly enough, such boxes cost 3 times more.
Possibility of synchronization with a smart home
To synchronize a smart socket with a Smart Home, use a smartphone or other gadget equipped with Wi-Fi and an Internet connection. Subsequence:
- Download and install the “Mi Home” program, which is provided free of charge by the “Play Market” or “AppStore” stores.
- Registration is in progress.
- The region is selected.
- The socket is connected to a 220V network.
- In the open Mi Home application, press “+”.
- The menu that opens contains the newly connected device.
- The required Wi-Fi point is determined.
- The location of the device (room) is indicated.
At the end of the procedure, the socket becomes part of the Smart Home equipment and is ready to participate in the expected scenarios.
Functions
The functionality is quite wide, but in general everything is limited to the banal switching on and off of electricity. I’ll immediately note the price - the price range in the store is wide: from 1,500 rubles to 10,000 rubles. Below in the article I will present several models and tell you how they differ from each other.
There are also models that have motion, smoke, humidity, temperature, etc. sensors. Such models will help you quickly understand what is happening in your apartment. It is clear that they cost much more. A standard model with regular Wi-Fi costs from 1,400 to 2,500 rubles.
Here is the entire list of functions. But functions can vary greatly from one model to another.
- Turning power on and off to connected devices.
- Control via smartphone or tablet via app.
- Smoke and air sensors will help you quickly detect a fire and call the fire department.
- Motion sensors will be able to detect uninvited guests.
- Child control to turn off the TV, computer and lights.
- Built-in timer, can be configured to turn devices on and off according to time. Well, for example, turn off or, on the contrary, turn on the lights at night and during the day.
- Ability to see power consumption.
Subtleties of choosing a good smart socket
Companies producing smart home appliances are offering increasingly competitive models. The appearance, capabilities and technical characteristics of all manufacturers differ. Therefore, when choosing the best option for your home, you should focus on your needs.
Firstly, you have to decide for what purposes and in what rooms the smart sockets will be used. This is the most important question, because if you just need to turn the electric kettle on/off, then there is no point in buying an expensive model with many additional functions and capabilities.
You may need more than one device, but several at once - the main and dependent ones.
When choosing a remotely controlled device to control the heater, do not forget about the power of this device
Secondly, it is important to select a power that matches the power of the electrical appliance that will be controlled using this outlet.
Under no circumstances should you rely on the fact that a socket with a lower output power will cope with a boiler or heating boiler. It is advisable not to buy smart devices with an output power of less than 2 kW at all.
Thirdly, you need to decide what additional features your model should have and choose a device that meets these requirements. After all, not all sockets have special connectors for connecting certain devices or sensors.
It is especially important to buy sockets with an additional battery for country houses, where power outages occur more often
Fourthly, it is highly desirable that the device has an additional battery.
Fifthly, it is better to choose models that provide several channels for control.
As for the cost, you need to understand that there are no good models with a wide range of functions at a low price. Therefore, the more a smart device can do, the more expensive it will cost.
Cheaper options are quite usable; they are made of high quality plastic and are quite capable of performing all the functions provided by the manufacturer.
Before purchasing the selected model, it is advisable to carefully study the technical characteristics of the device by reading the manufacturer’s instructions
The most popular smart plugs are from manufacturers such as TP-Link, Orvibo, SenseIT, Redmond, Xiaomi and Broadlink.
Models
Below I will present models of different price categories. In addition to the characteristics, I will write a couple of lines about the price and its advantages. If you get confused in all this diversity, then write about it in the comments, and I will try to help you with your choice. Just don't forget to write what device you need it for.
Digma DiPlug 100
A regular budget outlet with Wi-Fi. There are no additional sensors.
| Voltage | 100 – 240 V |
| Load current | 10 A |
| Power | 2500 W |
| Mobile application name | Digma SmartLife |
| Working temperature | from -10 to 40°С |
| Price | 1900 |
Digma DiPlug 160M
The maximum load and connection power are greater. But the price is not much higher.
| Voltage | 100 – 240 V |
| Load current | 16 A |
| Power | 3520 W |
| Mobile application name | Digma SmartLife |
| Working temperature | from -10 to 40°С |
| Price | 2200 |
Rubetek RE-3301
Protects the device from voltage surges. In addition, there is a sensor that calculates the total energy consumption of the device.
| Voltage | 230 V |
| Load current | 11 A |
| Power | 2500 W |
| Mobile application name | Rubetek |
| Working temperature | With positive |
| Price | 3100 |
GSM socket Alonio T6
The connection is via a SIM card. Management occurs via SMS messages. There is a built-in temperature sensor. Can even be used as a thermostat when connecting a heater. At the same time, you will be notified via SMS that the temperature at home has risen sharply or the power has been cut off. Built-in timer. Well suited for heating a garage or basement.
| Voltage | 220 V |
| Load current | 16 A |
| Power | 3500 W |
| Mobile application name | Alonio |
| Working temperature | from -10 to 50 |
| Price | 6000 |
Elgato Eve Energy
There is a voice control function. When connecting and using an iPhone or iPad to activate Siri features. Data transfer via Bluetooth.
| Voltage | 100 – 240 V |
| Load current | 11 A |
| Power | 2500 W |
| Mobile application name | Apple HomeKit |
| Working temperature | from -10 to 50 |
| Price | 10500 |
Xiaomi Aqara Smart Wall Socket ZiGBee
Built-in socket size 86*86*45 mm. Electricity calculation schedule for a day and a month. The cheapest place to buy it is on Aliexpress.
| Voltage | 100 – 250 V |
| Load current | 10 A |
| Power | 2500 W |
| Mobile application name | Xiaomi Mi |
| Working temperature | from -10 to 50 |
| Price | 1800 |
TP-Link HS110
Electricity consumption tracking. The “Away from Home” function turns the device on and off alternately, which creates the appearance of presence. Automatic shutdown timer for iron, steamer, kettle, etc.
| Voltage | 100 – 250 V |
| Load current | 16 A |
| Power | 3680 W |
| Mobile application name | Kasa |
| Working temperature | From 0 to +40 |
| Price | 1800 |
What it is?
Smart appliances with remote control were developed for private homes, which constantly require care and supervision.
A smart plug belongs to this group of smart devices. It is a device that connects to any outlet, and then any household appliance with a power of up to 3.5 kW is plugged into it. Attention
Up to 5 people can use the device at the same time. Each family member will have access to management.
What does the concept of a smart home mean?
The key idea of a smart home is considered to be automatic control of various elements in the apartment. For example, automatically turning off the lights when no one is in the room for a long time or shutting off the water supply in the house when a leak is detected. And, for example, a smart socket with a temperature sensor can turn on the heater when the temperature in the room drops. This system is designed to increase the security of your home and optimize various electrical networks to improve comfort.
How to choose?
First of all, you need to roughly understand what exactly you will be plugging into the outlet. The load and current power will depend on this. If you will use the outlet in the garage or where there may be sub-zero temperatures, then you should consider buying models with IP protection against moisture and dust. Well, of course, the operating temperature must be appropriate.
For permanent devices, it is better to take a built-in socket, but a regular block socket will not be bad either. Well, at the very end, start from the price. There are a lot of models. If you don’t need bells and whistles with motion and temperature sensors, then take a regular Wi-Fi socket.
Main selection criteria
A smart plug is not a cheap toy. The performance of household electrical appliances, the integrity of the electrical network and fire safety depend on its quality. Therefore, when purchasing a gadget, you should pay attention to every detail.
The main criteria for choosing a smart plug include:
- Power. Most devices on the market are designed for a current not exceeding 10A. When purchasing a smart socket, you need to make sure that the connected devices will not damage it.
- Type. Overhead or built-in. The first option is designed to be plugged into a regular outlet, the second is an independent device that is built into the wall. The popularity of overhead sockets is justified by mobility.
- Control. Determined by the purpose of the device. Technical capabilities and personal preferences. Possible options: remote control, mobile phone (SMS messages), gadgets connected to the Internet.
- Functions. Basic and additional features are taken into account (overload protection, scenario support, USB port, power consumption monitoring, network status monitoring, failure information, etc.).
- Working conditions. The device must be suitable for the environmental conditions. When placed in the bathroom and kitchen, it must be protected from moisture. Outdoor design means durability, dust and moisture resistance.
In addition, you need to pay attention to the reputation of the manufacturer, the quality of assembly and materials. Reviews about the smart socket, as well as expert advice, will come in handy.
A smart plug, as a complex high-tech device, cannot initially be cheap. If you set a low price and purchase the device second-hand, you may end up a victim of a counterfeit.
Why did I take it for myself?
Having read a lot of articles about smart homes, I wanted to do something similar at home. The most interesting thing is that such sockets are not that expensive. That's why I was even surprised when I looked at their price. I immediately installed several regular sockets.
I love to eat delicious food, so I put one on the steamer. I just throw all the ingredients in there in the morning. And when I get home from work, I turn on the steamer and when I arrive, a ready and delicious dinner is already waiting for me.
I ordered one built-in socket to turn the electric gate on and off. Of course, there is also a remote control, but just in case, I also connected it to the outlet. I connected another device to the router, but the connection comes from a mobile operator. Because if the wireless network on the router hangs, this is the only way to reboot it.
A friend of mine who is engaged in mining also connects his system to a router, and that in turn to a smart GSM socket. And if the system freezes, it won’t be difficult to overload the Internet. She also reports a power outage.
In any case, such an outlet is suitable for those who need to control the connection and disconnection of various electrical appliances. By the way, as practice has shown, this greatly saves energy, especially when using an outlet for water heaters.
15 minutes: preparing tools and assembling firmware
We will build firmware for Windows 10 (any build, but the authors strongly recommend LTSC).
- Download and install Arduino IDE.
- Let's download and install the drivers for the UART-USB bridge soldered on the board. In the author's case it was CP2102 (it says so on it).
- Let's launch the Arduino IDE and go to the menu File - Settings . In the Additional links for Board Manager , enter https://dl.espressif.com/dl/package_esp32_index.json. This will allow you to install ESP32 support directly from Arduino from the chip manufacturer's website. Click OK and close the dialog.
- Let's go to the menu Tools - Board - Board Manager , enter esp32 . In the item that appears, click Install .
- From the attached archive, unpack the GetStarted and open the GetStarted.ino .
- We find the following lines and inside the quotes we write the SSID of the Wi-Fi network and password accordingly: const char* ssid = “”; const char* password = "";
- We find the line and insert the connection string inside the quotes, which we obtained earlier using the dps-keygen . static const char* connectionString = "";
- We find the line and insert the identifier of our device inside the quotes: #define DEVICE_ID ""
- In the board settings (Tools - Board) set the parameters as in the figure below.
- Let's fix the SNTP library bug that leads to the ESP32 rebooting when the connection is lost, for which we open the file C:\Users\user_name\AppData\Local\Arduino15\packages\esp32\hardware\esp32\1.0.5\libraries\AzureIoT\src\az_iot\ c-utility\pal\lwip\sntp_lwip.c and at the very beginning of the SNTP_Init() function we insert the code: if (sntp_enabled()) sntp_stop();
The library version may vary. Replace 1.0.5 with the one that applies in your case.
- We connect the board and select the serial port that appears in the same menu (the port number can be checked in the device manager).
- Press Ctrl + U to assemble and upload the sketch to the board. If everything went well (as it should), we press the buttons on the board and see how the relays switch.
- From the menu Tools - Port Monitor you can view the debug output of the board.
If you want more than two outlets, no problem! Make changes to the schema and add button and socket pin numbers to the BUTTON_PIN and SWITCH_PIN .
Connection and setup
There is nothing complicated about this, since all control and configuration will be carried out through the application.
- Download the app for your socket from Google Play. There will be a QR code in the box under the socket that will help you quickly find the program you need. But you can simply enter the name of the company that produced the device in the search bar.
- We connect the outlet to your standard one.
- Open with the app on your phone. If you are asked to create an account, create and log in.
- Next, the system will ask you to connect to a Wi-Fi outlet. After this, you just need to act according to the instructions given.
- Finally, we connect the device to your home router.
The setup system may differ slightly from one firmware to another and from one company to another, but in general everything is quite simple. The most important thing before this is to choose the right device.
What types of smart plugs are there?
They are divided into several types depending on the method of placement and type of control.
By placement method
- Invoices. They do not require installation - just plug the smart device into a regular outlet.
- Built-in. These models are screwed into an installation box with a cable connection to the internal power supply system of the room.
By type of control
- Radio controlled. Remote control included.
- With timer. Inside these sockets there is a time relay that operates at the moment you specify. With their help, you can program small household appliances, lamps and irrigation systems to turn on or off.
- With GSM control. Inside these models there is an electronic board with a GSM module and a slot for installing a SIM card. The sockets can be controlled by sending messages or making calls to the SIM card installed inside.
- With Wi-Fi control. You can program such sockets from anywhere in the world where there is Internet access. To do this, you just need to download the application provided by the manufacturer.
Controllable outlet form factor options
All sockets equipped with Wi-Fi, in principle, like regular ones, are divided into two large groups:
- built-in;
- external.
To indicate that the device is operating, there is an LED indicator on the front panel. There is also a button that allows you to turn off or restart the device manually.
Built-in smart sockets look little different from regular sockets; they can be installed in a standard plastic socket box without additional modifications.
The outdoor gadget looks like an asymmetrical “mushroom” with a 220-volt output.
A device made in this form factor is switched on at 220 volts, like a regular tee. If necessary, it can be moved to any room or connected via an extension cord.
Advantages and disadvantages
A modern device allows you to control the operation of equipment in your home from a distance. Other advantages include:
- Additional functionality in the form of a timer or backlight.
- Control one point from 40 gadgets.
- Easy to operate and install.
- Optimal sizes.
- The presence of a temperature sensor, made of fire-resistant material.
- Reception range from 50 meters.
The disadvantages of the modern device include:
- When the power goes out, all settings are lost.
- Some models may not be compatible with the router.
- The Wi-Fi outlet reacts to its time zone, which is worth considering when choosing a manufacturer.
- In the event of an emergency, the device turns off.
- Without an Internet connection, it is impossible to control the outlet from a distance.
Sources
- https://okcomfort.com/elektrika/rozetki/umnaya.html
- https://NewSmartHome.ru/smart-home/umnaya-rozetka
- https://WiFiGid.ru/raznye-setevye-ustrojstva/wi-fi-rozetka
- https://elektrika.expert/rozetki/wifi-rozetka.html
How does Wi-Fi work from a wall outlet?
Operation is controlled by a built-in microprocessor. The processor coordinates work with a control device - a gadget with an installed application. There are also more complex modifications on the market with network adapters with 4 connectors, but such options are not suitable for everyone.
Wi-Fi from an outlet allows you to perform the following functions:
- Turn electrical appliances on and off from a distance.
- Control the amount of electricity used.
- Reboot electrical appliances.
- Set a timer to control devices.
- The presence of a temperature sensor ensures fire safety.
Before connecting the device, you should make sure that its power is lower than the power of the outlet. Such information is provided in the technical data sheet of the equipment.
How to make a device with your own hands: description and diagram
To make it yourself, you will need:
- Controller module with wi-fi - needed to receive and issue commands via wi-fi.
- Relay - responsible for turning contacts on and off.
- Power supply - for powering the modules.
- The socket box and the device itself.
Wires connect the relay, power supply and controller module to each other. Pieces of heat-shrinkable tubing are cut off and the modules are insulated. All components are placed in the socket box, the cable is connected and connected to the outlet. To do this work yourself, you need to have knowledge in electrical engineering and programming.
Smart sockets, like switches or other smart devices, bring additional comfort to life and increase the safety of using electrical appliances. They are installed in apartments and private houses, they are easy to connect and configure, and inexpensive. The main thing is to make sure before purchasing a model that it has the necessary properties.


