Progress does not stand still and newer and more advanced devices are appearing on sale. Some of them have fundamentally new tools for automating any processes. One such cheap home automation device is the Wifi relay.
When configured correctly, idle time equipment becomes “smart” and can be controlled from a regular smartphone. Currently, there are several models that differ in functionality and technical characteristics. It is worth understanding in more detail what a Wi-Fi relay is, what is the operation scheme of a relay controlled via the Wi-Fi protocol, and how to configure it for optimal operation.
What it is
Wi-fi relay Sonoff is a remote-controlled relay from ITEAD with integration into various smart home ecosystems. In simple models, control is carried out only via Wi-Fi, while in advanced models there is control via a radio channel with a frequency of 433 MHz. In addition to manual control, you can set the operation on a timer or use sensors. We'll talk about this below.
In addition to Wi-Fi relays, this manufacturer also has lamp sockets (Slampher), touch switches and sockets - all with remote control, which allows you to automate some devices with their help and without interfering with the internal circuitry.
A special feature of Sonoff Wi-Fi relays is that they are integrated into the ITEAD IoT System smart home ecosystem, and can also work with systems and services such as:
- Google Home;
- Google Nest;
- Amazon Alexa.
By default, devices are controlled through the eWeLink application, which you can download from the application markets for Apple and Android.
The appearance of the device is ascetic. In the basic version, you have two “Input” contacts for connecting 220V power, and 2 “Output” contacts to which the load is connected; the same 220V appears on them when turned on.
The standard connection diagram is shown below. The wires are connected with screw or clamp terminals, depending on the model.
At the time of writing, you can find Sonoff Wi-Fi relays in blue and orange packages on the domestic market. Blue - ordered mainly from China. Orange packages are products for our market; the words “World On” have been added to the name. Sonoff World On is a kind of localization of the device from ITEAD.
Why is it worth buying controllers for a Smart Home?
On our website it will be beneficial for you to purchase high-quality and affordable controllers for the Smart Home system from the well-known manufacturer Sonoff.
There are different types of relays designed to effectively perform certain functions, so everyone can choose a device that fully satisfies their requirements. Experienced Woots consultants will professionally help you make your choice. With our affordable and easy-to-use controllers, you can create a functional home automation system with access from anywhere.
Operating principle and setting
All (according to unverified data, almost all) Sonoff Wi-Fi relays are based on the ESP8266 microcontroller, which provides connection to a wireless network. In addition to this, the board contains a power relay, power supply and terminal blocks. There are descriptions, codes and diagrams on the Internet for self-assembly of the device, but the rationality and cost of this idea is questionable.
The operating algorithm is as follows:
The Sonoff Wi-Fi relay connects to your router and communicates with the cloud server. You connect to the Internet from your smartphone and control electrical appliances. You can control the device in “local” mode by pressing a button on its body. And thanks to the simplest connection diagram, home automation does not require deep knowledge of electrical engineering.
Let's figure out how to connect Sonoff to a smartphone, it's not difficult. To connect you need:
- Download the eWeLink application from the Appstore or Play Market.
- Register in it.
- Apply power to the device; in this case, you need to press and hold the button on the relay body (or other connected device from this family) for a long time.
- When the LED indicator starts blinking, release the key.
- Click on the device search icon in the application.
- Specify wireless connection settings.
- Assign a device name and use it from your smartphone or by pressing a button on Sonoff itself.
Wireless control without internet works on RF and Basic models
Everything is quite simple, such work allows you to control devices from anywhere in the world, because communication occurs via the Internet, and not a local network. On thematic forums there is a description of how to untie all Sonoff products from the cloud and make them work over a network without the Internet.
Instructions for setting up Wi-Fi
Smart Wi-Fi sockets controlled via the Internet
Next, more comprehensive instructions will be given for setting up the relay when connecting directly to a smartphone and through a shared router.
Operating mode 1 - the smartphone is connected to the module directly
The first step is to run the USR-TCP232-Test-V1.3 program and run the following commands:
- AT+CWMODE=2 — selection of AP mode;
- AT+RST - restart;
- AT+CIPMUX=1 — installation of multiple connections;
- AT+CIPSERVER=1.8080 — setting up the TCP server and setting the port number;
- AT+CIFSR — view the IP address for the Access Point mode;
- AT+CIOBAUD=9600—sets the port baud rate to 9600 baud.
After this, you need to connect to the access point from your smartphone and download the EasyTCP_20 software for Android from PlayMarket. Launch it and click Connect, entering the device address and port number. After this, commands can be created in blocks that will be sent to the relay.
The lineup
Now that we have figured out how the Sonoff smart relay works, let’s move on to a review of the proposed solutions. By the time this article was written, on the company’s official website there are 9 models of Wi-Fi connectors and 9 models of other smart products: sockets, switches, lamps, sockets. Let's look at what they are and the characteristics of some of them:
- Basic 10A is the simplest model, the relay is designed for current up to 10A, maximum load is 2.2 kW. Operates in the voltage range 90-250V, according to the wireless communication standard 802.11 b/g/n, operating temperature from 0°C to 40°C, Case dimensions: 88*38*23mm.
- RF - distinctive feature: support for remote control via 433MHz radio remote control (not included in the kit, you can bind any one).
- Dual - differs from the characteristics of the previous one only by the presence of two channels. So you can manage two loads from one device, but how many can you connect? The maximum current for one device is 10A and power 2200 W, and for two devices a total of 16A and 3500 W. Case dimensions: 114*52*32mm.
- TH10/TH-16 - models with temperature and humidity sensor: DHT11, AM2301, DS18B20 (temperature only). They connect to the 3.5 mm jack on the side panel. TH10 differs from TH16 in maximum load current - 10 and 16 amperes, respectively.
- POW 16A, the main difference is the ability to monitor the power consumed by the load. This is especially true when used to control a heater with a load current of up to 16A. With the ability to display daily and monthly reports. Case dimensions: 114*52*32mm. In the POWR2 version, it is possible to view the current consumption and what voltage is in the network.
- 4ch PRO is the largest option in the line. The main feature of the characteristics is to control 4 channels of consumers with a power of 2200W, that is, 10A per channel. Size: 145*90*40mm. Designed for installation in an electrical panel on a DIN rail and occupies 8 modules.
The cost of the simplest relay at the time of writing is $3.5, and the most expensive is $20. How many devices can be connected to one Sonoff Wi-Fi relay, as you can see, depends not only on the current consumed, but also on the number of channels
Remote control
If the Sonoff device is online, the green LED on its body lights up statically. When the LED blinks periodically, it indicates that the connection with the router or the Internet has been lost.
To remotely activate or deactivate the load, in the application, click on the relay icon and click on the large virtual power button in the middle.
The timer function is present, so you can configure the control option based on filters:
- Repeat or once;
- Days of the week;
- Date and time;
- Application on the current or next timer.
There is also a second countdown timer. Filters are as follows:
- Enable or disable;
- Enter the day, hours and minutes.
The third (cyclic timer) allows you to set certain cycles (after what time the relay will turn on and after what period of time the relay will change its position). It is also possible to indicate the time and calendar date of the beginning of this cycle.
Set multiple timers with caution. If one time is superimposed on top of the second, then neither the first nor any other programmed timer will perform its intended action.
In the parameters there is an item that allows you to set in what position of the circuit the automation will remain if 220 V suddenly disappears from it:
- Click on the relay icon and click on the three dots.
- Select "Settings".
- Activate the desired label next to “Power to switch”.
When power is applied to the relay, when:
- “On”—the device will turn on.
- “Off” - it will turn off.
- “Stay” will be in the same position as before turning off.
It is recommended to maintain the current version of the application, so in the settings of the utility itself, next to the “Software version” item, the “Download” button may be active.
Connection diagrams
We have already talked about the standard connection of a load to a Wi-Fi relay, but it is limited by the switching capacity of the contacts of a small-sized relay. How to connect Sonoff to control a powerful load? If you need to control a powerful load, use a contactor, powerful relay or other switching device.
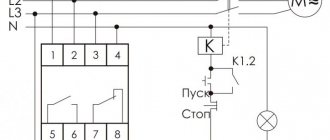
The Sonoff RF Wi-Fi relay is equipped with a 433 MHz radio module, which means that it can work with radio switches and remote controls. The figure below shows the connection diagram and how to install it instead of a regular light switch for a chandelier.
To install wireless control: remove the old switch, short-circuit its wires (the incoming and outgoing phases to the lamp) and connect Sonoff RF to the lamp's power supply. After that, stick the radio switch anywhere on the wall and use it, but do not forget to bind it. This way you can move the switch to a new location without cutting into the walls.
By the way, the size of the Sonoff Wi-Fi relay allows you to hide it in the bowl of chandeliers and lamp housings.
Equipment selection
As equipment - based on the goal of fitting into a $20 budget and taking something that I had not yet reviewed - I chose the Sonoff Basic power controller, the current price of which in the itead cc store is only $4.85 thousand. Relays - I chose as much as 100 A (22 kW at a network voltage of 220 V) from KZLTD, on Aliexpress - for $13.08 thousand. Total reaching the specified range - less than $20. May the pedants forgive me - I do not take into account the cost of delivery.
E-WeLink application
I'll tell you a little about the standard application.
If you do not yet have an account in E-WeLink, you will be prompted to create one. The first launch of the application is accompanied by tips that make it easier to explore its capabilities.
To add a device, you need to put it into pairing mode (after applying power to it, of course) by holding the button on it for 5 seconds.
Next, you need to enter the password for your Wi-Fi network, after which it will scan and detect compatible devices.
The next step is to come up with a name for the device and after that it will appear in the general list.
The principle is very similar - and it would be strange if it were not so - to similar systems from Xiaomi or Broadlink.
The main window of the control application contains a large round button - turn it on and off, and controls for all functions of the device.
The most useful and in demand will be the on timer; once you start it, you can forget about the need to turn the same boiler on and off every day. Countdown timer - convenient for random activation for a given period of time. A small settings menu allows you to rename the device, update the firmware, set the default status after a power outage, and enable the notification system.