If the oven in an electric stove does not work, there can be many reasons (from problems with the power cord to the failure of individual structural elements). Sometimes you can find the source of the breakdown and fix the problem yourself. But in most cases it is better to call a specialist.
Employees of the A-Iceberg SC repair electric stoves from all well-known manufacturers (from inexpensive Darina and Mechta stoves to multifunctional models from Gorenje, Beko or Hansa).
The technicians perform all the necessary actions at home, without taking the equipment to a service center. To call a specialist, fill out an online application on the website or call us at 8 (495) 213-33-33
(from 7:00 to 23:00 daily).
Electric stove oven does not work
To determine if an oven is malfunctioning, one indicator screwdriver is enough, and to check the heating elements of the oven, you can use an Ohmmeter measuring device. During this test, a continuity test was carried out for each individual wire, from the electric stove tires to the oven power switch. As a result of the inspection, it turned out that the heating elements of the oven were working. There is no break in the wire connections; power is supplied to the oven switch contacts. So where then should we look for the cause of the malfunction?
How to find a fault
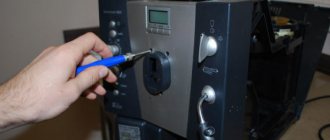
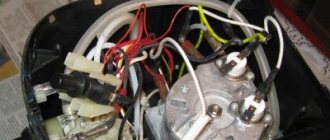
It was decided to remove the oven power switch and inspect the switch contacts. For this electric stove design, you first need to remove the control panel trim (photo 5)
In order not to create unnecessary work for yourself, before disconnecting the wires from the contacts of the power switch, it is advisable to mark the wires (photo 6).
Disassembling the oven power switch and its further assembly did not particularly inspire me, since such work, so to speak, is delicate. When I took the power switch apart, it was the first time in my experience that I had to do an unusual repair.
Unusual renovation
The entire power switch was covered in (non-living) small and adult cockroaches and their waste (photo 7).
All this had to be carefully removed with a brush. After cleaning the switch parts, all contacts were cleared of carbon deposits and rust.
The photo on the left clearly shows the condition of the shaft for switching contacts (photo 8). This is the kind of place that insects have chosen, although the owner regularly monitored and monitors the cleanliness of the apartment, and promptly uses means to destroy them.
So, all switch contacts have been cleaned, all that remains is to correctly install the contacts and assemble the power switch (photo 9).
Before assembling the power switch, you need to insert the support springs for the contacts (photo 10). The springs are difficult to install; to make assembly easier, you can use Monolith glue. A small amount of glue is applied with a cotton swab at the gluing site, after which the springs are glued - for their stability. Then, carefully insert the switch cover (the springs should align with the recesses in the cover).
The switch has been repaired, all that remains is to connect the marked wires to the contacts of the switch and install it on the control panel of the electric stove.
Before connecting the electric stove, all heating elements were tested for resistance. The owner checked the working condition of the electric stove and oven and was satisfied with the results of the repairs.
That's all for now. Follow the section.
Almost every second housewife faces problems in the kitchen. For baking lovers, the main problem is that the oven does not heat. Of course, such a catastrophe can be eliminated, but only if the true cause of the malfunction of the oven is found.
Diagnostics of oven components (elements)
Formula for calculating the resistance of a working heating element. Mains voltage (for which the heating element is designed) squared and divide the result by the power of the heating element. Example - voltage 230 volts, power 1600 watts. The resistance of this heating element will be 33 Ohms. To put it simply, we can assume that a heating element with a power of 1.5 kW should give a resistance of around 30 Ohms.
The general rule for element resistance is that the higher the element’s power, the lower its resistance.
The cyclic thermostat is also checked for resistance. A working thermostat should make a circuit (be closed) when turned off and open a circuit when turned on (when adding temperature).
Emergency thermostat (overheat protection). In normal condition it should be closed. At high temperatures it should open.
The general rule for checking the resistance of elements is:
- The mains power must be turned off.
- Before checking the resistance of an element, you need to remove one of the wires that is connected to it. To exclude the influence of other elements of the system.
Trouble-shooting
A kitchen electric stove equipped with an oven belongs to the category of high-risk household electrical appliances. When working with such devices, you must follow safety regulations to avoid electric shock.
Oven won't turn on
If, when turned on, the electric oven does not show signs of life (the backlight and indicators also do not work), troubleshooting begins by checking the power outlet. An electric stove, and therefore an oven, can be connected to both a single-phase and a three-phase network, depending on the model.
If there is a three-phase network, the voltage is measured between each phase and the working neutral wire (~220 V), as well as between all phases (~380 V). If the electric stove is connected to a single-phase network, then the measured voltage between the phase and the neutral wire should be ~220V.
After making sure that there is voltage in the power outlet, similar measurements are carried out at the input terminal block of the electric stove. To do this, connect the power cord to an outlet. If there is no voltage at the input terminals, the cause of the malfunction is the power cord, which must be replaced. Next, visually inspect the condition of the terminals and contact connections. Electrical wires are connected using contact connectors, to which they are attached by crimping (crimping). The connectors must be firmly attached to the terminals. If there is play, the contact is broken, the surface of the parts oxidizes, and the connection ultimately disappears. Once defects are found, they are eliminated.
The oven does not heat up when the backlit indicators are on
In cases where the oven lighting and all indicators are functioning, and the cabinet itself has stopped working (heating up), the cause of the malfunction is most often the failure of the heating elements. They are checked using a tester (multimeter) by ringing. If the resistance measured at the heater terminals is in the range from 10 to 100 Ohms, then this indicates their integrity and serviceability. If the tester detects a break or the resistance of the heating element approaches zero (short circuit), then such a heater must be replaced. It is necessary to replace a burnt-out part only with one that is completely similar both in technical characteristics and in design.
Insufficient heating
If during the cooking process it is not possible to achieve the required heating temperature, and the backlit indicators work properly, then this may be due to a faulty:
- fan;
- thermostat;
- mode switch.
In addition, simpler defects are also possible, for example, a door that does not close tightly or a damaged seal. Such malfunctions are detected by external inspection, and can be eliminated quite easily by replacing the seal and/or adjusting the latches (latches) and door stops.
Sealing rubber
The thermostat and mode switch are quite complex electromechanical devices that are most often impossible to repair. You can verify their serviceability by calling the contacts using a tester. If burnt connections are found, they are cleaned to a shine with fine-grained sandpaper. Burnt wires also need to be replaced. When ringing the mode switch, you need to check the electrical diagram. The functionality of the thermostat is checked in the same way. In this case, in a cold state, its contacts must be closed.
A non-working fan must be disassembled and carefully inspected. If bearing failure is detected, the entire device is replaced with a similar one. But sometimes a breakdown can be eliminated by simply lubricating the rubbing parts.
Spontaneous shutdown of heaters
The operation of heating elements installed in the oven of an electric stove (Ariston or other brands) is controlled by a thermostat (thermostat). Structurally it can be:
- mechanical (as in “Dream” electric ovens);
- electromechanical;
- electronic.
If the oven turns off spontaneously while cooking, there can only be one reason for this - failure of the thermostat. Regardless of the type of thermostat, it is replaced with a new identical part.
Thermostat
This device does not break down as often as others, but it still happens. The thermostat in a normally operating oven is a device that allows you to provide the optimal temperature for a particular dish and avoid overheating. By the way, if the oven overheats, the reason is clearly a malfunction of this particular element.
Thermostats are:
- mechanical;
- electronic;
- electronic-mechanical.
Checking the thermostat
To do this, you will need a special thermometer - it is sold in the same stores that sell ovens:
- Place the thermometer in the oven.
- Plug in the oven.
- Turn the knob to minimum heat.
- Wait 10 minutes - the thermostat should work and turn off the heaters.
- Check how well the thermometer readings correspond to the set mode.
- Open the door to allow the appliance to cool down.
- When the temperature drops, the oven should turn on.
- Check the shutdown mode - set the regulator to the appropriate position.
- The indicator goes out, the device turns off, and if this does not happen, replace the thermostat.
Some features of the operation of stoves of various brands
There are dozens of brands and hundreds of models on the market, but there are only a few truly unique designs. Below, brands are grouped based on similar oven control techniques.
The sequence of actions for Bosch, Siemens, Samsung, Electrolux stoves is as follows:
- select the required cooking mode: heating temperature and baking duration;
- set the desired value on the temperature regulator;
- place the dishes with food at the required height and close the door tightly;
- set the cooking time on the timer;
- follow the indicator on the panel for the remaining time, if the recipe requires intermediate actions with the dish: turn over, pour over the sauce, add ingredients;
- At the end of cooking, when the timer signal sounds, you should remove the dishes with the prepared dish and clean the cabinet of dirt as soon as possible.
If you leave cleaning until later, food particles and splashes of fat and sauce will cake, forming a hard-to-remove residue.
How to safely turn on and off an Ariston and Indesit gas oven
Gas ovens Ariston and Indesit are distinguished by their affordable price and at the same time high quality and safety in operation. With any ignition method - automatic or manual - you must make sure that gas combustion has started and is stable. In models with piezo ignition, simply turn the control knob to the maximum temperature zone and press it.
The igniter is marked in red, electric ignition in green.
In budget models with manual ignition, you need to turn the knob, press it, ignite the gas through the pilot hole and hold the knob pressed for at least 15 seconds. During this time, the safety system will work and gas will be supplied to the burner. If you release the handle earlier, the security system will shut off the supply.
Indesit control panel
The oven should be lit with the door completely open.
How to turn on a gas oven Gorenje, Darina, Hephaestus
Gas ovens of the Gorenje, Darina and Gefest brands are equipped with similar safety systems, and ignition is carried out in the same way. The door must be opened completely.
Systems equipped with electric ignition are ignited by turning the knob counterclockwise, pressing the knob and holding it pressed for 20 seconds.
If you turn the control in the opposite direction, clockwise, and do the same steps, the grill will turn on.
Checking the ignition of the Gefest stove
For models not equipped with electric ignition, you will have to use long gas matches or a kitchen lighter.
For Beko gas devices, the sequence of actions is exactly the same as described above, but holding the regulator knob down for 5-10 seconds is enough.
Replacing an oven light bulb
If the regulator does not respond to these actions, it needs to be replaced. To do this, the back panel of the plate is unscrewed and the mechanism is replaced. In order not to get confused in the placement of handles and wires on the stove, you should sketch the diagram (or better yet, photograph it).
In some cases, the stove can be repaired by replacing the fan. But a fan that has stopped working does not always mean a new one is strictly necessary; sometimes it is enough to thoroughly wipe its components with oil so that they do not rub against each other.
The oven light is designed to last for a long time. But if it burns out, it needs replacement. Be sure to keep the paper instructions for the electric stove, because it contains information about the size of the light bulb base and its power.
To replace a light bulb, you need:
- disconnect equipment from power supply;
- remove the protective cap;
- replace the light bulb according to the recommendations specified in the individual instructions (the replacement algorithm may differ in different models).
A few words about the principle of operation
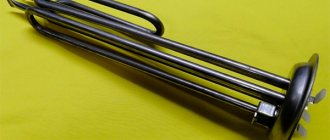
As I already said, the operation of an electric oven is ensured by electricity. When passing through thermoelectric heaters, it is converted into thermal energy. Thermoelectric heaters are heating elements. Essentially, they are metal tubes with high resistivity wire inside them. In addition to this peculiar core, there is a special substance - magnesia. It acts as an insulator and prevents contact between the wire and the sheath.
In an electric oven you can see the following types of heating elements:
- halogen - made on the basis of fire-resistant transparent glass. The main working element is lamps with reflectors. In typical household ovens, this solution is quite rare;
- spiral - such a heating element is formed by a single or double spiral. To adjust the heating, simply turn the knob. There are fairly smooth settings here, which gives high quality finished dishes;
- solid - in this case, the heating elements are fixed under a metal plate. The switches are usually set to six divisions - such possibilities are quite enough in everyday life.
An electric oven can be part of a stove or a separate appliance.
If the device works on its own, failure can occur in two places:
- faults in the electrical network;
- failure of the oven itself.
If your oven is combined with a hob, the list of possible sources of problems is much wider. Elements in different parts of the stove or the oven itself can fail.
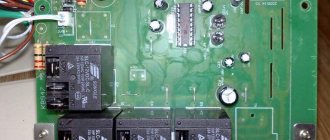
Control panel malfunctions
One of the most important parts of a modern Smart cooker is the control panel. It controls the cooking process automatically
, helping the housewife save her time. Failure of settings on the control board is a fairly rare problem, but sometimes it does occur. Self-repair is a complex process of diagnosing and configuring each element of the system.
As a rule, in such cases they rarely purchase a broken link and resort to simple repairs. The cost of purchasing new equipment is significantly higher than the cost of repairing it. If your stove is subject to repair, there is no point in overpaying extra money.
With proper care, an electric oven can last for several decades. However, even for an ideal housewife, electrical appliances sometimes stop working. There can be many reasons. We will now talk about what to do if the oven in an electric stove does not work.
Troubleshooting
Before you begin to look for the root cause of the malfunction and begin repairs, it is necessary to conduct a superficial diagnosis. Thanks to it, it will be possible to determine the most likely causes of failure of this equipment. If there are no complaints about the mains voltage, but the device still does not work after switching on, then you need to make sure that the outlet itself is working. It is possible that it has a different power than necessary, or that its contacts are simply worn out. If this is the problem, then you will simply need to replace the outlet and install the best option.
It often happens that in electric stoves that are equipped with mechanical controllers and switches, the light bulb does not work, and after some time the stove also stops functioning. Superficial diagnostics will allow you to determine without disassembling the case that the main reason for the failure lies precisely in the switch, which will simply need to be replaced so that the device can function in full mode.
If during the initial diagnostics it is revealed that certain parts of the heating elements are still functioning, however, they cannot boast of one hundred percent efficiency, then most likely the fault can be detected in the integrity of the power cord
In addition, you will need to pay close attention to the burner switches, which can also lead to similar problems.
It very rarely happens that all the burners stop working at the same time. This can only happen due to a rapid surge in voltage, causing electrical parts and wires to burn out. That is why, if all the burners do not work, then first of all you need to make sure that they are receiving voltage to the controller. Only after you are sure that the electric stove receives the required amount of current, but does not work, can you disassemble the structure and begin repairs.
Causes of electric oven malfunction
If the electric oven stops working, then the first reason for this is a power outage. The switch from the stove to the oven may also be faulty, or the oven heating coil may have burned out. Another interesting factor that may cause an electric oven not to turn on is that the timer is not set. For some manufacturers of electric stoves and ovens, setting the timer is a prerequisite for proper operation of the equipment. Just like when installing a new oven, you need to set the time, and when there is a sudden power outage, and when you turn on the oven again, you need to manually set the timer again.
And finally, the most common causes of breakdowns of any ovens: failure of the oven fan, malfunction of electrical elements, such as buttons or wires, damage to the oven glass - mechanical or as a result of wear.
103583
Prevention
Long-term, trouble-free operation of an electric oven is only possible if you comply with the requirements set out in the product operating instructions and carefully care for it after each cooking. In this case, it is recommended to wash the oven chamber with warm water with the addition of a small amount of dishwashing liquid. After finishing the oven treatment, the internal surfaces must be wiped dry.
Important! When cleaning the glass surfaces of an electric oven, the use of cleaning agents containing abrasive additives is not allowed.
Other reasons
Among other things, the oven may not heat due to wear of triodes, fuses (AC transistors), electronic module, timer, microwave emitter, temperature indicator. For example, a breakdown of the electronic module leads to a complete loss of functionality of the oven.
The device is simply not able to function without its “brain”. The equipment does not see signals from the thermostat, does not register the position of the switches, and does not start the heaters. In this case, the board is replaced with a new one, restoring the functionality of the old module and other listed components is a rare case.
DIY repair
Such repair of ovens is possible if the user has enough experience in the field of electrical engineering, as well as knowledge of the design features of a particular model.
In this case, you can eliminate simple flaws: change the cord or a burnt-out backlight lamp, clean the contact groups from oxide, install new switches. Without specialized experience, you should not try to repair an electronic programmer, replace a heating element, or install a new cooling system turbine.
Unskilled intervention in the design of equipment can lead to various negative consequences:
- the defect was not detected, as a result you just wasted your time;
- the defect was discovered incorrectly, the wrong components were purchased, and you wasted your money;
- During disassembly of the device, various internal modules may be broken, which will significantly increase the cost of restoring the functionality of the product.
There is also a possibility of injury (the unit is quite heavy, the internal metal parts of the structure are usually very sharp, since no one handles them) and electric shock (failure to comply with electrical safety rules).
To avoid risks, call electrical engineers from the A-Iceberg Unified Service Service. Our technicians will carry out diagnostics, detect the defect and carry out repairs at the client’s home within one to two hours.
Deciding on culinary functionality
Most modern ovens are multifunctional devices. What your oven can do determines how much you can realize your culinary potential.
Heating modes
Cooking different foods requires different temperatures and different heating rates. It follows from this that the more heating modes an oven has, the more varied the list of dishes that you can cook in it will be, the more opportunities you will have for various culinary experiments. Budget electric ovens, as a rule, have top, bottom and combined (top + bottom) heating, as well as a grill mode.
In more expensive models, convection modes are added to the classic heating modes. On the back wall of such ovens there is a fan around which a ring heating element is placed. The fan promotes rapid and uniform distribution of heated air throughout the working chamber.
Additional modes
Electronically controlled ovens often have a number of additional modes that significantly expand the functionality of the device. The presence of a convection fan allows you to implement a gentle defrosting mode of food: the heating elements do not turn on in this mode, and the fan circulates air at room temperature throughout the chamber. The “Stewing” and “Simmering” programs are designed for slow cooking of products at relatively low temperatures, which helps to maximize the preservation of nutrients in them. The “Fermentation” mode can be used to prepare yogurt at home, rise yeast dough, etc.
Steamer function
Some modern oven models have a steam mode. In most cases, this is not steaming, but rather a symbiosis of steam and heat treatment of products. However, there are ovens on sale with a special steam generator design - these can be used as classic steamers.
Microwave module
An electric oven can be equipped with a built-in microwave module. As a result, you get two appliances in one, which can be used as both an oven and a microwave. Moreover, if you wish, you can combine conventional heating with microwave heating, which can significantly reduce cooking time.
Automatic programs
Automatic programs built into the memory of an electronically controlled oven will help to significantly simplify the process of preparing various dishes. The user just needs to indicate the type of product (meat, fish, vegetables, etc.), select one of the types of dishes offered to him to choose from that can be prepared from this product, and enter the weight of the product.
Then the oven operates on its own: based on the algorithms stored in its memory, it selects the temperature mode and determines the process time, and after some time you get a ready-made dinner. The number of preinstalled automatic programs varies from model to model, but can reach several dozen. Some modern premium ovens allow the user to update the software by loading new auto programs in addition to existing ones, as well as save their own cooking algorithms.
Skewer
If you often bake whole poultry or large pieces of meat as the main course of a holiday dinner, a spit will come in handy. A spit rotating from a specially designed electric drive will help to heat the product evenly, making your signature dish even more tasty and attractive.
However, if your oven has a convection heating mode, then you can refuse the grill. A fan will also do an excellent job of its function: in this case, it is not the food that will rotate in the hot air, but the hot air around the food - the effect will be the same, which means that the meat on the grill will be cooked no worse than on a spit.
Temperature probe
When baking large pieces of meat, it can be difficult to assess how much the temperature inside the piece differs from the air temperature in the cooking chamber, and therefore to make an assumption about the degree of readiness of the product. A temperature probe will come to your aid - a thermometer that measures the temperature inside the product being prepared. When the required temperature is reached, the temperature probe will “notify” the control system about this, and it, in turn, will notify the user about this or perform an automatic shutdown.
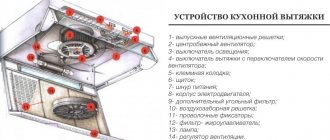
Oven device
When looking into the oven, the user will see little. Grates, backlight, open grill heating elements and protective thermal casing. But the structure of the oven is much more complicated. The design includes a number of key components responsible for temperature formation and air circulation.
Lower heating element
All ovens have a heating element at the bottom. It is this that forms the main heat flow for cooking. This element is not visible, it is covered with a thermal casing.
Ring heating element
The ring heating element operates in convection mode. At the same time, the fan turns on, which distributes hot air throughout the entire volume of the oven. This option is not available on all cabinet models.
Upper heating element
An open top heating element is only available in ovens with a grill option. Its task is both to ensure the product is baked on all sides and to create an appetizing crust on the surface of the dish. The security system controls the operation of the upper heating element, the heater automatically turns off when the door is opened.
Mode selection block
This can be either a circular switch or an electronic program selection panel. Depending on the complexity of the oven model, the user can choose the grill mode, activate the convection system, and use other options.
Temperature regulator
In models of ovens with electronic control, the temperature can be adjusted automatically, depending on the cooking program selected by the user. It is also always possible to set the exact value. In inexpensive models, this is done with a circular regulator, a familiar handle.
Thermal casing
The task of the thermal casing, the inner walls of the oven, is not only to protect the user from the danger of touching hot heaters. This metal shell distributes heat evenly, ensuring proper cooking.
Ventilation holes
Ventilation holes paired with a fan not only remove food vapors and excessively heated air. They cool the inside of the oven by the time it is time to remove cooked food from it, for complete comfort in using the device.
The oven fan is responsible for heat distribution
Information table
The main information that is displayed on the oven display is the execution time of the specified program. When the device is not busy with its main work, the display can display a clock or other data.
Door with heat-resistant glass
The door performs several tasks at once. It closes the oven chamber and prevents heat loss. Through its transparent heat-resistant glass you can monitor the condition of your food. In addition, the door works as user protection. The contact modules built into it are monitored by the oven's safety system.
Finally, the operation of the oven is impossible without an electronic control module and numerous temperature control sensors. The level of complexity of electronic and hardware components depends on the class of the oven, its cost and the number of options offered.
What may indicate poor performance of a gas oven or its malfunction?
There are several common reasons why a gas oven starts to work poorly or fails altogether.
How can this manifest itself? The most common symptoms of a malfunction are:
- the gas oven does not ignite even when the ignition button is pressed for a long time and frequently;
- after the gas control knob is released, the oven immediately goes out;
- the oven works properly for several minutes and then turns off on its own;
- the oven only works with a very small flame, which cannot be adjusted in any way;
- the flame in a gas oven is too high, which leads to complete combustion of food;
- The gas stove tap does not turn because it is jammed.
gas stove detail
All of the above faults are unlikely to be repairable on your own. In addition, in addition to the skills required for repairs, new spare parts may also be needed. However, before calling a gas stove repairman, check whether all conditions for its operation are met, because the stove may be working properly.
Here's what you should pay attention to:
is the stove connected to the electrical network (especially important if there is an electric ignition); Is there gas in the gas pipe, is the gas supply tap open?
If all the conditions for proper operation of the oven are met, but it still does not turn on or is acting up, then before calling a technician, you can try to start the oven yourself.
Ignition system
Electric stove oven does not work
To determine if an oven is malfunctioning, one indicator screwdriver is enough, and to check the heating elements of the oven, you can use an Ohmmeter measuring device. During this test, a continuity test was carried out for each individual wire, from the electric stove tires to the oven power switch. As a result of the inspection, it turned out that the heating elements of the oven were working. There is no break in the wire connections; power is supplied to the oven switch contacts. So where then should we look for the cause of the malfunction?
How to find a fault
It was decided to remove the oven power switch and inspect the switch contacts. For this electric stove design, you first need to remove the control panel trim (photo 5)
photo 5
In order not to create unnecessary work for yourself, before disconnecting the wires from the contacts of the power switch, it is advisable to mark the wires (photo 6).
photo 6
Disassembling the oven power switch and its further assembly did not particularly inspire me, since such work, so to speak, is delicate. When I took the power switch apart, it was the first time in my experience that I had to do an unusual repair.
Initial check
Before you grab your multimeter, put on your gloves, and pull out a set of screwdrivers, it makes sense to check that your oven has power. It is worth looking for answers to the following questions:
- Is food served?
- Is the power cable OK?
- Is there good contact between the socket and plug?
- Are there any traces of carbon deposits or melting on the plug and socket?
- Has the plug or oven fuse failed?
- Is the power cord in perfect condition, are there any fractures, abrasions or melts on it?
Checking the fuse in the plug
If there are no problems described above, but the oven still does not start, it is worth checking the device for standard faults.
Main reasons for lack of heating
- Broken oven thermostat. The thermostat regulates the oven temperature automatically. If the oven thermostat is broken, this can be easily determined. You need to turn on the oven, set the temperature you want and wait a little. If the oven does not heat up according to the mode you set, then you can assume that the problem is in the thermostat.
- Control board faulty. Owners of new oven models may consider this option. All modern ovens are controlled using a control board. If the board burns out, the oven does not heat up and may not turn on at all. However, this cause is considered very rare.
- Broken lower element. The lower heating element is used to heat the oven to high temperatures. It is very easy to understand that this is where the problem lies. When the heating element is broken, it does not turn red from high temperature and does not heat up. You can replace a broken lower heating element with a new one in our kitchen appliance service center.
- A breakdown of the upper heating element is completely identical to a malfunction of the lower heating element of the oven.
- The most primitive reason is considered to be a lack of electricity supply to the oven. To do this, you just need to make sure that you turn on the oven.
- Tablet malfunction. The tablet in the oven is a special sensor that protects it from overheating. If the oven overheats, the sensor cuts off the flow of electricity to the oven. It is possible to determine that the cause is in the tablet only with the help of a multimeter. A multimeter is a special device that determines the voltage in electrical devices.
- Breakage of switches and taps. This reason occurs very often, both in electric and gas ovens. When the switches are faulty, they do not transmit a signal to the heating element, therefore the oven does not heat up. The problem can be corrected if you replace the broken switches.
- Broken socket. One of the common reasons why the oven does not work. In order to make sure that the problem is not in the oven components, you need to plug the oven into a different outlet, then you can easily identify the cause of the malfunction.
- Low voltage. If the oven does not warm up or simply does not turn on, you need to make sure that it is supplied with the required amount of electricity (220 volts). You can determine the level of electricity using a special device - a voltmeter.
- Automatic oven shutdown. It often horrifies oven owners, but in fact, automatic oven shutdown is done to protect the equipment. In order to make sure that the oven has not broken down, you need to check whether the electrical network in the house is overloaded (the coffee maker, electric kettle, TV, and other devices powered by electricity are working).
- The power cord is faulty. The problem may be a broken or damaged cord. Before turning on the electric oven, you need to check the power cord; if there is any damage to it (even minor), it is better to refrain from turning on the oven.
- For a gas oven to work properly, you first need to check the gas supply. You need to check whether the valve on the pipe is open.
If all the components, socket, power cord, in your opinion, are working properly, then you can try resetting the programs and control of the oven, and then unplug it and turn it on again.
In order not to encounter such incidents, it is necessary to operate it according to the instructions from the moment you purchase the oven, then you will significantly reduce the risk of breakdown of your device.
If you were unable to solve the problem yourself, the right solution would be to call a specialist.
baked potatoes, apple pie, and the oven refuses to work? Apparently, you will have to do an unscheduled fasting day, consoled by how good it is for your health. It's sad, of course. But we can fix it! In fact, there is a very specific list of what can potentially break in the oven of an electric stove.
If you go through all the points below, you will definitely find the reason for the breakdown of your electric oven. And, if you have at least some experience in repairing electrical appliances, then you can cope with the misfortune yourself. So, what can break in an electric oven?
No electricity
Symptoms: Indicators do not light up, control buttons and switches do not respond
This is one of the few problems that the owner of an electric stove can easily fix on his own, even if he does not have special tools. If the indicators on the electronic display of the hob do not light up, then most likely the stove is not receiving power at all. Naturally, absolutely fatal cases such as a power outage throughout the house or entrance are not considered here.
First, check the power cable: visually everything should be in order, the plug is intact and undamaged, the wire is not pinched or melted anywhere, the plug is not hot to the touch. If the problem is in the plug, then either replace it, or, if it is not removable, replace the entire power cable. If the power cable is pinched somewhere, then it is better, of course, not to risk it and replace it.
It is quite possible that there are some problems in the electrical wiring at the place where the electric stove is connected: it’s easy to install - plug into it the power cord of some other electrical appliance that you just checked in another outlet. You can try plugging the stove into a different outlet if the cable can reach it or you have a suitable extension cord. If no devices in the socket work, first start looking at the electrical distribution panel: if you have a separate circuit breaker for sockets in your apartment, then it could simply be “knocked out”, and just turn on the switch; However, the question remains, why did it get knocked out? In other cases, you are still better off calling an electrician. If other devices do not work in other sockets, most likely, the power supply circuit breaker for the sockets throughout the apartment has been knocked out - you again need to go to the panel. By the way, if, after turning on the electric stove again, the machine “knocks out” again, then your affairs are bad: such symptoms indicate the presence of a short circuit in the electric network of the stove, and here you cannot do without a technician.
It is possible that your power supply voltage is outside the limits allowed for this model: usually it is from 200 to 240 volts. If you have a voltmeter, check the voltage in the outlet: if it is not OK or there is nothing to check, you will have to call an electrician.
Typical breakdowns of Darin's gas stove
As practice shows, due to the daily use of a gas stove, the auto-ignition system is the first to fail. A rather fragile device can break due to accidental entry of water or food into the spark generation unit, which is why the function simply stops working.
To eliminate such a problem, it is enough to determine which part has failed and replace it with a new element.
To maintain proper operation of the gas stove, it is important to promptly clean not only the hob, but the control panel, including the internal parts of the housing. Expert opinion
Expert opinion
Romanova Ksenia Petrovna
Interior design expert and fabric store manager
But equipment does not always break down only due to contamination, which means it is worth taking a closer look at the most common breakdowns of Darin’s gas stove.
Malfunction of electric ignition of the stove
When trying to light the burner, a noticeable click may be observed, after which a spark usually appears, but not in this case. If only one burner does not turn on, then the problem most likely lies in the piezo ignition electrode (candle) stopping working.
Due to long-term use of a gas stove, a crack may appear on the ceramic surface of the candle, due to which the electric ignition stops working.
Often the auto-ignition function fails due to damage to the wire connecting the electrode and the spark generation unit. There is only one way to confirm a breakdown - remove the stove cover and press the ignition button. If the wire is damaged, then in the area of the broken area you will see a spark jumping onto the body of the stove.
In both cases, the broken part will need to be replaced in order to restore the operation of the piezo ignition system. The first thing you need to do is disconnect the device from the power supply, but before you open the top cover of Darin’s gas stove, you need to remove all the burners.
If two or all four burners do not work, you will have to purchase a new ignition unit and replace it yourself.
Failure of the gas control system
All modern models of Darin gas stoves are equipped with a gas control system, which ensures safe operation of the equipment. Parallel to the electric ignition plug on the burner there is a flame sensor - a thermocouple, which, when heated, generates an electric current.
If the thermocouple is working properly, the valve opens to supply gas to the burner.
Otherwise, immediately after releasing the handle, combustion will stop, which means only one thing - the solenoid valve did not work, and the supply of the combustible mixture to the burner is completely shut off.
The thermocouple may stop working due to simple damage to the part itself, which is the wire connecting the flame sensor to the solenoid valve.
If even after cleaning the burner flame continues to die out, you will have to purchase a new thermocouple and replace it yourself. Since Darin’s gas stove has its own structural features, the part should be selected in accordance with its model.
If possible, it is better to buy an original thermocouple - this will guarantee a long service life of the gas stove.
Burner jet clogged
The problem of contamination of the nozzle (nozzle) of a gas stove can arise due to the ingress of grease, detergents and gas combustion products. In this case, the repair will consist of cleaning the nozzle nozzle, and it is best to use a wooden toothpick.
Since it is not always possible to effectively clean the nozzle hole, it is recommended to disassemble the plate for better access to the part.
To do this, you will need to remove the top panel, having first unscrewed several bolts, remove the nozzle, and clean it from clogging. If necessary, the toothpick can be made a little thinner so that it can fit into the nozzle hole.
The most common failures of jets only relate to their contamination, so it is extremely rare to replace the part.
The need to replace the jets in Darin's gas stove may only arise if you decide to switch from stationary blue fuel to liquefied gas from cylinders, and/or vice versa.
De Luxe 5040.38g
So, we continue our detailed review of gas stoves and the next model is De Luxe 5040.38g. The body of the device is black, which gives a special elegance to its appearance.
The hob is covered with black enamel and is equipped with 4 burners of different capacities:
- front right – 1 kW;
- front left – 3 kW;
- rear right and left – 1.75 kW each.
This burner power will be quite enough to prepare most traditional dishes. The dish stand is made of steel, so it may become deformed over time. Although enamel protects against corrosion and damage, the disadvantage of the surface is the difficulty of cleaning
. Therefore, before purchasing a stove, I recommend stocking up on a good cleaning product.
Oven volume is small – 43 l
., therefore, it will only be enough for a small family or a single person. And it can’t boast of functionality: only bottom heat is available. Of course, there is enough flour for baking, but you won’t be able to prepare gourmet dishes. I was pleased with the presence of gas control and an oven thermometer
, which is very convenient and practical.
It is also worth noting that the oven door is removable. This will allow you to better clean it and the camera itself if necessary. There is a utility compartment for storing dishes
, although the method of opening it is not very convenient.
The considered plate has the following advantages:
- acceptable price;
- pleasant appearance;
- compact dimensions;
- good build quality.
Among the shortcomings, I would like to note only the lack of an oven rack included.
Video review of the gas stove of this series in the video below:
Heating element burnt out
One of the most common causes of a poorly heating oven is a burnt out or damaged heating element: upper or lower heating element. You can check them visually: a working heating element should not have any dark spots, swelling, cracks or other mechanical damage; after turning on the oven, the heating element becomes red-hot. For more accurate diagnostics, the heating element must be “ringed” with a special device. A burnt heating element will have to be replaced. By the way, in modern stoves one burnt-out heating element can block the entire electric stove from turning on.
The electric stove does not work - what to do?
The heating elements of the hob fail much more often than their counterparts in the oven. But it’s not difficult to get to them, which means they won’t be difficult to remove if you have the most common tools, like a screwdriver and pliers.
Testing the heater
If the burner is suspicious, check the heating elements:
- Set the knob to maximum heat. The burner should heat up quickly - in about a couple of minutes, and evenly.
- If it doesn’t heat up or heats up too slowly, you’ll have to climb inside, check it with a tester and, most likely, change it. The procedure will be as follows.
- Lift the hob.
- Remove the heating element mounting strip fasteners.
- Remove the support supporting the heating element.
- Remove and turn the bar over - this must be done very carefully so as not to break the wires.
- Disconnect the wires.
- Take a photo of the wire location or draw it.
- Feel the contacts of the heating element - a multimeter is best suited for this purpose. If the result tends to infinity, you can immediately throw away the old burner.
- There are holes in the mounting plate - pull out the contacts through them.
- Connect the wires to the new element.
- Check resistance in different switch modes.
- Assemble the hob.
Tags: machine, beat, sconce, throw, upper, view, choice, generator, house, , replacement, protective, sign, like, , magnet, magnetic, installation, power, multimeter, voltage, setting, crimping, steam, connection , potential, rule, principle, check, wire, start, , work, size, regulator, repair, recipe, socket, row, light, network, system, connection, resistance, ten, type, current, transistor, , phase, photo , shield, effect