Access to the Internet has long become commonplace for modern people. To simultaneously use the World Wide Web with several gadgets, of course, one router providing wireless Wi-Fi is sufficient, but to connect it you need to install an Internet socket. In this article we will tell you about connecting an Internet outlet and look at step-by-step instructions.
This procedure differs from installing a conventional connector, because the design of the device is different and the principle of its operation has nothing to do with a 220V power supply point. However, having the necessary information and skills in working with electrical appliances, the user will be able to carry out the installation himself.
Design features of the Internet socket
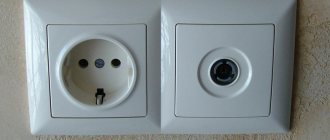
The described products are passive network equipment designed for switching devices to local networks using special disconnectors. Like regular sockets, devices for Internet connection, called RJ-45, can be external (surface), installed on top of a plane, and internal (mortise), mounted inside the wall.
Internal socket for Internet connection, painted in dark color
The main components of a computer connector are:
- front side – which is a decorative panel with a socket for patch cords;
- the reverse (internal) part is essentially a terminal block with contacts for wires from the Internet cable.
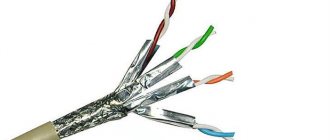
A twisted pair network cable is inserted into the socket, which contains four twists of two wires each. They are divided into eight conductors with different colors.
Appearance and internal structure of a twisted pair Internet cable
Each conductor is connected to the corresponding contact of the socket according to a specific diagram. This connection is called cross-connection. Its implementation is described in more detail in the next section. Wires come in two-pair and four-pair types. The former are used in networks where signal transmission occurs at a speed of less than 1 Gb/s. But in our high-speed age, everything is changing quickly and the data flow on the World Wide Web can very soon reach values of several gigabytes per second. Therefore, it is better to use four-pair products designed for speeds up to 10 Gb/sec to avoid later rework.
Checking the network functionality
Now we can check how successfully we connected. To do this, you need to connect your laptop or PC one by one to all the sockets that we installed and try to access the Internet. If any of the outlets does not work, you need to check:
There is another way to find out the performance. If your router has LAN connection indicator lights (they are usually located on the front panel), then you can connect PCs or laptops to each outlet (either simultaneously or one by one). If the corresponding LAN indicator lights up, everything is fine, there is contact. If not, you need to check for problems.
It is best to check the signal before installing the front panel and decorative plate of the socket.
Installation and connection of a power outlet
The twisted pair wire is laid in a cable channel or covered with a plinth. The free end is led out through the socket box (when installing a mortise model) or is left uncovered (if an overhead version is mounted). Its length is left sufficient to carry out the necessary work. 7-8 cm is removed from the very edge and the outer shell is removed from this area. The conductor pairs unwind, separate and straighten. Further steps are given in the instructions.
Step-by-step instructions for connecting RJ-45 with a four-pair wire
- The socket body is disassembled, the front part is disconnected and set aside
An open socket with two connectors with connection color schemes A, B.
On the reverse side there is a connection color scheme, presented in two options: A and B. For correct switching, it is necessary that the cross-connection of the socket corresponds to the connection diagram of the connector, so if its installation was carried out by another master, you must specify how the wiring was made. In Russia, scheme “B” is usually used
- Crimp the wires in the socket terminals according to the selected option (the color of the wire matches the color of the contact). For example, as shown in the picture, from left to right: brown, white-brown, green, white-green, orange, white-orange, blue, white-blue. It is better to consider the procedure for crimping in a separate paragraph of this publication.
Here the cross-connection of wires in the socket is made according to the color scheme “B”
- Secure the wire with a clamp and carry out a preliminary check of signal transmission through the connector. To do this, connect the connector from your tablet, laptop or mobile phone to the disassembled device and make sure there is a connection to the Internet.
- Trim excess wires. Assemble the socket by connecting both parts. Fix it on the wall or in it (depending on the type of design) just like a regular electrical point.
Connecting RJ-45 with two twisted pair wires
Preparatory actions in this case are carried out exactly as in the previous version. The only difference can be considered the connection itself. Instead of eight conductors, the four present in the wire are switched. The contacts corresponding to the color of the wires and corresponding to the selected scheme “A” or “B” are used. After this, the product is crimped, assembled and installed, and signal transmission is checked.
An example of crossing an Internet cable with two twisted pairs in an RJ-45 socket
Practical advice: Remember that two twisted pair wires are used to transfer data at speeds up to 1 Gb/sec. As the speed of the Internet signal increases, the wire will have to be replaced and all connections made on it will also have to be replaced.
Crimping wires on socket contacts
As stated above. When connecting wires to the terminals of the device, it is necessary to crimp them. The quality of operation of the entire system will depend on this procedure. There is no need to think that you need to scrupulously remove the sheath from each wire and then connect it to a bolted connection, as happens in conventional electrical sockets. The contacts of system connectors are designed in such a way that when the conductor is inserted tightly onto them, they cut the insulating coating and provide switching with the copper conductor. There is no need to strip thin wires.
Crimping the wires on the socket terminals is an important condition for high-quality switching
What are they?
All Legrand electrical sockets, as well as their analogues from other manufacturers, are divided into two types, with and without screw terminals. In terms of functionality, there are no differences between them, but there are some nuances in installation and further maintenance if necessary.
- Electrical sockets with screw terminals are somewhat less modern, but still easy to use. They are equipped with terminals between which the wires are clamped, and this operation is very simple. They can be used with both copper and aluminum wires. But tightly clamped aluminum wires, when exposed to heat, can become slightly deformed in the clamping area over time, as a result of which contact may be lost. Screw terminals allow you to easily and simply solve this problem in no time, simply by tightening the terminals.
- Screwless electrical sockets are slightly more expensive, but they are equipped with special automatic terminals shaped like a curved tooth. Their peculiarity is that if the wires are deformed due to exposure to high temperature and pressure, they are automatically tightened, preventing the contact from breaking. By installing such sockets, you will get rid of the need to periodically tighten the terminals manually (safety rules recommend performing this operation at least once every six months) once and for all.
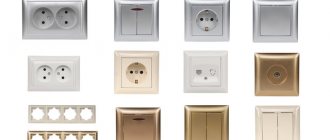
Review of products from famous brands - manufacturers of Internet sockets
The famous trademarks Legrand, VIKO, Lezard, Schneider enjoy well-deserved authority in the world market. The products of these companies are of high quality and reliability, thanks to which they have gained popularity among consumers. Some products from different manufacturers have differences in the internal structure, but they are only visual, and the connection principle remains unchanged - cross-connection in compliance with the color scheme and correct crimping of wires in the terminal block .
In Legrand Internet sockets, the internal part is separated by turning clockwise. RJ-45 sockets from Schneider have covers that perform the crimping function
To be able to conduct a comparative analysis, users are invited to familiarize themselves with the price values for products of the listed brands
| Brand name | State | Product Description | price, rub. |
| Legrand Valena | France | Internet socket RJ-45 for two sockets | 820 |
| Lezard | Türkiye | // | 697 |
| Schneider | France | // | 780 |
| VIKO | Türkiye | // | 296 |
The indicated prices demonstrate the average market cost of products and cannot reflect the full picture of the price segment of numerous models. The information is provided as an example and cannot be used as an information base. Each company has in its assortment products that represent a budget option, as well as premium products designed for buyers with a high level of income.
Types of HDMI cables
Today, there are five main cable options for devices connected using HDMI technology:
Standard. Designed to connect a signal receiver to a source at a short distance. Allows you to transmit images in HD quality.
Standard cable with Ethernet. It differs from the previous type only in the presence of a channel for connecting the device to the network.
Car cord. It has increased strength and resistance to vibrations and temperature fluctuations.
High speed cable. Designed to connect high-resolution devices that support 3D or Deep Color.
High speed with Ethernet. Equipped with an additional channel for connecting to the network.
Connecting a connector to connect a computer to an outlet: step-by-step instructions
To connect a laptop to an Internet outlet, you must have a power cord equipped at both ends with connectors - adapter devices that provide connection to an RJ-45 socket. The connector is crossed onto a wire with four twisted pairs according to the color schemes suggested in the figure:
Color scheme for cross-connecting the RJ-45 connector according to options “B” and “A”
The process of installing a device on a wire can be presented in the form of step-by-step instructions:
- The wire at the end is freed from the protective sheath, after which the twisted pair conductors are untwisted and aligned
- The wires are distributed according to the colors indicated on the corresponding color scheme and cut to the same length - 10-12 mm
- Having placed the conductors close to each other, they are all inserted into the connector together, after which the correctness of their location is again checked
- A crimping tool is used to crimp the wires into the connector.
If a crimping tool is not available, crimping can be done using a thin flathead screwdriver. To do this, use a screwdriver to press one by one on each of the contacts of the device so that it clamps the conductor located in it all the way. At the same time, the built-in microknife will cut through the insulation of the wiring and ensure reliable switching. The cross-connection diagram for the Internet wire on the connector must correspond to the diagram in the RJ -45 socket. Otherwise, connection to the World Wide Web will not be available .
Other connector connection diagrams
In addition to connecting the computer to the Internet connector, you may need a cord to connect the computer to another computer. In this case, the cross-connection will be different at different ends of the wire. Also, do not forget about the 2-pair wire, which is also often used for connections.
Twisted pair crimping diagrams for different connections with 4 and 2 pair wires
RJ-45 connector crimping
The Internet cable that enters the apartment is called twisted pair and is connected to a plastic connector. This plastic connector is called a connector, designated RJ-45. Professionals call such devices “Jacks”.
Basically, the plastic connector is made of a transparent material through which all the different colored wires are visible. Exactly the same parts are used to connect computers, a modem to a computer, and other computer hardware. In this case, the arrangement of colored wires may not be the usual one. This is the connector that is inserted into the information socket. The most important thing here is to understand the order of all the wires and then the problem with crimping the connector will be solved.