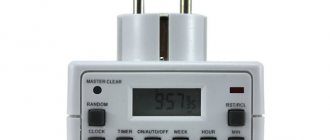
A switch with a remote control, a key fob with buttons and other devices for turning on lights remotely are not a new idea. An advanced solution is lighting control via the Internet and mobile phone, which allows you to create a large number of light variations at a distance, control load distribution across the network, and save energy.
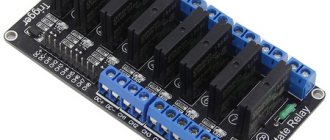
Ethernet relay control RODOS-8
- The built-in web interface allows you to control the relay and make device settings from any device via a web browser;
- Direct http requests (http GET); allows you
- creating scripts for various operating systems to solve typical problems; relay control via desktop shortcuts;
- implementation of relay controls on the user site;
Remote lighting control: operating principle and system advantages
Modern remote lighting control systems have the following undeniable advantages:
- the ability to smoothly control the light, as well as turn off various lighting fixtures;
- control of lighting levels;
- extending the service life of various electrical appliances;
- a noticeable reduction in electrical energy consumption.
Radio-controlled switches and intelligent electrical control offer virtually limitless possibilities for landscape lighting applications. The outdoor version of landscape lighting allows you to give extraordinary decorative appeal to such objects in the local area as illuminated paths and steps, a swimming pool, flower beds and flower beds, ponds and fountains, as well as garden plantings. Illumination of architectural details of a country house is also widely used. Country lighting can be functional and decorative.
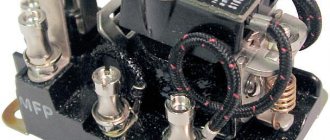
An example of connecting a contactor to an IP relay RODOS-8
To control loads over 7A/250V, you can purchase a CONTACTOR for this device.
Fig. 1 – Example of connecting a contactor to an IP relay RODOS-8
IP relay RODOS-8 is a power load switch with a built-in electromechanical monostable relay type 1C (changeover contact). There are 3 contacts from the built-in relay to the terminal block:
- COM – “general”;
- NO – “normally open” – closes to “COM” when the relay is turned on;
- NC – “normally closed” – closes to “COM” when the relay is turned off.
Communication with the device is carried out using the 10Base-T standard (the maximum permissible segment length is 100 meters).
Switching the built-in relay is accompanied by the corresponding LED on the side panel of the device turning on/off. The green LED on the device flashes approximately 2 times per second to indicate normal operation.
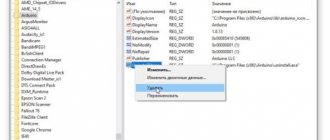
If necessary, all device settings can be reset to default values by pressing the special “RESET” button.
Fig. 2 – Front panel of IP relay RODOS-8
Fig. 3 – Rear panel of IP relay RODOS-8
Fig. 4 – Relay with changeover contact in IP relay RODOS-8
Fig. 5 – Switching power converter to IP relay RODOS-8
Built-in Web interface
Main menu of IP relay RODOS-9
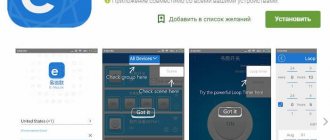
To gain access to the device’s web interface, you need to open any Internet browser and enter its IP address (default 192.168.1.20), after which you will be taken to the main page displaying the status of the built-in relay.
By clicking on the “Main” button in the upper left corner of the screen, you can return to the main page from any section of the web interface.
The “Setup” button opens the device settings section and control of the built-in relay. This section is protected by a login and password (default login/password admin/admin). To work correctly with the device via the web interface, JavaScript must be enabled in the browser.
Fig.6 – Ethernet relay RODOS-8 – main page
Relay control section
Fig. 7 – Ethernet relay RODOS-8 – relay control page
In this section of the web interface, the relay built into the device is controlled. There are 3 options available:
- “ON” – turn on the relay;
- “OFF” – turn off the relay;
- “SET” – send a pulse with the duration specified in the settings section (switching on and then switching off).
Section for relay settings and displayed names of the web interface
This section allows you to set the names of the built-in relay and the device itself, displayed in the browser. To set new names, you need to enter them in the appropriate text boxes and click the “Save” button. The allowed length of the relay name is 0...8 characters; The allowed length of the device name is 0…13 characters.
The “off” and “on” buttons determine the state of the built-in relay after power is applied to the device; If the “mem” button is turned on, then when the device is turned on, the state of the relay that was before it was turned off will be reproduced.
A tick in the “Secure management” field blocks access to managing built-in relays via HTTP GET requests outside the zone protected by login and password.
In the “SET Pulse duration” field, the duration of the pulse supplied by the SET command (Relay Control section) is specified in seconds. Acceptable values are 1…999.
Fig. 8 – Ethernet relay RODOS-8 – relay settings page and displayed names of the web interface
Network settings section
This section is intended for managing the device’s network settings, as well as setting a login with a password for the protected settings zone and relay control. The allowed length of login and password is 6 characters.
Fig. 9 – Ethernet relay RODOS-8 – network settings page
Types of models
The manufacturer offers a choice of models from the Sonoff World On series. There is a difference between them and it lies in the method of use:
- Sonoff World On (basic version) is suitable for controlling home appliances such as lamp, chandelier, CCTV camera, freezer.
- Sonoff World On RF is the same relay in the basic version, but comes with one control panel. This solution is well suited for controlling gates or raising barriers.
- Sonoff World On TH is equipped with sensors for measuring temperature and humidity, so the gadget is recommended for use in a greenhouse, next to a boiler or air conditioner.
- Sonoff World On Duo, 4CH and 4CH PRO - work with 2 or 4 devices simultaneously. More suitable for industrial applications.
We recommend reading: review and instructions for using the 4-channel version of the Sonoff 4CH Pro relay.
The type of connection to the device and pairing with a mobile phone is generally similar, so the article discusses further interaction with the simplest relay model.
Relay control via direct http (GET) requests
Device control via HTTP GET requests is performed by accessing specific files located on the device domain. All files for relay control are by default located in the protected zone “https://protect/...”, access to which requires authorization.
But by unchecking the “Secure management” field in the “Relay config” settings, the user can open access to files for managing relays located outside the secure area, for access to which authorization is not required.
Relay numbering when accessed via http GET requests starts from zero.
Example of control via the Windows command line and the wget.exe application
Fig. 10 – Controlling the RODOS-8 relay via the Windows command line and the wget.exe application
Source code of the RelayControl.exe executable file
echo off cd %~dp0 wget.exe -q -O- “https://admin: [email protected] /protect/rb0n.cgi” pause>nul
Example of control via Linux terminal
Fig. 11 – Controlling the RODOS-8 relay via the Linux curl terminal https://admin: [email protected] /protect/rb0n.cgi
Description
The Sonoff basic version relay switch allows you to control electrical appliances using a mobile phone. This is achieved by connecting the internal Wi-Fi module of the relay to the home router and providing the router with Sonoff access to the global network.
Sonoff Basic is a compact device that can be easily placed:
- Behind the ceiling;
- In a brick niche;
- In the bowl of a chandelier;
- Inside the lamp.
The kit includes 2 protective caps and screws for fastening during installation.
Device management via UDP
Relay control
RODOS-8 supports control of the built-in relay via the UDP protocol. Command structure for controlling a relay (square brackets are not placed in the command):
| [login] | [space] | [password] | [space] | k[N]=[action] |
Legend:
- [login] – login from the protected zone, set in the network settings section of the Web interface;
- [password] – password for the protected zone, set in the network settings section of the Web interface;
- [space] – space;
- [N] – number of the relay on which the operation is performed; numbering starts from “1”;
- [action] – action that is performed on the relay: 0 – turn off the relay (closing the normally closed and common contacts (NC and COM);
- 1 – turn on the relay (closing the normally open and common contacts (NO and COM);
- 2 – send a pulse of a given duration to the relay.
Example commands:
| admin admin k1=0 | Turn off the built-in relay. Login and password for the protected zone “admin” |
| admin admin k2=1 | Turn on the relay. Login and password for the protected zone “admin” |
Example of relay control from the Linux console
Fig. 13 – Controlling the RODOS-8 relay via UDP via commands from the Linux console echo -n “admin admin k1=1” > /dev/udp/172.16.0.150/8283
An example of controlling a relay from the Windows command line via PowerShell
Fig. 14 – Controlling the RODOS-8 relay via UDP via commands from the Windows command line
Example of PowerShell code (turn on the relay, then turn it off after 500 ms; device IP address 172.16.0.150, port 8283). The script text is saved in a separate file with the extension “.ps1”.
File "Send-UDPMessage.ps1":
[String]$Hostname = "172.16.0.150" [Int]$Port = 8283 [String]$Relay_1_ON = "admin admin k1=1" [String]$Relay_1_OFF = "admin admin k1=0" $udpclient=new-Object System.Net.Sockets.UdpClient $b=[Text.Encoding]::ASCII.GetBytes($Relay_1_ON) $bytesSent=$udpclient.Send($b,$b.length,$Hostname, $Port) Start-Sleep - Milliseconds 500 $b=[Text.Encoding]::ASCII.GetBytes($Relay_1_OFF) $bytesSent=$udpclient.Send($b,$b.length,$Hostname, $Port) $udpclient.Close()
Run the generated PowerShell script from the command line
@echo off powershell -executionpolicy bypass -File %~dp0Send-UDPMessage.ps1 pause>nul
Relay control via Hercules SETUP terminal program
Fig. 15 – Control of the RODOS-8 relay via UDP via the Hercules SETUP terminal program
Getting a list of connected devices
In order to receive a list of RODOS-8 devices operating on the network, you must send the character “R” (without quotes) to the network broadcast address on port 30303. In response, the device will return the “Device Name” specified in the web interface, as well as IP and MAC addresses.
An example of getting a list of connected devices on Linux
Fig. 16 – Receiving a list of connected RODOS-8 devices via UDP echo -n “R” | socat - UDP-DATAGRAM:172.16.0.255:30303,broadcast
Example of obtaining a list of devices via PowerShell Windows
Fig. 17 – Obtaining a list of connected RODOS-8 devices via UDP
PowerShell executable file “Send-UDPMessage.ps1”:
$Hostname = "172.16.0.255" $Port = 30303 $GET_IP = "R" $endpoint = new-object System.Net.IPEndPoint ([IPAddress]::Any,$Port) $udpclient=new-Object System.Net. Sockets.UdpClient $udpclient.Client.ReceiveTimeout = 1000 $b=[Text.Encoding]::ASCII.GetBytes($GET_IP) $bytesSent=$udpclient.Send($b,$b.length,$Hostname, $Port) try { while ($true) { $content = $udpclient.Receive([ref]$endpoint) echo ([Text.Encoding]::ASCII.GetString($content)) } } catch {} $udpclient.Close()
Running a PowerShell script from the Windows command line. Executable file "UDPstart.cmd"
@echo off powershell -executionpolicy bypass -File %~dp0Send-UDPMessage.ps1 pause>nul
Getting a list of devices through the Windows terminal program
Fig. 18 – Obtaining a list of RODOS-8 devices through the Windows terminal program