Before hanging a storage water heater on the wall, you need to decide on a number of questions:
- choose a water heater in accordance with its technical characteristics and design;
- find out whether it is possible to shut off the water during the installation period and access to communications;
- determine a specific place on the wall (horizontally and vertically) where you are going to hang the water heater;
- think over and plan the location of the cable, taking into account the characteristics of the room;
- decide on the number of mixers that will operate from the water heater (one or several);
- decide on the type of water supply to the water heater: flexible or reliable;
- consider the location of the electrical outlet for connecting the water heater.
Only after accurately understanding the above-described nuances of installing a storage water heater should you decide on its installation location.
Most often, the water heater is hung in bathrooms (bathroom or toilet) or pantry, kitchen (the boiler can be hidden in one of the hanging cabinets), hallway.
Undoubtedly, a water heater will fit most aesthetically and harmoniously into the decor of a toilet, bathroom or kitchen. In addition, in these rooms it will be easier to supply water to the heaters - the shorter length of pipes supplying cold water to the device will also contribute to the long service life of the water heating system!
the moderator chose this answer as the best
In my opinion, the best option is in the toilet above the toilet cistern.
The advantages of this installation:
Although the toilet is a wet room, it cannot be compared with the bathroom; a storage water heater requires electricity, moisture and electricity are a problem.
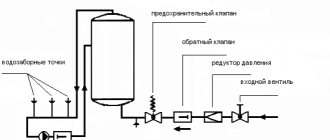
It is easier to connect the boiler, cold water (line) can be taken from the line to the toilet, we install a tee, on one side the tap is on the toilet, the other branch is on the boiler.
If it is necessary to drain the water from the boiler, this is easy to do, because from below the toilet, we put a hose on the drain valve and drain the water into the toilet (we cool the water first, you cannot pour boiling water into the toilet, it will burst).
What wire cross-section is needed to connect the oven?
Electrical cable with a cross section of 2.5 mm. sq. – this is the best option for connecting the oven and its safe operation. In this case, excessive heating will be prevented, which often leads to short circuits with adverse consequences.
Interesting materials:
How long does it take to clean a laptop? How much does it cost to clean sofas? How much does it cost to clean your computer from dust and replace thermal paste? How much does it cost to dry clean a down jacket? How much citric acid should I use to clean my washing machine? How much citric acid should I use to clean the kettle? How much citric acid should I use to clean my washing machine? Washing machine citric acid cleaning how many grams? How to clean the drain filter on a Samsung washing machine? Dry cleaning what is it?
What socket is needed to connect a boiler (storage)? Will a regular outlet work?
If the question is only about the socket for the boiler, it is logical to assume that your boiler is already equipped with a standard three-wire cable (phase, neutral and ground) and a plug with a grounding contact. If all this has already been supplied by the manufacturer to your water heater, this has already solved half the problem.
All manufacturers equip their water heaters with a wire with a standard plug having two working contacts (two round pins with a diameter of 4.8 mm) and a pair of side grounding contacts, only if the power of this water heater is up to 3500 watts.
Here it is -
This is due to the fact that the international standard for household electrical networks is 230 Volt AC, socket lines must be laid with copper wire with a cross-section of at least 2.5 square millimeters, and disassembly points (plug sockets) must withstand a current of at least 16 Amps. These criteria dictate such a power “ceiling” of 3.5 kilowatts. It turns out that if the heater has a plug, then it can be equipped with any socket designed for a current of 16 Amps (this is not a shortage and such sockets are sold in any hardware store) And in houses of new construction (after 2000), the wire feeding this socket should be 2.5 squares . In old houses, you need to first look at the cross-section of the supply line wire, and based on this, make a decision (connect to it or throw in a new one if the old one is not thick enough)
Water heaters with a power greater than 3.5 kW usually come without a wire, or there is a wire but it does not have a standard plug, just the ends of the wires are stripped, soldered or crimped. This immediately indicates that its power is too high for standard apartment wiring and this unit needs a separate line with a cable of larger cross-section (4 or even 6 squares of copper) and a terminal connection (or bolted), and those water heaters that did not have a wire at all when purchasing, it is better to power it directly with the power cable, without unnecessary connections, directly from the machine (or from an RCD or Difavtomat)
These signs (presence and absence of a plug) can be an indirect but simple guide in choosing the outlet into which the water heater (boiler) will be connected for the average person. Another simple rule is to look at the plug itself, it also shows the maximum current value, and accordingly it needs the power of the socket.
A person who is a little familiar with electrical engineering will, of course, be convinced of the power of the water heater indicated in the passport documentation, in the passport plate on the product, or even on the heating element of the water heater itself. And it is based on this information that you will need to select the cross-section of the power cable.
From personal experience I can add that cheap sockets cannot withstand the value indicated on them. Serious manufacturers, yes, are responsible for labeling, but nameless “China” almost never. And the water heater heats up for quite a long time (up to 5 hours!) So for this purpose, take only high-quality sockets from trusted companies, for example ABB, MAKEL, BERKER, Schneider... (not advertising!) with grounding, they can still withstand a load of 3.5 kilowatt for several hours in a row, and will not melt.
These are quite suitable, they cost around 150-200 rubles -
We care about protection
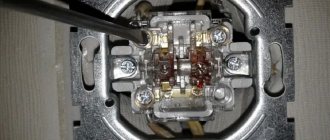
In order to make the operation of the boiler as safe as possible, it is necessary to install an RCD. This device will turn off the power supply at the moment when a phase current leak occurs along the main connection line of the boiler. The RCD is connected in the following sequence:
It is necessary to install the device as close as possible to the electric meter, then install a circuit breaker that will protect the electrical circuit and cut off the voltage in the event of a short circuit.
Then the grounding, phase wire and “0” are connected to the RCD. At the output, the device is connected to wires coming from the electric meter. This provides reliable protection not only against fire in the event of a short circuit, but also protection against electric shock.
Required tools and materials
Installing an electric water heater is not difficult, and it does not require expensive tools and equipment. Usually home craftsmen have everything at hand.
After the boiler is delivered to the installation address, it must be unpacked and inspected for compliance with the factory configuration, as well as to determine readiness for connection, specify the dimensions of the mounting strip and the boiler pipe for DHW.
List of basic tools and materials for installing and piping an electric storage electric water heater:
- household electric impact drill;
- set of concrete drills;
- professional building level bubble type;
- plumber's hammer;
- a set of locksmith's keys;
- hex keys, pliers and screwdriver;
- felt-tip pen for marking attachment points;
- anchor fastenings;
- tow or FUM tape;
- 2 standard hoses for connecting the boiler;
- 3 tees DN 15;
- 3 taps DN 15;
- PVS wire 3x2.5 for connecting the device to the electrical panel;
- RCD for operation in a single-phase network, according to the manufacturer’s recommendations, depending on the electrical power of the heating elements.
What factors should you consider when choosing a location?
There are several general rules regarding where to place a boiler, regardless of its type and type of operation.
- The wall where the boiler is hung must be load-bearing or made of brick or concrete (it should not be a partition made of foam block or plasterboard or wood).
- The location should be as close as possible to the central distribution of water communications.
- There must be an outlet nearby so that the electrical device can work with a direct connection, and not through an extension cord (this will protect the room from fire from the extension cord, which is not always safe).
- In the place where the boiler is installed, there must be a supply of free space so that in the future it can be repaired or serviced without dismantling the entire structure.
- It is better to install a vertical or horizontal water heater in a place that will be as close as possible to the sewer system to remove water from the valves or storage tank.
It is also recommended to install heating equipment of this category as high as possible so that it does not interfere with the passage (for example, if it is installed in a common room or in a bathroom).
Connecting an instantaneous water heater to a 220 V network
Connecting the boiler to a household (220 V) or industrial (380 V) type network is carried out without the permission of the energy company, in fact, at the request of the owner of the house or apartment.
Moreover, to “plug in” the water heater into the “socket”, the performer of such work only needs to have rudimentary skills in installing electrical appliances, multiplied by information about the diagram and connection procedure. Let's consider the procedure for connecting a water heater to the network, offering detailed instructions for this process to boiler buyers who are inclined to install it themselves.
Instantaneous water heater in an apartment
Basic Concepts
Electric water heaters are devices in which current energy is converted into heat and then transferred to water. Conventionally, such devices can be divided into 2 groups:
- Flow-through. The water is heated in them by passing through special systems with warm plates or pipes that instantly release heat to it. Flow-type heaters are characterized by high power.
- Cumulative. These include a conventional boiler with a heating element, which consistently heats the water inside the tank.
An RCD for a water heater is a special device designed to protect against current leakage.
The principle of its operation can be described as follows:
- The device is installed directly in front of the heater itself. All the current passes through it, which powers the mechanism.
- If there is a current leak inside the heater, then the RCD catches it, after which the entire system is switched off. Its operation is ensured using special sensors and switches.
It should be noted that the RCD, in its operating principle, resembles an automatic machine, but technically it is not one. It picks up even small current fluctuations that automatic machines are unable to analyze.
Today, such mechanisms do not always provide an optimal level of safety, so the water heater must also be additionally equipped with grounding. An RCD should not be confused with a difavtomat, as these are two different designs. The first mechanism is capable of catching only current leaks, and the second is more universal: the difavtomat also reacts to short circuits, overloads and other similar problems, while “knocking out” the electricity.
Some tips on where to place a water heater during a complex renovation
If the water heater is installed as part of a comprehensive renovation, like other equipment, it is important that it be included in the project. The project is drawn up in advance by the architect, taking into account all the features of the apartment. Of course, repairs are best done on contractual terms with a contractor company.
With a comprehensive repair, the customer receives the following benefits associated with determining the location and installation under the boiler:
The water heater is mounted on a load-bearing or strong wall (brick, concrete). Hanging on drywall and similar walls is prohibited;
a water supply scheme is being thought out so that it is convenient and closer to the pipes;
The location of sockets and electrical wiring under the water heater is safe for users. A separate copper cable will be laid and connected to an additional machine. This is an additional safety measure against power surges when turned on. The wire must be grounded;
during installation, space was left for checking (removing) the heating element;
access to the sewerage system is provided for draining water from the overpressure valve;
when installed next to an existing water supply system, the housing will not block valves, meters, or shut-off valves. In addition, there will be free access to the boiler itself.
The device body can be aesthetically hidden (at the customer’s request).
Point 3 - boiler cleaning and care
You can accept congratulations: the boiler is installed, works and makes you happy, but... It will have to be removed. You will be surprised - how to remove the boiler and why? But no one canceled the purge. Determining how often a boiler needs cleaning is not difficult. Much depends on the operating conditions; if you use the boiler carefully and periodically heat it at maximum temperatures, then cleaning once a year will be optimal.
In addition to cleaning, it is important to constantly check the safety system. Diagnostics is as follows: turn the handles from time to time and evaluate the ease of these manipulations. And pay attention to the noise during work: a whistle is heard - an alarm bell.
It would be a good idea to check the boiler thermostat; for this, use a multimeter in dial mode and a regular container of water. This way we check how the terminals are connected. The thermostat rod is dipped in water. A small click will be heard as the contacts engage, and the multimeter should indicate that one of the pairs of terminals is open.
Before removing the boiler, disconnect from the water supply and electrical network. There are two ways to clean it - call specialists or do it yourself. The second option is budget, so we’ll focus on it.
You can clean the boiler yourself either mechanically or chemically. But the steps are the same:
- Turn off the machine and disconnect the wiring from the temperature regulator.
- Get rid of the water inside (it’s better to flush it into the toilet).
- Do some cleaning.
- Reassemble and reconnect the device.
First you need to unscrew and then flush the boiler. Most models have one main nut on the bottom. It is enough to unscrew it to get the heating element, and it is the heating element of the boiler that will have to be descaled.
There are options with wet or dry heating element. But, remember, scale may not only be on this part; the walls of the device could also be damaged. Cleaning the heating element in the boiler is still more important. There are two reasons for this:
- a small amount of scale on the walls reduces heat loss;
- This is additional protection against pipeline water.
But, again, it all depends on the degree of contamination. Let's move on to a description of cleaning methods.
Mechanical cleaning - the heating element is removed from the tank and cleaned with a knife or a metal brush. At the final stage, it is also recommended to go over the heating element with sandpaper.
Chemical cleaning - you can use cleaning products for electric kettles (the operating principle of the devices is similar). Or use acetic acid. Fill an enamel bowl with water, dilute a cleaning agent there (proportions: 10 liters of water - 250 ml of product) and lower the heating element into it.
Manufacturers often indicate regular replacement of the anode. What is this? The pin is made of metal and coated with magnesium. It is recommended to change the anode in the boiler at least once every two years. It is also a good idea to install an anti-scale water filter on the boiler. A good choice would be a flow filter from Our Water.
Reasons for false alarms of RCDs
The cause of false alarms of the RCD is both a malfunction of the protective device itself and problems with the water heater. When searching for a problem, it is important to find out which of these 2 nodes it is located in.
Malfunctions of the residual current device:
- Dust, dirt, and water got into the RCD. Switch off the voltage and clean the protection device.
- The electronic circuit inside the protection device is faulty. The RCD will have to be replaced with a new one.
- The “Test” button is stuck (jammed). This usually happens due to dirt. Clean the button and make it moveable.
- The boiler power cord is damaged. It is necessary to find a place with broken insulation. Then restore the current-carrying conductors and insulation. If there are several such points, it is advisable to replace the cable with a new one.
Additional Information. Sudden changes in room temperature can lead to condensation of moisture from the air on cold metal surfaces. Therefore, the contacts of the RCD and its internal elements, when rapidly cooled in a damp room, become covered with small drops of water. This factor can lead to false alarms of the device.
Water heater malfunctions:
- The heating element is damaged. The heating element must be replaced.
- Water leakage onto live parts. The leak needs to be fixed.
- Increased air humidity in the room. Found in basements. The exhaust needs to be adjusted.
RCD trips when turned on
Here we are talking about a new boiler and RCD. The water heater and protective device were purchased at the store and installed in the proper place. The residual current device is activated the first time it is turned on.
This usually happens due to improper installation. The following points need to be checked.
- integrity of the power cable;
- correct connection of wires to the protection device and the boiler;
- whether the dowel that holds the water heater got into the cable laid in the wall;
- no leaks in the water heater tank.
Differences between RCDs and circuit breakers
On sale there are 3 similar in appearance, but different in purpose, protection devices. People often don't understand the difference between them:
- circuit breaker;
- differential machine;
- residual current device.
The circuit breaker is designed to protect apartment electrical wiring from overloads and short-circuit currents. The device turns off the voltage if a short circuit occurs somewhere in the network between the phase and neutral wires. Or there are too many consumers connected to the outlet, whose total power exceeds the permissible limit.
The differential automatic machine also responds to overloads and short circuits. Additionally, it turns off the apartment when a differential leakage current occurs. For example, if the phase wire in the water heater is frayed and touches the grounded housing.
The residual current device reacts only to leakage currents. It will not turn off the apartment in case of overload or short circuit.
The difference between RCD and Difavtomat
Checking work
It is strictly forbidden to connect the water heater to the network without water. After the device is installed and the water pipes are connected, the boiler must be completely filled with liquid. To make sure that the heater is completely filled, you need to open the hot water tap and wait until water flows out of the tap with an even pressure.
All places where pipes are connected to the boiler must be checked for possible leaks; if such places are found, then all threaded connections must be additionally tightened with a wrench.
Then the plug is inserted into the socket and the maximum water heating temperature is set on the control panel. After the water temperature reaches maximum values, it is necessary to inspect the pipe connections again. If the water supply connection points are absolutely sealed, then the boiler can be used for its intended purpose.