To repair LED lamps, you do not need to be a qualified electronics engineer or purchase expensive equipment. It won’t be difficult to organize the work at home if you first prepare everything you need and understand the features of the fixtures. The main thing is to take your time and do everything carefully, following the recommendations from the article.
The tester allows you to quickly find a broken diode.
Frequent breakdowns
In practice, various types of breakdowns often occur:
- the LED lighting device does not work at all, neither from the remote control nor through the switch;
- Switching on via the remote control does not work;
- some commands sent from the remote control are not executed;
- a weak or dim glow is visible;
- blinking is observed;
- Clicking noises are heard when switching.
If these or similar breakdowns occur, you should try to figure out the cause of the breakdown and try to repair the LED chandelier with your own hands. Craftsmen who understand electricity can handle LED lighting.
The repair itself
Let's look at the repair of LED devices using the example of a chandelier. It is easiest to carry out work in a situation where there is a simple chandelier that is not equipped with a control panel. All such devices, as we have already found out earlier, are assembled according to the same principle. The circuit diagram of such devices always contains the following elements:
- LEDs. They can be combined into a compact bridge;
- capacitors (electrolytes);
- several resistors (resistance);
- coil with winding.
Let us remind you that this is the simplest operating diagram of an LED chandelier. The repair in this situation will look like this:
- remove the lamp from the ceiling;
- we disassemble it;
Disassembled LED chandelier
- Now you need to carefully examine the device board for visible defects in the driver, broken wires and other components of the electrical circuit. If there are no such defects, then this is considered a good sign;
- Now we remove the lampshade and study the appearance of the LED lamp or LEDs placed in the housing. The presence of burnt spots on the lamp base or the diodes themselves indicates their malfunction;
- If obvious signs of damage are detected (burnout of the driver, LED, broken wires, etc.), repairs involve either replacing the damaged element or soldering broken contacts.
Also in this situation, you can carry out preventive work: tighten all the screws, repack all the terminal blocks, etc.
LED continuity
In addition, if the cause of the breakdown is not identified, then it is necessary to check the functionality of the LED circuit. To do this, carry out the following manipulations (the easiest way):
- fix the lamps;
- we supply power to it. It is best to use a separate power supply for 12 or 24 volt devices;
- You need to ring all the LEDs. For testing, you can use ordinary tweezers when connecting the lamp to the power supply. To do this, you need to alternately close the contacts on each diode using tweezers;
- the lamp will light up when a burnt-out LED is detected;
- Now all that remains is to replace the burnt out diode and return the chandelier to its place.
Block LEDs
Remember that replacing LEDs with a jumper is only possible if their number in the overall circuit is at least 10. Otherwise, the capacitor will be overloaded. In such a block type situation, the LEDs will simply burn out.
Preparing for repairs and what is required for this
You need to prepare everything you need for work. Some items may be on hand, others will have to be purchased, but this will not cost much. List of tools and accessories:
- A small soldering iron with a small tip. The contacts in the lamps are small, so the standard option will not work. It is best to buy a special model with different types of tips (flat and point). We must not forget about the materials for soldering - solder, rosin, etc.
Soldering iron with a thin tip and USB charging - Set of tweezers. The tool store sells sets of tweezers for small jobs; they have devices of suitable shapes and sizes.
- Holder for a lamp or other unit (the so-called “third hand”). A good solution is a device with a magnifying glass to simplify the work. You can adapt available elements - cut off a plastic bottle or pick up something else.
- Small gas burner. Models from tobacco kiosks that are used to light cigars are suitable. If you can’t find such a device, buy a so-called “turbo lighter” that does not go out from the wind.
- A set of screwdrivers of different sizes to remove and disassemble the lamp. Most often, Phillips-head screws are used as fasteners.
Set of tools for repair.
Some fixtures use hex head screws, so you may also need a set of wrenches. Repairing LED lamps is a scrupulous job, since the products contain many small parts, and if handled carelessly, they can be damaged.
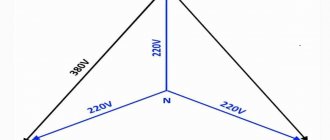
How 220 V LED lamps work
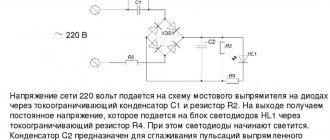
It is known that LEDs cannot operate directly from a 220 V network. To do this, they need additional equipment, which, most often, fails. We'll talk about it today. Let's consider the LED driver circuit, without which the lighting device cannot operate. At the same time, we will conduct an educational program for those who do not understand anything about radio electronics.
The driver in the LED lamp does the main jobgauss 12w driver
The 220 V LED lamp driver circuit consists of:
- diode bridge;
- resistance;
- resistors.
The diode bridge serves to rectify the current (converts it from alternating to direct). On the graph it looks like cutting off a half-wave of a sine wave. Resistors limit the current, and capacitors store energy, increasing the frequency. Let's look at the operating principle of a 220 V LED lamp.
Elements of LED light sources
Before disassembling a failed LED lamp into its component parts, be sure to study its structure and operating principle. Standard equipment of this type consists of an electronic power board, a light filter and a housing with a base. Cheaper models use conventional capacitors instead of current and voltage limiters.
One lamp can contain several dozen LEDs, which are connected in series or in parallel. In the second case, the design turns out to be expensive (a separate resistor is connected to each LED diode or group), so not everyone can afford it.
The operating principle of an LED is almost identical to a semiconductor element. The current between the anode and cathode moves in a straight line, which leads to the formation of a glow. Each LED individually is characterized by a minimum power, which is why several are used at once. To create the required luminous flux, a phosphor coating is used, which transforms the light into a spectrum visible to the human eye.
High-quality models contain a high-tech driver that performs the function of a converter along with a diode group. The primary voltage goes to a transformer, which reduces the current characteristics. At the output of the element we obtain the direct current necessary to power the LED diodes. In order to reduce ripple in the circuit, an auxiliary capacitor is used.
Despite the numerous varieties, differences in devices, and the number of LEDs used, all lighting devices of this type are characterized by the same design, which simplifies their maintenance.
Features of the structure of controlled lamps
LED lamps, which can be controlled using a remote control, have appeared relatively recently. To make this possible, devices of this type received additional elements of their design.
Chandelier controlled by remote control
As we found out, a standard LED lamp (for example, a ceiling chandelier) consists of a driver, a regulator unit and a housing. The driver has terminal clamps (terminals). Power is supplied to them. From the regulator block in a simple chandelier, wires run to the lamps. The number of such wires, depending on the design of the device, can be from 1 to 12. In models of LED lamps operating from a control panel, an additional antenna is built into the design, as well as voltage regulators and units that automatically adjust the glow of the product. At the same time, several drivers, as well as various types of LEDs, can be located in raster lamp models. Remember that DIY inspection and repair of LED lamps depends entirely on their type.
Cooling radiators
Many models of regulators, drivers and power supplies of LED lamps come with cooling radiators. They have a seat through which a microcircuit or other control element gives off heat. Most lamps have radiators.
The lack of special lubricant and thermal paste is the reason for overheating of the majority (up to 15%) of boards and units. Unscrew and check whether it is applied along the plane of the seat.
Thermal paste is applied in a thin layer over the entire surface of the seat; a large amount will only worsen heat transfer. By screwing an additional thin aluminum plate to the radiator, you can increase heat transfer, while the installation is carried out without blocking the main air flows passing through it.
Types of breakdowns and their causes
To repair LED ceiling lights with your own hands, you need to study the main types of breakdowns and the factors that cause them.
If the remote control does not respond to touches far/near and it is not the batteries at all, the following reasons for the malfunction are possible: failure of the remote control due to clogged contacts that need to be cleaned with alcohol; dysfunction of a low-quality Chinese device, requiring its complete replacement; poor operation of the device relay.
If the remote control works on the third or fifth attempt, and responds to touches only close, then the problem is a bad relay that needs to be replaced, an interruption in the LED loop as a result of missing contact or its melting. The reason may also be a breakdown of the lamp control unit. Often, repairing chandeliers with a remote control is limited to installing better batteries.
A stationary switch fails as a result of oxidation of wires, malfunction of the transformer, incorrectly selected electrical circuit, regular surges in the network, overheating and overvoltage. Often the cause of the phenomenon is a poor-quality switch and improper operation of the device.
LEDs with light bulbs do not light up due to a failure or failure of the power supply, the LEDs and lamps themselves, or burnout. Also sometimes the problem is network failure, high voltage, overheating of the device and poor-quality lighting fixtures. In any of the above cases, a complete replacement is required.
The LED chandelier does not turn on due to a poor connection, poor-quality wiring, or a failure at the level of the device itself or near the switch. Another problem is the lack of checking the operation of the lamp before purchase - a manufacturing defect is possible. Sometimes the reason lies in problems with the remote control.
Incorrect connection of LED lamps
Sometimes flickering, humming and a number of other malfunctions are associated not with the lamp itself, but with the characteristics of the supply networks and additional devices.
The easiest way to check for a flickering/buzzing LED light bulb is to test replace it with an incandescent or fluorescent IC with the same base. If the test lamp lights up normally, it means:
- A dimmer that is not designed to work with LEDs is used.
- Your LED light bulb is not dimmable.
It happens that consumers are faced with the “ghost effect”: the lamp is turned off, but continues to glow. This may happen for the following reasons:
- The neutral wire is not grounded or the ground resistance is too high.
- Due to electromagnetic induction, cables laid next to each other induce a stray EMF, which is enough to dim the LED lamp.
Rice. 11. The dim glow of an LED lamp after it is turned off is called the “ghost effect”.
Types of malfunctions and their causes
To successfully repair a chandelier with a remote control, you must first study the types of faults and what caused them.
Most common breakdowns
Typical troubles due to which you have to repair a chandelier with a remote control include:
- complete or partial lack of lighting;
- spontaneous shutdown of the lamp;
- short blinking;
- device failure.
A breakdown can be caused by a temperature exceeding 50°, rupture of the contact - either the thread, or the holder, or its detachment. Diode burnout occurs due to overvoltage in the network, burnout (breakdown) of the capacitor. These breakdowns are typical for inexpensive boards. Other potential causes:
- short circuit;
- incorrect connection to the circuit;
- incorrectly implemented device connection diagram.
Breakdowns and factors causing them
Since any malfunction has certain causes, the connection must be established first.
- The remote control does not respond to touch. In addition to battery malfunction, an unpleasant situation can be caused by clogged contacts that need cleaning, poor operation of a radio relay due to poor quality, and gradual degradation of the capacitor. This defect requires replacement.
- The remote control starts working only on the second or third (fifth) attempt, or reacts only close. This malfunction can be caused by low-quality batteries or a faulty relay, interruption of the diode loop due to poor contact, its melting.
- Fixed switch failures. In this case, the culprit is oxidation of the wires, incorrectly selected electrical circuit, constant voltage surges, and overheating. The problem is often caused by a malfunction of the transformer, a bad switch, or improper operation.
Failure of light bulbs and/or LEDs to work is the most “popular” surprise. This breakdown is provoked by a network failure or failure of the power supply, burnout of elements due to their low quality, or overheating of the device. In any of these cases, replacement of lamps or inspection of the unit is required. If the light intensity of the devices in the line differs, it is also recommended to completely replace them.
If an LED chandelier does not turn on, it is possible that the culprit is a poor connection or poor-quality wiring anywhere in the electrical circuit. To avoid such a problem, it is imperative to check the device before purchase, including the operation of the remote control.
Malfunctions associated with insufficient heat dissipation
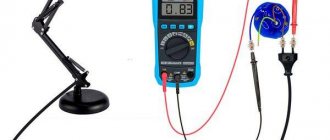
Overheating of LED ICs leads to a decrease in the service life of the lamps, as well as to a deterioration in the functional parameters of the equipment. Faster than expected in the design, the luminous flux decreases and the spectrum degrades with a shift in color temperature towards blue (due to burnout of the phosphor on the diodes).
Rice. 10. Non-contact LED temperature measurement
Another typical malfunction due to insufficient heat dissipation is a periodic decrease in brightness, or even turning off the lamp (protection is triggered). After such an operation, it is necessary to check the condition of the radiators and their operating conditions. Sometimes it is enough to clean the radiator grille of dust to restore normal operation of the device. In the worst case, the consumer has to deal with:
- A design error, or outright fraud (one example of pseudo-engineering is a plastic radiator grille on a powerful lamp).
- Installation error (example: the minimum distance from the ceiling is not maintained).
- Insufficient ventilation and excessively high room temperature.
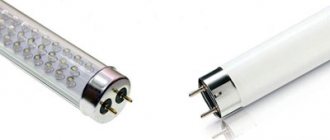
Lamp design
The reasons for the burnout of fluorescent lamps depend on the ballast
Incandescent and fluorescent lamps are connected in different ways, but any, even the highest quality, light sources can burn out. There are many reasons why fluorescent lamps do not work. To identify them, you need to briefly familiarize yourself with the design and operation.
The operating principle of fluorescent lamps is an electrical discharge that occurs in mercury vapor. The emitted ultraviolet light is converted into visible light by a special substance - phosphor, which is applied to the inner surface of the lamp bulb.
For a gas discharge to occur, a high voltage is required, which is created when the lamp is turned on through the use of ballasts.
There are two fundamentally different types of ballasts:
- electromagnetic, which uses a throttle and starter;
- electronic, assembled using radio-electronic components.
Disassembling an LED light bulb with sealant
Not all products are easy and simple to disassemble without damaging the components. Try turning the top of the body. If all else fails, you will have to use a solvent. Draw a certain amount of solvent into the syringe and squeeze it through the needle along the seam. Wait about 5 - 10 minutes, then repeat the operation.
Do this at least three times, then begin to rotate your upper body in different directions to swing it. Once the flask is removed, clean the interior walls by removing sealant and degreasing surfaces. If the device will be used in a room with a low level of humidity, no sealant is applied.
The lamp does not turn on from the remote control: what to do?
If the chandelier stops turning on from the remote control:
- Check the voltage on the battery (video example here). If it is discharged, replace it with a new one. Check if the chandelier has started working;
- If the battery is fine and the remote control still does not give a command, check the buttons. Look at the remote control light through the phone's camera while pressing each button alternately. If the button is working, then you will see the light blinking on the phone display (you will not see anything with the naked eye). If there is no blinking when you press one or more buttons, they need to be repaired. You can buy a new remote control. But it is paired with a receiver, and replacing it is a troublesome task;
- If the battery and buttons are working properly, but the lamp still does not turn on from the remote control, then the failure lies in the radio signal receiver. Then you will have to replace it, and the remote control too.
The remote control buttons usually stop working when the contacts become clogged. There are two ways to fix this:
- Clean the contacts from dirt and factory grease. Apply a drop of superglue and apply graphite crushed with a file onto it. Assemble the remote control;
- Instead of graphite, try a piece of foil (without a paper backing, which will not transmit the electrical signal).
And to replace the receiver you need to buy a new control unit with a remote control. The devices must be set to the same frequency. Then:
- Turn off the power to the apartment;
- Remove the chandelier and open its box;
- Remove the old receiver by cutting the wires;
- Get a new power supply. Study it carefully. It has several multi-colored wires, exactly the same ones in the chandelier (you cut them);
- Now place the unit on double-sided tape in the box in the same place where the old receiver was located;
- Strip, connect and insulate wires of the same colors;
- Close the box and hang the chandelier in place.
There is another option for the development of events. Think about it, do you really need remote control of the chandelier? If not, then remove the broken receiver from the chandelier box by connecting the controller directly to the two-key switch. When switching, the first key will change the modes of bright, moderately bright and dim lighting, the second will switch the backlight operating modes.
Why do lamps fail?
Most often, lamps stop working due to violations of the rules and recommendations for operating the device, overheating of the equipment, partial or complete burnout of the diode, incorrect compatibility of materials (LED lamps cannot be installed inside a suspended ceiling), high voltage surges and capacitor burnout, technical violations when connecting devices to the network .
Also, breakdowns occur due to short circuits, incorrect installation, errors in the construction of the electrical circuit and poor quality of the product itself.
In order to assess and determine the degree of damage to the lamp, you need to look at its structural parts visually. You need to make sure that the board is in good working order before putting it back in, as well as that the soldering is working and that there is no carbon deposits causing the elements to melt. If there is no deformation, you need to look for the cause of the malfunction using a tester and a multimeter.
DIY LED lamp repair: step-by-step instructions
Let's look at a simple LED lamp repair as an example:
| Illustration | Action to be performed |
| After removing the diffuser cover, carefully inspect the LEDs. If such a black dot is noticed, the element has burned out. | |
| LED elements can be soldered from the strip, but it is more convenient to purchase them separately. This is how they are sold. The size of the light diode may vary, but the characteristics should be suitable. | |
| We unsolder the burnt element, clean the contacts and apply a special paste. The element is glued to it, making soldering easier. | |
| The ground corner of the element shows where the negative terminal is located. If the polarity is reversed, the light bulb will not work. | |
| We warm up the light diode with a soldering (or industrial) hair dryer and press it a little with tweezers. | |
| All that remains is to check the light device. In our case, the test is carried out without a diffuser. You shouldn't do this with him, because... dangerous. |
As you can understand, repairing a 220 V LED lamp with your own hands is not so difficult. If there are no new parts, you can use burnt out light bulbs by removing the elements from them. One working light device is assembled from 2-3 old ones.
Download and buy
Here are the datasheets (technical information) for some high-power LEDs:
• led datasheet 4.8W- / Technical information on high-power LEDs for headlights and spotlights, pdf, 689.35 kB, downloaded: 711 times./
• led datasheet 10W / Technical information on high-power LEDs for headlights and spotlights, pdf, 1.82 MB, downloaded: 888 times./
Read also: Assembling a Bosch screwdriver gearbox
That's all, vote for Sergei from Sochi, ask questions in the comments, share your experience!
Special thanks to those who send circuits of real LED drivers for the collection. I will publish them in this article.
With the advent of LED technology, lighting systems have reached a whole new level. Economical, environmentally and electrically safe devices are used everywhere today - they have replaced the standard “Ilyich lamps” and the “housekeepers” that have gained popularity. The former have long been outdated from a moral point of view, the latter are extremely dangerous to health due to the mercury vapor contained inside.
Despite their long service life, even such devices fail over time. In some situations, expensive repairs of LED lamps can be done independently, at home, which we will consider further.
Problem with lamps or LEDs
The control controller is the only source of the problem when all LED lighting devices do not turn on. If only some of them refuse to work, then there are two options: either failure of the elements themselves, or failure of one of the two transformers feeding the LED lines.
Since they are connected in series, if one electrical appliance fails, the others will also not be able to work. In this case, the burnt element is found and replaced with a new one. If halogen lamps do not light, then repairing a chandelier with a remote control consists of checking the transformers, as well as the lamps themselves, connected in parallel. They are called, then the faulty elements are replaced.
When all the LED backlights do not light up, the first thing to check is the ballast capacitor. It is connected to a multimeter. If the voltage is normal, then the entire circuit of lamps is often replaced. If the voltage is minimal or completely absent, then the capacitor is replaced with a new device. When all the halogen elements do not light up at once, it is possible that the electronic transformer is the problem. It is also tested, and the faulty one is replaced.
LEDs for LED drivers
I couldn't decide on LEDs. They are the same in both modules, although their manufacturers are different. There are no inscriptions on the LEDs (on the reverse side either). I searched from different sellers under the line “Ultra-bright LEDs for LED spotlights and LED chandeliers.” They sell a bunch of different LEDs there, but all of them are either without lenses or with lenses at 60º, 90º and 120º.
YF-053 CREE LED
I have never met one similar in appearance to mine.
Actually, both modules have the same malfunction - partial or complete degradation of the LED crystals. I think the reason is the maximum current from the drivers, set by the manufacturers (Chinese) for marketing purposes. Like, look how bright our chandeliers are. And the fact that they shine for at most 10 hours does not bother them.
If there are complaints from buyers, they can always answer that the spotlights are out of order due to shaking, because such “chandeliers” are mainly bought by the owners of jeeps, and they drive not only on the highway.
If I can find LEDs, I will reduce the driver current until the brightness of the LEDs noticeably decreases.
It is better to look for LEDs on AliExpress, there is a large selection there. But this is roulette, depending on your luck.
Datasheets (technical information) for some high-power LEDs will be at the end of the article.
I think the main thing for long-term operation of LEDs is not to chase brightness, but to set the optimal operating current.
See you later, Sergey.
PS I have been a fan of electronics since 1970, when I assembled my first detector receiver during a physics lesson.
Malfunctions of chandeliers with PU and their elimination
So, most often the LED chandelier with a remote control simply does not turn on. What could be the reasons?
- The remote control itself does not work. You need to check the batteries, they may simply be dead. Replacing them with new ones can immediately solve this problem.
- If the first reason is excluded, and the chandelier still does not light, then you need to deal with the controller. This is the name of the receiver that receives signals from the control panel.
- Since our chandelier is an LED lamp, the light sources themselves cannot operate directly from a 220-volt network. An additional power supply must be installed in the chandelier design. This is a step-down transformer. Repairing such a malfunction consists of replacing the faulty device with a new one.
It should be noted that combined type chandeliers are halogens as the main type of lighting and LEDs used as backlight. So, you always need to pay attention to which halogen lamps should be installed in the lighting device. This refers to their power. If lamps of higher power were installed by mistake, then either the step-down transformer or the lamp sockets will definitely burn out. By the way, repairing cartridges in such chandeliers is the most difficult.
How to change the controller
Let’s immediately make a reservation that changing the controller to a new one is not a cheap pleasure. Such a device costs half the price of the LED lamp itself, so it’s worth first understanding the faults, and only after that deciding the issue of purchase and installation.
If the controller does not work completely, then the entire chandelier will not light. If some of the light sources are on, then you need to deal with groups of light bulbs separately. By the way, sometimes there are situations when the repair issue is solved by replacing the remote control.
So, let's consider the situation with the inability to turn on part of the chandelier. How to correct the situation, what repairs will be needed?
- To do this, first the controller is disconnected from the circuit;
- then each light group must be connected separately (in turn) to a voltage of 220 volts;
- if one of them does not light up, then you will have to deal with its power supply;
- if, on the contrary, all groups light up normally, then the whole problem is in the controller.
In the first case, you don’t need to think much, just install a unit from the neighboring group in place of the power supply. If in this case the light bulbs light up, you will have to buy a new device and install it in the lamp circuit.
In the second case, you will have to change the controller itself. If you do not have the opportunity to purchase it, then you can exclude the device from the connection diagram and transfer the switching on and off of the LED chandelier from a regular switch. This is not difficult to do, because the controller itself in the electrical circuit of the chandelier is connected by two wires: phase and zero. From it, the zero circuit is supplied to the zero contacts of the power supplies, phase to phase.
Replacing the controller is just as easy. Four contacts are disconnected: two input, two output. The device is dismantled, a new one is installed, and the connection is made according to the old circuit through four contacts. By the way, the connection diagram is usually indicated on the device itself (on the body), which is quite easy to understand.
In principle, it is possible to repair the controller itself. But you must first check it for serviceability, for which you use a multimeter set to check the voltage. The 220 V mode is set and testing is carried out. If the measuring device shows that 220 volts passes through the controller circuit, then the device is working; if not, then there is some kind of defect in it. As practice shows, most often all faults are in the board, other elements are normal. If you are not a specialist in this matter, then do not try to carry out repairs yourself. Because it is very difficult to find a defect, sometimes even experienced craftsmen, not finding it, simply change the plateau.
Sometimes the cause of the malfunction is capacitors, which can also be checked using a multimeter. Typically their capacity is at least one microfarad. If the meter readings are less than this value, then such a capacitor should be replaced.
Source and LED resistance calculations
Now, for fun, let’s calculate the output resistance of the power supply and the resistance of the LEDs. The calculations involve the good old Ohm with his famous law and the voltage divider formula.
So, for the case of 30 LEDs we have:
- Open circuit voltage of the current source – 305 V,
- Current source voltage under load – 107 V,
- The current in the circuit (yes, old Kirchhoff with his 1st law!) is 0.02 A.
To make the calculations clearer, I am attaching a diagram:
Circuit for measuring resistance
We assume that the input of the circuit is supplied with voltage from an ideal EMF source with zero internal resistance. A real source of electricity has an internal resistance Ri, which we will now calculate.
When measuring the open circuit voltage Un = Uхх = 305 V, since the input resistance of the voltmeter is much greater than the internal resistance of the source Ri.
When a load is connected, Un = 107 V, which means that the voltage dropping across the internal resistance of the source Ri is 305 – 107 = 198 V.
Knowing the current, let's calculate the internal resistance:
Ri = 198 V / 0.02 A = 9900 Ohm.
Is it a lot or a little? Everything is relative. In this case - in comparison with the load resistance:
Rн = 107 V / 0.02 A = 5350 Ohm.
This is the resistance of LEDs connected in series when a current of 0.02 A flows through them. This means that the resistance of one LED is 5350 Ohms / 30 = 178 Ohms.
We see that the resistance of the power supply is greater than the load resistance. This means that in front of us is a current source. That is, when the load resistance (the number of LEDs) changes within certain limits, the current remains almost unchanged.
You can calculate the resistance of diodes, when there are 22 of them, it will be less due to the fact that the current will be greater, and the current-voltage characteristic of the diode is nonlinear.
Okay, we've deviated somewhat from the topic.
Now - the promised dessert.
Beauty and versatility
New power line chandeliers look very beautiful and are designed to perform various operations such as switching the brightness of lighting, changing color, turning on the lighting when a person enters, and playing music. The designer endowed the new lighting fixtures with beauty, versatility and operation from a switch and control panel. Typically, incandescent lamps and LEDs should function harmoniously in them, performing any operating modes that the owner desires:
- execution of a command to illuminate only all or half of the incandescent lamps;
- the combined glow of half of the incandescent lamps with a separate level of LEDs;
- lighting of all incandescent lamps and all LEDs;
- operation of LED lamps only;
- other lighting options, color changes, depending on the number of levels and capabilities.
The lighting device must properly perform all these functions through the control panel (sometimes there are 2 remote controls) and perform basic actions through the switch.
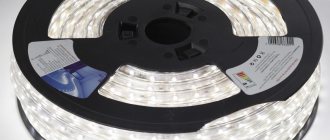
Extending the life of refurbished lamps
In some cases, refurbished lamps do not last long. Especially if they are in closed lampshades. Heat accumulates in them. To increase service life, you will need:
- Turn on the lamp through a film capacitor and connect two lamps in series.
- Disassemble the lamp, remove the film capacitor and install a new component with a lower capacitance.
The considered reasons for the malfunction of LED lamps are the simplest and most common. To understand them, you don’t need to delve into diagrams and design solutions.
In any case, repairing a lamp is much cheaper than buying a new one. The main advice: when making repairs, use only high-quality elements with good technical parameters. This is the only way the LED lamp will last a long time.
Our channel in Yandex Zen:
Post Views: View statistics 51,612
Minor faults
A chandelier with a remote control may not turn on for other reasons that are minor.
- Broken wiring or poor quality contacts.
- The LEDs themselves do not work.
Therefore, before the chandelier is installed on the ceiling, we recommend that you carry out a small check on the floor or table. To do this, it is connected to the network through an outlet using a plug.
It is checked whether there is voltage at the input contacts of the controller, then at the output contacts. Then you need to make sure that electrical current is supplied to the power supplies. Then the voltage is measured after the power supplies (it must be reduced and correspond to the rating indicated on the device body). Be sure to check the wires connecting the power supplies to the light sources. And lastly, the groups of LEDs themselves are checked. In principle, nothing complicated, but sometimes this will determine whether the chandelier is on or not.
More driver circuits
Below I will post some information on diagrams and repairs from me (author of the SamElectric.ru blog)
LED floodlight Navigator, discussed in the article About the repair of LED floodlights (the link was already given at the beginning of the article).
The circuit is standard, the output current varies due to the ratings of the piping elements and the power of the transformer:
LED Driver MT7930 Typical. Typical electrical circuit diagram for an LED spotlight
The circuit is taken from the datasheet for this chip, here it is:
• LED Driver MT 7930. Typical application / Description, typical connection circuit and microcircuit parameters for drivers of LED modules and matrices., pdf, 661.17 kB, downloaded: 1657 times./
The datasheet describes in detail what needs to be changed and how to get the desired output current of the driver.
Here is a more detailed driver diagram, closer to reality:
LED Driver MT7930. Electrical circuit diagram
Do you see the formula to the left of the diagram? It shows what the output current depends on. First of all, from the resistor Rs, which is located at the source of the transistor and consists of three parallel resistors. These resistors, and at the same time the transistor, burn out.
Having the diagram, you can begin repairing the driver.
But even without a diagram, we can immediately say that first of all we need to pay attention to:
- input circuits,
- diode bridge,
- electrolytes,
- power transistor,
- soldering
Next, you need to check the power supply to the microcircuit, which is supplied in two steps - first from the diode bridge, then (after normal startup) - from the feedback winding of the output transformer.
I myself have repaired just such drivers several times. Sometimes the only thing that helped was a complete replacement of the microcircuit, transistor and almost the entire wiring. This is very labor-intensive and economically unjustified. As a rule – it’s much easier and cheaper – I bought and installed a new Led Driver, or refused repairs altogether.
Common types of breakdowns
LED lighting devices, due to their rather complex design, can have a wide variety of malfunctions, the type of which will determine the repair actions you carry out yourself. But the most common typical breakdowns include the following:
- complete or partial lack of lighting;
- the appearance of short-term blinking;
- spontaneous switching off of the light during operation of the device;
- failure of a light bulb or LED.
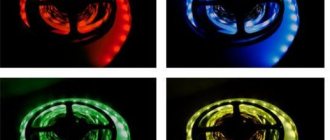
Light
A variety of reasons can lead to the breakdown of a lamp of this type. The most common causes of breakdowns of LED lighting devices are the following:
- incorrect operating conditions. When purchasing a lamp, be sure to find out what operating conditions will be considered optimal for it. If a chandelier or wall sconce operates in unsuitable conditions, then there is a high probability of breakdown;
- overheat. Problems with an LED lamp can begin when the temperature of the diodes exceeds 50 degrees. Due to such a high temperature, the contacts of the thread or the holder itself may break, as well as peeling on the contact board;
- LED burnout. It can occur in whole or in part. The reason for this is network overvoltage or capacitor breakdown (burnout);
These are the main reasons that can lead to a malfunction of the LED device. But besides these, there are additional reasons, which include the following points:
- incorrect connection of the product to the network;
- a short circuit that appears in the circuit;
- improper installation of the device;
LED chandelier on the ceiling
- non-compliance with its connection diagram;
- originally purchased low-quality product. For example, this may be poor soldering of the circuit contacts, as well as LEDs and other elements of the lamp device (for example, the driver). Usually such moments are called “manufacturing defect”.
As you can see, a variety of reasons can lead to malfunction of this type of lighting fixture. Therefore, in order to make repairs yourself, you must first find the cause of the breakdown.
Schematic diagram of LED driver TH-T0440C
What does this module look like (this is a car LED headlight):
LED spotlight module TH-T0440C
Diagram of LED module (driver) TH-T0440C
There is more incomprehensibility in this scheme than in the first one.
Firstly, due to the unusual switching circuit of the PWM controller, I was not able to identify this microcircuit. In some connections it is similar to the AL9110, but then it is not clear how it works without connecting its pins Vin (1), Vcc (Vdd) (6) and LD (7) to the circuit?
The question also arises about connecting MOSFET Q2 and its entire wiring. After all, it has an N-channel, but is connected in reverse polarity. With such a connection, only its antiparallel diode works, and the transistor itself and its entire “retinue” are completely useless. It was enough to replace it with a powerful Schottky diode, or a “accordion” of smaller ones.
How to repair a fluorescent lamp
The optimal repair method is to replace the faulty element
In most cases, the easiest solution is to replace the faulty elements. You can check by installing a known-good element. Complete repair of a fluorescent lamp involves a number of difficulties and requires certain qualifications and experience. Before disassembling the fluorescent lamp, you need to make sure that it is disconnected from the network and that electricity is not supplied to it.
The easiest way is to find a replacement for a faulty starter. You can force the lamp to turn on by installing a button instead. This method is dangerous because holding the button for more than the required time can cause the filaments of the electrodes to burn out.
It is more difficult to use lamps without a choke. Several workable options for such inclusion have been developed. Most circuits use the principle of multiplying the mains voltage for stable starting. These circuits use rectifier diodes and capacitor banks, which causes an increase in the size of homemade ballasts. A powerful resistor or an incandescent lamp of 25-40 W is used as a choke to limit the current, depending on the power of the fluorescent lamp.
The advantage of resistors is their small size, but the problem is the high heat generation on it during operation. Incandescent lamps provide additional light output, but because they operate at a reduced voltage, their lifespan is virtually unlimited.
Abnormal activation of protection
Sometimes such a cyclic “symptom” occurs in LED lamps of various designs:
- When turned on, the lamp flashes, goes out after 0.5–3.0 seconds, then “turns on”.
- The blinking cycle lasts from several minutes to an hour.
- After sufficient warming up, the lamp stops blinking and begins to shine normally.
The driver functionality may provide the following types of protection:
- From excess current on one of the circuit elements.
- From the input voltage falling below MIN.
- From a voltage surge at the input above MAX.
- In case of a short circuit in the load.
- From exceeding the MAX temperature of the diode.
Checking each version requires high qualifications and significant time to conduct an “investigation”. In addition, you need a set of professional equipment: one tester is not enough. Therefore, it is better to use ready-made solutions.
Rice. 9. 47 µF capacitor in the external driver circuit
Diagnostic statistics for the described malfunction indicate that no more than 10% of cases of abnormal protection operation are caused by the use of substandard components in the driver - resistors, transformers, or poor soldering quality. In 9 out of 10 cases, the culprit for blinking is a capacitor with low capacity. An underestimated parameter may be the cause of an installation error, but more often it is simply a consequence of the electrolyte drying out. Warming up increases the capacity, so over time the lamp reaches the set mode.
The solution to the problem is to replace the capacitor with an analogue one with a capacity 2–3 times larger.
But this solution is more likely for those who are professionally involved in electrical engineering. For the mass consumer, repairing LED lamps is not cost-effective. Another way to save is much more realistic - by choosing the quality of installation and packaging, certified by a guarantee from Inter Lighting.
Design and basic operation
LED lamp design
LED lamps are an electric arc ignited in a vacuum at the boundary of a pn junction. By controlling the voltage, you can regulate the arc light. The design of the chandelier includes a mounting unit with a control unit, a radio receiver, a lighting segment, a remote control, and decor. In addition, music systems with speakers and strip lighting are often built into the devices.
The fastening unit includes a bar with a cross, the control unit includes controllers with printed circuit boards and wires, and the lighting segment includes sockets with sockets for LEDs.
LED driver circuit for YF-053CREE-40W LED module
The appearance of this spotlight is shown at the beginning of the article, but this is what this lamp looks like from behind, the radiator is visible:
The LED modules of this spotlight look like this:
YF-053 CREE LED Module YF-053CREE-40W
I have a lot of experience in copying circuits from real complex devices, so I copied the circuit of this driver easily, here it is:
YF-053 CREE LED spotlight driver, electrical circuit
Internals and operating principle of a chandelier with remote control
Before you start repairing a faulty chandelier, familiarize yourself with its design, which includes three groups of electronics:
- LED lamp (backlight);
- Halogen lamp (main and additional lighting, sometimes also LED);
- Relay with receiver of the signal supplied by the remote control.
An LED lamp contains dozens of small diode multi-colored bulbs that are used to switch lighting modes. They receive electricity from a capacitor included in the LED design. It also lowers the voltage level to the level required for the diodes to operate. The light bulbs are connected in series, so if one of them breaks, the others immediately go out. Finding a burnt-out diode is difficult; it’s easier to replace everything.
The halogen unit is powered by several transformers that pulse the supplied voltage. If the halogen lights stop lighting, there can be two reasons: a malfunction of the bulbs or a breakdown in one or more transformers.
The relay that receives and processes the radio signal includes several electromagnetic relays that switch current of certain power values. It is powered by a quenching capacitor. The resulting excess electricity goes into a capacitor, which plays the role of ballast. The more hours the chandelier has burned out, the higher the risk that the relay will become detached from the board. The place where they connect is the weakest in the structure.
Each chandelier requires a remote control, which usually has only 4 buttons. Its electronic circuit is simple and very reliable. Therefore, if the chandelier does not turn on from the remote control, but works properly if you give commands using the switch, simply replace the batteries.
Design of diode lighting products
The basis of any LED lamp and the same light bulb are diodes, which begin to glow when current passes through them. Therefore, in order to independently repair lamps of this type, you need to know how it works.
Note! The operating principle of LED products will be identical for all versions. Therefore, knowing it, you can repair any lamp or light bulb with your own hands.
Structure of an LED lamp
To understand how to repair LED lighting devices yourself, you need to understand their design. Such devices consist of the following components:
- frame. Typically, LED lamps have a unique housing, the appearance of which is selected depending on the style and required design. From the point of view of the functionality of the device, it does not matter. This is just a container for the “filling”;
- driver. This device plays the role of a power converter. It is capable of delivering direct current. Very often, the cause of a device malfunction lies in the failure of the driver;
Note! All LED products operate at a voltage below the mains voltage (220 volts). Typically their voltage is 12 or 24 volts. Therefore, installing a driver in the lamp will be a mandatory requirement in order to connect it to the network.
- LEDs are the main light source. They produce light by converting electrical energy transmitted through a driver;
- radiators. It is used to cool heating light sources;
- optical elements (lenses and reflectors). With the help, the light emitted by LEDs is converted into a luminous flux acceptable for humans.
This is the simplest LED lamp device. But today there are lamps on sale that can be controlled using a remote control.