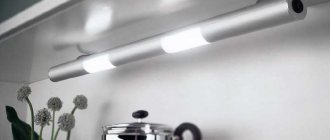
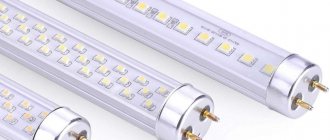
LED lamps correspond in many respects to fluorescent lamps: size and appearance, brightness, identical base. LEDs differ from fluorescent lamps in their long service life, light source and lack of need for special disposal. Thanks to this similarity, it became possible to save money by replacing only the light source in failed or outdated lamps, leaving the same frame.
Replacing fluorescent lamps with LED lamps does not require any special skills - if you have an algorithm of actions, even a home craftsman can handle the alteration on his own.
Benefits of remodeling
The minimum operating time of an LED lamp declared by manufacturers is 30,000 hours. Much depends on the light elements and electronic ballast. But the benefits of redesigning a fluorescent lighting device are obvious for a number of reasons.
Let's consider what is better - LED lamps or fluorescent lamps:
- The main difference between fluorescent lamps and LED lamps is energy consumption. Fluorescent devices consume 60% more electricity.
- LED lighting fixtures are more durable in operation. The average service life is 40-45 thousand hours.
- LEDs do not require maintenance or inspection; it is enough to remove dust and occasionally change the tubes.
- LED tubes do not blink; it is advisable to install them in children's institutions.
- The tubes do not contain toxic substances and do not require disposal after the end of their service life.
- LED analogues of fluorescent lamps also work during voltage surges in the network.
- The next advantage of LEDs is the availability of models designed to operate from a supply voltage of 85 V to 265 V. A fluorescent lamp requires continuous power supply of 220 V or close to it.
- LED analogues have virtually no disadvantages, with the exception of the high cost of premium models.
220V LED light bulb circuit
Structurally, the 220V LED lamp consists of three main parts: the housing, the electronic part and the cooling system. The mains voltage is supplied through the base to the driver, where it is converted into a direct current signal necessary for lighting the LEDs.
Light from emitting diodes has a wide scattering angle and therefore does not require the installation of additional lenses. A diffuser is enough. During operation, driver parts and LEDs become hot. Therefore, heat dissipation must be carefully considered in the design of the lamp.
The body part of the LED lamp includes a base, a plastic shell inside which the driver is located, and a translucent cover in the form of a hemisphere, which also serves as a light diffuser. In expensive lamp models, most of the body is occupied by a ribbed radiator made of aluminum or special heat-conducting plastic.
In budget-class light bulbs, the radiator is either completely absent or located inside, and holes are made around the circumference of the body. Cheap Chinese products with a power of up to 7 W have a solid body, without any heat dissipation.
In branded 220V LED lamps, a printed circuit board with SMD LEDs is attached to the radiator through thermal paste for effective heat dissipation.
In cheap Chinese models, this board is either simply inserted into the grooves of the case, or attached with self-tapping screws to a metal plate for cooling the crystals. The efficiency of such cooling is extremely low, since the plate has a small area, and Chinese manufacturers, as a rule, forget to apply thermal paste.
The radiation is output through a diffuser, usually made of matte plastic. And in cheap 220V LED lamps, such a housing still reliably hides the shortcomings of the Chinese assembly from the prying eyes of the consumer. The diffuser is attached to the base either with sealant or a threaded connection.
Conversion of a lamp with electronic ballast
If the model of the illuminator is more modern - an electronic ballast choke and no starter - you will have to make an effort and change the connection diagram of the LED tubes. Components of the lamp before replacement:
- throttle;
- wires;
- cartridge pads located on both sides of the body.
We get rid of the throttle first, because... without this element the design will become lighter. Unscrew the fastening and disconnect the power wires. Use a narrow-tipped screwdriver or pliers for this.
The main thing is to connect 220 V to the ends of the tube: apply phase to one end, and zero to the other.
LEDs have a peculiarity - 2 contacts on the base in the form of pins are rigidly connected to each other. And in fluorescent tubes, the contacts are connected by a filament, which, when heated, ignites mercury vapor.
Lighting devices with electronic ballasts do not use a filament, and a voltage pulse breaks through between the contacts.
It is not so easy to supply 220 V between contacts with a hard connection.
To make sure the voltage is correct, use a multimeter. Set the device to resistance measurement mode, touch the two contacts with the measuring probes and take measurements. The multimeter display should show a zero value or close to it.
LED lamps have a filament between the output contacts, which has its own resistance. After applying voltage through it, the filament heats up and causes the lamp to work. Further connection of the LED lamp is recommended to be done using 2 methods:
- without dismantling cartridges;
- with dismantling and installing jumpers between the contacts.
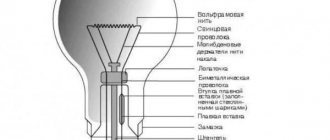
How does an LED lamp work?
The light source in an LED lamp is a light-isolating diode, consisting of a semiconductor crystal with two terminals (cathode and anode) and an optical system. Further in the text the abbreviation SD or LED will be used.
When electric current passes through a semiconductor in the forward direction, charge carriers (electrons and holes) recombine. As a result of this, optical radiation of photons occurs (due to the transition of electrons to another energy level).
The lamp also contains a driver (a special microcircuit) that provides power to the LED. The radiator (cooling system) collects and removes excess heat. The diffuser minimizes light loss.
Schematic representation of an LED
In the diagrams, LEDs are conventionally designated as diodes with arrows that indicate optical radiation.
Manufactured 220V LED light bulbs may differ in external design, but the principle of the internal structure remains the same for all models.
Light emission in lamps is carried out by LEDs, the number and size of crystals of which can vary depending on the power and cooling capabilities. Their color spectrum is determined by the substance included in the structure of each crystal.
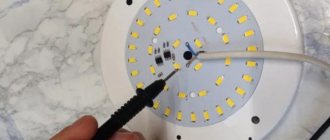
To get to the starting driver, you need to carefully remove the protective “skirt” of the lamp. A printed circuit board or assembly of interconnected radio elements will open under it.
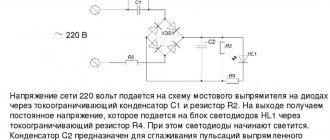
At the driver input there is a diode bridge connected to the electric base of the lamp in contact with the socket. Thanks to it, the alternating supply voltage is rectified into constant voltage, supplied to the board and through it supplied to the LEDs.
To better dissipate the emitted flux and protect the crystals from touch, as well as to avoid their contact with foreign objects, a scattering protective glass (transparent plastic bulb) is installed outside. Therefore, in their appearance they are very similar to traditional light sources.
To screw the light bulb into the socket, their bases are made in standard sizes E14, E27, E40, etc. This allows you to use ice lamps in your home network without resorting to any changes in the electrical wiring.
Without dismantling
Refusing to dismantle the cartridge is an easier way: there is no need to understand the circuit, make jumpers, climb into the middle of the cartridge and tinker with contacts. Before dismantling, you need to buy several Wago clamps. Remove the wires leading to the cartridge at a distance of 1-2 cm. Place them in the Wago clamp.
Do similar actions on the other side of the lighting fixture. All that remains is to supply a phase to the terminal block on one side and zero on the other. If you were unable to purchase clamps, twist the wires under the PPE cap.
Features of a switching power supply
A UPS is an inverter system in which the input voltage is rectified and then converted into pulses. The main feature of the UPS is a significant increase in the frequency of the current transmitted to the transformer. It is also worth noting the small dimensions of such a device. Another advantage is that the power supply does not have any energy losses during operation, unlike linear ones, which lose a significant part during conversion to the transformer.
The operating principle of a switching power supply from an energy-saving lamp is as follows:
- The input rectifier, consisting of a diode bridge and a capacitor, converts alternating current (input) into direct current.
- The inverter, in turn, transforms direct current into alternating current, but the frequency increases from 50 Hz to 10 kHz, which is 200 times higher.
- This current is transferred to the transformer. It will either increase or decrease the voltage.
- The output rectifier converts alternating current into direct current, but the frequency remains high.
As a rule, modern circuits use MOSFETs - transistors. Their main feature is their very fast switching speed. Accordingly, high-speed diodes should be used in such ballasts. They are located in the output rectifier.
If the output voltage is very low, then a transistor can perform the rectifier function. Alternatively, you can use a throttle instead. Such simple current converters are found in circuits of 20 W energy-saving lamps.
With dismantling the cartridges and installing jumpers
This method is more thorough, but does not require purchasing additional parts. Algorithm of actions:
- Carefully remove the covers from the sides of the lamp.
- Removable cartridges with insulated contacts located inside. There are also springs inside the socket, which are necessary for better fastening of the lamp.
- There are 2 power wires leading to the cartridge, which are snapped into special contacts without screws. Scroll them clockwise and counterclockwise. After this, we pull out one of the wires with force.
- Because the contacts are insulated; when one of the wires is removed, the current will flow only through one socket. This will not affect the performance of the lamp, but it is better to install a jumper and thereby improve the device.
- Thanks to the jumper, there is no need to try to make contact by turning the LED tube to the sides.
- It is recommended to make a device from the excess power wires of the main lighting fixture, which will remain after replacing the lamps.
- The next step is to check for continuity between the isolated connectors after installing the jumper. We perform similar actions on the other side of the lamp.
- Follow the rest of the power wire. It should be zero, not phase. Remove the rest with pliers.
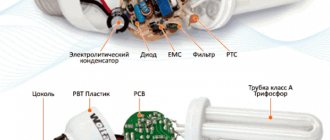
LED lamp 220 device
- The lamp contains:
- frame;
- base;
- diffuser;
- radiator;
- LED block;
- transformerless driver.
How does an LED lamp work? The figure shows a modern LED lamp using SOV technology. The LED is made as one unit, with many crystals. It does not require wiring of numerous contacts. It is enough to connect just one pair.
- Each LED lamp consists of the following parts:
- The diffuser is a special hemisphere that increases the angle and evenly scatters the directed beam of LED radiation. In most cases, the element is made from transparent and translucent plastics or frosted polycarbonate.
- LED chips are the main components of new generation lamps. They are installed either one at a time or in dozens. Their number depends on the design features of the product, its size, power and the presence of devices for heat removal.
- Printed circuit board. In their manufacture, anodized aluminum alloys are used, which can effectively transfer heat to the radiator, which will create an optimal temperature for the smooth operation of the chips.
- A heatsink that removes heat from a printed circuit board with LEDs recessed into it. For casting radiators, aluminum and its alloys are also selected, as well as special molds with a large number of individual plates, which help increase the heat-dissipating area.
- A capacitor that removes ripple in the voltage supplied to the LED crystals from the driver board.
- A driver that smoothes, reduces and stabilizes the input voltage of the electrical network. Not a single LED matrix can do without this miniature printed circuit board. There are external and built-in drivers. Most modern lamps are equipped with built-in devices that are mounted directly into their housing.
- A polymer base that rests closely on the base part, protecting the housing from electrical breakdowns, and those changing light bulbs from accidental electric shock.
- A socket that provides connection to the cartridges. Typically, nickel-plated brass is used in its manufacture. This guarantees good contact and long-term corrosion protection.
Also, a significant difference between LED devices and their conventional prototypes was the location of the maximum heating zone. For other types of emitters, heat spreads from the outside of the surface.
LED crystals heat up their printed circuit board from the inside. Therefore, they require timely removal of heat from inside the lamp, and this is structurally solved by installing cooling radiators.
When a lamp with a burnt-out LED is repaired, the entire lamp is replaced. The shape of the lamps is round, cylindrical and others. Connection to the power supply is made through threaded or pin sockets. For general lighting, luminaires with color temperatures of 2700K, 3500K and 5000K are selected.
The spectrum gradations can be any. They are often used for advertising lighting and for decorative purposes.
Types of LEDs
An LED is a semiconductor crystal made of several layers that converts electricity into visible light. When its composition changes, radiation of a certain color is obtained. The LED is made on the basis of a chip - a crystal with a platform for connecting power conductors.
To produce white light, the “blue” chip is coated with a yellow phosphor. When the crystal emits radiation, the phosphor emits its own. Mixing yellow and blue light creates white.
- Different chip assembly methods allow you to create 4 main types of LEDs:
- DIP - consists of a crystal with a lens located on top and two conductors attached. It is the most common and is used for lighting, lighting decorations and displays.
- “Piranha” is a similar design, but with four terminals, which makes it more reliable for installation and improves heat dissipation. Mostly used in the automotive industry.
- SMD LED - placed on the surface, due to which it is possible to reduce dimensions, improve heat dissipation and provide many design options. Can be used in any light sources.
- COB technology, where the chip is soldered into the board. Due to this, the contact is better protected from oxidation and overheating, and the glow intensity is significantly increased. If an LED burns out, it must be completely replaced, since DIY repairs by replacing individual chips are not possible.
The disadvantage of the LED is its small size. To create a large, colorful light image, many sources are required, combined into groups. In addition, the crystal ages over time, and the brightness of the lamps gradually decreases. For high-quality models, the wear process is very slow.
Classic connection via electromagnetic ballast
Features of the scheme
In accordance with this circuit, a choke is connected to the circuit. Also, the circuit must include a starter.
Choke for fluorescent lampsStarter for fluorescent lamps - Philips Ecoclick StartersS10 220-240V 4-65W
The latter is a low-power neon light source. The device is equipped with bimetallic contacts and is powered from an electrical network with variable current values. The throttle, starter contacts and electrode threads are connected in series.
Instead of a starter, an ordinary electric bell button can be included in the circuit. In this case, voltage will be supplied by holding the bell button pressed. The button must be released after the lamp is lit.
Connecting a lamp with electromagnetic ballast
The operating procedure of the circuit with an electromagnetic type ballast is as follows:
- after being connected to the network, the inductor begins to accumulate electromagnetic energy;
- electricity is supplied through the starter contacts;
- the current rushes through the tungsten heating filaments of the electrodes;
- the electrodes and the starter heat up;
- the starter contacts open;
- the energy accumulated by the throttle is released;
- the voltage on the electrodes changes;
- a fluorescent lamp gives light.
In order to increase the efficiency and reduce interference that occurs when the lamp is turned on, the circuit is equipped with two capacitors. One of them (the smaller one) is located inside the starter. Its main function is to dampen sparks and improve neon impulse.
Connection diagram for one fluorescent lamp through the starter
Among the key advantages of a circuit with an electromagnetic type ballast are:
- time-tested reliability;
- simplicity;
- affordable price.
- As practice shows, there are more disadvantages than advantages. Among them it is necessary to highlight:
- impressive weight of the lighting fixture;
- long lamp on time (on average up to 3 seconds);
- low efficiency of the system when operating in cold conditions;
- relatively high energy consumption;
- noisy throttle operation;
- flickering, which negatively affects vision.
Connection procedure
Connecting the lamp according to the considered scheme is carried out using starters. Next, we will consider an example of installing one lamp with the inclusion of a model S10 starter in the circuit. This state-of-the-art device has a non-flammable body and high-quality construction, making it the best in its niche.
The main tasks of the starter come down to:
- ensuring the lamp is turned on;
- breakdown of the gas gap. To do this, the circuit is broken after a fairly long heating of the lamp electrodes, which leads to the release of a powerful pulse and direct breakdown.
The throttle is used to perform the following tasks:
- limiting the current value at the moment of closing the electrodes;
- generating voltage sufficient for gas breakdown;
- maintaining the discharge combustion at a constant stable level.
In the example under consideration, a 40 W lamp is connected. In this case, the throttle must have the same power. The power of the starter used is 4-65 W.
We connect in accordance with the presented diagram. To do this we do the following.
First step
In parallel, we connect the starter to the pin side contacts at the output of the fluorescent lamp. These contacts represent the leads of the filament of the sealed bulb.
Third step
We connect the capacitor to the supply contacts, again, in parallel. Thanks to the capacitor, reactive power will be compensated and interference in the network will be reduced.
What are the savings?
In order to calculate the savings from replacing fluorescent lamps with LEDs, you need to make an appropriate calculation; for this, you can take as a basis two lamps of the same power, one of which is equipped with a fluorescent lamp, and the second with LEDs.
For the calculation, we will take lamps with the same characteristics in terms of luminous flux, providing the required illumination at a given point in the room, and the indicator on which the calculation will be based will be the power of the light source.
Comparative power values of fluorescent and LED light sources are given in the table:
| Source type | Power, W | ||||||
| luminescent | 5,0 – 7,0 | 10,0 -13,0 | 15,0 – 16,0 | 18,0 – 20,0 | 25,0 – 30,0 | 40,0 – 50,0 | 60,0 – 80,0 |
| LED | 2,0 – 3,0 | 4,0 – 5,0 | 8,0 – 10,0 | 10,0 – 12,0 | 12,0 – 15,0 | 18,0 – 20,0 | 25,0 – 30,0 |
A single-lamp fluorescent lamp, model Camelion WL-3016 36W 2765, with a power of 36 W, will cost the buyer 820.0 rubles, plus the cost of the lamp itself and the starter - the total amount will be, on average, 900.00 rubles.
A built-in LED lamp, model Feron AL527 28542, 18 W, white light, will cost the buyer 840.00 rubles.
At the initial stage of comparison, the initial parameters are approximately the same, these are: the luminous flux, depending on the power of the installed light source and the cost of the lamp itself. For a comparative analysis, it is necessary to fill out a comparative table, compiled on the basis that the lamps operate 10 hours a day, 365 days a year.
| Index | Fluorescent lamp | LED lamp |
| Lamp power, kW | 0,036 | 0,018 |
| Electricity consumption per day, kW/hour | 0,36 | 0,18 |
| Electricity consumption per year, kW/hour | 131,4 | 65,7 |
| Cost of electricity for consumers in 2022, rubles/kWh | 2,97 | 2,97 |
| Costs of paying for consumed energy, rubles | 390,26 | 195,13 |
| Savings by year, rubles | – | 195,13 |
| Costs of maintaining lamps, rubles | 100,00 | – |
| Savings, total, rubles | – | 295,13 |
Notes:
As can be seen from the table, with the same initial indicators, the savings from the use of LED lamps, in terms of the cost of used electrical energy, in comparison with a fluorescent lamp, is 100%.
Of course, the resulting figure that determines the savings in using an LED light source is not great, because Only two lamps were compared, but even on the scale of a single apartment, when 5–10 fluorescent lamps are replaced, the savings will increase significantly, which will significantly affect the family budget. In the case when the replacement is carried out in an office building or production workshop, the savings from replacing lamps can be felt already in the first month after completion of the work.
Let's sum it up
Converting a fluorescent lamp into an LED lamp is a profitable undertaking. In addition, even a beginner can cope with this process if he follows the instructions. However, you should not save money on purchasing light bulbs, because the above benefits only apply to premium quality options.
A failed LED leaves a very unpleasant aftertaste. And if this has happened more than once, then it becomes quite natural to want to understand the reasons - why do LED light bulbs burn out? Read in detail in a special article.