Craftsmen often have the desire to make a diode light bulb for at least the reason that it allows you to save 10 times more electricity when compared with an incandescent lamp. This is extremely beneficial in terms of monetary costs. But for self-assembly you need experience in working with lighting circuits.
First, you should familiarize yourself with the principle of operation of an LED lamp and find out what types of lamps exist. After this, you can begin to select the necessary materials and tools. To ensure that the light bulb lasts a long time, it is better to buy only high-quality structural elements.
Working principle of LED light bulb
The operation of LED lamps is based on the action of a semiconductor 1-2 mm in size. Inside it there is a movement of charged elementary particles that convert the current into direct current from alternating current. However, the chip crystal also has another type of electrical conductivity - negative electrons.
Fig. 1 – operating principle of LED lamps.
The side with the minimum number of electrons is called "p-type". The other, where there are more particles, is the “n-type”. When they collide, particles of light - photons - are generated. If the system is energized, the LEDs will continue to emit a stream of light. All modern LED light bulbs operate on this principle.
Measures to combat LED flickering
A DIY energy-saving LED lamp has a huge advantage, but you need to work hard so that when using your homemade product, users are not bothered by excessive LED flickering:
Drive LED products using an LED power supply that is designed for their rated load.- Make sure that all LED products used are compatible with the control circuits and power supply.
- Check for wiring or other faults in the fixture and ensure that the dimmers are not overloaded.
- Consider using a constant current LED driver.
- When installing your system, experiment to see if there is a minimum level of dimming that bothers you.
To avoid the influence of LED flickering, you should always keep the above points in mind.
Types of LED devices
The type of specific lamp is determined depending on the location of the LEDs:
- COB . The LED is soldered into the board. This will increase the intensity of the glow and protect against overheating;
- DIP . Here the crystal is connected to two conductors, and an enlarger is installed above them. The modification is used in the production of garlands and advertising banners;
- SMD . To improve heat dissipation, diodes are mounted on top. Due to this, it is possible to reduce the size of the light bulb;
- "Piranha". We are talking about ultra-bright light-emitting diodes with increased vibration protection. In most cases, they are installed in cars, as they are characterized by reliability.
A variant of the DIP LED called Straw Hat or “straw hat”.
The most significant disadvantage is the COB design. If at least one chip fails, it will not be possible to replace it; you will have to change the mechanism completely or buy a new lamp.
What materials are required for manufacturing
To assemble the light bulb you need to buy the following structural elements:
- frame;
- LEDs (separately or mounted on a strip);
- rectifier diodes or diode bridge;
- fuses (if there is a burnt-out unnecessary lamp, they can be removed from it);
- capacitor. The capacity and voltage must correspond to the number of chips and the electrical circuit;
- If you have to make a frame for installing chips, you need to purchase a heat-resistant material that does not conduct current. Metal will not work, so it is better to buy thick cardboard or durable plastic.
Tools for the job will include pliers, a soldering iron, scissors, a holder and tweezers. You will also need liquid nails or glue to mount the LEDs if using cardboard.
History of LEDs
Captain Henry Joseph Round, one of the pioneers of radio, noticed an unusual glow emitted by silicon carbide during an experiment. He published his observations in General World, but he could not explain the nature of the phenomenon.
Russian scientist Oleg Losev observed the emission of light from crystals - diodes. In 1927, he published details of his work in a Russian magazine and filed a patent for the “Light Relay.”
In 1961, the infrared diode was created by B. Biard and G. Pitman. However, Nick Holonyak is rightfully considered the founding father of the LED. His student J. Craford created a yellow LED in 1972. At the end of the 80s, thanks to the research of the Russian scientist Zh. I. Alferov, new LED materials were discovered, which gave impetus to the further development of LEDs.
In the early 70s, green LEDs were first invented; in 1971, blue LEDs appeared, which were very inefficient. A breakthrough was made by Japanese scientists only in 1996, who invented a cheap blue LED.
LED lamp circuits
Before you start assembling the LED lamp, you need to choose one of the possible schemes. There are several options, they all have their advantages and disadvantages. It also all depends on the purpose of making the lamp. One of the most common schemes includes a diode bridge and 4 LEDs.
LED element
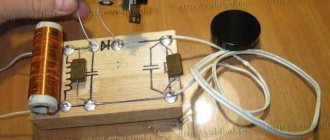
If there is a broken LED lamp in the house, you can take the missing parts from it. But before rearranging any elements, you need to check them for correct operation using a 12V battery. Failed parts should be removed. To do this, you need to take a soldering iron and unsolder the contacts, removing the burnt diodes.
Fig. 3 – finished platform with LED elements.
Do not forget about observing the alternation of cathodes and diodes mounted in series. If 2-3 chips are being replaced, they can be soldered to the same areas where the burnt chips were located. Next, about 10 diodes are installed in a row, observing polarity. You also need to make sure that the soldered ends do not touch each other. Otherwise, it will cause a short circuit when turned on.
Converter circuit with diode bridge
As mentioned above, the circuit includes 4 LEDs connected in different directions. That is why the bridge can transform 220V current into pulsating current. This happens during the transition between 2 sine wave chips.
Fig. 4 – circuit with a diode bridge.
Polarity is lost due to their change. During the assembly process, you need to connect a capacitor to the positive output in front of the bridge. Another one should be behind the bridge. It will perform a smoothing function during voltage drops.
Schemes for a softer glow
If the master is faced with the task of getting rid of flickering, which is characteristic of almost all LED light bulbs, several additional elements need to be included in the circuit. In general, it should include capacitors, resistors and a diode bridge.
To protect the lamp from power surges in the network, a 100 Ohm resistor is installed at the beginning of the circuit, followed by a 400 nF capacitor, then a bridge is mounted, followed by a resistor. The last to be included in the circuit are the LEDs.
Characteristics
The main characteristics of emitting diodes include:
- operating current – the current value at which the lamp operates stably;
- voltage - the power that is needed for the device to operate;
- power is an important indicator that is needed when choosing a power supply;
- color temperature - the shade of the glow, it can be warm, neutral and cold;
- luminous flux - amount of light per 1 sq.m.;
- scattering angle – determines the area to which the lighting will be directed.
The characteristics also include crystal size.
Calculation of required brightness
Before buying lamps, determine what brightness you will need. This parameter should take into account the area of the room, its purpose, what function the lamps will perform. According to the standards for 1 sq.m. the living room should have 300-400 Lux of light, for the kitchen and bedroom about 250 Lux, for the hallway 100 Lux.
Light control
You can control the brightness of the lighting in various ways. These include:
- changing the number of diodes;
- change in current flowing through diodes;
- using the power regulator.
You can purchase a lamp with a dimmer. With its help you can adjust the brightness of the backlight.
Resistor circuits
This scheme is quite capable even for novice masters. To assemble a device based on it, you need to buy 2 12k resistors, as well as a pair of circuits with the same number of chips soldered in series, taking into account polarity. One strip of diodes on the side (R2) is connected as the anode, and the other (R1) as the cathode. Devices that are assembled according to this scheme are distinguished by a soft light, since at the moment of switching on the LEDs light up one after the other.
Fig. 5 – resistor for an LED lamp.
Thanks to this effect, the naked eye practically does not see the pulsation. This bulb is best suited for a table lamp. To get optimal lighting, it is recommended to purchase strips with 20-40 diodes. If there are fewer of them, it will give an insignificant luminous flux. But the more elements, the more difficult the work is technically.
Features of do-it-yourself installation in an apartment
During installation, you need to take into account the lighting features. You must follow the safety precautions and instructions for installing lamps.
Schemes of spot diode lighting of premises
Spot lighting should be mounted in such a way that there is heat dissipation
This is especially important for suspended ceilings. There are different patterns for arranging lamps - round, oval, with and without a central chandelier
LED Strip Light
The tape is installed in an aluminum profile, which will act as a heat sink. LED strips are sold in reels of 5 meters. If a smaller piece is needed, it is cut strictly along the intended lines. An additional power supply is purchased.
Chandelier installation
Chandeliers come with and without controls. Before you install the chandelier, you need to assemble it. Before installation, all wires are also connected in accordance with the instructions for the device. It can then be hung on the ceiling and tested.
Work is carried out with the power supply turned off!
Ice panels
Ceiling panels are fixed to both concrete and wooden surfaces. Installed using cables that allow you to adjust the height of the lamps
It is important to correctly mark the ceiling in order to then mount the panel
Installation of a wireless volumetric lamp
Wireless lamps are convenient because they do not require cables to operate. They can be installed anywhere in the apartment - as night lights, kitchen lighting. Due to their low weight, wireless ceiling lamps can be mounted on suspended ceilings and plasterboard products. Wall-mounted ones are mounted in a place convenient for users. LED lighting is an effective way to create high-quality light in any room and outdoors. LEDs have many advantages over classical sources. They are environmentally friendly, economical, durable, and safe. The variety of forms of diode sources allows you to create unique design solutions.
Manufacturing stages
The assembly will be considered based on a standard fluorescent lamp base. The first step is to disassemble the lamp. All luminescent devices are connected to the base with latches through a plate with tubes. Here the master’s task is to find the fastening points and disconnect the base using a knife or flat-head screwdriver.
Fig. 6 – removing the fluorescent lamp base.
During the disassembly process, you should be careful not to accidentally damage the tubes, which contain toxic substances. You should also prevent damage to the electrical wiring connected to the base. The upper part with tubes is used to make a plate for installing LEDs. To do this, the tubular elements must be removed.
Fig. 7 – disassembled lamp.
At the next stage, you will need a plastic or cardboard cover; it will serve to insulate the LEDs. For example, if HK6 diodes are installed in a lamp, each of them has 6 crystals connected in parallel. With minimal energy consumption they will provide the brightest light possible.
To connect each of the chips, 2 holes should be pierced in the plate according to the selected scheme. On this material, the diodes can be fixed as firmly as possible, so thick cardboard should be used only in extreme cases. But if there are no other options, the LEDs are attached to the base using superglue or liquid nails.
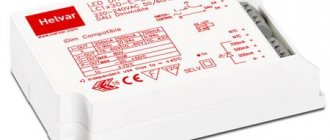
According to the example given, the device is designed for 6 chips with a power of 0.5 W each, so parallel connected elements should be included in the circuit. You need to install a driver for a light bulb operating on 220 volts. At this stage, it is important to isolate it from the payment using cardboard or plastic to avoid short circuiting. There is no need to worry about overheating, as this lamp practically does not heat up.
Fig. 8 – driver for an LED lamp.
At the next stage, you can begin assembly. Light bulbs operating from a standard socket and a 220V network have low energy consumption and a power of up to 3 W. The assembled lamp has luminous flux characteristics from 100 to 120 Lm. But thanks to the white light, it seems bright. The product is suitable for illuminating a pantry, corridor or installing in a table lamp.
LED lamp E27 from energy saving and ready-made driver
You can use the base from a faulty LED lamp.
To make an LED lamp, you will need a faulty CFL product, NK-6 LEDs, a soldering iron, pliers, solder and a cardboard base. The work is carried out step by step:
- The base is removed from an old 20 W light bulb. You will need to pry off the latches or drill out areas with a chiseled core.
- The empty base is cleaned of excess solder and treated with alcohol or cosmetic nail polish remover.
- There are 6 holes on the base cover. Mark round niches on a piece of cardboard, which are then cut out using nail scissors.
- A strip of diodes consisting of 6 crystals connected in parallel is disassembled.
- The crystals are connected 3 in parallel.
- Two ready-made chains with parallel LEDs are attached in series.
- 6 elements with a power of 1 W are connected to the finished driver from a broken LED light bulb.
- A circle is cut out of cardboard and placed between the driver and the board. The driver is installed in the base.
- The light bulb is completely assembled and tested for functionality.
The result will be a white, bright analogue of a 30 W incandescent light bulb. The brightness of the product will be 150-200 lm, and the power will be 3 W.
To adjust the lighting area, you can bend the leads of the LED elements.
Choosing a lamp housing
You should decide on the case before choosing a circuit. In this case, you can use several options:
- incandescent lamp base;
- self-made device;
- using a housing from a halogen or energy-saving lamp.
Masters prefer the last option, since it is the simplest.
Energy saving lamp housing
It is recommended to make a housing for a DIY LED lamp only if the craftsman has enough experience. In most cases, part of the structure is taken from an energy-saving lamp or incandescent lamp. The burnt-out light bulb should be disassembled and the converter board removed. The scheme is installed in one of the following ways:
- Hide it in the basement. A plastic bottle cap will do.
- Place the diodes in the holes made under the bulb in the lid.
- Place the circuits inside the base. This option has improved heat transfer characteristics. Here the chips are connected through existing holes.
To place the chips, just cut a circle out of thick cardboard or plastic. If the work is done carefully, the device will have an aesthetic appearance.
Base with incandescent lamp
Some craftsmen choose the base of an incandescent lamp to install the circuit, as it has an important advantage: after assembly, the master will not have any difficulties screwing the light bulb into the socket, which will ensure heat exchange.
Fig. 9 – incandescent lamp base.
The base of an incandescent lamp also has its disadvantages. The finished structure will not have a beautiful appearance, and it will also not be possible to make high-quality insulation.
We recommend watching the video: How to assemble an LED lamp with your own hands.
Diffuser
There is a lot of room for creativity here. For example, a glass pendant from a Soviet chandelier, or the front glass from an old flashlight.
Sometimes the charging board can be quite long and there is not enough space in the cartridge body to install it. Then a plastic box, for example, for medicines, will come to the rescue. The missing length is cut out and glued to the cartridge body. The diameter of the flask must be selected commensurate with the diameter of the cartridge body.
If the lamp will be used as an indicator or night light, then the lid from the same jar can serve as a diffuser, as in the photo below.
It should be understood that the brighter you want to get light, the more transparent the diffuser should be. Glass with a lens will help make the light directional. Such glass was used in Soviet lanterns, so you can look for it if you wish.