The original design solution of a table lamp often determines its price and popularity on the market. Everyone wants the chosen product to serve without fail and for a long time. However, technology is technology, sooner or later breakdowns may occur and you have to think about how to fix the lamp.
In such cases, it is not necessary to take the lamp to the workshop. If you have at least a school understanding of electrical engineering and the ability to hold a screwdriver with pliers in your hands, most faults can be identified and repaired yourself at home. We'll tell you how to do this in the article.
Repair instructions for a table lamp.
When repairing a table lamp, we check the integrity of the electrical circuit and socket contacts - everything is as described above, but there are also some peculiarities:
Personally, I check the table lamp as follows
— I plug it into the socket, then the switch, and carefully measure with a multimeter the presence of 220 Volts at the contacts of the socket. Just be careful not to short circuit.
Note:
Energy-saving lamps can be supplied with reduced and constant voltage - take this into account when checking.
Many people are probably familiar with the situation: a table lamp breaks.
, we’ve already changed the light bulb and plugged it into a different socket - nothing helps.
It's 90% that the cause of the breakdown is burnt wires near the socket. This happens due to the fact that a light bulb of a larger, uncalculated power is often inserted.
Important:
The whole process will take you no more than an hour, provided that you already have all the supplies you need. At the same time, a cheap similar table lamp costs on average 300-500 rubles. Therefore, think again about whether you should repair it.
Well, if you still decide to repair, read on carefully.
What you need to repair a table lamp
Note:
Materials:
- two-core cable about 0.5 m long, with a cross-section of at least 2.5 m?. A meter of good two-core cable costs no more than 50 rubles.
- ceramic cartridge – 10 rub.
- electrical tape - 10 rub.
- heat-resistant insulation – 10 rub.
Tool:
- screwdrivers
- pliers (with wire cutters)
How I repaired my table lamp
I have this cute example of a Chinese green table lamp, independently decorated with little animals.
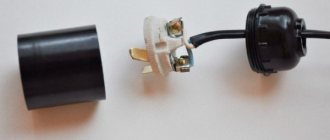
The first thing you need to do is get to the cartridge. Unscrew the lampshade fastening.
And we take out the cartridge.
As you can see, the wires were burned and torn due to strong heating, the insulation became rigid and burst.
If you have disassembled the lamp and the wires are intact, then the reason is most likely in the switch; use a multimeter or a “test screwdriver” to check the presence of voltage in the circuit before and after the switch. If there is no voltage after the switch, but there is before it, then it needs to be replaced. You can easily buy a similar switch at any electrical goods store. If there is no voltage even before the switch, then only the plug and the supply wire remain. If the plug is detachable, you can check for a broken wire. If not, we change everything along with the cable.
Important:
Unfortunately, my socket was without wire clamps. To avoid soldering, I decided to replace the cartridge. The existing wires will also no longer work, so we replace them with our own, preferably with thicker insulation. Just don’t overdo it, thick wires may not fit into the metal corrugated rod. In general, before connecting them to the cartridge, I recommend checking this. The wires at the point of connection to the cartridge must be covered with thermal insulation to avoid severe overheating.
Important:
To make it easier for the wires to fit into the corrugation, wrap the ends with electrical tape.
Since the load of the light bulb is not very large (on the lampshade it is written: “maximum 60W”), you can simply twist the wires together, wrapping them well with electrical tape.
If you have a soldering iron, you can solder it, it won’t hurt, or buy special connecting terminals. As an alternative, you can use an excellent homemade wire connection using copper tubing. Don't forget to wrap the wire connections properly with electrical tape.
Put the wires in place.
Make sure, if possible, that the wires do not lean against the socket inside the lampshade.
Well, that's it, our table lamp
working again!
Do not use bulbs larger than 60W, otherwise the wires will burn out again. This is a table lamp, not a spotlight! Well, if a 60W light bulb is not bright enough, in this case, use a gas-filled one (by the way, they say these lamps are harmful and emit toxic gas) or, better yet, an LED lamp. Such lamps heat up less, so you can safely use any brightness, they will not damage the wires, and you can also save energy.
Bright light, friends!
Our service technicians will quickly and efficiently repair lamps in Moscow. We will diagnose and repair any model of lamps: from the most ordinary wall lamps, sconces, floor lamps to luxury expensive chandeliers. The professionalism of our electricians is confirmed by a large number of perfectly completed orders!
What to do if the lamp does not turn on
It happens that the lamp stops turning on. Or the new light bulb does not light up. The reasons are mainly as follows:
- the light bulb itself is faulty;
- there is no contact in the cartridge;
- faulty switch;
- broken contact in the wires.
First you need to check the functionality of the new light bulb. The easiest way is to screw it into another lamp, which is known for sure to work. If it doesn’t light there either, the reason is the light bulb.
If the lamp is in order, you need to check the integrity of the electrical wiring and the presence of current at the input and output contacts of all elements of the lamp from the socket to the light bulb. According to technical specifications, all 220 V table lamps must be equipped with switches for safety reasons. It is prohibited to plug them directly into a power outlet. Thus, we check the conductivity of the connections one by one on the plug, switch and socket.
Experts call this operation “diagnosis” of the system and, when searching for a breakdown, do it in the reverse order - from the light bulb to the plug. For this purpose, an electrical tester is used - a device for determining the voltage in the network.
Testing wiring using a multimeter.
Checking and repairing the cartridge
We call the cartridge contacts. If there is current on them, but the light bulb does not light, the problem is in the socket. It often happens that high-quality repair of a table lamp is limited to cleaning the socket contacts with fine-grained sandpaper.
It may be that the central or side cartridge contacts have sagged and do not contact the light bulb or touch its base. Then you need to bend them with a screwdriver. If the contacts are burnt, broken off or corroded, the cartridge will have to be replaced. It must also be replaced if the metal thread is damaged or shorted to the body.
Video: It was about - Patron!
Checking the switch
If the cartridge is working, we test the switch contacts. You can ring it without disassembling it - through the wires connected to it. If there is voltage at the input but not at the output, then there is an open circuit inside the switch housing.
Switches can be push-button or key switches, built into the wiring or into the housing, but always of a delicate and thin design. It is often difficult to disassemble them, and even more difficult to eliminate the malfunction, so advice: if it breaks, it is better to replace it with a new one.
We recommend viewing: How to correctly connect a switch.
Broken contact in the wiring
A table lamp may stop turning on if there are breaks or breaks in the wires, which are often accompanied by a short circuit. Sometimes the wire breaks off at the terminal block fastenings at the base of the plug, switch or socket. The light then either goes out completely or blinks randomly. The wire at the break may spark and a crackling sound can be heard.
The location of the damage is sought by visual inspection and feeling the wire along its entire length. Repairing an electrical wire is not difficult - you need to thoroughly clean it, solder it together and insulate the broken ends.
But it is still better to simply replace the damaged area. However, you should remember the rule - if you have to change a flexible power cord, then only with a homogeneous one and with the same or larger cross-section. Otherwise, the cord may overheat and catch fire.
It will be useful to read: Restoring table lamps
If you need to repair a lamp on a clothespin, you should especially carefully examine the integrity of the wiring and all elements of the device. Over time, the fastening of the lamp weakens, sometimes it falls and is damaged.
Reasons for repairing LED lamps: device, electrical circuits
Before you start repairing LED lamps with your own hands, it is important to find out the reasons for their failure. The declared service life of lamps may not coincide with the actual lifespan
This is due to poor quality crystals.
There are the following reasons for malfunctions of lighting devices:
- Voltage drops do not greatly affect the operation of electrical parts; noticeable fluctuations in voltage readings can cause a malfunction;
- unsuitable lamp. If the wrong lamp is selected, the light source may overheat.
- light-emitting elements of poor quality contribute to the rapid failure of products;
- improper installation of the lighting system has a negative impact on electrical wiring;
- Strong vibrations and shocks can cause damage to such equipment.
Disassembling the device allows you to determine the exact causes of breakdowns
To avoid having to repair the LED light bulb yourself, you need to minimize the impact of the listed factors on the lamp.
Frequent problems arising with ice devices
It is often necessary to repair LED lamps yourself if there are problems with the capacitor. To carry out the test, it will have to be removed from the board. You can measure the voltage of an element with a multimeter. The same device checks the operating condition of the diodes.
The diagram shows the order of connecting drivers
In some cases, LED elements blink. This happens if the current-limiting capacitor is faulty. The cause of the breakdown may be a burnt-out emitter. The malfunction cannot be seen in all LEDs, so you will have to check every detail. A tester is used to find the problematic diode.
When making renovations, you can experiment with LED elements. For example, choose warm or cold light temperatures. Some devices do not have a smoothing capacitor and a rectifier. They can be installed using a soldering iron.
Lighting sources are tested using a multimeter or probe
Design Features
Before you begin repairs, you need to understand the design of the lighting fixture. The main design elements are presented in Figure 1.
Rice. 1. Installation of an energy-saving lamp
Designations:
- A – Spiral-shaped flask. Essentially, it is a sealed tube containing an inert gas (usually argon) and mercury vapor inside it. Two electrodes are fused at each edge, with a filament stretched between them. The inside of the tube is coated with phosphor.
- B – The upper part of the body to which the bulb is attached. We immediately warn you that it is unrealistic to remove the flask without damaging the integrity of the body, so it is better to perceive them as a single structure.
- C is a ballast mounted on a printed circuit board; it is also called electronic ballast or simply ballast. As you understand, when it fails, the lighting device turns into a disposal item. The ballast diagram will be given in the corresponding section.
- D – Fuse, as a rule, its role is played by low resistance.
- E – Lower part of the housing, ballast is installed in it, fastening with the upper part is ensured using latches.
- F – base. In everyday life, the more common types are E14 (minion) and E27. The lower part of the case with the plinth also represents a single, non-separable structure. On the outer part of the housing there is a marking of the lighting device, which indicates its main characteristics.
Service life of a repaired lamp
How long will such a light bulb with a “shunted” LED last?
Everything will depend on two factors. Firstly, what is the voltage in your network (normal, high (>230V) or low).
Secondly, where is this light bulb located? If this is a corridor, toilet, utility room, barn, etc., where it is turned on for a short time, then the lamp can easily last for several months.
If this is a living room, bedroom, kitchen, then we are talking about a much shorter period.
It is believed that the missing element will cause an increase in current in the entire circuit. Which is often what actually happens.
And this already leads to the sequential failure of the remaining LEDs one after another.
But if the driver in the lamp is made of high quality and has a good pulse current stabilizer, then the operation of the lamp will be maintained for a very long time.
Here is a visual comparison of the current strength in a “shunted” lamp...
and in a lamp, where instead of a burnt-out LED, several additional resistors were soldered in, which were precisely supposed to reduce the current.
As you can see, there is practically no difference. Do you think it’s worth bothering with this and worrying about a shorter service life?
But again, we repeat, this is only if you have a good driver.
With the classic cheap power supply circuit for an LED lamp using a quenching capacitor, the service life is reduced significantly.
Current stabilization in such lamps is very conditional.
Safety precautions
When working with an LED lamp and its components, you should follow simple rules that will keep your health, as well as the things and tools around you, safe. Before repairing LED light bulbs, you should familiarize yourself with these simple but important rules:
- Any manipulations with the lamp (disassembly, soldering, desoldering) must be done only when the device is disconnected from the network.
- All capacitors must be manually discharged after turning on the lamp, even if they are bypassed. To do this, you need to briefly short-circuit the leads of the capacitors with a metal tool or a dielectric pen.
- After repair, when checking the functionality of the lamp, you need to protect your eyes: an explosion of one of the elements is possible. You can use special safety glasses or simply turn away with your eyes closed while you plug in the repaired lamp.
Connecting wires to the cartridge and the final stage of repair
After the operation of removing the contact petals from the socket is completed, you can begin connecting the wires to the socket and assembling the lamp into a single unit. We thread the wire into the mounting bracket of the socket, remove the insulation from the conductors and form “rings” on them.
Next, using M3 screws, we connect the wires to the contact elements of the cartridge.
As you can see, the center contact screw not only makes electrical contact with the center blade, but also secures it in the socket.
Well, the last thing to do is to attach the cup of the table lamp to the corrugated pipe and thereby secure the socket with the wire. To do this, just align the corrugated pipe and the electric cartridge with the mounting holes of the cup and screw in two screws.
That's it, the entire DIY table lamp repair is complete. We admire the result.
I hope this material will be useful to the home handyman
Thank you for attention. All the best
And finally, just a very funny video about electrics:
We recommend that you read:
Author - Anton Pisarev
- https://vashtehnik.ru/elektrika/remont-svoimi-rukami-svetilnikov-i-lyustr.html
- https://sekret-mastera.ru/vtoraya_zhizn/remont-nastolnoj-lampy.html
- https://moydomik.info/load/remont/remont_ehlektriki/remont_nastolnoj_lampy_svoimi_rukami/29-1-0-138
Before you start repairs
If a table lamp breaks, the first thing you need to do is disconnect it from the power supply and remove the plug from the socket. All repair work, including inspection, must be carried out with the lamp completely disconnected from the power supply. Indeed, in the event of an insulation breakdown, exposed wires can come into contact with the metal elements of the lamp body, and if they touch, you will receive an electric shock.
You should not touch its metal parts immediately after turning off the lamp; this is unsafe. Capacitors retain a static charge for some time, and if the insulation is broken, the product body may become energized. We need to wait for the capacitors to discharge! The lack of current in the switched off lamp is checked with a voltmeter, and only after that can the repair begin.
Typical design of a table lamp.
If the lamp uses an incandescent lamp, it is important to remember that during operation it heats up and can heat nearby elements, including the metal lampshade. Wait until the lamp cools down to avoid burns when touched.
For this reason, table lamps do not use bulbs with more than 60 watts of power.
You should handle the light bulb carefully when unscrewing it; it may crack in your hands. There is no need to screw the light bulb into the socket too tightly - unscrewing it after prolonged use at high temperatures will not be easy, and this often ends in the socket breaking.
Repairing or replacing a lamp socket or chandelier
Let's say the cartridge crumbles or the contacts are so rusty that there is no point in cleaning them. In this case, it is recommended to replace the cartridge. The photo shows options for purchased electrics:
Disassembling the lamp
In front of us lies a typical white ceramic flat mount socket (left). Structurally becomes part of a bathroom wall lamp
Note the relatively strong isolation of the node. If necessary, such a cartridge can be purchased for a price of 30 rubles and replaced with the old one. Black sockets are also structurally included in the inclined type lamp, but for the pantry
It is not forbidden to install one under the ceiling of the bathroom, but if the neighbors flood it, such an installation will not lead to anything good. Notice the design on the right. Inclined chuck without back wall. We found a chandelier backdrop and showed that the parts fit together perfectly. It is not necessary to buy the cartridge separately; purchase it as part of the electrical part of the lamps. In stores, instead of the usual black cartridges, readers will be surprised to find mostly white ones - plastic and ceramic. In terms of size and design, they were not close to the usual ones. When modifying the socket of a chandelier or lamp, the work will increase: usually the backdrop is attached to a threaded connection (seen in the photo), which does not fit the diameter of the new standards. You will have to finish it with a file, which is long, tedious and does not guarantee a successful outcome. Our technical solution looks better, although the inclined lamp is a little more expensive than the socket separately.
Types of cartridges
It can be useful to clean the cartridge contacts. Do this with fine sandpaper. The procedure is aimed at reducing contact resistance. In this case, ignition is simplified
Please note that halogen lamps often blink several times before starting. This does not indicate the need to repair the lamp, but simply indicates the design features of gas-discharge sources
Useful tips
Some practical tips for lamp repair:
- Do not put pressure on the light bulb when screwing it into the socket. The base is made of ductile metal that deforms under pressure. However, halogen bulbs have circular contacts, so they are difficult to damage.
- Halogen lamps rotate endlessly. From a certain moment, when rotating, the glass begins to scroll relative to the base. The problem is the contacts. The new lamps have a shorter thread and do not reach the bottom.
- If the switch is in the off position, the phase should not be directed to the cartridge contacts. If this is not the case, you need to turn off the circuit breaker in the electrical panel (at the entrance).
To create contact between the lamp and the base, perform the following steps:
The central contact is turned upward using a screwdriver. The contact pad should be at an angle, not vertical. The lunar contact is usually vertical
Any of the existing petals is carefully lifted (at least a millimeter), focusing towards the periphery of the cartridge. The bent ends are slightly straightened.
Most often, two or three fittings are enough for the lamp to turn on.
Particular attention should be paid to maintaining the edges of the cartridge, otherwise it will have to be replaced
Source
What to do if the light bulb in the chandelier does not light
The main types of faults for older luminaires relate to compatibility. If the screwed-in energy-saving lamp does not want to work, get ready to think about repairing the chandelier. Let's reveal a secret: you can't push. Do not try to force the light bulb back into the socket: its base, made of soft metal, will easily break. Halogen ones have specially made circular contacts so that damage cannot be caused.
Try it: Halogen light bulbs rotate endlessly. They reach the limit, then the glass begins to rotate relative to the base. It's a matter of contacts. The threads of the new light bulbs are cut shorter – they don’t reach the bottom. Repairing a ceiling chandelier comes down to working with contacts
Please note: the switch is in the non-working position, the phase should not go to the cartridge. Otherwise, you need to turn off the circuit breaker (plugs) in the access panel:
- The central contact is bent upward with a screwdriver. The contact pad should be at an angle, and not strictly vertical.
- Lunar contact is more difficult to modify. Old chandeliers usually stand vertically. At least one petal must be carefully lifted (by half a millimeter), pressing towards the periphery of the cartridge. Sometimes the bent ends are slightly straightened.
The point of the measures is to ensure electrical contact between the lamp base and the socket. Usually no more than three fittings are required. Do not break the edges of the cartridge. Repairing a ceiling light may also lead to the need to replace the socket, but this is a last resort.
Source
Diagnosis of failure
Since no one keeps any special tools for diagnosing a printer at home, you will have to rely only on a visual inspection of the device.
Often, the problem that arises is solved during the inspection process:
Pay attention to the error number, which is written on the computer monitor screen, and in some printer models it is duplicated on its own screen (you will also need this information when talking to the service technician if you can’t handle it yourself); If there is no error on the monitors, then check whether the printer is connected to the computer and whether it is connected to the network (we are all human and sometimes we forget about basic things); If everything is in order with the power supply, then you should proceed with an internal visual inspection for paper stuck inside the printer mechanisms (if the cause of the breakdown is paper, then disconnect the cartridge and carefully remove the stuck piece); Check all mechanisms, whether the paper feed tray is tightly closed, whether the tray carriage is slammed shut; niches and cavities for contamination; dust, dirt, and ink from the printer itself can clog its mechanisms and cause breakdown. During a visual inspection, check all niches and cavities for contamination with dust, dirt, or dried ink. Very often, dried ink accumulates on the ink head or on adjacent working units
If you manage to discover any of the above, rest assured that you can handle cleaning them yourself.
Characteristics
Thanks to its compact size and the presence of auxiliary fastenings (screws or tape), the battery-powered Smart Light lamp can be installed on any surface. It reacts to movements within a radius of 3 m by automatically turning on. The device can cover an angle of up to 90 degrees, rotating in a plane up to 360 degrees. If there is no movement, after a minute the Smart Light turns off. It has 7 LED lights that shine brightly while consuming minimal energy. The lamp is wireless, runs on AA batteries - there are 4 of them in the lighting fixture.
Consumer reviews of this product are mostly positive: more expensive foreign analogues are mentioned in comparison. In reviews, consumers indicate compliance with the nominal and actual characteristics of the device
Also pay attention to the sharpness of the touch sensor, which responds to small movements. The lighting device, judging by the reviews, can be installed both in the corridor or on the staircase, and in the garden - it’s bright enough
https://youtube.com/watch?v=YvHFL7TLM-A
Reasons for writing off a table lamp in the write-off act
As of today, reconciliation reports are available. Checking compliance with cash, payment and financial discipline Cash transactions for the period The cash desk premises in the Institution are isolated and equipped.
A complete check of cash transactions established that the funds received from the bank were capitalized in full and on time. WATCH THE VIDEO ON THE TOPIC: We draw up an act for writing off materials Household inventory on the balance sheet Independent choice of a specialist Causes and signs of breakdowns Regardless of how long ago the lamp was purchased and how long it worked, one fine day it may fail.
In such a situation, a reasonable question arises: why did this happen and how to solve the problem? There may be several factors that lead to various types of malfunctions: Inoperative cartridge. Replacing it with a new one will not be particularly difficult; you don’t even have to call a specialist.
But if you need to replace not only the cartridge, but also the wires connected to it, you cannot do without the help of a qualified technician. Burnt twist. In low-quality lamps, both phase and zero twisting can burn out.
In both cases, the lamp will not perform its function.
The problem is corrected by removing the failed twist, stripping the wires, and restoring them by soldering.
The soldering area must be protected with insulating tape or other materials.
Defect in the transformer or power supply. Halogen and LED lighting devices are most often susceptible to such damage. The power supply and transformer in these lamps usually do not last long, so sooner or later they will have to be updated. Bad signal from the remote control. Lamps equipped with remote controls often stop working.
In some cases, simply replacing the remote control is enough to restore operation. Problems with the light bulb. Sometimes, in order to resume the operation of a light fixture, it is enough to check whether the bulb has burned out and how well it is screwed into the socket.
Decorating a boring table lamp
In this master class I will tell you how to decorate a table lamp. I got this lamp; all my hands couldn’t reach it. I finally decided to update the lamp :) I’ll tell you how I did it, I hope you will be interested :)
We will need: 1. Lamp with lampshade. 2. Cotton (any fabric you like). 3. Lace. 4.Texture paste. 5. Palette knife or unnecessary discount card. 6. Acrylic paint. 7. Brush. 8. Lace. 9. Glue gun. 10. Stencil.
First, unscrew the lampshade from the leg.
Let's go over the entire surface of the leg with sandpaper, where we will apply texture paste and remove the resulting dust. The surface must be clean.
Apply texture paste through a stencil.
Let the texture paste dry.
Let's start working with the lampshade, measure the diameter of the lower part of the lampshade. I have it 100 cm, height 21 cm.
We cut out a piece of fabric 102*27 cm from cotton, add 2 cm in width for allowances and 6 cm for the bottom of the lampshade. We connect the edges and mark on one side, 1 cm away from the edge, 1 cm for the hole to thread the lace.
We sew our part, not forgetting to leave room for threading the lace.
We turn the edge and stitch it, insert the lace.
Let's try our blank on a lampshade.
Along the top edge we make a stitch with the widest stitch of the machine for assembly.
We tighten our edge along the diameter of the top of the lampshade (by pulling one of the threads of our line).
Glue the fabric to the lampshade with a glue gun.
When gluing, we try to straighten the folds so that they stick evenly.
We tighten the bottom of the lampshade with a cord and tie it, cutting off the ends.
We cut out a cut on the bias 7 cm wide and 25 cm long - the edging for finishing the top of the lampshade.
Fold in half and iron.
Glue along the edge of the top of the lampshade with a glue gun.
When you have glued the entire part, we turn the edge over so that the edge is neat.
The free edge of our part needs to be stretched and bent a little, and see how it fits.
I stitch the lace from one edge in large steps and gather it into a gather, then use a needle to grab it to the top of the lampshade.
When we have sewn the lace, we bend it over and sew our edging with a hidden seam.
This is how it should be.
We also decorate the bottom of the lampshade with lace and sew it with a hidden seam.
We cut out a bow measuring 8*60 cm, don’t forget the seam allowances, stitch it, turn it inside out and iron it.
We tie it with a bow. Sew it or glue it to the lampshade with a glue gun.
We paint the lampshade leg with white acrylic paint.
A closer look at our pattern.
This is the lamp I got; it will decorate the chest of drawers in my office. I wish you a sea of inspiration! I really hope you liked my master class!
See you again! PS: I'll show you my intermediate experiments with a lamp. At first I decided not to paint the leg, paint the bottom the same color and give it an aged look.
When the paint was dry I rubbed the drawing with wax.
Then I painted it with white acrylic paint and decided to rub it so that brown paint would appear in the places where I applied the wax, but it did not appear, apparently due to the fact that I applied many layers. I used this method before and quite successfully.
Then I decided to tint the flowers brown on top with a brush; in short, it turned out not at all what I wanted to see. I had to paint everything with white acrylic; I probably applied 10 layers of paint in total. This is how I ended up experimenting :)
I wish your experiments to be a success! Don't be afraid to try something new!!! This is so interesting :) Thank you for watching my master class to the end :)
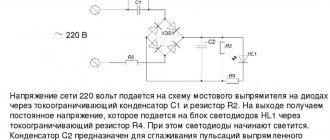
The simplest electrical circuit
To repair lighting devices, you need to know at least the general principles of constructing electrical circuits. Modern lamps are equipped with many additional electronic mechanisms and have a variety of functionality. However, the principle of connecting a lighting device (light bulb) almost always remains the same.
The simplest electrical circuit of a lamp.
The figure shows diagrams of different types of lamps with several light sources, but they are also typical for table lamps.
An important feature, especially for desktop models, is the ability to adjust the brightness and intensity of lighting. It is these devices that are widely used for students, creative workers and in the electronics industry for the assembly of small parts and precision mechanisms.
In such models, the electrical circuits are somewhat more complex and include additional elements for adjusting the lighting.
Brightness control circuit, where S2, S3, S4 are step controllers.
Types of socles
Unlike incandescent light bulbs, fluorescent light sources cannot be connected directly to the electrical network. The connection is made through additional devices - ballasts, which are ballasts. In turn, it is divided into two types: external ballasts and built-in electronic ballasts (EPG). Depending on the modification, ballasts are built into the socket or directly into the lighting fixture. This factor is taken into account when replacing fluorescent lamps.
Structures with installed external ballasts can be equipped with two or four pin sockets. To connect four-pin sockets, chokes or other similar devices are required. Two-pin sockets cannot be connected except through an inductor.
There are models equipped with a base with built-in electronic ballasts. The thread of such caps can be of standard or small diameter. Each design has its own characteristics that should be taken into account when replacing different types of fluorescent lamps.
Connection diagram, startup
The ballast is connected on one side to the power source, on the other to the lighting element. It is necessary to provide for the possibility of installing and fastening electronic ballasts. The connection is made in accordance with the polarity of the wires. If you plan to install two lamps via ballasts, a parallel connection option is used.
The diagram will look like this:
A group of gas-discharge fluorescent lamps cannot operate normally without a ballast. Its electronic design ensures a soft, but at the same time almost instantaneous start-up of the light source, which further extends its service life.
Ignition and maintenance of the lamp's functioning is carried out in three stages: heating of the electrodes, the appearance of radiation as a result of a high-voltage pulse, maintenance of combustion is carried out by constantly applying a small voltage.
Failure detection and repair work
If there are problems with the operation of gas-discharge lamps (flickering, lack of glow), you can make repairs yourself. But first you need to understand whether the problem is in the ballast or the lighting element. To check the functionality of the electronic ballasts, the linear light bulb is removed from the luminaires, the electrodes are short-circuited, and a regular incandescent lamp is connected. If it lights up, the problem is not with the ballast.
Otherwise, you need to look for the cause of the failure inside the ballast. To determine the malfunction of fluorescent lamps, it is necessary to “ring” all the elements in turn. You should start with the fuse. If one of the circuit components fails, it must be replaced with an analogue. The parameters can be seen on the burnt element. Repairing ballasts for gas-discharge lamps requires the use of soldering iron skills.
If everything is in order with the fuse, then you should check for serviceability of the capacitor and diodes that are installed in close proximity to it. The capacitor voltage should not fall below a certain threshold (this value varies for different elements). If all the ballast elements are in working order, without visible damage, and the ringing also did not give anything, all that remains is to check the inductor winding.
Repair of compact fluorescent lamps is carried out according to a similar principle: first, the housing is disassembled; The filaments are checked and the cause of the breakdown on the control gear board is determined. There are often situations when the ballast is fully operational, but the filaments are burned out. Repairing the lamp in this case is difficult. If there is another broken light source of a similar model in the house, but with an intact filament, you can combine the two products into one.
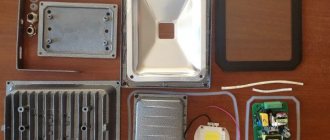
DIY LED replacement
Burnt-out LEDs are often the reason why a light bulb fails.
Usually, after disassembly, you can immediately see which elements are damaged and require replacement. But there are often cases when at first glance all the diodes look normal. Visually recognizing burnt-out LED elements is not difficult. As a rule, they differ from their working “brothers” in that they have noticeable black dots and tan marks
In this case, you will have to use a multimeter and ring each element separately to identify the faulty one. Or remove the elements that raise doubts from the board and test them using wires connected to a 12-volt power source.
When only one diode is damaged, you can simply short-circuit its outputs. If the luminaire uses a chain connection, this moment will not in any way affect the loss of functions of all other elements.
Old, faulty diodes will have to be unsoldered, then the board will have to be turned over and new chips soldered to the visible contact tracks.
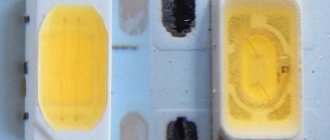
The board always indicates such information as the type and size of the LED used
It is very important to replace faulty modules with similar ones so that the lamp continues to work as correctly as before the repair. In some cases, you can replace the LED without using a soldering iron.
To do this, the board will need to be warmed up well with a hair dryer. The soldering area will become soft and pliable, and the diode can be easily removed using ordinary tweezers
In some cases, you can replace the LED without using a soldering iron. To do this, the board will need to be warmed up well with a hair dryer. The soldering area will become soft and pliable, and the diode can be easily removed using ordinary tweezers.
You will need to install a working light source in a place that has not yet cooled down. When the board cools down well, it will be firmly fixed and will not move anywhere.
The main thing is to clearly remember the location of the element relative to the smaller and larger contacts and place the correct one in compliance with the polarity.
Diagnostics of an electric motor or how to identify a malfunction of the stator and rotor
If there is a suspicion of malfunctioning of the electric motor, then the exact breakdown can be identified using diagnostic measures. To do this, you will need a multimeter, as well as a diagnosable rotor and stator. First, let's find out how to check the suitability of the rotor (aka anchor):
- Carry out a visual inspection. If there are signs of soot and deformation, then there is a high probability that the part has burned out. It is also necessary to inspect the collector unit, on which the presence of soot, chips and distortions is unacceptable. Misalignment occurs when the brushes wear unevenly.
- Use a multimeter to measure the resistance of the armature winding. Set the device to 200 Ohm resistance measurement mode or continuity testing
- One probe should alternately touch the collector plates, and the second should touch the steel core. The presence of resistance indicates a violation of the insulation. To eliminate the problem, you will need to replace the rotor winding
- If a breakdown between the winding and the housing is excluded, then the rotor must be checked for signs of insulation failure. To do this, use a multimeter in resistance measurement mode to check the quality of the insulation between the plates. A mark is placed with a marker from the beginning, and after that the resistance between the plates is checked one by one
- The resistance value should be approximately the same. A difference in resistance value of more than 10% from the standard value indicates an insulation failure. You will need to rewind the rotor winding or replace the part completely
- Interturn short circuit - another cause of failure may be the presence of an interturn short circuit. However, it is impossible to check the presence of such a defect with a multimeter. To do this, a special device is used, which must be guided through the collector. If there is an interturn short circuit, the device will make a corresponding sound. The defect can be eliminated by replacing the winding
If it is determined that the defect is with the armature, then it must be rewound or replaced. If the rotor is working properly, then we move on to checking the serviceability of the stator - a stationary mechanism, which also consists of a winding and a steel core from a set of thin plates.
The algorithm for checking the health of the stator is as follows:
- The absence of breakdown of the winding to the housing is checked. To do this, touch the winding terminal with one probe, and the steel core with the second. The device should not show the resistance value, otherwise a breakdown may occur and the stator must be rewinded
- The resistance in the windings is checked by touching its terminals one by one. The resistance value in all windings should be approximately the same value, which indicates its serviceability
- Check the integrity of the metal plates of the steel core. It is unacceptable for them to delaminate, so you will need to replace a separate unit
It doesn’t matter what brand the jigsaw is - Interskol, Makita, Bosch, Skill, Metabo and others. When purchasing a new motor, you need to take into account its parameters and dimensions. There are markings on the motors that you need to use when purchasing a new electric motor for a jigsaw.
This is interesting!
It is almost impossible to repair the electric jigsaw motor yourself, since this will require rewinding the winding. This can be done at a service center, but the cost of such a service is almost identical to the price of a new part.
Causes of breakdowns
It often happens that table lamps simply stop turning on and working. There are several main reasons for these malfunctions:
- Broken cord. This may be indicated by periodic loss of light or blinking. Very often the main place of damage is near the fork, as it is susceptible to frequent bending.
- Failure of the switch will not allow the circuit to close, which will cause the absence of light.
- Broken wiring near the socket. Very often this occurs due to burnout of contacts that fall out of the clamps.
Diagnosing this is quite simple, which can be done with a routine visual inspection or using special instruments.
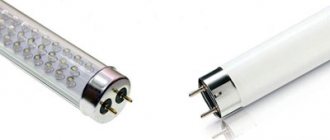
How to repair a fluorescent table lamp
But if you have a fluorescent table lamp on your table (with a so-called fluorescent light bulb inside), the repair technique with it will be somewhat different - more subtle, let’s say.
To repair a desk fluorescent lamp, you will most likely have to use a driver (board with control electronics) from a new inexpensive energy-saving lamp of the same power or from the same lamp that does not light up. It is better to watch the details of this process in the corresponding video below.
Watch an online video on how to repair a fluorescent table lamp:
Materials used in preparation: sprosikak.ru and shutterstock.com
Wiring diagram for Chinese touch switch
So how do the wires connect to this miracle box? First of all, focus on the inscriptions and symbols on the case.
One of the power wires must be interrupted by a switch. Because of this, the lamp actually does not light up.
In this case, it does not matter which wire it is: phase or neutral. After all, as soon as you insert the other side of the plug into the socket, the “timings” will immediately change
In general, connect the conditional phase cable from the power cable to the voltage supply cable to the sensor (black - black).
Connect the neutral from the network to the other power wire of the sensor - red (red). That is, the red and black wires from the box go to the 220V outlet.
White (white) and again black (black) are connected by two wires going to the lamp.
According to the diagram, you need to connect the three ends in one place:
conditional zero from the network
ZERO for sensor
ZERO on the light bulb
The phase is interrupted through the sensor and goes to the lamp with a separate conductor. If you're completely confused, here's a clearer picture.
The general connection diagram is as follows.
After twisting the wires, all contacts must be soldered.
And then wrap it with electrical tape or apply heat shrink.
Everything can be connected to PPE (insulating plugs).
Repair cost, warranty
You pay for the work only after a positive result. We always perform our duties efficiently and make sure that there are no errors in our work. We work so that our clients can enjoy the results!
| price | ||
| PC. | Disassembly and assembly of the lighting fixture | 400 |
| PC | Replacing lamps | 150 |
| PC. | Replacing lampshades | 150 |
| PC. | Cleaning the horn from burnt wiring | 350 |
| PC. | Replacing a button, switch (sconce, floor lamp) | 350 |
| PC. | Replacing the light controller (Dimmer) | 450 |
| PC. | Replacing wiring in a fluorescent lamp | 550 |
| PC. | Replacing the starter socket | 250 |
| PC. | Replacing a round chandelier transformer | 1000 |
| PC. | Replacing a chandelier transformer, lamp | 500 |
| PC. | Diagnostics of the lighting device | 800 |
| PC. | Replacing wiring in a floor lamp | 450 |
| PC. | Replacing wiring in a chandelier, sconce | 300 |
| PC. | Replacing a non-standard cartridge | 300 |
| PC. | Replacing a conventional cartridge | 200 |
| PC. | Replacing the throttle | 500 |
| PC. | Replacing the wiring in the horn | 300 |
How does our company approach the repair of floor lamps and sconces?
You need to call us at the numbers listed on the website and ask the consultant everything you need: cost of services, operating hours, speed of order fulfillment, and so on. Or immediately bring your floor lamp or sconce to our workshop. Our employees fulfill orders within the agreed period.
Type Diagnostics Master's work
Floor lamp or sconce 350 rub. from 1500 rub.
We also have our own warehouse of lighting elements; if you wish, we can provide spare parts and lamps for your lamp.
Tell me what doesn't work
Address of the service center in the Northern Administrative District: Moscow, Khoroshevskoe highway, 24. Begovaya metro station, 2 minutes on foot.
Bottom line
In this article, we examined in detail the typical malfunctions of monitors and their self-repair with examples.
Repair cost
The cost of repairs depends on the availability of parts and their cost. Service centers can charge from 500 rubles for work. A warranty is added to this price, which is usually from 1 month.
When repairs are not cost-effective
If the matrix is broken, repair is not profitable. Its cost starts from 70% of the cost of the entire monitor.
Useful videos on repairs
Post Views: 1,882