How to Remove Grant's Ceiling Light? AutoExpert
The reasons why you sometimes have to remove the interior lamp on a Lada Priora car may be the following:
Expert opinion
It-Technology, Electrical power and electronics specialist
Ask questions to the “Specialist for modernization of energy generation systems”
Replacing the interior lighting lamp of a Priora - All about the Lada Granta For the rear light, it is better to make the LED backlight brighter, and in front put medium-brightness LEDs by the author of the Repair and Tuning video. Ask, I'm in touch!
Replacing the interior light bulb
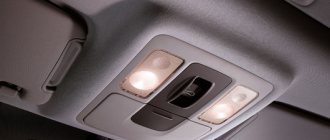
Hi all! Recently, after going fishing, I discovered that the central interior lamp was not working. Having looked at the section “Self-help, car care” in the instructions, I was pleasantly surprised. There on page 201 it is written exactly how to deal with this problem. It turned out that it was enough to remove the entire diffuser and replace the lamp. But no matter how I tried to remove the diffuser, I couldn’t. The lampshade is fixed quite rigidly. And with increasing force, it seems that it may burst. Although the instructions are all easy and simple. Help with advice. Has anyone encountered this problem? Thanks in advance!
it must be removed so that it does not warp. You need to unclip all the latches at once, there seem to be 4 of them, and pull. Also, for convenience, I removed the lid with slots, the one closest to the glass, from there the latches are visible and you can get it with a screwdriver.
A screwdriver is cruel. Well, I thought that the instructions simplified everything too much! This means there are four fasteners, and not two as in the picture. Okay, thanks for the advice! Let's break!
The latches are located differently than in the pictures.. they are located a little further from the edges on the long side.. (displaced closer to each other).. I had sex with them for several minutes before I realized.. now I’ll take them off and put them on with a bang.. you can dive there)))
Added after 3 seconds:
Tanist
I think that you can do without a screwdriver, it all depends on desire and abilities, it’s not for nothing that they say: it doesn’t matter where your hands come from if they are golden
Those. There are only 4 latches: 2 each on the driver and passenger sides. And to pull it out, you need to take the panel somewhere in the middle on both sides, and then carefully pull it down. So? By the way, what is the standard size of the central lamp?
I don’t think it will be possible to drag it in the middle, it fits quite tightly, I dragged it a little from each corner so that it doesn’t warp. In my opinion, the lamp is in the glove compartment and trunk, you can just take them off and have a look.
standard size.. xs.. lamp with two contacts is cylindrical.. in the store they called it “finger”.. now I’ll attach a picture to explain where the latches are..
here... red is where the latches are, blue is where they are marked in the book)))
Added after 3 seconds:
F-ZerO
Oh thanks! I searched there, but only in the “lighting” section. But it was necessary to get into the “crickets”

Added after 5 minutes 59 seconds:
The lamp there is C10W.
I changed the lamp myself, using the information from https://astra-h.ru/noise_potolok.html. I bought a light bulb at BOSCH, for 2 light bulbs - 58 wooden ones.
Guys, I pull this lampshade as indicated in the manual, with the front edge down on both sides. The fingers are sore, the bastard crunches, it bends, but the latches are dead. Can you tell me the secret to removing this lampshade? He even gave me a plastic card. the bastard is tightly latched. I'm afraid to break it.
I soundproofed the ceiling and glued it with Madeleine as per the instructions. Behind the hill they probably also read Astra Fak)) maybe they increased the thickness of the plastic!) When snapping it, the antennae broke off. I had to order a new lampshade. On the new one (removed) I tried to latch it, in general, I opened the cover of the light bulbs (which is transparent) with the help of two screwdrivers, if it was already on the ceiling, I doubt I would have been able to open it without breaking it. The antennae that are attached to the hood are sitting dead, the rear ones are easily snapped off with your fingers.
I did it differently and easier. On the windshield side, the lamp is held on by 2 latches. There are 2 thin holes for them. I stuck a flat-head screwdriver into them, pushed it back a little and at the same time pulled the lampshade down. After releasing the two latches, the side facing the interior can be easily removed from its seats.
Well, this topic was created out of nothing))) I also became a necrophiliac)))
10W 12V 41mm length!! 10W finger 3 or 4 types of different lengths!!
Added after 10 minutes
:
Well, so the topic is not fully covered. But I sorted it out based on how the light bulb burned out 1.) I removed the cover closest to the glass, it simply comes off 2) I removed the farthest (large cover), it also does not threaten to break, it came off quite easily. 3) I removed the volume sensors, there are 4 latches, 2 in front and also opposite the front 2 in the back I felt with a plastic card, it was difficult to remove. 4) and now the glass of the lampshade, the front latches 2 pieces to the left and right of the buttons became deeply visible, carefully removed the front and then the rear ones.
A thin flat-head screwdriver is simply necessary to press the hidden latches, they are in the depths of the lampshade in particular and near the block with volume sensors. Well, warm up the interior in the winter so that the plastic is not too fragile, I also turned on the light bulbs for reading, they heated the lampshade from the inside
Without damage in general, and so on until you take it apart and you yourself don’t understand where to press with a thin screwdriver, you can’t disassemble it on the fly.
Last edited by vanis777; 02/05/2017 at 11:56 am.
Source: astraclub.ru
Choosing a recessed luminaire
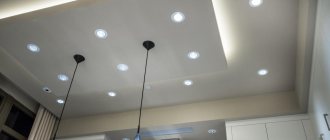
The ceiling lamp can be built-in or overhead. The second model is attached more easily directly to the mortgage hidden under the tension fabric. As for built-in point light sources, there are certain difficulties associated with cutting holes in the tension fabric.
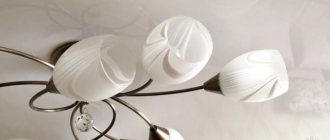
But first things first, let's start with choosing a recessed spotlight. The variety of point models on sale is huge. There are different shapes, decorative finishes, there are even lamps with shades, etc. But regardless of the design, the design of all spotlights is the same:
- the device consists of a housing with a profile ring;
- 2 ear-shaped springs are attached to the body as fasteners.
The case size of each model may vary. The diameter of the hole that will have to be cut in the tension fabric depends on this. Inside the housing there is a socket for a lamp or LED unit.
Round or square?
There is one very important point that requires special attention before choosing lamps. The fact is that the shape of the models can be round or square. The easiest way to install round lamps in suspended ceilings. They are easier to level.
Installing square lights is a little more difficult. Devices on the ceiling will have to be leveled using a laser level, otherwise distortions will be clearly visible from below. However, there is another pitfall.
Not every company will even undertake to install devices with a square body. Cutting square holes on the tension fabric is dangerous; at the corners it can shoot out like arrows and break. If you wish, you can try to install models with a square body only on a fabric stretch ceiling. And then, first, round holes are cut out in the canvas where the mountings for the lamps are located. From the inside, the canvas is glued to the mortgage, and only after the glue has completely dried, the hole is given a square shape.
You can install recessed lighting fixtures with a square body only at your own peril and risk. Square housings are generally not suitable for PVC suspended ceilings, since the film will immediately burst at the corners of the cut hole.
Replacing the interior light bulb
Hi all! Recently, after going fishing, I discovered that the central interior lamp was not working. Having looked at the section “Self-help, car care” in the instructions, I was pleasantly surprised. There on page 201 it is written exactly how to deal with this problem. It turned out that it was enough to remove the entire diffuser and replace the lamp. But no matter how I tried to remove the diffuser, I couldn’t. The lampshade is fixed quite rigidly. And with increasing force, it seems that it may burst. Although the instructions are all easy and simple. Help with advice. Has anyone encountered this problem? Thanks in advance!
it must be removed so that it does not warp. You need to unclip all the latches at once, there seem to be 4 of them, and pull. Also, for convenience, I removed the lid with slots, the one closest to the glass, from there the latches are visible and you can get it with a screwdriver.
A screwdriver is cruel. Well, I thought that the instructions simplified everything too much! This means there are four fasteners, and not two as in the picture. Okay, thanks for the advice! Let's break!
The latches are located differently than in the pictures.. they are located a little further from the edges on the long side.. (displaced closer to each other).. I had sex with them for several minutes before I realized.. now I’ll take them off and put them on with a bang.. you can dive there)))
Added after 3 seconds:
Tanist
I think that you can do without a screwdriver, it all depends on desire and abilities, it’s not for nothing that they say: it doesn’t matter where your hands come from if they are golden
Those. There are only 4 latches: 2 each on the driver and passenger sides. And to pull it out, you need to take the panel somewhere in the middle on both sides, and then carefully pull it down. So? By the way, what is the standard size of the central lamp?
I don’t think it will be possible to drag it in the middle, it fits quite tightly, I dragged it a little from each corner so that it doesn’t warp. In my opinion, the lamp is in the glove compartment and trunk, you can just take them off and have a look.
standard size.. xs.. lamp with two contacts is cylindrical.. in the store they called it “finger”.. now I’ll attach a picture to explain where the latches are..
How to change an interior light bulb
Repair manuals
Victor
wrote on 12/02/2013 There is nothing complicated in this procedure; you need a small flat screwdriver to carefully, without scratching the plastic and upholstery, pry the cover into the groove and systematically open the cover. Then take out the light bulb and go to the store with it - sometimes it can be difficult to find just such a lamp. You can take a different color or power, but you need to look at the limits in the car's passport so as not to install a bulb that is too powerful. In general, it is very easy and any novice motorist can handle it. Good luck to you!
Daniel
wrote on 04/24/2014 Here I’m thinking, will it be difficult to replace the interior light bulb on a Toyota Avensis?
Alexei
wrote on 05/06/2014 Daniil is no more difficult than driving a regular car. Simply the most important thing is to either find someone who has already removed the lampshade or look on the Internet for mounting locations for the lampshade. The main thing is not to pull with terrible force, otherwise you may break off the ears, then the entire lampshade will have to be changed. For example, I changed it on my Toyote Camry without any problems, but on the Mercedes I could hardly remove it, it was too complicated, as it seemed to me. As for the light bulbs, see for yourself which ones to install, but be careful, not all LEDs can fit into the lampshade. Therefore, first remove the lampshade, take the lamp “to try on,” so to speak, and only then buy it. I always do this.
Sergey
wrote on 08/07/2014 Where can you buy such lamps for your salon and at what price?
Natasha
wrote on October 23, 2014 Well, it’s quite simple! I myself am a novice motorist, my car is not yet three months old, but I have already carried out this procedure. In principle, everything is already well described in the video and everything is clear, but I would like to add that when replacing an interior lighting lamp, you still need to be very careful, for the first time I chose a not quite flat screwdriver and because of this Almost scratched the plastic. It would be a shame. By the way, I set the lamp brighter than it was originally, although there were concerns that it wouldn’t fit, but everything worked fine, you just need to look at the range in the car’s passport!
Paul
wrote on 01/23/2015 Where can I buy a diode platform like yours instead of a lamp? Thank you very much in advance for the hint.
Video on how to remove the interior lamp (front rear) on a Skoda A5
Are you replacing light bulbs with diodes in the Octaha's interior? To avoid unknowingly picking apart the lampshade itself, watch the video on how to easily pry the glass in the lampshade with a screwdriver and remove it from the front and back.
What you need for removal: a small screwdriver and 15-20 seconds of your time. A caveat: don’t go there at -30, so as not to break the ceiling mount.
Catalog number of the lamp itself: 6L0 947 105 BY20 and 5JA947105Y20
We insert a screwdriver into the middle of the lampshade, as shown in the video, carefully pry up the glass and remove it. If you need to remove the entire lampshade, unscrew the two bolts. To insert the glass back, first insert the inner part and snap it into place. The rear lamp is removed in the same way as the front one. A visual video to help you.
I took a photo of myself for clarity.
Carefully, without damaging the interior parts, pry off the diffuser with a screwdriver. It turned out that everything was done simply, I was afraid of scratching or breaking it inadvertently.
If a spring has flown out of the interior lamp
During disassembly, a cone-shaped spring flew out, where the board is. The spring presses the switch that can be turned on to open the doors. Remove the lampshade, you can see this spring on the other side. There goes a copper plate.
Important points when removing spotlights
There are important points that need to be known and taken into account when dismantling spotlights. They are as follows:
- If you decide to change LED light bulbs, you need to find out at what voltage they will operate. Manufacturers produce 12V and 220V light bulbs. However, they have no visual differences. Possible power and voltage are indicated on the base of the product or on the packaging.
- When working with halogen light bulbs, it is strictly forbidden to touch them with bare hands. If fingerprints are left on them, the bulbs will quickly burn out. To avoid negative results, you should work with halogens with gloves, using napkins, special grips or tape.
- The retaining ring often does not fit into the groove.
There are several options for the development of events. Maybe you haven't inserted the light bulb all the way and it extends beyond the ring, thereby blocking the grooves. To correct the situation, you need to unscrew the light bulb and insert it again, but correctly. If for some reason the housing is deformed, it must be replaced. It is possible that the arrangement of the springs was disrupted during removal of the light bulb. They, supporting the body, prevent the steel stopper from getting into the grooves. It is necessary to disassemble and reassemble the lighting fixture in the platform. Retaining ring
Replacing the interior light bulb
Hi all! Recently, after going fishing, I discovered that the central interior lamp was not working. Having looked at the section “Self-help, car care” in the instructions, I was pleasantly surprised. There on page 201 it is written exactly how to deal with this problem. It turned out that it was enough to remove the entire diffuser and replace the lamp. But no matter how I tried to remove the diffuser, I couldn’t. The lampshade is fixed quite rigidly. And with increasing force, it seems that it may burst. Although the instructions are all easy and simple. Help with advice. Has anyone encountered this problem? Thanks in advance!
it must be removed so that it does not warp. You need to unclip all the latches at once, there seem to be 4 of them, and pull. Also, for convenience, I removed the lid with slots, the one closest to the glass, from there the latches are visible and you can get it with a screwdriver.
A screwdriver is cruel. Well, I thought that the instructions simplified everything too much! This means there are four fasteners, and not two as in the picture. Okay, thanks for the advice! Let's break!
The latches are located differently than in the pictures.. they are located a little further from the edges on the long side.. (displaced closer to each other).. I had sex with them for several minutes before I realized.. now I’ll take them off and put them on with a bang.. you can dive there)))
Added after 3 seconds:
Replacing lighting bulbs
Technical offers in Kazan such type of services as replacement of lighting lamps. All work is carried out by qualified auto electricians with extensive experience and appropriate approvals. During the replacement, the design features of automotive lighting equipment of a certain make and model of car are taken into account.
Relevance of service provision
Automotive lighting technology ensures safe and comfortable operation of the vehicle at night and in poor visibility conditions. In some cases, it is also used in anti-theft systems and security systems.
Without working lighting devices, operating passenger vehicles in the evening, at night, in foggy and/or rainy weather is difficult and unsafe for all road users. Plus, lighting technology is necessary to indicate the dimensions of the car and warn about intended maneuvers (turning, reversing). There are various malfunctions, electrical equipment may fail due to wear and tear of the wiring, but the main one is burnout of lamps.
Features of the work
Replacing a lamp is a rather specific type of service; the main thing is to choose the right light bulb, depending on its:
- functional purpose;
- design features;
- operational characteristics.
The features of the vehicle's lighting technology and the electrical equipment installation circuits used are also taken into account.
Functional purpose
When replacement is required, the light bulb is selected taking into account the installation location. This is either an outdoor or indoor installation. When installed externally, the lamps are placed in the head optics, side and rear lights.
Depending on the location of external installation, all lamps can be divided into several types. In head optics it is:
- headlight bulb , including elements such as a low beam lamp as well as a high beam;
- lamp size;
- turn signal lamp (direction indicators).
Note that the low beam lamp can be combined with a high beam lamp (two filaments).
Additionally, not all cars at the front still require the installation of lamps for fog lights, daytime running lights (DRLs) and tuning elements, searchlights, spotlights, including rally lights.
The taillights have their own characteristics. Auto electricians at our technical center install such devices as:
- brake light bulb;
- turn signal lamp;
- lamp size;
- reverse light.
Additionally, it may be necessary to replace the lamp of other equipment, that is, elements such as lamp , fog lamps and an additional brake light lamp , but this time the central one.
On the side parts of the car, the lamps in the direction indicators are replaced, and very rarely the parking lamps are also replaced.
Internal installation involves replacing lighting elements for general, local and background lighting in a number of places. Our auto electricians replace items such as:
- interior lamp;
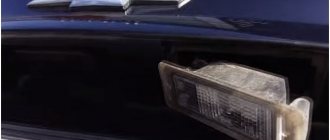
- lamp illumination of the instrument panel, luggage compartment, engine compartment, glove box;
- background lighting bulb (tuning element).
The interior lamp is placed in the ceiling lamp and is necessary for general illumination of the interior space in the car. Local lighting bulbs are needed to illuminate certain areas, including the dashboard, glove compartment, trunk, engine compartment and other places.
Design features
Keep in mind that the headlight bulb , license plate light and other types of lamps differ in design features and their operating principle. Technical specialists install such types of lamps as:
- incandescent (classic option, used less and less);
- halogen (with one or two filaments);
- xenon (including xenon and bi-xenon);
- LED (based on LEDs).
Features of working with different lamps
The range of lighting devices produced today is very diverse. Often, installation and dismantling problems are associated not so much with the processes themselves, but with the unusual designs of pendant lamps.
The type of ceiling covering is also of great importance. The algorithm for working with a suspended ceiling may differ from manipulations with a standard or suspended type of structure.
Removing a chandelier from a suspended ceiling
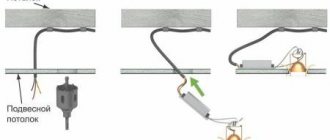
Stretch ceilings are most often found in modern houses and apartments. They are attractive due to their ease of installation, cost and variety of designs. When installing lamps, a special fastening system is often used, which includes a wooden mortgage or a suspended platform. As for the type of fastener, it all depends on the type of lighting device. In order to change the chandelier in such conditions, it is necessary to turn off the power to the room and prepare a stepladder and tools. The further algorithm of actions will look like this:
- cleaning the body (removing all decorative parts, shades, glasses and lamps);
- dismantling the protective cap;
- releasing wires from terminals and insulation;
- checking the absence of electricity in the network (using an indicator screwdriver);
- dismantling the lighting fixture from a hook or strip with careful removal through a slotted hole in the ceiling.
The remaining ceiling wiring must be insulated to prevent short circuits after the power is turned on.
How to properly remove spotlights from a suspended ceiling
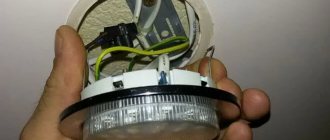
Spotlights do an excellent job of providing additional lighting, replacing outdated wall sconces. Replacing such a lamp in an apartment yourself is quite simple. You just need to strictly follow the sequence of all actions, namely:
- De-energize the room.
- Using a flat blade screwdriver, remove the housing cover and remove the light bulb.
- Carefully pull out the body of the spotlight, if a gap forms, insert your fingers and press the latches, thereby releasing the lamp and dismantling it completely.
- Using a lever or hidden spring, open the terminal block and pull out the contacts.
Removing a spotlight from a suspended ceiling
The instructions for dismantling built-in lighting fixtures from a suspended ceiling differ from the suspended version. Its design is much more rigid, which allows the luminaires to be installed using a spacer system. Such fasteners provide more reliable fixation of the device.
To remove the spotlight, you need to carefully hold the device, pull it out, forming a gap, and then unscrew the base, gaining access to the wiring diagram. Then everything is simple: the contacts are disconnected and isolated.
Why remove the car's dome light?
In fact, there are many reasons for removing the ceiling light in a car; each person finds certain problems or they find it. The process of removing the lampshade is quite simple - it does not involve installing an LED strip in the headlight, which, by the way, can be useful to many car enthusiasts. So, there are the following reasons:
- Replace the lamp with a more powerful one or it has burned out.
- Replacement of the diffuser, which can be easily damaged.
- Checking all contacts in the car when installing the backlight.
- A simple replacement for another lamp if you want to install different lighting in your salon.
As a rule, people try to change such lamps only if they are too bright or dim. You can also install multi-colored lighting, it will always look beautiful. For example, you have a blue LED backlight installed, you can install such a lamp without any problems.
Possible mistakes
Before replacing the lamp, you need to turn off the electricity in the apartment.
The most common mistakes during installation and dismantling include:
- Replacement with power on. This mistake should not be made; it can lead to serious injury.
- Trying to change the lamp immediately after turning off the light. Even LED sources can get a little warm, so you need to wait until they cool down.
- Selecting a radiator with an unsuitable base.
- Touching a halogen lamp with bare hands. There will be traces of grease on the source, which may cause the flask to crack.
- Using higher wattage light bulbs. This problem is especially relevant for halogen lamps. The GU5.3 base does not make good contact with lamps above 40 W, so it is better to use fluorescent or LED sources. It is not recommended to install lamps with a power higher than 35 W on suspended ceilings.
It is important to pay attention to the choice of lamp. You should carefully inspect the device for defects and check the strength of its parts. It is not recommended to buy cheap LED sources from unknown manufacturers
It is not recommended to buy cheap LED sources from unknown manufacturers
Such products can quickly fail, do not meet the declared characteristics, and have flickering. It is better to purchase a lighting device from well-known companies
It is not recommended to buy cheap LED sources from unknown manufacturers. Such products can quickly fail, do not meet the declared characteristics, and have flickering. It is better to purchase a lighting device from well-known companies.