| To remove the interior lamp, you need a pull hook, for example, 3370 or HAZET 2520-1. For this purpose, you can also use a plastic wedge, for example, HAZET 1965-20 (refer to the illustration below). |
| EXECUTION ORDER |
|
Front dome light/reading light
| EXECUTION ORDER |
|
|
|
Replacing the reading light bulb
| EXECUTION ORDER |
|
Replacing the ceiling light bulb
| EXECUTION ORDER |
|
|
Rear reading light
| EXECUTION ORDER |
|
Replacing an incandescent lamp
| EXECUTION ORDER |
|
Glove box light
| Some lamps, such as the door signal lamp, entrance lamp, front footwell lamp and trunk lamp (sedan), are removed in the same way as the glove compartment lamp. |
| EXECUTION ORDER |
|
|
|
Replacing an incandescent lamp
| EXECUTION ORDER |
|
|
Cargo compartment light (Station wagon)
| EXECUTION ORDER |
|
|
|
Replacing an incandescent lamp
| EXECUTION ORDER |
|
|
We recommend: 6 reasons why the air conditioner in the car began to work poorly
Tailgate light (Station wagon)
| EXECUTION ORDER |
|
|
|
Replacing an incandescent lamp
| EXECUTION ORDER |
|
Rear footwell lamp
| EXECUTION ORDER |
|
|
Replacing an incandescent lamp
| EXECUTION ORDER |
|
|
Vanity mirror lighting
| EXECUTION ORDER |
|
Replacing an incandescent lamp
| EXECUTION ORDER |
|
Door handle lighting
| EXECUTION ORDER |
|
| Follow the instructions in Section Replacing the battery. |
- Remove the door trim, refer to the Section Removing and installing the front door trim.
- Remove the lamp (1) from the holder on the door trim.
- Disconnect the lamp connector (2).
- Installation is performed in the reverse order of removal. At the same time, insert the lamp into the installation opening and secure it.
Reasons for replacing the interior courtesy lamp
As a rule, most drivers do not pay attention to the interior lamp as long as its operation completely suits them.
Therefore, the procedure for dismantling the lampshade may be due to the following reasons:
- The interior lighting has stopped lighting - this occurs both due to a burnt-out light bulb and due to a lack of contact at the input of the lamp itself.
- Insufficient lighting - in most cases is due to the fact that low-power or outdated devices are installed in the ceiling, producing a weak luminous flux. It can also occur due to the burnout of any part of the lighting devices in the ceiling.
- Flickering of the lamp - occurs due to poor contact or malfunction of the LED lamp driver. To diagnose the cause, it is necessary to remove the ceiling light.
- A broken lens glass or a cracked lamp housing is caused by careless actions of both the driver and passengers. It also occurs during the natural aging of plastic and the loss of its mechanical properties.
Regardless of what reason led to the need to dismantle the lampshade, you should take this procedure as carefully as possible, since careless actions can easily cause damage to both the lamp itself and the ceiling lining. Which will entail additional costs for their repair and restoration.
Reasons for withdrawal
The main reasons for this event may be the following:
- replacing a damaged lens;
- replacing the light bulb with a more powerful one;
- checking contacts (if the light does not work);
- complete replacement of the lighting device.
To ensure that you do not damage the integrity of the mounts, diffuser, interior trim or the light bulb itself, you need to carefully dismantle it, which we will talk about later.
What should you pay attention to before removing the ceiling light?
Before working with the side or central lamp, be sure to remove the power terminal from the car battery, as this may result in a short circuit in the circuit. Which can lead to additional damage and a seemingly simple procedure will result in a number of unexpected costs.
Before removing the lampshade, you will need to inspect the outside where the diffuser is attached to the body. As a rule, these are small depressions into which you can insert a screwdriver or some other flat object.
Rice. 1. Lock on the lamp
In each car model they can differ radically. But the most common are mechanical clamps and spring latches. The mechanical clamp can be easily opened using a screwdriver or other flat object. The spring latch can also be opened by pressing on it with a screwdriver or other object that can penetrate the hole.
It should be noted that at this stage the movement of the diffuser should be as easy as possible. If, after disengaging the lock, you cannot easily separate the diffuser from the lamp body, then somewhere there is an unreleased fastening unit. Therefore, it is better to check the entire body again, it is quite possible that there is an unnoticed lock somewhere, perhaps it is covered by a casing or a sticker. There is also a possibility that while opening the lock on one side, the lock on the opposite side could return back into the groove.
Because with enough force, you can simply break the diffuser, damage the lamp housing, or tear it out of its place of fixation. Depending on the design features, the outer glass can be removed separately, leaving the lampshade itself in its socket, or the entire lamp can fall out completely.
To remove glass you can use:
- A screwdriver or a knife - selected in accordance with the characteristics of the lamp;
- A special spatula - as a rule, it comes with the lampshade or is sold in specialized stores;
- Manually - if the design allows, you can remove the diffuser with your hands by pressing on certain areas of the lampshade or on the latches.
It should be noted that the impact of a metal tool on plastic elements is fraught with the appearance of scratches and the subsequent loss of external aesthetics by the lampshade. To prevent such phenomena, you can place a plastic bag under the screwdriver so that it is located between the screwdriver and the body.
Rice. 2: Place the bag under the screwdriver
In order to figure out how to remove the interior lamp, consider this manipulation using a specific example.
Selection of material
The most popular solution is the use of glass shades. This design is transparent, allowing free passage of light. They are easy to care for and, at the same time, varied in style and color.
But glass is a fragile material and can easily break under mechanical stress. Therefore, such models are not recommended for installation in children's rooms.
An alternative to glass when searching for the best shades for modern chandeliers can be plastic products. Of course, they are not as expensive and look less presentable, but the visual similarity and variety of design skills will allow you to choose a design that is perfect for an apartment decorated in a high-tech style.
Fabric modifications will help create a cozy and homely, calm atmosphere in the apartment. They look original and will fit perfectly into the bedroom interior. However, the lampshade will be demanding to maintain - the fabric is prone to absorbing dust and odors. Over time you will have to change it.
For lovers of ethnic and oriental notes in design, there are paper products that are distinguished by their aesthetics and originality. True, they cannot boast of durability.
Step-by-step instructions for dismantling the lampshade
To do this, consider upgrading your interior lighting. The following example shows the replacement of a conventional incandescent light bulb in a lampshade with a more modern and efficient NIGHTON ML-6 LED board. This replacement will be relevant for the interior of Chevrolet Aveo, Daewoo Matiz, ZAZ VIDA with the same type of lampshades. This technology for dismantling the ceiling lamp will be relevant for other brands of cars. Carefully study the external design of the lamp.
Rice. 3. Lamp for dismantling
As you can see, near the switch there is a small groove, highlighted in the figure with a red circle. In order to remove the diffuser, it must be pryed off with any flat object. In this example, you pry up the lampshade with a knife and apply a little force towards the inside of the cabin.
Rice. 4. Pry off the glass with a knife
Please note that the knife should fit easily into the hole, but you will also need enough width. Since the thin fabric creates a large load at the pressure point. Also, you should not apply force only from the edge, since if it slides, the plastic may chip and you will damage the lampshade. Gently press down and remove the diffuser.
Rice. 5. Remove the glass
As you can see in the picture, you will see the lamp itself without glass. In this example, the housing is fastened with bolts on both sides of the ceiling lamp. To remove them, you will need a Phillips screwdriver of the appropriate size.
Rice. 6. Unscrew the mounting screws
To remove the fastening screws, jerking movements are not allowed, which could damage the bolt or cause the screwdriver to slip off. If excessive force occurs, you should first remove the lamp so as not to break it with a screwdriver or damage your hands or eyes from fragments.
Rice. 7. Unscrew the second screw
When unscrewing the second screw, it is better to hold the case with your fingers to prevent it from uncontrolled falling out. Since this can also break the light bulb or damage the housing.
Rice. 8. Take out the light
After unscrewing the bolt, carefully separate the lamp from the casing. At the same time, it should come off easily without any effort. If this does not happen, there may be an additional attachment point that you missed. Then inspect the surface again; you may need to pry it a little to determine the location of fixation.
Rice. 9. Power cord
After the lamp is separated from the casing, it is necessary to disconnect the power cord. If they have a plug-in fixation, then it is enough to open them; if they have a bolted fixation, they need to be unscrewed.
Also make a note of which wire goes where, as you will need to reconnect them. In this situation, the power wires for the lampshade are multi-colored and easy to navigate. If they all have the same color, they can be marked with a marker or electrical tape, depending on what you have at hand. The main criterion for such spontaneous marking is that you can easily determine the original location of the wires in the lampshade.
Parts to improve the lighting of the rear of the car
The closest “relative” of the Polo sedan in the model range of the German concern, which can boast of rear lighting, is the Volkswagen Passat. The expensive “German” Poliku still has a long way to go. But considering that the “Kaluga resident” is gradually acquiring Jetta’s character traits, everything is not so hopeless for the young “state employee”. Moreover, in the skillful hands of an experienced fish specialist, a “native” from the Kaluga plant can easily turn from an ugly duckling into a beautiful swan. Subject, of course, to the availability of financial resources.
In the cabin, one of the first steps towards transformation may be the installation of lighting on the ceiling for rear passengers. With an elegant lampshade, the sedan's spartan interior will look stylish and lively. Well, you shouldn’t forget about the practical benefits of internal equipment parts either. If, God forbid, something falls into this “Dante’s hell” (a pen, keys or other small thing), it will never return. At least until dawn.
The set of parts required for installation includes:
- Courtesy light VAG (3C0947291EY20). Today a lighting device costs about 1,700 rubles.
Installation frame for fixing the device to the ceiling (1K0867599D). A branded VAG will cost about 230 rubles.
Special connector (3B0972705) with three contacts (N10335807). All together will cost 300-400 rubles.
Standard cheap male-female terminal (20-30 rubles).
Those who are used to saving on energy can replace conventional light bulbs in the ceiling with LEDs. There are three elements installed inside.
Why remove the car's dome light?
In fact, there are many reasons for removing the ceiling light in a car; each person finds certain problems or they find it. The process of removing the lampshade is quite simple - it does not involve installing an LED strip in the headlight, which, by the way, can be useful to many car enthusiasts. So, there are the following reasons:
- Replace the lamp with a more powerful one or it has burned out.
- Replacement of the diffuser, which can be easily damaged.
- Checking all contacts in the car when installing the backlight.
- A simple replacement for another lamp if you want to install different lighting in your salon.
As a rule, people try to change such lamps only if they are too bright or dim. You can also install multi-colored lighting, it will always look beautiful. For example, you have a blue LED backlight installed, you can install such a lamp without any problems.
Cosmetic mirrors
Their lighting is not built into all models and is not available on all brands of cars. However, if there is an appropriate light bulb, it should work, and more stable than all other lighting devices. It is unlikely that your family life will remain cloudless if your precious “half” does not get the opportunity to make sure that she, as always, is on top.
Why is there a lamp in the car?
A lamp is called a lamp that is installed under the ceiling of a car and creates a luminous flux that illuminates the interior of the car at night. The lampshade is an inconspicuous, but very necessary device. It is he who helps to count money in a car or find an item lost in the car.
Such lighting provides not only single, but also group placement of lamps. So a car can have a whole set of lamps that illuminate not only the driver’s seat, but also the rear seats.
The placement of lampshades also has a slight variety. Thus, in classic VAZ models, the first lampshades were mounted on racks between the doors. They emitted a small luminous flux, and therefore they only analyzed whether the car doors were open or not. Then, in front-wheel drive cars, more advanced lampshades began to be used, consisting of a plastic diffuser and a powerful lamp. Later, the LED version of the lamp began to be used to improve interior lighting.
Ceiling reupholstery
The ceiling is one of the weak points in a Priora car. It is easy to damage, scratch, burn and smudge. As a result, when tuning the interior of a Priora hatchback with your own hands, you must redo the ceiling.
The simplest way is to cover it with artificial suede - a self-adhesive velvet non-woven film. Tuning includes several stages:
We disassemble the interior, remove all rubber bands, seals and interior elements. To remove the ceiling, it is necessary to dismantle all racks, clips, passenger handles, visors, and other fasteners. It is necessary to disconnect the power supply to the backlights. We pull out the ceiling that is sagging
We need to be careful, so we lower all the chairs. We paste the plastic ceiling using self-adhesive tape. We install the ceiling in place.
Thus, our efforts in tuning the car will not be in vain. We will update the interior and give the car its own character.
How to remove the interior lamp yourself?
This question usually arises only for beginners who have recently started driving; car owners with extensive experience are usually familiar with all the tricks, unless, of course, they prefer a personal driver. However, before answering this question, let’s ask another – why is this necessary? After all, different situations require different actions. If you want to change a light bulb, the operation scheme will be standard; if the lens has burst and requires replacement, you will not have to remove the lampshade at all.
But let's return to the action plan and consider it step by step, and only then decide for what purposes this knowledge can be used. Before removing the interior lamp or changing a light bulb, which is much easier, you need to separate the diffuser from the base
. Usually it is held by spring clips or on fasteners-flags; in the first case, it is enough to pull the cap, in the second, you need to carefully pick it up with a “minus” screwdriver.
Sometimes the lampshade and diffuser are removed in one movement, since they form one whole.
And here in front of you is the lighting filling itself, you can change the light bulb. Determine the light source, depending on the type you will have to remove it from the socket by pressing the spring clip if it is an incandescent lamp, or disconnect the wires from the contacts of a fluorescent lamp. The second option involves first removing the casing that protects the power terminals by unscrewing a pair of screws. The lampshade itself is usually held in place by 2-4 screws, by unscrewing which you can easily remove the housing from the hole in the casing. Next, all that remains is to disconnect the wire connector.
Correct dismantling
Depending on the make and class of the car, removing the interior lamp can be done in different ways. The reason for this is the different design of the diffuser mounts. Today, products secured with special flags and spring clips are popular. In the first case, you just need to pull the transparent cover towards you. In the second, using a thin minus screwdriver, you need to pry off the cover in specially designated areas (we have highlighted them in the photo).
Please note that dismantling must be carried out with extreme caution. It doesn't take much force to remove the diffuser, so if there is resistance, it means you're doing something wrong. It is better to re-examine all the joints; perhaps the hole for the screwdriver is hidden somewhere else.
It should also be noted that sometimes the lid is removed by itself, and sometimes along with the “internals”. This depends on the design features of the device. As soon as you remove the first obstacle, a new one will appear - a light bulb. Depending on the type of base, the lamps can turn off in different ways: if you press on the spring or simply disconnect the contacts.
Next, you need to remove the car interior lamp with your own hands. It is usually secured to the casing with several screws (2 to 4) or a mechanical latch. Here you need to be extremely careful, because the electrical wiring from the battery is connected to the housing. All you need to do is disconnect the contacts.
Another important tip is to mark the wires for yourself, because you will have to install the interior lamp in the old place after the repair work. To do this, you can use electrical tape of different colors or a marker.
How to remove a courtesy light in a car
It is worth noting that there are a large number of different car brands, almost all of which have different removal methods. But, there are tricks that can be safely applied to all cars. In this article we will not talk about how to remove the ceiling light in the interior of a domestic car, this includes: 2101, 2105, 2106,2199, etc. – if you have such a car, try to find another article. Find out what types of electrical circuits there are.
Initially, we recommend watching a video on how to remove the ceiling light in the cabin, after which we will tell you a few more tricks.
There are two main ways to remove the lampshade, we will talk about them separately.
Nowadays the most popular products are attached to special flags with a spring clip. To open them, just pull the transparent cover towards you a little, this is how it looks in the photo.
The second option is when you need to pry a little with a screwdriver, you should notice a special hole. If it is not there, read on.
If you start trying to remove the lampshade using these methods, but nothing works, don’t try. Remember, the lampshade is always easy to remove; if nothing comes out, it means you are doing something wrong.
A very rare option is when you need to press the lampshade inward, loosen it a little and pull it out. This also happens, but it is very rare, so we do not place any emphasis on it.
After you have pulled out the lamp, be aware of the wires and turn off the power to the battery initially, it can short-circuit the wiring in the car. Sometimes, to change a light bulb, you just need to unscrew and insert a new one - this is an easy way. It can also be more difficult when all the wires are fastened with special terminal blocks, they need to be disconnected. Do this carefully, they are very easy to damage.
So we told you how to remove the ceiling light in the cabin and looked at the main methods. There is nothing complicated, but remember, if it doesn’t work, don’t touch it, you’ll only break it.
What to do if the lights are turned off.
Content
How to remove the interior lamp? Where to start and how to end this process? It should be noted that the work itself depends little on what kind of car you have. In all cases, the lampshade is usually secured with clamps - one or more.
The brand only affects the number of lamps in the cabin. In any case, before proceeding with the replacement, you should disconnect the ground. It won’t jerk you too much, even if the battery is in working condition (especially with the engine turned off). But the feeling in this case, frankly speaking, is not pleasant. So, it’s better to remember about an unloaded gun, which, by definition, can fire once in a lifetime! Let's consider, as an example, replacing light bulbs in various places in the car interior, for which it is necessary to first remove the lampshades protecting them.
Why and how is the lampshade replaced?
The need to replace a lamp appears if it clearly shows signs of mechanical damage, in the event of an electrical malfunction, or when the driver wants to install a more powerful lighting device.
There are cases when one of the elements of the lampshade is lost, and spare parts from the lampshades of the new and old model are simply not interchangeable. In this case, you have to change the entire device.
- Mechanical failures : they are usually understood as any violation of the structure due to mechanical influences - damage to fasteners, chips, scratches, etc.
- Electrical faults : often result from mechanical damage. Electrical faults can manifest themselves as insufficient contact due to incorrect position of the contact group. Another malfunction is a short circuit between the contacts. In this regard, further operation of the lampshade is not only unacceptable, but also dangerous.
In fact, replacing the lampshade is not difficult at all. To do this, it is necessary to determine the method of mounting the lamp and take appropriate measures. Most often, fastening screws are installed inside the lamp, and the diffuser acts as protective glass. Another method of fastening is latches, as well as plugs, under which the fasteners are located.
To change the lamp, you need to remove the diffuser. It can be attached using latches or by means of axial projections on its surface. Open the lamp housing and remove the diffuser. Now, to avoid damaging the electrical circuit, disconnect the negative terminal of the battery. Then remove the lamp from the fixture. It is attached to the contacts, so removing it will not be difficult. Next, unscrew the screws securing the lampshade to the ceiling and remove it. In some cases, open the fastening latches using a flat tool and remove the lamp from the ceiling mount. Disconnecting the wires will be necessary in any case, but the sequence of this operation depends on the length of the wire and the installation method.
Now let's consider a replacement with changing the lamp to a more powerful one. Before starting this procedure, try changing the lamp in an existing device. Most likely, this was the main problem. If you are still unhappy with the result, you can change the entire lamp. To do this, you need to remove the old one using the same method and try on the new lamp. It is quite possible that the dimensions of the new one will be a little larger, and the electrical circuit may change, although the connection method will remain the same.
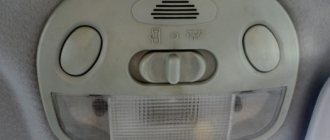
Main front lamp
You should take care of it first (in your own interests). In the evenings, this source is the driver’s best friend. Especially if you need to write something down or find something, and daylight is no longer enough. It's funny that this lamp is attached simply, with just one clip. True, on new cars there are as many as three light bulbs, so it is more convenient to change them by removing the entire structure.
The lampshade is pryed off with a screwdriver from the side opposite the windshield and smoothly pulled towards you by hand. As a result, you have a lighting fixture hanging on wires. The protective panel can be removed by hooking your fingers on both sides. The main light bulb is immediately visible, the side ones are located on the sides, in sockets that can be unscrewed by turning 45 degrees counterclockwise. The entire procedure of changing and pulling out followed by putting it in place takes a few minutes at most.
How to remove the interior lamp yourself?
This question usually arises only for beginners who have recently started driving; car owners with extensive experience are usually familiar with all the tricks, unless, of course, they prefer a personal driver. However, before answering this question, let’s ask another – why is this necessary? After all, different situations require different actions. If you want to change a light bulb, the operation scheme will be standard; if the lens has burst and requires replacement, you will not have to remove the lampshade at all.
But let's return to the action plan and consider it step by step, and only then decide for what purposes this knowledge can be used. Before removing the interior lamp or changing a light bulb, which is much easier, you need to separate the diffuser from the base
. Usually it is held by spring clips or on fasteners-flags; in the first case, it is enough to pull the cap, in the second, you need to carefully pick it up with a “minus” screwdriver.
Sometimes the lampshade and diffuser are removed in one movement, since they form one whole.
And here in front of you is the lighting filling itself, you can change the light bulb. Determine the light source, depending on the type you will have to remove it from the socket by pressing the spring clip if it is an incandescent lamp, or disconnect the wires from the contacts of a fluorescent lamp. The second option involves first removing the casing that protects the power terminals by unscrewing a pair of screws. The lampshade itself is usually held in place by 2-4 screws, by unscrewing which you can easily remove the housing from the hole in the casing. Next, all that remains is to disconnect the wire connector.
Lighting from behind
New cars, even budget ones, usually have autonomous lighting for those sitting in the back. And if it doesn’t work, and you want to hear less whining from the children shoved onto the back sofa, it’s better to fix it before you leave - nerves are more expensive. It's a little more hassle than changing a light bulb on a vanity mirror.
The lampshades here are wider, so there are more latches on them: there are 3 of them on the side opposite the switch. Each one is pryed off with the same screwdriver. There are two latches next to the button - they also need to be released
. Now the lampshade gently pulls down - and you gain access to the burnt out light bulb.
Obviously, the removal procedure is simple and easily accessible. And you shouldn’t go to a service station with such small things, since probably even a schoolboy can remove the interior lamp.
Smooth turning off of the interior lights as a reason to remove the lampshade
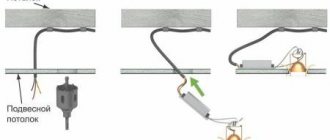
As a rule, a light under the ceiling of the car is connected to the door closing mechanism and automatically turns on and off depending on whether you slammed the door or opened it. But often the light comes on suddenly and also goes out immediately. And this is inconvenient if you drive into a dark garage and, after getting out of the car, have to find the light switch, but don’t want to leave the door open. You can correct the situation by installing a small scarf in the interior lamp with several radio components connected in a circuit
The diagram is easy to find on the Internet, although ready-made devices are also sold that ensure smooth switching off of the lights in the cabin. For example, there is an option with six resistors, two transistors and one capacitor. The outputs are connected to a 12 V power supply, that is, the on-board electrical network powered by a car battery is quite sufficient. How smoothly the light fades in the cabin will be depends on the capacity of the installed capacitor; the larger it is, the longer the light lasts. When the door is open, the capacitor is charged, the circuit is completed, if the car is closed, the circuit breaker will open and the current from the capacitor will feed the lamp for a certain time.
How can I use the interior lamp?
The most interesting things are atypical solutions, when a familiar thing begins to be used not quite for its intended purpose, but no less effectively. In particular, the ceiling lamp can provide not only smooth switching on of the light in the cabin with a little modification, but also in the same way become a power source for the DVR. Initially, a charger from a cigarette lighter with a USB socket is provided for this purpose, and it is this that can be used with a slight modification.
To begin with, two wires are soldered onto the external contacts, since there is a fuse inside and does not leave any room for action. We wrap it with electrical tape, albeit unsightly, but securely. As a rule, the lamp has 3 contacts, one for “plus” and two for “minus” (constant and active when the doors are opened). We need a constant one, we find it and solder the wire from the corresponding charging terminal, and we also connect the “pluses” of the lampshade and the adapter. Then we remove the charger under the ceiling trim and run the USB cable from the recorder there.