A chandelier is the most common type of lighting fixture for spacious halls and living rooms. Typically, this bulky and luxurious device operates in several modes, providing economical or full lighting with one, two or more installed bulbs.
The product requires painstaking care - from sweeping away dust and washing lampshades to replacing electrical wiring. During the repair work, the device is removed, so below we discuss the question of how to remove a chandelier from the ceiling without damaging the structure.
Main stages of dismantling
The general scheme for dismantling a chandelier does not depend on the materials used to make the ceiling. First, you need to prepare well and be sure to turn off the power to your apartment/private house (at least the room from which the device is removed).
The correct sequence of actions is as follows:
- Gather the tools needed to dismantle the old lamp and install the new one. Carefully inspect the design of the future chandelier and make sure there are no defects.
- Turn off the power supply to the room/apartment with a switch inside the distribution panel, usually located in the vestibule or entrance (on the site).
- Check if everything was done correctly by turning on the lighting devices and connecting electrical appliances to the outlets. Ideally, you need to use a tester (or a simple indicator screwdriver).
- Despite the power being turned off, work must be carried out wearing protective rubber gloves designed for operation under voltage of 220 V.
- Unscrew the old chandelier and, provided the fasteners are the same, fix the new one to the ceiling. If the holders are different, then the work will become much more complicated.
Connecting electrical wiring
Step by step steps:
- completely turn off the electricity in the room;
- bring the wires out through the hole;
- for convenience and free control with your hands, hang a chandelier;
- remove the protective sheath from the power cable, measure the required size of cores for placement in the terminal box;
- clean the ends of the wires by 0.6 cm, fix them in the terminal box: the color of the cable corresponds to the shade of the terminal;
- close the box lid;
- assemble the lighting fixture.
All twisted cables are placed in a plastic corrugation. This will protect against overheating and short circuit.
Preliminary preparation
Changing the interior, making repairs, breaking down – there are countless reasons why people decide to replace an old chandelier with a new one. If a similar need arises, you can go two ways - call an electrician you know or try to do everything yourself.
In the second case, you need to read the instructions for dismantling a specific chandelier from a specific ceiling and be sure to follow safety rules.
After the voltage at the switchboard is turned off, you will have to prepare the necessary tools. During the work you may find it useful:
- indicator screwdriver;
- stepladder or stable chair;
- wire cutters, pliers and a stationery knife for removing insulation.
Installation of new equipment
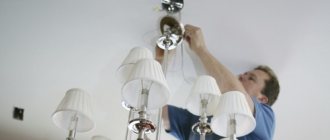
The answer to the question of how to change a chandelier on the ceiling is actually a fairly simple technology. After the old lampshade is removed from the ceiling, you can begin hanging the newly purchased one. This operation is also performed in several stages. After installing the hook or strip:
- carefully clean the ends of the wires protruding from the ceiling;
- spread them apart;
- turn on the machine in the dashboard;
- check each wire using an indicator, thus determining the polarity;
- turn off the voltage again;
- Mark each wire with electrical tape of the appropriate color.
How to remove the shade from a ceiling light? ServiceYard - the comfort of your home is in your hands.
Sometimes it becomes necessary to completely dismantle the old lamp and hang a new one. Dismantling is also necessary during repairs - instead of a chandelier, an ordinary socket is hung. For such work it is not at all necessary to invite an electrician, but safety precautions must be observed.
Expert opinion
Viktor Pavlovich Strebizh, lighting and electrical expert
Any questions ask me, I will help!
If you decide to hang a new ceiling lamp, you first need to remove the old chandelier, completely dismantling the structure and leaving only the input wires on the ceiling. If there is something you don’t understand, write to me!
Dismantling the elements that make up the chandelier
When you have collected all the necessary tools, visually examine the chandelier. Once again, make sure that there is no voltage, and then begin to remove all hanging elements from the device, which include glass decorations, lampshades, etc.
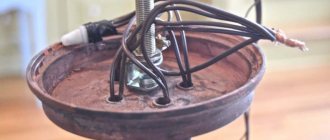
Be sure to unscrew the light bulbs from the sockets and remove the cover under which the wires are hidden. The remaining parts used to connect the device to the electrical network are located under a decorative cap secured to the base of the ceiling with a screw.
Step-by-step instruction
The entire process of dismantling a chandelier with your own hands can be represented in the form of a simple algorithm of actions:
- Power outage.
- Preparing tools.
- Removing decorative elements, shades, and light bulbs from the chandelier frame.
- Dismantling the decorative base.
- Disconnecting wires.
- Fastening works.
- Removing the frame from the ceiling.
- Insulation of exposed contacts.
Despite the apparent simplicity of the actions, each stage is characterized by its own nuances.
We remove lampshades, decorative elements and components
After completely turning off the light from the input panel, you can begin to “disarm” the lamp. The design of most lighting fixtures is similar. It includes the following components:
- decorative cap (cup);
- wires;
- frame made of metal or plastic;
- lampshades;
- light bulb sockets;
- hanging decorative parts (depending on the model).
First, all hanging elements and shades are removed.
The second stage is incandescent lamps or their LED analogues. Next, the ring or washer securing the cap is unscrewed and the latter carefully goes down, providing access to the connection diagram.
Important! In small rooms, they often use not massive hanging chandeliers, but plate lamps that are closely adjacent to the ceiling panels and take up little space. During their dismantling, it is necessary to carefully unscrew the bolts holding the single lamp using a screwdriver. Then you need to remove the lamp and the cover under which all connections are located.
De-energize and disconnect the wires
The room is de-energized at the very beginning of work. To do this, you can use a switch, but it would be more expedient and safer to turn off the circuit breaker.
Disconnecting the wires is quite simple. When twisting and manual insulation, it is enough to carefully cut off the layer of insulating tape with a knife and disconnect the chandelier contacts from the wiring cables.
When using terminal blocks, you need to press the lever or release the spring (depending on the clamp model) and release the contacts.
Removing the chandelier from its mount
There are several ways to remove a chandelier from the ceiling. It all depends on the method of its initial installation.
Hook
An anchor hook is the most common method of installing ceiling lights. In this case, removing the chandelier is very simple. It is enough to lower the closing cap, stick your hand into the hole, feel for the hook and carefully remove the chandelier frame from it. Then disconnect all wires.
Dismantling the chandelier mount
Not only the wires are hidden under the decorative cap, but also the fasteners necessary to securely fix the device to the ceiling. There are two standard options for mounting a chandelier - a hook and a cross-shaped bar. In the first case, everything is much simpler than in the second, where there is a need for additional tools - wrenches of the required sizes.
Before removing the chandelier mount, remove the insulation and disconnect the wires. The latter necessarily move in different directions. When the chandelier with the mount is removed, turn on the power and use a tester to check each exposed wire. Insulate them by marking phases and neutral.
How to clean a fabric lamp without removing it from the ceiling
Having previously cleaned the lamp from dust using a stiff brush, the fabric surface is treated with a special solution, which each housewife can prepare independently. You will need half a tablespoon of ammonia, a tablespoon of water and the same amount of boric acid. The resulting slurry is applied to the lampshade and left for some time.
Armed again with a stiff brush, the cleaning agent is swept off the surface of the lamp and coated with a homemade antistatic agent. A tablespoon of vinegar is mixed with six tablespoons of water and a teaspoon of soda. The antistatic agent is applied using a soft brush.
Features of dismantling depending on the type of device
Not only chandeliers, but also other lighting fixtures are installed on the ceilings of living rooms, halls, bedrooms and other living rooms. Moreover, the dismantling process depends, among other things, on the design of the ceiling itself. Recently, suspended and suspended ceilings have become widespread.
Removing a spotlight from a suspended ceiling
Such work can be done independently without calling an electrician. The main thing is to follow the sequence of actions exactly. Use a screwdriver and remove the installed light bulb from the housing. Insert another screwdriver into the hole where the light bulb was, then carefully pull out the housing. Stop as soon as you can get your fingers inside the hole to press the latches (latches) and remove the device from its seat.
Unscrew the screws from the terminal block and pull out all the contacts. All actions must be performed without haste, carefully so as not to damage fragile structural elements, including fixing latches. If you do not hold them, they will fall back and are likely to damage the ceiling structure.
Often, a spotlight is dismantled to be replaced with a new lighting fixture. The installation process also requires strict adherence to the sequence of actions. Disassemble the device and put a temperature protection ring on it, and then insert the device into the finished hole, securing it with the same clamps.
Connect all wires to the terminal block, securing them with screws. Make sure that the connections are made strictly according to the color markings. Close the contacts with special caps and place them in a box with a lid. Install a light bulb inside the spotlight, and then check the operation of the device by connecting the electricity.
Often there is a need for a banal replacement of a failed light bulb. In this case, there is no need to dismantle the lamp, but you must turn off the current. Unscrew a halogen or regular light bulb. If the device uses an LED product, you will need to move the clamps, remove the thermal ring and pull it out of the housing.
Hold the ring firmly to avoid springing back. Use gloves when removing halogen lamps, as greasy marks left on the glass body can significantly reduce the life of the device. Instead of gloves, special wipes are suitable. To install the light bulb, follow the reverse sequence of steps.
Removing a spotlight from a suspended ceiling
Suspended ceilings are much harder than stretch ceilings. Most of them are constructed from durable sheets of plasterboard, which affects the process of dismantling spotlights and other lighting fixtures. Before dismantling, select a new device that will be installed in place of the old one.
To securely fix the housing in suspended ceilings, products with spacers are used - two springs are placed opposite each other. Hold the device on both sides and pull it out of the frame to a certain distance so that there is enough space to unscrew the base. If you need a simple replacement of a light bulb, then these steps will be enough - unscrew the lamp and install a new one, then return everything to its place. Be sure to press the spacers against the base, and then insert the device into the seat. When the springs are released, the fixation occurs and the device remains in the ceiling.
Often, replacing a light bulb may require complete dismantling of the lighting fixture. Hold the product at either end and pull down using minimal force. When you notice the springs, compress them so that the lamp leaves the holes without any problems. Hold the springs firmly to prevent them from slipping out and injuring your hands.
Removing a chandelier from a suspended ceiling
Chandeliers can even be installed on suspended ceilings, for which special fastenings are used. Dismantling such devices is a more difficult task compared to removing spotlights, so there is often a need for help. Before starting work, turn off the power to the room.
The further process depends on what fasteners were used to mount the device. In any case, you will need to get rid of the protective cap to reveal the insulated wires connected to each other. Remove the insulation and double check that there is no electricity by applying an indicator screwdriver to the various contacts. Disconnect all wiring and remove the chandelier hanging on the hook. All the same is done for installing a chandelier with a similar mount.
Instead of a hook, a cross-shaped bar can be used. The sequence of actions will be almost identical. The only change is that after disconnecting the wiring, you need to unscrew the nuts or screws holding the chandelier bar under the ceiling.
Ceiling structures
Before you try to remove the shade from a ceiling light, you need to understand what it is attached to and act accordingly. The simplest option is threading, and in this case the main thing is not to use excessive force so as not to tear it off.
Important! As a rule, the lampshade is unscrewed counterclockwise, and screwed clockwise.
How to remove the shade from a plate chandelier?
As a rule, this design is secured with bolts. They are slightly recessed, so you won't be able to unscrew them without a tool. Phillips screwdriver needed:
- Disconnect the chandelier from the power supply.
- Stand on the stepladder, asking an assistant to secure you, and at the same time pick up the fasteners when you remove them.
- Carefully unscrew the bolts while holding the chandelier with your other hand.
Important! The bolts can be quite fragile, so you need to unscrew them smoothly, without much stress.
How to remove the shade from a spotlight?
In spotlights, an extremely simple mounting option is often used. No fasteners, no threads. The part is simply inserted into the base.
To remove an element, you need to pull it towards you. This requires some effort, but not too much. It is extremely undesirable to squeeze the lampshade, as well as to press it too hard when inserting it.
Dismantling methods depending on the type of fastening
Chandeliers can be attached using a hook or a cross-shaped strip.
Removing a chandelier hanging on a hook
The simplest option. After removing the protective cap, insert your hand into the hole and remove the chandelier hanging on the hook. Be sure to de-energize the room or the entire house/apartment first. All that remains is to disconnect the wires and install a new product.
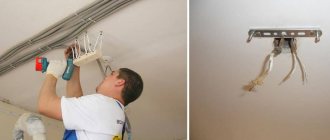
Removing a chandelier from a cross-shaped strip
In this case, after removing the protective cap, a different picture is observed. The fastening system is hidden under it. The plank can be either cross-shaped or rectangular. First, unscrew the screws or dowels with which this strip is attached to the ceiling.
Setting temporary backlight
Apartment renovations are carried out not only during daylight hours. Therefore, there must be lighting in the hall. It can be created from a piece of electrical wiring about forty centimeters long.
How to make a transformer with your own hands - step-by-step instructions, diagram, drawings, list of materials + photo of a finished homemade transformerWhich hidden wiring detector is better? TOP 10 best manufacturers with photos and descriptions
Technological maps in construction - what is it?
Having exposed the ends of the wires on all sides, screw the pair to a simple socket, but only this way: the neutral wire (the probe will show it to you) to the lamp base.
At the top, secure the part of the wire of the temporary lamp by simply bending it onto the hook, and insert the contacts into the hanging blocks. If there are no blocks, then make twists with hanging phases, separating them and wrapping each separately with electrical tape.
Tips to make the process easier
Incorrect dismantling
There are many articles on the Internet that provide incorrect instructions for dismantling a ceiling chandelier. Some “specialist authors” recommend cutting the canvas around the circumference of the lamp in order to quickly and without any effort remove the lighting device. This approach is wrong and very dangerous. And that's why:
- It is almost impossible to restore the ceiling structure after this.
- It is not always necessary to completely dismantle the product - often the device requires a simple replacement of the light bulb.
- When cutting the fabric, you can touch the wires, which will cause an electric shock.
- It will not be possible to install a new lamp of the same size in place of the old lamp. In this case, you will only have to hang a chandelier with a larger diameter.
- As a result of such actions, it may be necessary to completely replace the stretch ceiling.
Possible problems during dismantling
Lighting fixtures do not always leave their installation location freely. Problems especially often arise when dismantling spotlights. The most common of them are:
- overly compressed springs, leading to destruction of the contours of the grooves or crumbling of the thermal ring made of plastic;
- electric shock if the room was not de-energized before starting work;
- injury to fingers due to spring-type latches when removing the lamp from its seat;
- damage to the ceiling structure due to careless removal of the lamp.
Dismantling a chandelier or any other lighting fixture is not fraught with difficulties. The main thing is to follow basic electrical safety rules and clearly follow the designated sequence of actions. If you do not have experience working with electrical appliances or do not have basic knowledge, then this task should be entrusted to a specialist.
Easy or difficult?
Yes and no. The main thing is not to rush, because if you are not standing on the floor, you can lose your balance and fall, either by yourself or with a chandelier in your hands. Remember the famous joke about why a man who was removing a chandelier fell from his chair.
Usually in old apartments, builders inserted a small hook into the slab in the center of the room, and hung a chandelier on it. He covered the hook with a cap; it was installed on almost all Soviet and imported multi-lamp lamps.
If you have just moved into a secondary home after other owners, then the fasteners there may be different: on modern fasteners or self-tapping screws, as well as on spacers in the reinforced concrete ceiling, or on the lamp itself.In short, you first need to study everything in detail and, if necessary, prepare the necessary tools.
Safety precautions
Regardless of what kind of chandelier you get, you must follow safety rules. They are quite simple:
- Before removing the lamp, turn off the power.
- Allow all parts to cool.
- If you cannot reach the lamp directly from the floor, use a stepladder; in extreme cases, a strong table will help you, but unreliable structures such as a stool placed on a table are dangerous.
- The work must be carried out with an assistant who will hold the stepladder and provide assistance in a timely manner if the wiring suddenly breaks somewhere and you receive an electric shock.
- Your hands should be dry.
- If you have washed the lampshade and want to hang it back, dry it thoroughly.
Final work
After installation, inspect the ceiling for scratches, tears and other damage. If the installation of the tension fabric was carried out by a non-professional and there are defects, the following recommendations will help hide the defects:
- Carefully cut off the material remaining in the thermal ring, leaving 2-3 cm from the edge. This will prevent slipping and deformation.
- Iron-on adhesives will help hide various types of damage on the canvas. In addition, they will add a “zest” to the design.
- To prevent the cables from coming into contact with the inner ceiling area, they must be placed in a corrugation.